
Likes
Comments
Share


@AdirondackGreen
Follow
Pulled 8 7-9g colas on the first struggler, well short of my qp per-plant goal. Ill increase my plant and yield count as I pull the rest. Still have 2 more plants that ahve gone another week and didnt miss the feed this one did. Hopefully we still get at least ~10oz from this run :(

Likes
7
Share


@StickyFingah420
Follow
Semana de cosecha! Al fin el tan esperado momento momento se aproxima y no puede tener una mejor pinta! Realmente he quedado maravillado con la belleza de este fenotipo muy parecido al que promociona el banco en su portal, así que muy satisfecho por eso.
Solo esperar a que se seque bien el sustrato y estaremos cosechando estos bellos frutos 🤩😍


Likes
44
Share


@Zorachus
Follow
Ok, all caught up. I haven't done an update in almost 6 weeks. I've been so busy. Lots of picture updates!
First of all, there have been flashlights in my back yard, so I am going to have to start bringing them inside for the night soon. It's been on the news that kids are taking pictures and staking out plants already. Not good.
The Lost Coast Plant Therapy is still working great for the powdery mildew. The fish fertilizer is slowing the yellowing leaves, but they are still turning yellow. I think i will be ok, I am not too worried.
I am about to do my last feeding of the year after writing this. I will be giving them a heavy Gaia Green Power Bloom dose, and some bat guano.
They are smelling and looking great, and I cant believe how fast the buds are growing. I'd say 4-5 weeks to go, tops, hopefully sooner.

Likes
2
Share


@Green_Peace
Follow
Reaching peak flower now so added PK into the mix for extra Potassium and Phosphorous over the next 10 days or so. Never had plants soak up this much nutrients without any burn (touch wood) so I'm really impressed with the Vitalink range. Theis plant is at the front right of the tent, and to the left of the screen in the timelapse.
Defoliated for the last time at the beginning of this week.

Likes
5
Share


@Bdawg
Follow
Good week goign from strength to strength. Introduced pk 13-14 at half dosage to start.
Likes
13
Share


@BB_UK
Follow
Was supposed to update my diaries yesterday but literally forgot lol #edibles but they’re flowering nicely and stretching as they go! They’re truly loving life under the ts1000 can’t wait to see what the next week brings!
Likes
13
Share

@Janerussel
Follow
Flushing started. The reason why this plant took longer to flower than expected was probably because I kept the light too close. I also think that during the plant's life cycle I should have done a few cleansing flushes on the roots so that they would have absorbed the nutrients better and that's why the plant suffered from an overdose of nutrients. The quality of the buds seems very good. The buds are rock hard and have a lot of resin on them. I'm waiting for the amber to appear in the trichomes before I harvest. The plant is also still swelling. The flush may take a little longer.

Likes
15
Share


@OrganikTek
Follow
Sorry brothers to be so lait this week... had some problems with may Home Assistant raaspberry. Lost a day and half of photos.
Weather is Getting better
Black Cream Is in senescense. Buds are fattening and getting some color. Shes so Beautiful now.
The other are starting to a lot of pistilis out. Flowering in early stage. didnt train them so much let them grow more vertically.
Chears BrotherHood


Processing
Likes
28
Share


@BIGBUDZ450
Follow
Day 57. Everything looking good, some look like their stretch is done, bud sites everywhere, fed them 1 L - 1.5 L of their solution. Using boost and terpinator.
Day 58. Fed them Full with 20% runoff. They are starting to smell really good.
Removed a lower branch on some of the plants since the light wasn't going to reach.
Removed some fan leaves on some of the plants giving room for bud sites to get some light.
Day 59. Looking real good, some still haven't stretched but have buds growing.
I'm expecting them to stretch this week. I'm always giving them something to drink and they love it! ***********
Day 60. So down to 8 plants. It sucks because one of the barney’s pinneaple chunk that hermied was a real beast with huge branches and buds,
but tips of pistils were brown so probably would of had seeds even if i would of cut the balls as they grew. I saw some pistils on another plant that turned brown,
Going to keep that one since it’s not hermie and just 2 pistils that are brown tipped. Fed them 1.5 L of solution each no runoff.
Day 61. Looking good, buds growing nicely, long white hairs so i’m expecting big colas. All of them stretched except the 2 Diesel strain.
Keeping light at 14-22inches from top of colas and humidity at 35-40%. Fed them 1 L -1.5 L solution each no runoff.
Day 62. Defoliation, removed some fan leaves covering bud sites towards the middle of the lights. I make sure to not over do it and place the plants correctly for the bud sites to get direct light. I’m having a hard time with the 2 Diesel plants, they aren’t stretching and are slow on forming buds, they gave me a hard time through whole grow. Fed them All 1.5 - 2.5 L each of their solution with little or no runoff.
Day 63. The 2 Diesel are starting to have their stretch. Everything looking good, buds are getting bigger and bigger. Making sure humidity is always under 45%. Keeping lights at 10-20inches from top of main colas. 40k-70k lux on the lights , updated with pictures.
***** Checked out plants and signs of hermies are showing, i see some male balls
Both Barneys Pinneaple Chunk are showing signs of hermies ( balls growing ), going to remove both from tent and focus on the 8 other ones. What a terrible day ( day 59 )


Likes
51
Share


@Dunk_Junk
Follow
23cm vertical growth this week. Over doubled her height and got a lot more bushy too.
I think she's going to be a fab plant!
Likes
60
Share


@julian100614
Follow
Esta semana seguimos con la floración para dejarla solo 1 semana más en fase vegetativa 😃
Durante esta semana y la que viene empezaremos a reducir los nutrientes para que poco a poco vaya teniendo los alimentos de floración y haga su transcurso como debe.
Por el momento tiene un sistema radicular muy solido con un gran tronco creado en estas 7 semanas 💪
Esperemos que siga con la misma fuerza que hasta ahora 😊

Likes
Comments
Share


@Mnterpteam
Follow
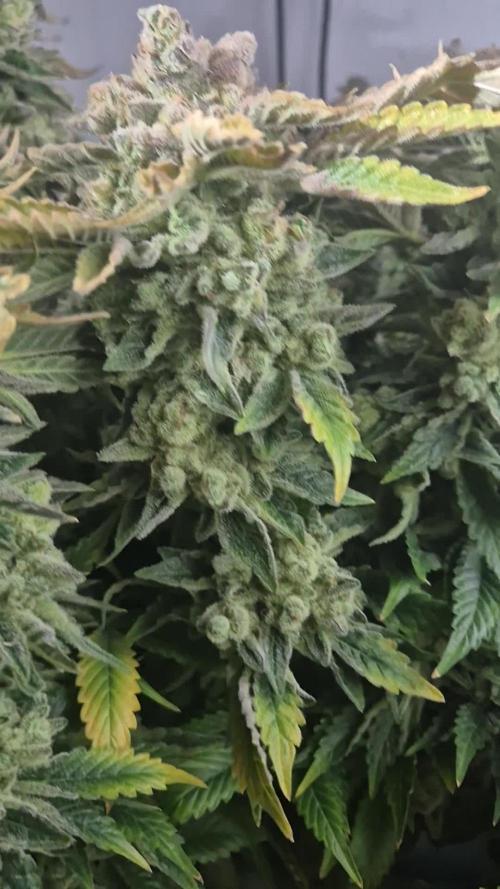
Put on A LOT of frost this week. Fan leaves are covered to the tips, I love this pheno so far.

Likes
Comments
Share


@Nofeckingclue79
Follow
These buds are are a crazy purple colour super dense and smell lovely cannot wait to give the update on how it tastes and smokes 🤤✌️👍

Likes
22
Share


@BigDaddyK
Follow
Short plant , dense , would suit people with reduced height rooms , flavoursome
Likes
4
Share

@eldruida_lamota
Follow
Vamos familia, actualizamos la octava semana de floración de estas Permanent maker de Seedstockers.
La temperatura que estuvo entre los 24-25 grados y humedad dentro de los rangos correctos.
En cuanto a las plantas pues estas últimas semanas cogimos un poco de trips y pues ahí ando combatiendo con planchas pegajosas de color azul, estiraron bien y ensancharon bastante también.
Las flores se están llenas de tricomas y están acabando de madurar, aún con la plaga, por el momento todo correcto, ya está semana solo recibieron agua, estoy esperando para desinfectar todo por la plaga y poder empezar en nuevo proyecto.
Hasta aquí todo lo de esta semana , ya queda nada, buenos humos.
- os dejo por aquí un CÓDIGO: Eldruida
Descuento para la tienda de MARS HYDRO.
https://www.mars-hydro.com
Hasta aquí todo, Buenos humos 💨💨💨

Likes
141
Share


@Golden
Follow
Week 7 Flower: The High Stakes of Growing Gold
As we sail through Week 7, the journey has been smooth sailing, thanks to our signature dry amendment feeding technique. But now, the stakes are higher as we transition to flushing our ladies. With rain on the horizon, the threat of bud rot looms large, adding an element of suspense to our cultivation adventure. But amidst the anticipation, one thing remains certain: our bud sites are densely packed and sticky as ever, promising a bountiful harvest on the horizon.


Likes
6
Share

@eldruida_lamota
Follow
Vamos familia, actualizamos la 4 semana de floración de las Originales de GB.
Están enormes, tienen un buen color, se ven sanas, y van progresando las flores adecuadamente.
La alimentación de Agrobeta la están aceptando muy bien , ya se las puede apreciar.
Agrobeta:
https://www.agrobeta.com/agrobetatiendaonline/36-abonos-canamo
Mars hydro:
Code discount: EL420
https://www.mars-hydro.com/
Las maximas de temperatura no superan los 26 grados y las mínimas no bajan 20, así que no me puedo quejar.
Los niveles de humedad también son los correctos van entre 50%/65% de humedad relativa.
Por supuesto el Ph lo estamos dejando alrededor de 6.
Hasta aquí es todo, buenos humos 💨💨💨.


Likes
5
Share


@TherealNICOGREEN
Follow
Skal rykkes uden for om Max 10 dage hun er virkelig sød og hun har fået en super god start og jeg er sikker på hun nok skal blive til noget! Men jeg vil GERNE ØNSKE JER ALLE SAMMEN HELD OG LYKKE 🤞 MED DETTE ÅRS FEDESTE KONKURRENCE;) synes jeg! Keep up the good work 😇😉😎💚💚