
Likes
Comments
Share


Likes
48
Share


@Mr_und_Ms_Lue_Roots
Follow
Hallo und herzlich Willkommen,
Die Purple C. K. auf dem Balkon verlangsamt ihr Wachstum enorm. Seit dem Rausstellen ist sie noch gute 15 cm hoch gewachsen.
Um Schimmel vorzubeugen haben wir nochmal ein wenig entlaubt. Das Durstverhalten wird auch geringer.
Die Purple C. K. im Garten macht sich gut.
Wir freuen uns auf eine neue tolle Woche und wünschen somit allen Growmies einen angenehmen Sonntag und eine erfolgreiche neue Woche!
Vielen Dank an alle diejenigen die Liken, Kommentieren und unsere Updates verfolgen!
VG 😎

Likes
15
Share


@emeraldlabs
Follow
This girl is stretching! She gets the flower tent all to herself in a few days tho!
Photos/video taken 56 days after breaking soil, day 14 of flower.
Likes
50
Share

@PhinolaGreen
Follow
13. Woche
Die letzte verbliebene Pflanze ist gar keine Banana Purple Punch Auto RF3 wie ich die ganze Zeit vermutet hatte. Tatsächlich ist es eine Guava Auto RF3, das verrät mir der Geruch. Die sieht wirklich gut aus 😁👍🏻

Likes
17
Share


@JohnnyBarrel
Follow
Week 18
Middle August : weather is changing. Return of heat and humidity: 28 degrees, a little bit rain. A heat wave is coming but near the ocean the maximum will be around 32 degrees.
It’s good to grow in greenhouse during this period :
-ventilation control: I adapted the rythme: for now it’s around 18h/24h intermittently
-pests and diseases control: insect’s traps natural and artificial, less heat
-humidity control: no rain problem
Daylight 14h: 7h/21h
Flowering time 😁. Healthy plant, beautiful green color, just a few yellow leaves on the base.
More watering: 1,5L every 60 hours
Same cocktail: Calmag (0,5ml/L)+ FloraGro (2ml/L), FloraMicro (2ml/L), FloraBloom (1ml/L) + Root booster + Cannazym
Feeding soil with guano bat (NPK 3/6/10) for a slow dispersion + dried horn and blood (NOK 13/0/0) for nitrogen add.
Protecting plant: sprayed Neem Oil, added diatomaceous earth on soil. I found signs of thrips attack.
I will make a defoliation soon.

Likes
1
Share

@Chucky324
Follow
Hello This is the end of week 3 and the beginning of week 4 of flowering.
Did some trimming and sucker branch removal this week.
After 3 weeks of flowering the sucker branches are obvious.
They don't reach the canopy height and they don't have flowers on them.
And anything growing down gets cut off too.
I trimmed up some of the fanleaves too.
Removed some that were blocking light from the top and thinned out some from the middle for better air flow.
There will be less chances of WPM and Bud Rot, later in the grow with better air flow now.
They will be left alone for the rest of the grow.
OK. Be Great.
Chuck.

Likes
30
Share


@TightNugs
Follow
Good growth this week,switched nutes to advanced nutrients after my other nutes went off.Seeing instant results so happy days.
🤞🍁

Processing
Likes
37
Share


@MG2009
Follow
09/12/2018
Purple tip cutting seems to be taking .#1 is filling out well lots of fresh flowers stacking up nicely.#2,#3,#4 all doing well👍hope they finish up in 4weeks🙏 No feeding this week just molasses for soil microbes,
09/17/2019
Did some defoiliating and green tie 's to spread out lower branches on #1 . she is a beast. Seeing, some differences between #2,#3,#4 .#4 being darker green, #3 is paler green #2 not as pale, #1 lighter green but not pale at all. Given deep soaking today, and I noticed phase 3 flowering is starting!🙏 should start stacking them fat buds for next couple of weeks hope she done at 10 weeks fingers crossed.


Likes
1
Share


@PatriciaGant
Follow
Dane, We all should help one another.
Human beings are like that.
We should live by each other’s happiness - not by each other’s misery.
We don’t want to hate and despise one another, share the Joint.
And mother earth is rich and can provide for everyone.
We can Grow enough Happiness, In this paradise, there is room for everyone.
We only exist to bring joy into the world and The way of life can be free and beautiful,
but we have lost the way.
Grow High and Give the world A smile.
At the end we own nothing more then all our memories, lets make them amazing for everyone,
nothing to loose only everything to win.
A last kiss goodby, a second one, softer and long as a sign, that you are woth it.
That Everyone worth who loved and give.
Enought Hippie Talk, now have a nice day and an even better grow, thx for watching by.
((From Seed 🌱
week report:
Likes
4
Share


@Lucidite
Follow
I started the week by flushing the plants. It was time. The oldest two plants have two weeks max. The run off started at 1900ppm and went down to 400ppm. By that time I had pumped about 60 litres through the four of them. The tap water is already 300ppm, so this is a good level I think. The leaves are responding. I can see the nutrients being drawn out of them. They are withdrawing.
I am also looking at trichomes daily now. The mature plants are 1/3 clear, 2/3 cloudy, with a few amber. The younger plants are 2/3 clear, 1/3 cloudy, with no amber.
I couldn’t wait any longer. I cropped and chopped 3 buds from under the canopy and dried them slowly on a metal plate over boiling water. It took 1/2 hour, but it produced a nicely dried pile of smelly weed. If I lost any potency in the process we didn’t notice. We got really really stoned. If this sample is any indication, I think it will easily be my best grow yet in terms of potency. Now I’m curious about the weight.
Likes
19
Share


@TylerBud
Follow
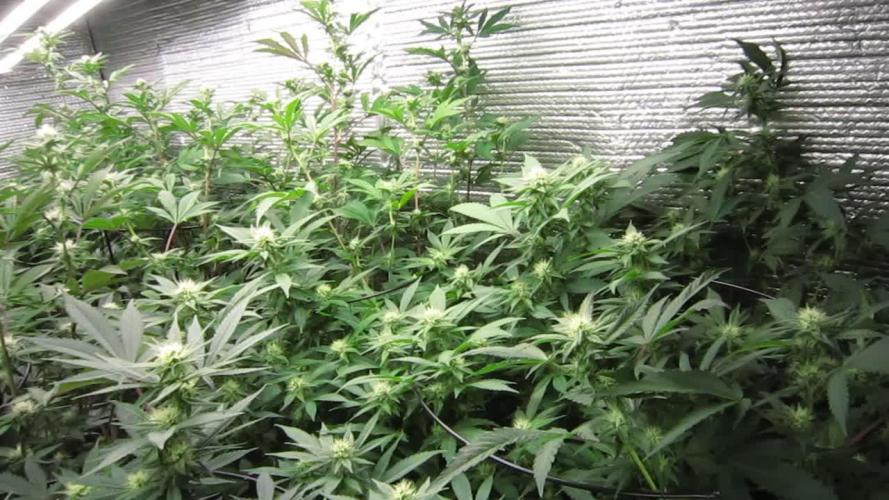
Welcome to the Jungle 😁😎
Girls are enormous , i literally lollipopped them 😅 , later in the flowering i will also make a great defoil of the tops to prevent very serious mold that already attacked my autos ,

Likes
4
Share

@Borberad
Follow
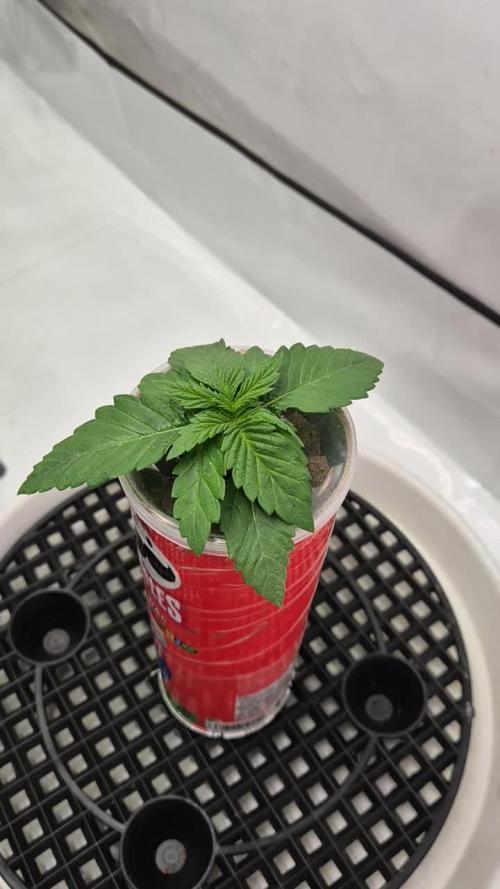
Die gute gewöhnt sich so langsam an Mario aber ob sie wirklich Freunde werden wird sich noch zeigen. Bisher wurde von oben gegossen. An Tag 8 gabs erstmals Wasser von unten (Osmosewasser *Leitwert 30myS und pH 6,3) An Tag 12 wurde getoppt.


Likes
7
Share


@Manollo420
Follow
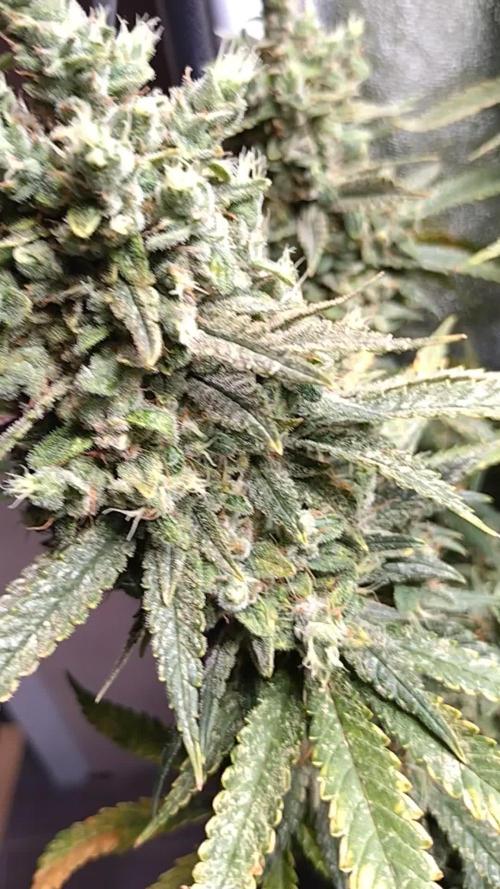
Almost done here, one or two weeks remaining
Buds are getting nice n fat
Gonna keep a close look on those trichomes
Learnt a lot this grow, got a lot of cool plans for the future
Stay tuned
Likes
2
Share


@HempZ
Follow
nice plants, really hungry and stretchy. Huge buds, biggest ive grown, nice terps but buds a little aired.

Likes
7
Share


@fabialien
Follow
Lunes 11 de marzo 7 am de 2024:
Se dejaran hidratando las semillas por 24 hrs.
Martes 12 de marzo 7 am de 2024: pasamos a papel dejamos por 24 hrs.
Miércoles 13 de marzo 10 am de 2024: revisamos las semillas y vamos preparando macetas pequeñas para transplante.
Miercoles 13 de Marzo 3:30 pm se traspasa a tierra.
Viernes 15 de marzo 11:47 pm 2024, ya que abrieron bien se pone bajo lámpara 100w a 30 cm de distancia, tienen domo protector! El lunes en la nueva semana subimos el avance, hasta el Lunes...
Sábado 16 de marzo 2024, de las 3 semillas la 1 ya abrió completamente, 2 y 3 están por abrir completamente.


