
Likes
Comments
Share


@MrGrowthSpurt
Follow
What's up Growmies🤟🏽. I am back with another week #9 is in the books, hello Week #10.
I noticed small rust spots and yellowing on the top sugar leaves on Tropicana Cookies, White LSD #2 and Caramelicious. It isn't fungus, (it doesn't rub off and is more like its burned into the leaf rather than growing on it) so I'm guessing it is due to a lack of calcium or magnesium. As a result I have implemented calmag into the feedings. I swear it creeped up out of nowhere.
Other than that things are going very well, I am enjoying the journey.
It is crazy to me how my 2 white LSD plants while the same seed have taken on different characteristics. White LSD #2 has taken on a pinkish/red undertone which looks pretty amazing if you ask me. I wonder if I mislabeled it at the beginning of my grow and if it is actually my Tropicana Purple Cookies? I doubt it but then again I was high around the time I put these babies from their incubators into their final home.
Not much to report other than I stopped smoking new years eve, so for the first time in a long time I have clean urine🙌🏾🙌🏾. I mainly stopped to take a tolerance break and to prove to myself that I am in control. I will be tasting these suckers once they are done. I did the same thing on my last grow, took a little over 90 day hiatus, once harvested and I decided to smoke, boy was I super zooted! It was like the first time I got high, had me questioning why I smoke because I was sooo stoned😂. I'm looking forward to feeling that way again.
It won't be long now another 7 to 8 weeks (including 1 week to dry and 2 to cure) and I will be smoking again more than likely.
I still have them on a 2 waterings with nutes and 2 waterings with plain ph'd water schedule. Going forward I plan on adding calmag into the mix, which is something I didn't have to use on any of my 6 previous grows, we shall see how it goes.
Until next time my friends, Happy Growing, and may the grow goddesses bless you all with a bountiful harvest 💪🏾

Likes
12
Share


@Drtomb
Follow
Starting week 5 of flower. Everything looking good and plants appear to have finished the stretch. Autopilot is in full effect and the plants look like they will be fruitful.

Likes
Comments
Share

@Appoldro420
Follow
Strain: Chocolate Haze (Royal Queen Seeds)
Medium: Coco bricks (Action budget bricks – hell yeah 💰)
Light cycle: 12/12 from seed
Grow Style: No training, no stress – just flow
Grow Medium Prep: 500L of coco – never again in one go 😅
The Kickoff 🚀
This run started off wild and direct – no veg time, straight into 12/12 with Chocolate Haze. I wanted a quick turnaround and thought, hey, why wait?
I germinated 14 seeds, hoping for at least 9 strong ladies. Ended up with 11 survivors – not bad! First few weeks were a bit chaotic: stretching due to low light (I tucked the seedlings under mature plants, which I do not recommend 😆), and the coco prep took way longer than expected. But hey, that's the game.
Early Veg/Bloom — Lessons Learned
pH: Started a bit high; some light green leaves at first
EC: Too low at 1.3 — they weren't having it. Upped to 1.7 and then to 2.1 later
Environment: New extractor dropped temps way down (25°C vs my usual 30°C). Thought it would help, but growth felt slower
Coco quirks: They looked overwatered at times, but coco is tricky like that. Eventually, roots hit the bottom and they took off
Around mid-March (3 weeks in), pistils showed up – officially the start of flower. I topped them once just before full bloom kicked in. Always a strange move, cutting healthy plants... but they bounced back beautifully. Nice and bushy now.
Week 2–5 Flowering 🌸
These ladies are small but mighty. Not tall, but full of energy. The canopy is tight and even (except for one shorty), and they've been stretching like crazy — classic sativa move. Had to raise the lights twice in two days. I’ll probably do some defoliation soon to slow things down a bit.
Environment is now dialed in:
Temp: 30°C with lights on
RH: Holding nicely in that humid sweet spot
CO₂: Set to 500ppm (passive mostly, no full-on enrichment)
Feeding is now solid, color has recovered beautifully, and the buds are starting to form nice stacks. I’ve kept it low-stress — no nets, no heavy training, just letting them do their thing.
Observations & Setup Tweaks 🔧
Ventilation: Running the fan at just 30% now. Tent takes 18 seconds to vacuum seal, which tells me airflow is minimal – less CO₂ loss.
CO₂ System: Minimal usage at 500 ppm. I’m not going all-out with gas bottles; it’s just there as a buffer.
Structure: These Chocolate Haze plants don’t get tall, but they do fill out nicely. Perfect for a space where height is limited.
Auto side note: One of the autos in the same tent is way taller, but less dense. Makes me appreciate the Chocolate Haze structure even more.
Current Status (April 17) 📆
We’re deep into flower now — week 5, and it shows. Buds are swelling and resin production is kicking in. Nothing major to report (which is kind of the point of this grow — set and forget). Just a slight dry issue with one auto, which I adjusted on the Blumats.
Besides that? Happy plants, happy grower. 🌞
Check the latest pics — they speak for themselves.
Final Thoughts (So Far) 💭
This Chocolate Haze grow has been chill, efficient, and surprisingly hands-off. The direct 12/12 schedule really works when you're going for a fast cycle with minimal hassle. And even though I’m usually more into hybrids, this sativa-dominant lady is winning me over — the structure, the vigor, the smell… mmm.
Now we wait for the real magic — the last few weeks of flower. Trichomes incoming. 🍫✨
Stay tuned for harvest updates — it’s gonna be sweet.
Feel free to drop any questions or thoughts. Always happy to share the love for the plant. 💚
Peace

Likes
39
Share


@J_diaz420
Follow
El día 19 de floración se hace poda de brotes bajos y una pequeña defoliación de hojas de abanico 👍
Likes
49
Share


@masterofsmeagol
Follow
7/4 SUN was poking out a little bit. Plants loved that little feeding and seen to he noticeable larger this morning. I'm considering starting the nutes. At least the organic ones as well as upping the water intake I've been scared to water with all this rain and my experience last time. I plan on applying BT this afternoon and doing some work on the bottoms of the plants. I also saw a chipmunk in my cage so I have some spots in my fence that need to be patched. I know I can't compare this year to orher years as these are seeds and all the other years were clones. I CAN say for certain that my plants are healthiest they've been out of any of my journals. Previous plants were much larger but I was fighting numerous fungal, pathogens and pests at the sane time. Ear wigs would've lollipopped most buddies by now but I've seen no sign of them. I'm going to apply more poison where they were and add some rat traps inside the cage for the chipmunks. Once I fix the cage I think I'll be good.
UPDATE: Went back over and fixed the holes on my cage from high winds. I found an old wire trap or cage and just cut sections and ziptied them to the existing wire and to the structure thus covering any open holes. I'll need to put lathes aroubdvtge outside because if a rodent REALLY wanted in they could get in. My belt had been wearing thin but I use shit until it breaks (yesterday the heal came off my shoe lol) so I was working hard sweating my nuts off and my belt gives out totally. At least ive got the major stuff done. I took a few videos too. I'm imagining it was this little bit of sun that gave these plants that boost of growth but I'm wondering if the added nutes had anything to do with it. Bags weren't light and I could feel moisture in the soil so I didn't water. I'll check again tomorrow morning. Since I didn't see many plants or even leaves for that matter with damage I decided to hold off ob the BT and the plant doctor. Only time will tell if that was the right decision.
7/5 Plants look fantastic. I see a few more holes in leaves sporadically amd I'm hoping it's pillars. I've seen lots of lightning bugs on my camera though and grasshoppers are abundant. Not one growth shoot has been chewed (knock on wood) which is what the earwigs had always done. I watched a video from last year and by nowcthey had lollipopped all lower leaves. It may not be the best weather growing season wise but despite the rh consistently in the 90's I still don't have pm or fungal pathogens. Need to get the BT out. Didn't water as we've had all that rain. I'll water either tonight or tomorrow morning. Sunny high in the 90s low is 66. Tomorrow looks good too.
UPDATE WENT BACK OVER AROUND FIVE. IT WAS 88 DEGREES SO I WANTED TO CHECK THE GROW BAGS. THE POTS ARE FINE. IT WAS HUMID AS HELL. ONE PLANT WAS SLIGHTLY DROOPY BUT VERY LIGHT AND DRY. I FOUND TWO OTHERS THAT SEEMED LIGHTER THAN THE REST BUT HADNT DROOPED. I MIXED TWO GALLONS OF WATER WITH 1TSP KANGOROOTS AMD PHED IT CLOSE TO 6. I FED THE 3 PLANTS THAT WERE SUPER DRY LIKE A HALF GALLON AND SPRED THE REST OVER THE OTHER EIGHT PLANTS. THEY WERENT DROOPING BUT THEY WERE VERY DRY. I PLAN ON A FULL WATER TOMORROW. I WOULDVE DONE IT TODAY IF THE TEMPS WERENT SO HIGH. ITS RAINED A MONTH STRAIGHT SO I HAVENT HAD TO WATER. I MADE A COUPLE VIDEOS BUT I'LL HAVE TO UPLOAD TOMORROW.
7/6 Another super hot day. I hefted the pots and they still had some weight but I could tell they were dry. This rain has messed up my watering schedule. Well it made it so I didn't NEED to water. These are big plants now. I need to get a schedule to stick too. They're going to probably need a gallon a piece at least. I'm still nervous watering. Right now I'm just reading the plants. I added .5tsp kelp me/you to 1 gallon of water to help with heat stress. I fed an additional two gallons to the garden this morning including the two container plants in the back. They were dry on top too but I know they have water deeper down. Next watering I'll be more consistent and try to give them there 10%. It's great having the bags elevated. I can finally see when I start getting run off. I could even measure the ph of it instead of relying on that meter. Ill check the ph when I go back over. Still a few 🐛 holes but they are few and far between. I really don't want to spray for such a small problem but if I cant find them at night that's what I'll do.
UPDATE: Another 90 degree day. I went back over and gave the garden a gallon of water as they were dry and it didn't rain. Tried to use a soil ph meter to check ph. First couple were 6.4, 6.5 then I got 7.3 and I accidently dropped it. Then I got somethings that were high eights and even one 9! Obviously the Meter shit the bed. I'll lower the ph of the water slightly when I fully water tomorrow and I'm going to measure the runoff.
7/8 I must've messed up the journal again as the dates are off. GAVE PLANTS A FULL WATERING. Each girl got a gallon. I couldn't upload my videos this morning as I had to break up a fight. 3 on 1. Didn't give me a chance to put the videos up. I'll take some stills then I can upload them. I took stills and they all uploaded but didn't fucking save. I'm nit going to keep trying to upload if it's not going to. Noticed a few more holes in leaves and one skeletinized leaf so I need to either spray the bt or something more versatile. I'm putting more poison around the cage and de between the bags. I'll go check things out tonight. Sick of writing a book and uploading to just hace them disappear
7/9 Did a quick video today. Noticed the bags were fairly light despite the plants being soaked amd the pallets wet. I was pressed for time. I gave two gallons to the entire garden. I hope that will hold them over until tomorrow. I'll need to up how much water I give them. Going with a gallon and a half next time. I see more pillar spots and a moth took off when I shook the plants this morning. So I'm gonna have too apply the BT. I figure if I go over before dark tonight I might be able to see aju nocturnal insects around. Luckily my dad feeds the birds and they are always there. I think they help with pests.
UPDATE IT WAS A LITTLE COOLER TODAY BUT MICH MORE HUMID. I WENT AROUND SIX TO MAKE SURE THE GIRLS WERE OK WITH WATER AND TO GIVE THEM A TREATMENT OF BT. I WENT THROUGH THE GARDEN ANDCGOUND THREE LEQVES TO DEFOLIATE AND LITERALLY A COUPLE LEAVES ON TWO PLANTS WITH PILLAR HILESM WHEN I ARRIVED TWO BIRDS FLEW OUT. A HORNET CAME IN WHILE I WAS THERE. THIS DO LESS APPROACH SEEMS TO BE REALLY WORKING. I DODNT SEE NEARLT ENOUGH DAMAGE TO WARRANT SPRAY8NG MY EXTREMELY HEALTHY GIROS WITH ANYTHING. ILL KEEP AN EYE ON THEM AND CLEAN THEM UP A BIT. I DO NEED TO INSTALL THE VERY8CAL TRELLIS FOR SUPPORT. THEYRE PRETTY HEALTHY THOUGH. ONE PLANT IS ABOUT AS WIDE AS IT IS TALL. STILL......PLANTS ARE EXPLODING AND ITS GETTING TIGHT IN THERE. I NEED TO GET THE TRELLIS UP THOUGH.
7/10 I went over and was planning to water. Plants were wet and it's raining. Top of the medium was moist but the bags were light. ONE bag was super light but seeing that we are having showers all day and an additional half inch of rain coming tonight so I didn't water them. Especially since they looked great. Decided to to spray BT yet as the damage is so small and i think the birds have been taking care of the pillars for me. Now I'm wondering if I should've gave that ONE plant a little bit of water but it will be find. Did a video. I'm being careful not to over water. Last year this is when all my buddies were devoured by earwigs. And no senescence like the years before. I think it was hust those earwigs. I haven't lost shot for leaves. Even the stalks are bright green and look amazing.

Likes
38
Share


@DeepRootsGrowTrees
Follow
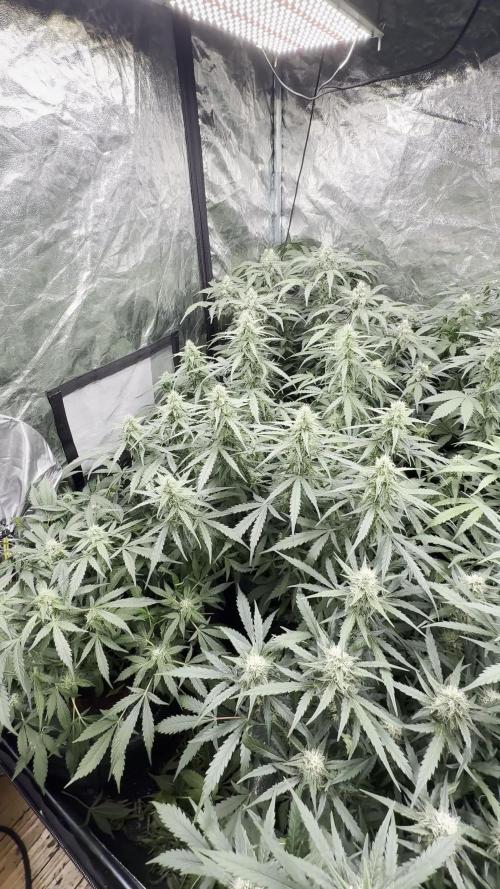
TROPICANA COOKIES 🍪 FF/FASTBUDS
WEEK #14 OVERALL
WEEK #6 FLOWER
This week she's doing good no issues she's looking good and her buds are are tight and getting frosty really good looking plant she's got the purple hues in the leaves and some of the buds with the orange hairs!! Stay Growing!!
Thank you for stopping by and taking a look!! It's much appreciated!!
Thank you FASTBUDS!!
TROPICANA COOKIES 🍪 FF/FASTBUDS

Likes
8
Share


@Portnugs
Follow
Resin is increasing and looks like bud sites are ready to start putting on some bulk. Issue with low ph drift reaching 5.2 so I decreased 50ppm with distilled water without calmag to soften the water and counter the drift.
After decreasing ppm, ph drift continues, so I flushed for 2 days with distilled water and added back nutrients at half strength to increase to 800 ppm over time.

Likes
57
Share


@1Right_Angle
Follow
Feb 13th
- last nite confirmed something that I had noticed over the last couple of weeks. There is a difference in how fast each of the 3 plants pics up its moisture. The blue God was very dry while the Colombian was at the other end of the scale; still moist. The A.G. is always between these two, never the same.
- big feed tonight @ 16L / 3 plants
- upon checking the Pots moisture levels, it was decided NOT to feed the Colombian Gold. The soils Moisture level was still too moist to go ahead and give it a big feeding. I can wait a day or two till it needs it.
Pictures attached; identical conditions; solid schedule, the Colombian just stays wetter, longer. It now gets its 5.33 Litres a little behind the others.
May 16th,
- feeding day for the Colombian Gold and some trichome shots of the Blue God
May 17th,
- holding off on the Flush of B.G. till Wed. Still lots of clear trichomes, very few amber.
May19th,
-wow, talk about life getting in the way. And its all good. Its has just been very busy, And the plants need attention. As highlighted earlier, Blue God is at the end of week 6 now and tonite is its last meal; as per normal. Acapulco and Colombian are still too moist.
- pictures and updates tonight
May 20th
- flush carried-out
- tent empied washed; yikes
- it is the end of week 7 for the Acapulco, and it get flushed at the end of week 8 with the Colombian. As busy as things have been, there will be lots of scrutiny in the next couple of weeks, as the Trichome watch begins.


Likes
10
Share


@Cocogrow1234
Follow
Week 4 flower : everything’s looking nice still got the lights about 7-9” from top of canopy without any issues . The humidity has gone up to 50% in day and I can’t really get it any lower I’ve already got a dehumidifier so don’t want to get another one . I would like to lower to 40-45% and lower for last 2 weeks but can’t see that happening .
I’ve started the pk from end of week 4 (day 28 )at 1ml per litre this took my ec to 2.2 I will see how it goes and maybe up it to 1.2-1.5 and I’m going to use the pk for 7-14 days then I will start the flush
I also lowered the silicone to 0.5ml per litre
3x blue cheese plants are on the left but has spread over
and 1x sunset sherbet on the right
Likes
55
Share


@Belverde
Follow
Welcome growers
We finished week n°5 with these three SORBET#4 🌿🌿🌿🍧
The whole family reacted pretty well after last week's topping and looks very healthy and happy
They have some differences, especially in terms of height..
There are two fairly identical phenotypes, small in size with close internodal spacing and deep green leaves
The other, on the other hand, is visibly more grown in height and has a more "open" structure, typical of specimens that tend to have a profile more on the Sativa side.
However, I am giving everyone the same amount and type of nutrients, which I will report later 😉
In this week i have reduced the lights cycle from 16/8 on/off to 14/10 on/off 💡
At the same time i have increase the intensity of my two led SP3000 from 50% to 75% and im going to put them at the maximum potency after the switch at 12/12
The two led panel are connected with a cable and i have only to adjuste the dimmer of one of them for change the intensity of each one, in just one move..
About nutrients 👇
In this seven days i still giving their always organic/veganic nutrients..
A little bit of silicium (Bionova) / Activator (Biomagno) / Crescita (Biomagno) / Activera (Biobizz) / Grow vegan (Bionova) / The Missing Link (Bionova) / X-Cell (Bionova) / Bioheaven (Biobizz) for the first time and a little bit of P-K 3-5 (Bionova) {not in spray solution but mixed with the othersone in to the water}
Like i usually do, a little bit of everything at any watering 💧
Anyway..
I decided to take both photos and videos, basically so as not to bore you and me with the same things over and over again..
Hope you enjoy
This was the last week before it officially went into bloom..
So stay tuned, the show is going to start soon 🎬
Thanks for watching 😎👍👍
FC ✌️
🇮🇹

Likes
1
Share


@Generix
Follow
Sorry not many pics this week, struck down with man-flu! Few pics of the new 600wt lumni fully adjustable light I picked up and have replaced one of the smaller kingbo’s with it, thought about having the two kingbo’s either side of this lumni but I really didn’t wanna forfeit the 400wt cobs! Also bought another double output air pump, so going into flowering phase, watt/plant ratio has increased and so has aeration to the air domes inside the smart pots. I’ve also added a small water pump to the nutrient tank to keep it moving/oxygenated while it’s waiting to feed into the drip tray.

Processing
Likes
6
Share


@Dairon
Follow
Como podeis ver en el video, han duplicado su tamaño en cuestión de 12 días, por lo que ha sido necesario la utilización de tutores y una poda de bajos bien potente pues ya no podré hacerle más, aparecen las primeras flores y con ello iré aumentando la EC progresivamente, pero con mucho cuidado de no sobrefertilizar .


Likes
5
Share


Likes
14
Share


@AGrade_Labs
Follow
These ladies are doing their thang! One week since sprout. Had to move them to cups to support the stem as they were flopping. Placed a fan for circulation to try and get some strength in them. First feed at the end of week one. Went with half dose of the 1EC measurement as per Pro Line chart.
Likes
422
Share


@Crashoverite
Follow
Hi everyone 😁
Welcome back in another week update!
Thank you all for this amazing support on this bananas journey💚💚💚
Uploading and updating each week content on daily bassis so please revisit this diary if week not over yet.
So far all going great. Girls looking very healthy and happy. Due to my short trip had to leave my 🍌💜👊 girls unsupervised for 3 days. Was stunned when opened my cabinet on the Dec 5th. Athena stretched like crazy. Good 3 inches. She better slow down as not much roof space left for her. May tie some taller branches to netting if necessary. Introducing blooming nutes for the first time this week on December 6th at smaller dosage and on the second watering as listed.
Week 8
Dec 4 - Dec 10
Dec 5
Leaves tucking
Dec 6
Heavier selective defoliation on both girls. Athena fully lolipopped and Xena at 75%. Watered with 8 ltr beetwen both with perfect runoofs PH 6.4. Girls were very thirsty 🤤
Dec 7-8
Just enjoying how my girls developing. Frost has landed and they are start showing colours. All is looking great.
Dec 9
Second watering for this week 7 ltr beetwen both. Runoffs PH 6.4
Even with so much difrence in size of my 🍌💜👊 girls it seems that they are drinking my juice almost equally.
Dec 10
Applied selective defoliation and tied 3 tallest branches of Athena to netting to avoid any potential burns on these beautiful baby colas.
It's the end of the week!
Thank you all again for such a great support, all the likes, dm's, comments and follows 💚💜💚💜
Stay tuned for coming week update 😁✌️💚
Likes
8
Share


@ChitownCannaChica
Follow
Just trying to keep her watered! Smells amazing like sweet jelly. Very nice trichome production considering the vessel! Probably another week or so! ✌️💚🌿💨


Likes
10
Share


@Fibro_Witch
Follow
Gave the photos a haircut today. Removed some fan leaves and lower branches that wouldn't amount to much. Gave the branches to my horse because he loves them! Tried enticing the ducks with fan leaves but they weren't having any of it. They prefer lettuce, not "The Devil's Lettuce"😂
I added in a little 5-1-1 fish fertilizer to my feeding regimen as well. Still picking off inchworms.
And as you can see I made it to the hardware store and put up this baby almost completely by myself. I only asked my husband to hold the center roof panel support while I screwed it in. Couldn't have been better timing since hurricane Dorian came through yesterday and we had plenty of rain. Of course it didn't fully protect them but the majority of the rain hit the roof. And then it got down to 49 F last night. It's really Fall now!
This girl is frosty and she ain't near done, those pistils are like a white walker! So looking forward to this finish, because it's gonna be better than last year for sure!
Likes
4
Share


@BrigadeDesTerps
Follow
La Persian est au milieu de la box , très vigoureuse, j’en attend beaucoup de elle
