
Likes
Comments
Share


@sunshinegroww
Follow
So this lady is almost ready quite few of the trichomes are starting to be milky ,so another 1-2 weeks and will start flushing smells rather gassy and stacking up nicely now 💪💪💪


Likes
17
Share


@ArtisticGrown
Follow
This plant is taking well to the training and im in love! Lets see how rapidly she grows within the next week or so!!! Lets go papaya

Likes
20
Share


@adam_pawloski87
Follow
We are in Flush !! Was giving them GH Flora series + rapid start + cal mag

Likes
12
Share

@DaedalusGrow
Follow
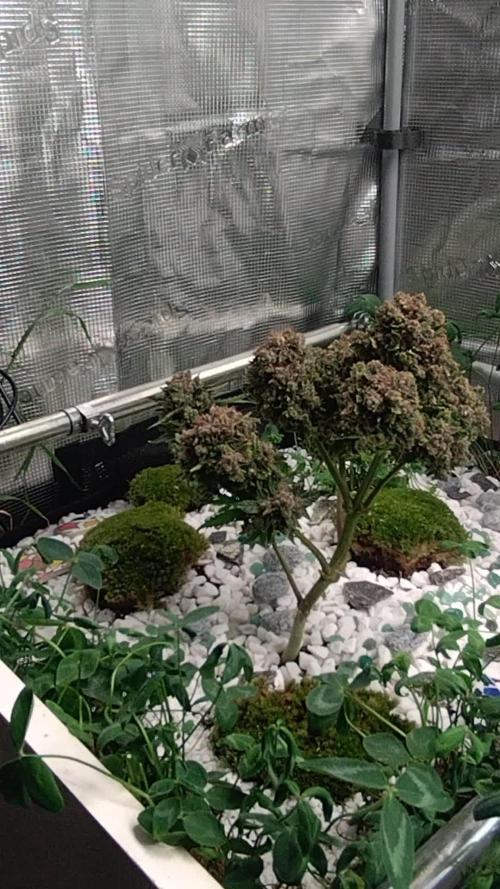
Willkommen in meiner kleinen Canna-Bonsai Oase!👇 🌿
Manchmal liegt die größte Schönheit im kleinsten Detail. Diese kleine Kunstpflanze ist eine Frost Banger von 42 Fast Buds, liebevoll gezogen als echter Bonsai.
Es ist einfach faszinierend zu sehen, wie sich diese Sorte auf so kleinem Raum entfaltet. Der Name ist absolutes Programm: Die Blüten sind schon unglaublich harzig und frostig! ❄️🔥 Die tägliche Pflege, das Beschneiden und Formen dieses Mini-Baums ist für mich pure Meditation – mein persönlicher kleiner Zen-Garten für den Alltag. 🧘♂️💚
🌳
Habt ihr euch schon mal an einem Canna-Bonsai versucht oder bleibt ihr lieber bei den großen Pflanzen? Lasst es mich in den Kommentaren wissen!
Likes
24
Share


@MadeInGermany
Follow
Hey everyone 😃
The time has come , On flowering day 69 the harvest was carried out 😍.
After spending two days in the darkroom at 62% humidity, they were now harvested cleanly by hand 😃.
After harvesting, they were laid out on the net as usual, where they can now slowly dry again for about 7-10 days at 62%.
Then they come with 62% in jars for 2-4 weeks, and then the 58% boveda packs are put in 👍.
Of course, I will come to the phenotypes themselves in detail in the last update.
Until then, I wish you all the best, stay healthy 🙏🏻 and let it grow 🍀👋
You can buy this Strain at
https://www.amsterdamgenetics.com/product/kosher-tangie-kush/
You can buy this Nutrients at
https://greenbuzzliquids.com/
Type:
Kosher Tangie Kush
☝️🏼
Genetics:
Kosher Kush
X
Tangie
👍
Vega lamp:
2 x Todogrow Led
Quantum Board 100 W
💡
Bloom Lamp :
2 x Todogrow Led
Cxb 3590 COB 3500 K 205W
💡💡☝️🏼
Soil :
Canna Coco Professional +
☝️🏼
Fertilizer:
Green Buzz Liquids :
Organic Grow Liquid
Organic Bloom Liquid
Organic more PK
More Roots
Fast Buds
Humic Acid Plus
Growzyme Big Fruits
Clean Fruits
Cal / Mag
Organic Ph - Pulver
☝️🏼🌱
Water:
Osmosis water mixed with normal water (24 hours stale that the chlorine evaporates) to 0.2 - 0.4 EC. Add Cal / Mag 2 ml per l water every 2 waterings . Ph with Organic Ph - Pulver to 5.8 .

Likes
21
Share


@cadur
Follow
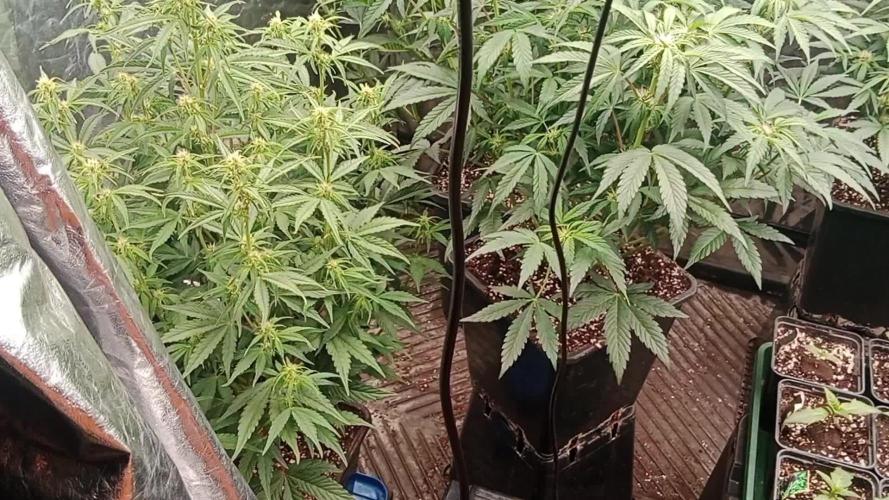
It's going very well, nice even canopy and she's filled my 70x70cm tent.
On the cusp of the flowering stage, going to go very easy on the nutrients this time. Will start at 1/8 photo period recommended level and ramp up to 1/2.
Likes
3
Share


@ChameleonsCannabis
Follow
I love sativa. This is a great freaking plant. Long skinny buds (a little squeezed by me :) and the smell is incredible (strong put in jar open 5 min later my house smells strong) its sweet from the haze but it's got that gassy fuel smell to it also with a tiny bit of earthy after aroma. It's wonderful smokes great gets me higher than any weed at the stores and I never have coughed from it I don't think it's so smooth. Organically grown buds are fckin smooooothh man I never would have understood until I grew organic! This bud is the tits I'm stoned off a mix of blueberry amnesia haze northern ligbt joint as I write this lmao good harvest

Likes
9
Share

@Psychopat_od_vedle
Follow
Ahoj 42 den Mango cherry rutz musel na balkon po večerech mě tam je smutno ne dělám si srandu musel potřebuju místo na miminka.jinak rostou kvetou ale smrdí tak odporne že nevím nevím no 🤣hrůza


Likes
9
Share


@Wicked_Stix
Follow
Had a lot going on this week so the plants didnt get any care or maintenance at all other than just checking on the water level a couple times. They need some major defoliation which I wanted to do this week but procrastination is the vibes currently. Will probably get some done next week.... the plants are looking good and most of them are bushing out pretty nice. They dont seem to be stretching as much as they normally do by this time, but they are transitioning to flower. Will probably do a flush and water change soon since they haven't had one in over a month. I'm just anxious to see some frosty buds at this point.
Processing
Likes
6
Share


@iamdiddy
Follow
weathet is cold and i save my qween zkittles indoor room , wheet 450 vipaspectra led 450.
feels great..31.09.19
pliace comment..
Likes
12
Share


@KannaGrowing
Follow
Estamos en la última semana para dos de las cuatro variedades, así que a partir de este momento, eliminamos Bio Flores.
Añadiremos al bidón de riego Canna Flush, que nos va a ayudar a lavar bien nuestras raíces, eliminando restos de sales y nutrientes. Buscamos que las plantas gasten sus reservas de las hojas, que poco a poco veremos como pierden verdor, eliminando clorofila, sobre todo las más bajas.
Canna Flush - 20ml por cada 10 litros de agua.
Bajamos la potencia de nuestros balastros a 600w.

Likes
19
Share


@Jaxx_Teller
Follow
Well we're under on my first hydro run.
Had to set off another purple punch as the seed was not healthy. The new one has just popped and looks good and only a week behind the rest so no biggie.

Likes
10
Share


@MoMedicalAlchemist
Follow
Transplanted from 3 gallon to 5 gallon pots im going to let recover and will probably be putting them into flower next week or the week after.Gettin the flip 43 day veg


Likes
11
Share


@CannabisCultivate
Follow
These ladies are doing quite well and we have had no issues to mention for the week. They are all happy, healthy and strong. Kabul is the tallest of the three, White Widow is not far behind and the White Russian is a stout plant with a lot going on. So far they have been untouched and we do not have plans of manipulation for them, nature shall take her course.

Likes
10
Share


@DeepRootsGrowTrees
Follow
ROYAL QUEEN CBG AUTO ORGANIC
This lady grew 💪 and big really impressed with her and the big buds she grew without needing much attention 👏 a smoke with earthy undertones as she relaxes, calms, and brings a feeling of serenity without any anxiety or head high!!
Thank you to ROYAL QUEEN SEEDS!!!
Thank you to FOOP!!!!
THANK YOU GROW COMMUNITY for your support 🙏 views, likes, and comments!!!
Likes
9
Share


@OGbros
Follow
ITA: siamo giunti quasi alla fine del viaggio. Ho tolto tutta la soluzione presente nel sistema e l'ho sostituita con acqua del rubinetto senza sali. Le piante resteranno così dai 2 ai 4 giorni per il lavaggio delle radici. Insieme all'acqua ho utilizzato Flora Kleen (ex flush kleen) della GHE, a concentrazione di 2ml al litro. La raccolta si avvicina!!!!
edit: ho finalmente raccolto le piante ma che fatica ragazzi! In 4 ci abbiamo messo tutto il pomeriggio e le prime ore della sera per finire di trimmare!! Ho tagliato le piante ramo per ramo in modo che l'essiccazione sia più veloce. Ho appeso i rami in una box 80x80cm con all'interno un deumidificatore e un estrattore da 10mm. L'umidità oscilla dal 48% al 55%, direi ottimo! Aggiornerò il diario dopo aver pesato le cime secche e dopo alcune settimane di concia per la smoke review
ENG: we have almost reached the end of the journey. I removed all the solution in the system and replaced it with salt-free tap water. The plants will remain in this way for 2 to 4 days for washing the roots. Together with the water I used Flora Kleen (formerly flush kleen) from GHE, at a concentration of 2ml per liter. The harvest is approaching !!!!
edit: I finally harvested the plants but what an effort guys! 4 of us took the whole afternoon and early evening to finish trimming !! I cut the plants branch by branch so that drying is faster. I hung the branches in an 80x80cm box with a 10mm dehumidifier and extractor inside. The humidity ranges from 48% to 55%, I would say excellent! I will update the diary after weighing the dry buds and after a few weeks of tanning for the smoke review

Likes
250
Share


@Ju_Bps
Follow
Hello my friends 👨🌾👩🌾👊,
Week was good with nice sun🌞🌞, a bit too much but plants looks good,
No rain,
I've found again lot of bugs on the #2 today.🤬🤬
Plants drink a bit more💧💧, cause hot temperature, next week will be very hot around 40°C 🔥🔥.
I've given this week,
#1 and #2
1× 1.2l water + canazym + sugar royal
1x 1.2l water + tera flores + canna boost
#3
1x 1.5l water + canazym + sugar royal
1x 1.5l water only
1x 1.5l water + tera flores + canna boost
PH@6
Pistils are more and more orange/brown, end is coming ✂️
Sorry not much pics this week I was a bit more busy.
See you next week, and wish me not a big storm 🌞🌞⛈️⛈️ after this hot temperature 🔥🔥

Likes
15
Share


@902EastCoast
Follow
Day 43 of flower: This week was great again. Tied a few branches up that had fallen. All the ladies look and smell amazing. Afghan kush early harvest will be the first done for sure. 🔥💨✌️🏼💚
