


Likes
52
Share


@Santica_Garden
Follow
At the end of Week 3 from Seed, this is how the ladies are doing. Could be doing alot better but they have been transplanted and topped so I will give them a chance to recover fully. Happy Growing guys, any questions just ask 👍🏾🌱💚

Likes
4
Share

@Z420Organics
Follow
Fastbuds Auto Update – Unexpected Harvest 🚨🌱
A major issue came up this week — my dehumidifier broke down! 😱
Until it’s repaired or replaced, it will take several days, and in the meantime, the humidity has been spiking up to 80%. 💦🌫️
With Botrytis (bud rot) lurking in these conditions, I had to take action. Today, I harvested two plants, even though they weren’t fully ready yet. 🌸✂️ Better to be safe than lose everything to mold!
They went straight into the fridge for a slow dry 🌿 — not the original plan, but it’s the best way to protect the quality under these circumstances.
Fingers crossed 🤞 that the rest will make it through until I get the humidity under control! 🌱💚.

Likes
129
Share


@StarLorr
Follow
Welcome to my Cherry Cola🍒diary.
In this Diary:
Seeds: [420 Fast Buds]from my growmie Tropicannibis_Todd 👊🏻😎
Media: Pro~Mix HP Open Top Grow Bag, Connect.
Nutrients: Green Planet Nutrients,
2 Part Dual Fuel starter kit.
RealGrowers: Recharge.
Diablo nutrients: Supplements.
Feeding :
Wed 06Mar: 3 1/3L Nuts/Recharge pH'd 6.5
Sat 09Mar: 2L Monster Flower,Blaster pH'd 6.5
Mon 11Mar: 3 1/3L Nuts/Recharge pH'd 6.5
___________________________
D-Fol: 10Mar keeping up with the fan leaves😄
__________________________
She's getting smelly and sticky😋
Buds are getting bigger😁
Some pistils are changing colors.
___________________________
Thanks for stopping by, likes and comments are appreciated.👊🏻😎
Keep on growin!
Keep on tokin!!!
😙💨💨💨💨💨


Likes
34
Share


@UnorthadoxDude
Follow
Hello! I am back! Welcome to day 76, almost the end of week seven for Poppy the Purple OG Punch.
I am not going to be able to compete in the contest as she is not yet ready so my first two competition entries end in total failure.
Poppy has suffered multiple snapped colas in the move, and a lack of training, but she is doing okay, buds are fattening nicely.
Height 82cm, she was fertigated 10l about 4 days ago, and 7.5l today.

Likes
5
Share


@Stick
Follow
So I know I said they would have one more week into the vegetative stage, but after looking at my calendar, my jars, and the plant's size, I've decided it was a good time to flip into flowering stage. After 7 days into blooming plants are in stretch mode at full speed, everything is looking good so far for these Amnesia Kush clones!


Likes
3
Share


@Ogbangbang2981
Follow
oh did I add I noticed she showing sex this morning as the sun rises
so this morning Feb 18 6:22am I decided to up my nutrients
with the first bottle of nutrients I mixed was on a early veg level so I just add 2ml of each my fox farms advance nutrients along with some algas ( made with seaweed somewhere on the island ) which is a root stimulant and a few drops less than a teaspoon of molasses. and gave my baby a deep feed hope I dont regret this hope I dont get nut burns .

Likes
4
Share


@JeyGanesha
Follow
Inizio ottava settimana.gia emanano un profumo delizioso
.tra una due settimane ci sarà un profumo fortissimo 🤣😂🤤💪buono buono
Likes
31
Share


@crystal_garden_0
Follow
Great week. Bit of nutrient burn but nothing to worry about. Buds starting, hopefully all goes well. End of week 4. Low stress training almost daily
Likes
73
Share


@Roberts
Follow
Deep Forest Auto is still bulking. Lots of frost, and a strong citrus aroma is coming from her. She is putting on weight and looks like she will be great. Thank you Doctor's Choice, Medic Grow, and Gen1:11
Thank you grow diaries community for the 👇likes👇, follows, comments, and subscriptions on my YouTube channel👇.
❄️🌱🍻 Happy Growing 🌱🌱🌱
https://youtube.com/channel/UCAhN7yRzWLpcaRHhMIQ7X4g


Likes
6
Share


@pzwags420
Follow
Week 5 flower is progressing well. bud sites are getting bigger with more pistils and trichs on leaves everyday. This will not be a 8 week strain I'm thinking 10 but will calibrate if necessary to get the full potential of this genetic as I can see she is a special one already!

Likes
31
Share


@TheHighentist
Follow
They looking good, but temp is a little too high. It is what it is
One of the plants (In front to the left) is more frosty, with less amber pistils.
But overall the trichomes are starting to go from crystal to cloudy. Which is my timing for start flush.
24/7
-Temp 23-26day/21-24night
-47%RH (2+-)
25/7 Water day* start of flush
Gave them till run through with plain ph balanced water, and topped it off with some light nutrients-mixed water.
-Temp 23-26day/21-24night
-49%RH (2+-)
26/7
-Temp 23-27day/21-24night
-47%RH (2+-)
27/7
-Temp 23-26day/21-24night
-47%RH (2+-)
28/7* Water day / flush
-Temp 23-27day/22-24night
-47%RH (2+-)
29/7
-Temp 24-27day/22-24night
-47%RH (2+-)
Likes
55
Share


@pifflestikkz
Follow
Day 135
14/09/24 Saturday
De-chlorinated tap water pH 6 with Plagron products.
Day 137
16/09/24 Monday
Feed today using de-chlorinated tap water pH 6.
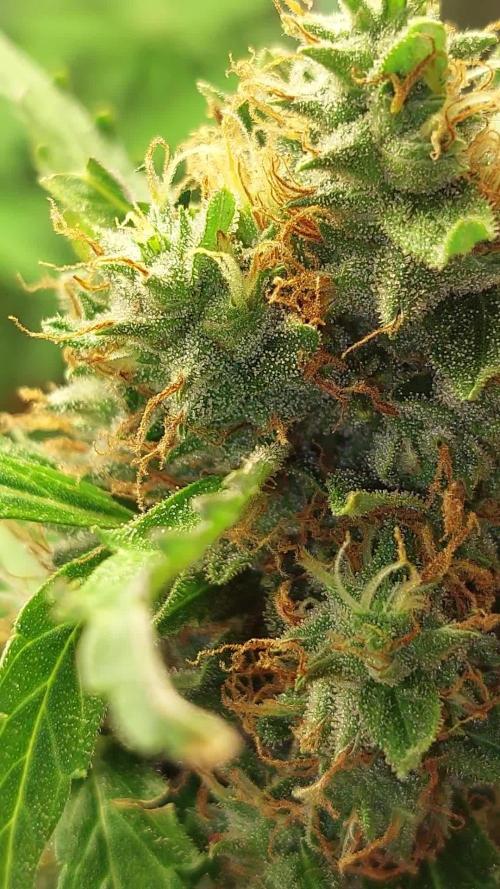
She is seriously stacking now, zesty aroma with a fruity kick.
Trichomes incoming 🤩
Picture and video update, ✌️😎
Day 138
17/09/24 Tuesday
De-chlorinated tap water pH 6 today with Plagron products.
Pic update
Day 140
19/09/24 Thursday
De-chlorinated tap water pH 6 only today.
Day 142
21/09/24 Saturday
Another feed to push this week they seem to be handling it 💚. Fattening up on the buds now and pistils starting to mature.


Likes
4
Share


@Tetiana_Riz
Follow
🌱 Eternity Grow Cup 2025 – Plagron & Zamnesia! 🏆
We’re in the 3rd week of our amazing journey with Runtz Automatic from Zamnesia Seeds, and everything is going perfectly! Our beauty has already reached 15 cm and grows stronger every day. The daytime temperature is between 26 and 28 degrees, dropping to a comfortable 20 degrees at night, and humidity stays around 60-70%. We're carefully feeding her with nutrients from Plagron, and the results speak for themselves. 🌿
Huge thanks to Zamnesia for the amazing seeds and Plagron for top-quality nutrients and the Eternity Grow Cup 2025 competition! This is an incredible opportunity to showcase our skills and enjoy the process! 🙌
Stay tuned for more updates, there’s lots of exciting stuff ahead! #EternityGrowCup2025

Likes
200
Share


@Ferenc
Follow
Day 96, 15th of December 2020:
Wao and wao... this is what I can say.
A bit late I was on holiday I usually start the week with the first day but now with the last one.
So let's start with the "black sheep" of this group as she is alone here RQS Wedding Gelato.
Easy growing issue free little bushy lady. Absolutely great choice of grow. Pretty much ready for Christmas but she can be cut even now lol....
And now let's speak about the Original Sensible Seeds' girls...
Well Black Ghost OG similarly to RQS Wedding Gelato is calm little bushy and issue free lady.... no problem all good ready for Christmas....
Runtz Gum the thick chick with heavy big buds and excellent appearance is really amazing. I placed a stick there and fixed her to look better... It was not necessarily but i have done it.
She needs more time pretty much done ny Christmas or a bit after....
Gelato from Original Sensible Seeds is similar in terms of acting such as streching and all that ...
The same situation applies not much to really say we wait ;)
I am really happy to have these ladies....
Well, Do-Si-Dos OG is the craziest one ever... lol.... not only due her crazy kind of streching style but the trichome developement that comes along to the fan leaf "holder" stem is pretty crazy....
Those buds are like a diamonds sticky and she would be ready to harvest but need to wait because I need to go....
I really had to fix her by placing a stick there I broke one stem but fixed as it did not come off... so crazy especially now because of the weight of the buds... now she looks even more beautiful...
I think she is the most challenging grow ever.
Original Sensible Seeds genetics is unique really high quality just look at them.
Royal Queen Seeds as well but this is my second grow from them my first was a Green Gelato which is the same calm littlw bushy plant. Amazing very good for newbies ;)
I am going on holiday again and back on 28th of December so after harvest starts.
Girls will be cut after.
The 7th weeks starts with tomorrow 16th of December....
Only flushing and no more nutritient will be used.
Soon full report comes. Lamp is the same 11 hours on and 13 off....
The last 4 days they will get 4 days darkness and only ventilation will be working no even more water ;)

Likes
22
Share


@Aeromax
Follow
23/4 :
Received the Migro Aray 240W so i switched the lamps in the box. I'm not using the old 600w LED fixture.
It will grow even better with the new light !!! 👽
Still don't have a basic grow nutrient, will try to grab one soon.
2 Pink Gasoline and 1 Capri Zun didn't make it unfortunaltely 😞
25/4 :
The Migro light delivers the first results !!
Also i ordered the whole FloraFlex nutrient line. Can't wait to receive these 😊
