
Likes
Comments
Share


@XxDetermined100
Follow
The plant was easy to grow overall .. it grew fast and a little on the tall side which had me nervous but I was able to raise the lights up just enough to finish, so it all worked out in the end. buds came out hard and frosty no complaints . This was a freebie seed too! didn’t expect it to come out as fire as it did man was i wrong. Straight fire 🔥
Ran into root rot in the beginning of veg but the great white and hydroguard saved my ass.🙏

Likes
9
Share


@rolling_stoned
Follow
So pleased with the growth, this week I put a net up to separate out the buds a bit and trimmed the plants to try and get more light to the lower buds. Instead of replacing the water, I'm now directly recycling and adding nutrients and additives. I found the easiest way was to pump the system out into another bucket so I could measure more accurately how much to add and then replace the mix back in the system. The grow room smells wonderful. I'm so looking forward to when I can try it.


Likes
6
Share


@ForbiddenBotanist
Follow
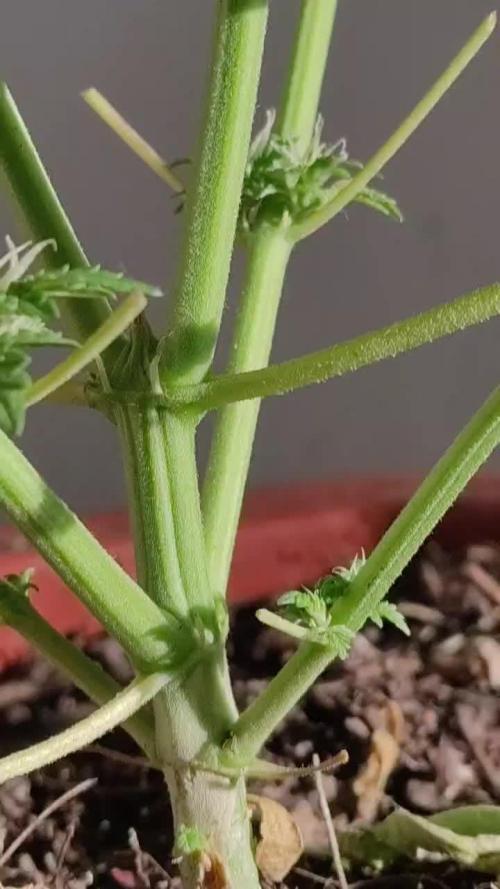
Removed a lot of stalks to point the plants energy where I want it.
Not a lot more to say
-


Likes
16
Share

@Bncgrower
Follow
Final stretch, next week it's time to flush them. The smell is really strong when I open the bedroom door, I believe in an extremely satisfactory result.. ❄️💪🌲
***The photo of the trichomes ended up getting mixed up, so I'll post photos of all the plants.
Likes
6
Share


@AestheticGenetix
Follow
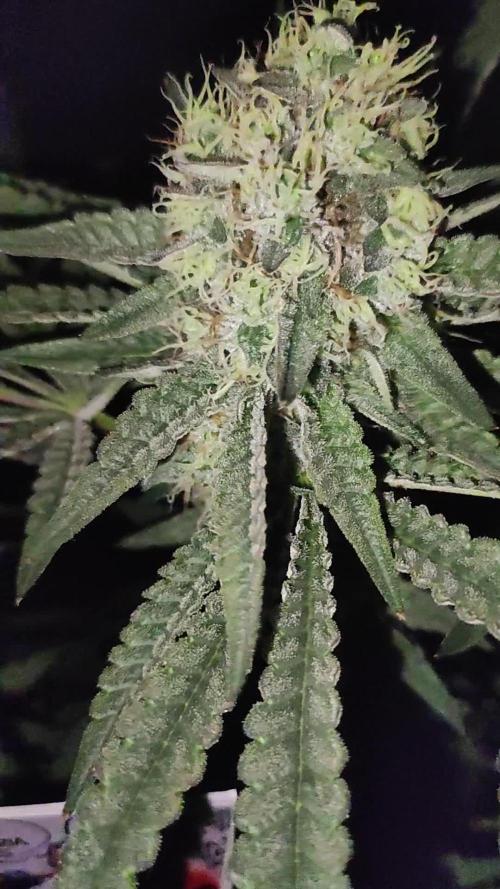
8/16/25 looks like she's gonna produce some chunky buds. Thick white trichomes everywhere on the plant. Seems like she would produce a decent yield

Likes
27
Share


@jonesy_grows
Follow
Nothing much to report, some tight buds are starting to form
Week 4 day 4, the buds are definitely starting to take shape, and the trichomes are forming on the sugar leaves, pistils are still mostly light colored. I cant wait to watch these buds chunk up over the next few weeks.
Likes
5
Share


@Stick
Follow
Clones are ready to become monsters, roots are exploring the fabric pots, while tops are growing vertically and creating new nodes everyday. I think it's almost time to trigger the flip, I'm limited with heights and these babies will probably stretch a lot. One more veg week and we'll jump into the flowering stage!


Likes
8
Share


@Orenburchik
Follow
18 неделя. 9 неделя цветения. 30.12.2024
День 1.——
День 2.——
День 3.——
День 4. Сегодня полив чистой водой с добавлением sesnizym с ph 6.3 в объеме 1.5 литра
День 5.——
День 6. ——
День 7. Сегодня крайний полив компотом с добавлением всех стимуляторов с ph 6.3 в объеме 1 литра.
P.s: Вот и подходит к своему завершающему этапу мой Арбуз :) на следующий неделе начинаю давать Finish от Advaced Nutrients для промывки в течении всей недели и следом 10-14 дней чистой воды и отправимся в темноту на пару дней….

Processing
Likes
49
Share


Processing
Likes
5
Share


@Andres
Follow
I was traveling ... to give information ... the temperature has dropped ... I think she will be even slower outdoor ...


Likes
92
Share


@DogDoctorOfficial
Follow
Week 18 (Week 10 Flower) Grow Diaries Report – Part One: Wrapping Up the Journey
🌱 Pre-Harvest Reflections
This week has been a mix of emotions as we approach the final chapter of this grow. Let’s talk about why we made the decision to pre-harvest portions of the Gorilla Melon and Papaya Zoap. While both plants have been incredible performers, a few buds on each started showing early signs of bud rot. This is an unfortunate but natural challenge when growing such dense and resin-packed colas. The decision to harvest those sections early was made to protect the rest of the crop and ensure quality and integrity for the remaining flowers. Vigilance is key in a packed garden like ours, and careful monitoring ensured the rest of the room remained safe and thriving.
🌈 A Symphony of Colors and Frost
The grow room is a visual masterpiece this week, with shades of deep purples, vibrant greens, and golden hues taking over. The fading is absolutely breathtaking, showcasing the natural progression of the plants as they near the end. Combine this with the insane level of frost blanketing the buds, and it’s safe to say this is one of the most beautiful gardens I’ve ever cultivated.
✨ Spectrum Management: The Secret to Stunning Results
The current lighting setup is a game-changer:
• 50% whites to maintain overall balance and structure.
• 100% reds for enhanced ripening and color development.
• 100% UVs to boost resin production and amplify those trichome levels.
The ThinkGrow LEDs paired with the TrolMaster spectrum control system have truly unlocked the garden’s full potential. Watching the plants sparkle under this setup feels like seeing stars on a clear night—magical and unforgettable.
🌟 Quick Recap: The Journey So Far
From seed to this incredible moment, this grow has been a testament to precision and passion. From germination to veg and through flowering, every detail was carefully tuned, every decision made with intention. Along the way, we navigated challenges like pests, mold, and environmental shifts, proving that adaptability and dedication are essential. And here we are, ready to bring this journey to a close with nothing short of perfection.
Week 18 (Week 10 Flower) Grow Diaries Report – Part Two: The Tools That Made It Possible
💡 ThinkGrow LEDs: These lights have been the heartbeat of the grow, delivering unparalleled spectrum control and efficiency. The ability to fine-tune every stage of the plant’s life cycle has been a game-changer.
🌬️ AeroFan System: Consistently circulating air while keeping the environment balanced and mold-free. The AeroFan’s role in preventing hotspots and ensuring even coverage cannot be overstated.
📱 TrolMaster System: The brain behind the operation, the TrolMaster system has provided unmatched control and precision. From monitoring temperature and humidity to dialing in lighting and CO2, it has truly transformed how I grow.
🏕️ Tent-X Setup: The foundation of the grow, this tent provided the perfect space for controlled cultivation. Its design maximized efficiency while keeping everything neat and manageable.
🌡️ Sensors and Monitors: Every parameter was tracked with pinpoint accuracy. From VPD to soil moisture, the sensors ensured every need of the plants was met in real-time.
Each tool, piece of gear, and setup component has worked seamlessly together, creating a true ecosystem of excellence. This grow wouldn’t have been the same without them.
Ending with Gratitude and Excitement
To the community: thank you for joining me on this incredible journey. Whether you’ve been here since the beginning or just tuned in, your support has been everything. From the lovers to the critics, you all push me to grow (pun intended).
To the sponsors: ThinkGrow LED, TrolMaster, Aptus Holland, Pro-Mix Soil, and everyone else involved—your products are not just tools; they’re inspirations.
And finally, to these plants: you’ve taught me patience, resilience, and the beauty of the process.
🔥 Next Up: Stay tuned for the epic harvest and a deep dive into the final results, from trichomes to yields and beyond. The end is just the beginning of the next adventure. 🌟
Let’s finish this grow strong! 🌱✨ Growers Love.
Discount Codes so you can save big on your next check out 💚💚💚
Kannabia - DOGDOCTOR 30% off
SeedsmanSeeds - DOGDOCTOR 10% off
CannaKan- DOGDOCTOR 15% off
terpyz.eu - DOCTOR 15% off
The Neutralizer - PORKIT5-DOG 15% off
Fast Buds - DOGDOCT 15% off
As always thank you all for stopping by, for the love and for it all , this journey of mine wold just not be the same without you guys, the love and support is very much appreciated and i fell honored and so joyful with you all in my life 🙏
With true love comes happiness 💚🙏 Always believe in your self and always do things expecting nothing and with an open heart , be a giver and the universe will give back to you in ways you could not even imagine so 💚
Friendly reminder all you see here is pure research and for educational purposes only
Growers Love to you all 💚💚💚


Likes
12
Share


@The_Good_Twin
Follow
6/11/22
Today starts week 9, and the 3rd week of flower. I may have a problem in my grow tent! Stella’s tent mate might be a male, or a hermie. I don’t know, because I’ve never grown one or seen one except for pictures.
I was planning on going out of town for the Fourth of July for a few days, but I was wondering how my plants would fare. I skipped 1 day between feedings and she looked absolutely terrible! She was so dry, and all her leaves were limp. She truly looked scary. I’m only uploading a couple pics of her today. I’ll add more tomorrow to see how she bounced back.
Anyway, the point of all this is that I told my wife that I was going to skip a day and see how they looked. After seeing the results, my wife was not happy. Our trip may get canceled because I’m a responsible grower. 🤷♂️
Today I was going to give her an entire gallon, but she only took about 14 of 16 cups before the runoff was more than sufficient. I felt it was a waste to give her more since it would just run out.
I’m still using the mid-bloom nutrients. So today she received 14 cups or 0.875 gallon of the following:
CALiMAGic - 2 ml
FloraMicro - 4.7 ml
FloraGro - 3.8 ml
FloraBloom - 8.5 ml
Floralicious Plus - 2 ml
Liquid KoolBloom - 2 ml
The initial pH was 5.8. I added 3 ml of pH UP which adjusted the pH to 6.3. I didn’t even bother with my TDS meter today. I didn’t need any added frustration.
Runoff was sufficient, and the pH was 6.3. Honestly, it seems like the first bit of solution just ran through her.
The tent was warm at 86.9F, but humidity was low at 36%.
I’m really worried about her tent mate being a male or hermie and spreading that to her and the other plant (Sir Jack - auto) that just joined them in the flowering tent.
Hopefully I’ll know for sure by tomorrow. Happy growing everyone!
6/12/22
I wanted to add some more photos to show how she bounced back after feeding. The temperature in the tent was a few degrees cooler today because it’s starting to rain here. The humidity went up to 54% from 36% over night just because she was fed.
Her largest tent mate (Rocket Fuel) turned out to be a male and was removed and placed outside last night. He’s enjoying the rain right now. I plan to dispose of that later.
Stella has room to spread out for a little bit, but I’ll be giving her more company soon. My other diary, “Stella’s Cuatro” are her daughters, and they will be joining her soon.
Happy growing everyone!
6/13/22
Today is feeding time once again in The_Good_Twin grow room. I’m going to try and be brief today.
Stella took a whole gallon today, and had a wonderful amount of runoff so I can be assured that she has been thoroughly fed.
I kept with the same nutrient levels as on the 11th. Look above to see.
The initial pH was 5.9. I added 2 ml of pH UP which adjusted the pH to 6.2.
Her runoff pH was 5.9.
Temperature was 88F, and humidity was 51%.
She has reached 45.5 inches tall and is once again almost touching the light. In fact, the branches that I’ve previously bent using HST, are now righted and almost back to the lights. Oh well. I’ll have to think of another way to raise the light or not worry about it. 🤷♂️
Happy growing everyone.
6/14/22
Stella is a thirsty girl! She took another gallon of water today mixed with more of the mid-bloom nutrients. I’ve been trying to keep up with her needs so that she makes some super fat and crusty nugs for me at the end of her journey.
All of the branches that I performed HST on have grown longer, and turned up, and once again are at the top by the light. I feel like I’m going to have to do it again, but lower down the branch. She’s not going to like it, but kissing the light isn’t going to turn out well!
Enough blabbering on…
She received:
CALiMAGic - 2 ml
FloraMicro - 4.7 ml
FloraGro - 3.8 ml
FloraBloom - 8.5 ml
Floralicious Plus - 2 ml
Liquid KoolBloom - 2 ml
The initial pH was 5.8. I added 3 ml of pH UP and adjusted it to 6.3. I’m still not using my TDS meter. There’s a small sense of freedom there.
Runoff was about 20%. Her pH was 5.8. The tent temperature was 83F, and humidity was 61%.
She’s HUGE, but she’s going to have to make some room, because there’s going to be a large family reunion this weekend. Stella’s Cuatro is going to be moving in.
It’s going to be crowded. Happy growing everyone!
6/15/22
I fed Stella another gallon of water today mixed with the mid-bloom nutrients as the day before.
Same nutrient levels as above. I calibrated my pH meter today to make sure it’s measurements are correct. The initial pH was 6.3, and didn’t not need adjusting.
Runoff pH was 6.1. I’m not even bothering with my TDS meter anymore. Eventually I will, but I’m not in the mood for the frustration that it gives me.
The tent temperature was 84.4F, and humidity was 47%.
Her bent branches, and one or two additional ones are getting into the light again, so they were taped and bent over again. So, more HST completed to try and keep her at a reasonable height. 🤷♂️
I don’t know how I’m going to fit 4 more of her into the tent, but I’ll have to figure a way.
Happy growing everyone!
6/16/22
Another day, and another feeding for Stella. The branches that were bent yesterday, as well as the ones that were bent for a 2nd time have all survived (so far), and their ends have started a slow curve upward again.
I mixed another gallon of water with the same nutrient levels as the other day. Look above to see what she received.
The pH going in was 6.2. The runoff pH was 6.0.
The tent temperature was 84.4F, and humidity was 63%.
I know all of you are tired of reading it, but she’s a huge plant! I’m hoping for a nice haul of top notch bud when she’s done. However, right now I’m starting to feel a little burnt out from caring for so many plants.
Don’t we all wish we had such problems! Happy growing everyone!


Likes
9
Share


@Trichom420CZ
Follow
Its looks like my best start of automatic seed ever. I hope that will my best flowwr ever too.
Likes
18
Share


@Mastr
Follow
I chop her down day 70 and let her dry in temperature 17° and humidity 60 I already test her bud and its so nice for daytime stoner test like diesel and fruit i love to smoke her bud cant wait to they get dry and I guess she produce 3or 4 ounces let see next week thanks to everyone all grower happy growing friends 💚
Likes
17
Share


@Naujas
Follow
To tell the truth, I am very surprised myself, how amazing she is FastBuds Gorilla cookies, she copes well with a small space:) she drinks 1 liter every day :) everything looks better than expected:) good luck to everyone.