The Grow Awards 2026 🏆
Likes
Comments
Share
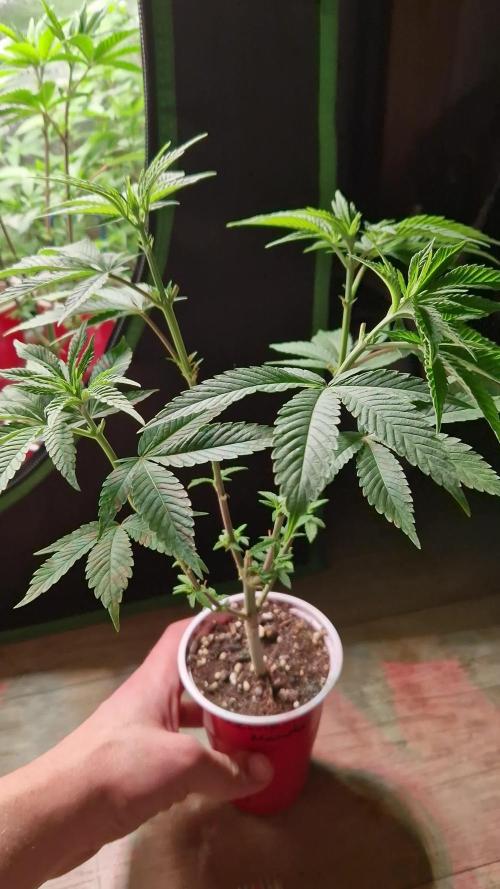
I like development at this stage😁 13.3.23 poured clean water 150ppm light at 50% Frosted Guava | Original Sensible Seeds Frosted Guava ist eine atemberaubende Marihuana-Sorte, die eine große Menge fester, kompakter Blüten hervorbringt, die mit potenten THC-Trichomen übersät sind. Durch die Kombination von Guava und Frosted Skywalker lässt Sie die tiefe Indica-Sensation auf Wolke 7 schweben. Machen Sie sich bereit für den Start nach einem 9- bis 10-wöchigen Indoor-Blühzyklus. Diese mit Zucker überzogenen Knospen sind bereit für den Fang und was für eine Ernte sie mit rund 600 g bringen m2. Feminisierte Frosted Guava-Samen gedeihen auch im Freien, werden Anfang Mitte Oktober fertig und ernten etwa 700 g plus pro Pflanze. Mit einem exotischen Terpenprofil aus Caryophyllen, Limonen und Pinen ist die Beute von Frosted Guava eine Kombination aus süßen, fruchtigen Aromen mit Tönen von sauren Erdbeeren und Grapefruit, aber machen Sie sich bereit, die Potenz ist belebend und bereiten Sie sich darauf vor, mit vollständiger Entspannung von Körper und Geist entrückt zu werden . Alle schriftlichen und visuellen Materialien sind nur für Informations- und Bildungszwecke bestimmt. this week I decided to install a large tent Mars Hydro 120•120, for one and a lamp with a large coverage FC E4800. I set up the climate control, now the temperature is around 24, I installed two fans to blow the Secret Jardin monkey fan 20w, I wanted to buy them for a long time. The heater also works! Hope it warms up soon 😅
Likes
5
Share
@CalGonJim
Follow
11/3 12AM MONDAY. CRITICAL KUSH IS DONE!! I dont want to do the report yet, I never expected SO much paperwork to be a pot head....!!!! 11/3 730am BIG DAY WITH RACCOONS, THE CALGONJIM SHOW IS AWESOME TODAY!!! 11/5 10AMD ....very injured so cant move well enough to update, pain blood and maybe a 3 4 days to heal, bad one. 11/6 140pm OUCHGODDAMNIT.....OH ANOTHER GREAT GODDAN DAY. ALSO I MADE AIR FILTERS FOR THE TENTS. DID SOME WATERING, THE PLANTS LOOK PPRETTY GOOD. 11/7 11AM HUGE BLOOD THING on neck, very bad...still need to grow the medicine I need to heal....would rather just not ever deal with any of it, soon just. a few more things. 11/7 10:45PM working on my little gardens till the end I hope 11/7 730am PROLINE, PROLINE, PROLINE!!! GET IT?? SHUT UP IT WAS AWESOME.
Likes
8
Share
Likes
422
Share
Hi everyone 😁 Welcome back on another week update. If you interested to see the full week update. Please revisit this journal as will be posting daily updates. Thank you for such a great support 😊 me and my🍌💜👊 girls loving you all 💚💚💚 So far everything is going great. Girls are healthy and happy. This week I will be increasing nutrients, continue with leaves tucking and perhaps will install scrog net by the end of the week. Wishing you all a wonderful week ✨🍀✨ 06/11 day 29 Watered 500ml each pot and sprayed with water and fish mix solution. 08/11 day 31 Girls started growing faster. Good few cm in to all of the directions in one night. Watered again with 500ml each pot as belive that they need just a bit more time for the first runoff experience. 11/11 day 34 It was a Spa day for the 🍌💜👊 girls. Full package; 1st - removed 7-10 fan leaves from each girl. 2nd - LST on few longer branches 3rd - shower with fish mix and water solution. 4rd - Watering 500ml for Athena and approx 300ml for Xena. 12/11 What a great and a bit busy week with my girls. Perfect response on yesterday selective defoliation and stretching. No signs of any stress. Girls are strong 🍌💜👊💪 So far I am very pleased how this grow going 😁 Thank you all for such a amazing support 😊💜 Peace and love brothers and sisters ✌️💚
Likes
4
Share
Likes
7
Share
We’ve reached the final week before harvest. Most of the plants are already ready for root flushing or do it. I’ll do it in batches since humidity levels are a bit tricky. I flush the roots with plain water first and then add several liters with Final Flush to see if it leaves any effect on the flavor. I’m still applying a preventive fungicide foliarly. They’ve developed some great main buds, and I’m really looking forward to trying them.
Likes
3
Share
@TyRun
Follow
Intermediate Results Overview This grow was intense! Setting up the grow consumed so much of my time and focus that I started slacking at work, and it took me a month to get back on track. But hey, what’s the point of a job if it gets in the way of growing? 😉 In the end, everything worked out, and I gained invaluable experience. This was my first grow using coco coir. At first, I didn’t get it, but then it just clicked! Now I’m hooked: "I’m here to stay." Coco is more controlled than soil, flushes easily, and you can introduce beneficial microbes, which thrive in it. My main takeaway from this grow? If you buy coco, don’t forget CalMag! Next time, I’ll definitely install HEPA filters at the intake. The amount of dust was insane, and the grow box pulls air like a vacuum cleaner. Watching the timelapse, you can see the box sucking in every bit of dust. I vacuumed the intake filters weekly. The plant was incredibly sticky, but that also meant it caught a lot of lint and fibers between trichomes, especially visible under a microscope. Smoking microplastics? No, thank you! --- On CO2 CO2 only works if everything else is dialed in. If the plant experiences stress from deficiencies or overfeeding, you can forget about it. Since CO2 supplementation requires turning off the exhaust fan, it’s hard to manage temperature and humidity. The plant releases so much moisture that RH jumps to 80% within minutes. It’s doable, but definitely a challenge. --- On Magnetic Fields No clue what’s happening here yet, but it’s fascinating! I’ll test again with a control sample. --- Nutrients Dreams do come true—I’ve tested almost everything Advanced Nutrients offers. It wasn’t all smooth sailing; their feeding charts need adjustments for your conditions, and you usually need to feed less than recommended. Overall, I’d say the nutrients performed 100%, and I see no reason to switch. I’ll stick with them for future grows. --- Strain This strain is reliable, though not the most productive. It flowered exactly as advertised and delivered a frosty finish. It tolerated all my mistakes like a champ—especially mold. Despite an abandoned SCROG plan turning the plant into a bouquet, there wasn’t a single mold spot, even in the densely packed lower buds that got almost no light. Zero mold issues! --- Aroma As advertised: pine, wood, and citrus. At first, I thought it smelled like grapefruit, but now I’m leaning toward bergamot. Bergamot with a classic weed aroma—a recognizable twist on the usual scent. During the grow, the smell was strong, but the carbon filter handled it perfectly. --- Flavor It’s too early to say, but the flavor is definitely there! Embarrassingly, all my past harvests tasted the same—like nothing. Just smoke. This one has a distinct sour taste. I’m excited to see how it develops after curing. --- Effect Too early for a full review, but I love what I’ve tried so far. The high lasts about three hours, with euphoria and relaxation. It’s the perfect evening strain. I’ve smoked a lot over the years, but I’ve never experienced true euphoria—until now. Guess I’ve been stuck with garbage and ditch weed before. 😅 It’s not a strain for productivity or chores, but it’s perfect for chilling, watching something, or chatting. No anxiety, just great vibes. It feels like having a beer after a long day: you relax, and life feels good again. --- Roots The roots were healthy—maybe too healthy! While the AirPot (20L) prevented root circling, it didn’t eliminate it entirely. There were dead zones at the bottom where roots circled around the perimeter. A dense root mat formed at the bottom (so dense you couldn’t poke a finger through it), which likely contributed to salt buildup. Breaking through that mat required more water, and I suspect this caused EC to spike 1.5x the next day if there was no runoff. Next time, I’ll mix some pumice with the substrate at the bottom, about 3–4 cm deep. --- Timelapse I only got the timelapse running after the switch to flowering, so it’s not from the beginning. Still, it’s an incredibly useful tool for understanding growth rates. I’ll definitely use it for future grows. Comparing yesterday to today is one thing, but rewinding a week to see how things were is game-changing. I recommend it! You can even use an old phone with a timelapse app if your camera doesn’t support it by default. --- What’s Next I’ve grown fat buds before, but I’ve always neglected curing. This time, I’m doing it by the book with full control. Drying in the grow box with RH controlled at 50–60% (averaging 55%) for a slow, even dry. Temps are kept between 20–23°C, with frequent venting to keep it below 21°C for terpene preservation. After 7–10 days, when small stems snap with a characteristic sound, I’ll trim and jar them with humidity sensors. For the first two weeks, I’ll burp the jars twice daily, then reduce to once daily for the next two weeks. After that, I’ll monitor the RH sensors and adjust as needed. I’ll share the details after curing is complete. After drying, I’ll weigh the buds, take photos, and share another post in a month or two after curing to report on the flavor and aroma. For now, I’m taking a breather, fine-tuning my setup, and preparing for my next grow: Wizard Trees - Zangria S1.
Likes
7
Share
First off, that mf holds it's name very well. The smell on that strain is phenomenal. Much of fruity citrus and earthy notes and that's without the curing. I smoked a bit to get a taste. Smoke and taste quite harsh but that should go away with the curing. I harvested 634g wet, including a lot of stems, and ended up with 121g dried. they lost 80% of their mass and I might have over-dried them since I expected to get more tbh. However that's more than enough to get me through next harvest. The 3 plants turned out to be pretty different phenotype. All over pretty great but one could have used denser buds. They don't have the same maturity which means I got buds for all occasions. Kept the trimmings in the freezer for an hour and also harvested 0.67g of kief with a 220 micron bag. A lot of impurities but that was to be expected. I don't think the calcium problem has had a significant impact. Overall very happy with the product and the experience.
Processing
Likes
5
Share
@Ensign420
Follow
Week 02 Introduction This week has been a bit of a struggle. Had my first experience dealing with slime and brown algae. But I think adding enzymes and increasing the beneficial bacteria helped to fix the issue. Also experienced nutrient burn for the first time. My nutrient solution strength got as high as 671 PPMs. So backed it down to about 430 PPMs during the end-of-week reservoir change. Also cut Hydroguard (expired?), CaliMagic, and Superthrive from this grow. Now she's still stunted, but is starting to recover. Hopefully... [START OF WEEK 02] Day 01 - Monday - 08/10/20 - Total Days: 008 ----------------------------------- - [0830]: Still looks a bit yellow. But getting larger! --- Solution strength was at 248 PPMs. --- Just topped off with a bit of distilled water --- PH went up to 6.1 so PH'd down to 5.8 --- Ran the top feed for a bit to wet the hydroton. - [2130]: She's looking even more yellow now. --- Even the new leaves are really yellow. --- Decided to add more base nutes. --- Added 4ml of Sensi A --- Added 4ml of Sensi B --- Now at about --- Solution Strength went up to 304 PPM. --- PH was at 6, --- Also raised the water level a bit more. --- I really hope it's a nutrient deficiency and not an over-watering issue. --- Please live! Day 02 - Tuesday - 08/11/20 - Total Days: 009 ----------------------------------- - [0830]: Looking less droopy. But still yellow. --- Decided to do a reservoir change. --- 4.5gal of distilled water --- 8ml of Sensi Grow A --- 8ml of Sensi Grow B --- 8ml of Voodoo Juice --- 4ml of B-52 --- 4ml of CaliMagic --- 4ml of Hydroguard --- 4 drops of Superthrive --- PH'd down to 5.8 --- Solution strength: 302 PPM --- Since I didn't want to risk over-watering the rockwool, I did not to do a top feed, may do one tonight after the sleep cycle (lights are still set to go off at 10am and back on at 4pm). --- As I was doing a reservoir change, I noticed that the tubes and bucket were a bit slimy. Didn't really stink or anything. Is this normal? Maybe due to the Hydroguard and Voodoo Juice? --- I hope she gets better soon! - [2215]: Getting larger! But still yellow. --- Also can see a root growing through the net pot! Tiny little thing but it's there! Will have to start dropping water once more appear. --- After looking over a few DWC diaries using AN nutes, seems like my solution strength is still too low. Most around this stage average around 500 PPMs with about 4ml per gallon. --- Top fed for a minute to wet the top of the hydroton. --- Solution strength went down to 263 PPM. --- Added 8ml more of Sensi A --- Added 8ml more of Sensi B --- Now base nutes are at 16ml for 4.5 gal of water. --- PPMs went up to 411. --- Still lower than 500 PPMs, but that's okay. --- PH was at 6. Not sure if I should adjust PH using AN nutes. So going to not ajdust unless PH goes above 6.1. Day 03 - Wednesday - 08/12/20 - Total Days: 010 ----------------------------------- - [0830]: Looks like more root growth! --- She still looks yellow. But leaves are perky. --- PH was at 6.2 so lowered down to 5.8. --- Solution strength was at 394 PPMs --- Since roots are still growing, I decide to lower the water level a bit. Now water level is a bit below the net pot. - [2200]: Root is getting longer! --- Slime is returning. Not sure why. --- Solution strength: 357 PPMs --- PH: 6.1 --- Decided to add an enzyme along with more beneficial bacteria to hopefully cure the slime. --- Added 16ml of Sensizym --- Added 5ml of Hydroguard --- Added 8ml of Voodoo Juice --- New solution strength: 430 PPMs --- New PH: 6.1 --- Top fed for a minute. --- This slimy residue is really freaking me out! I hope the added enzymes will help eliminate the slime. --- Going to do a full reservoir sterilization/nutrient change over the weekend. Please survive until then girl! Day 04 - Thursday - 08/13/20 - Total Days: 011 ----------------------------------- - [0930]: I think the enzymes worked! There is little to no slime now! --- Although I think the root was also dissolved in the process. It's now just a little stub sticking just below the net pot. The enzyme is also suppose to dissolved dead roots too but guess that root was too weak? Not sure what happened there. But I think the slime is cured! --- Solution strength went down to 395 PPMs. Decided to add more base nutrients. --- Added 8ml of Sensi A --- Added 8ml of Sensi B --- Added 4ml of B-52 --- Solution strength went up to 598 PPMs. --- PH was at 6.1 --- As long as the PH is between 5.5 and 6.3, I'm not going to use PH Up or Down. But still will monitor PH levels. - [1715]: Checked up on her after her nap and shes looking alive but stunted. But no slime! --- Decided to add some sugars to help maintain the enzymes and beneficial bacteria. --- Solution strength was at 587 PPMs. --- PH was at 6.2 --- Added 8ml of Bud Candy --- Solution strength went up to 671 PPMs. --- PH also went up to 6.3 --- Lowered water level a bit to hopefully promote more root growth. --- Top fed for a minute. --- She is getting bigger, but still looks yellow. Day 05 - Friday - 08/14/20 - Total Days: 012 ----------------------------------- - [0915]: Leaves look a little burnt on the tips. Still no slime. --- Going to back off on the PPMs to hopefully fix the nutrient toxicity. --- Solution strength was at 632 PPMs --- PH was at 6.3 --- Added/Removed water until PPMs were at 536. --- PH was still at 6.3 --- Raised water up a bit, then top fed for a minute. - [2200]: Looking better. Still yellow though. --- Solution strength: 514 PPMs --- PH: 6.5 --- Added PH down. --- New solution strength: 518 PPMs --- New PH: 5.2 --- PH was kind of high. So decided to PH down. Had to use quite a bit to bring it down. But eventually got it to drop down to 5.3. A little low, but so far, the PH has always gone up so wanted to start it really low. --- Ran the top feed for a minute to re-saturate the top of the hydroton. Day 06 - Saturday - 08/15/20 - Total Days: 013 ----------------------------------- - [0830]: She looks stunted. leaves are still yellow. --- Solution strength: 514 PPMs --- PH: 5.6 --- Top fed for a minute. --- Not sure what to do at this point. Going to do another reservoir change soon. Hoping she lives until then. - [2145]: Looking pretty much the same. --- A bit of slime has returned. Since I've been diluting the nutrient solution, the enzyme ratio has dropped. So I guess this is expected. --- Also noticed that slime build up was on the air-stones. Never really checked the stones so not sure how long that has been there. Looks brown too, which can't be good. --- Going to do an H202 sterilization of the system (minus the net pot) tomorrow so did not add anything. --- Lowered the water level to below the net pot. --- Then top fed for a minute. Day 07 - Sunday - 08/16/20 - Total Days: 014 ----------------------------------- - [0900]: STERILIZATION DAY! --- Decided to skip today's night cycle for a deep clean. --- I'm hoping that skipping a night cycle won't be too stressful. --- Temporarily moved her to a new bucket. --- Used about a half of gallon of straight distilled water to flush out the net pot. --- Drained the system and wiped up all the brown sludge. Also removed the air stones and cleaned up all the goo. --- Filled the system with 2 gallons of distilled water and at least 30ml of food grade hydrogen peroxide (35% strength). --- Yea its a lot, but since I'm not going to sterilize the system overnight, I went with a really high doseage. Basically I kept adding until I started to see little bubbles start to form. --- Then I ran the water pump. - [0915]: Boiled the air stones in tap water for about 10 min. Then reconnected them to the airlines. --- I let the air stones and hose soak in the sterilization solution for about 5 minutes so the peroxide can absorb into the stones. Then ran the air stone to help mix and agitate the solution. --- Occasionally, I'd repeat the process of turning the air pump off for a few minutes to let the stones soak. - [1000]: Covered the top two row of holes of the net pot with some aluminum tape. Hopefully this solves the light leaking in through the hydroton. - [1200]: Used an old toothbrush and scrubbed the pump clean. Then drained the system. --- Refilled with more distilled water and peroxide. Again added a lot. --- Ran system again to sterilize even more. - [1530]: Drained the system and refilled with distilled water to rinse. --- Ran the system for a few minutes, then drained and rinsed again. --- Did this a few more times over about an hour. - [1630]: Added 4 gallons of fresh distilled water. --- Added 15ml Sensi Grow A --- Added 15ml Sensi Grow B --- Added 12ml of B-52 --- Added 16ml of Voodoo Juice --- Added 16ml Sensizym --- Solution strength was at 430 PPMs --- PH was at 5.6 --- I was going to add Hydroguard, but I think the bottle is expired. Since 2017 or 2018!? I think Hydroguard is good for up to 2 years from the date on the bottle or 6 months after opening. So not going to use from now on. I wonder if this could have contributed to the slime build up. --- Also removed the CaliMagic and Superthrive too. Going to only use AN products to eliminate the chance of incompatible nutrients. --- Placed her back in the bucket and top fed for a minute. --- Here's hoping for the best. Going to let it ride until morning! Please feel better! [END OF WEEK 02]
Likes
26
Share
Week 6 for the gorilla gas has finished up. These girls are showing their phenotypes and it's awesome. 3 different plants. One tall and lanky, one in the middle and one runt. All smell amazing. Finished up giving it bulk of the nutrients now it's a downward slope from here. Gradually decreasing every day till flush. Looking forward to the harvest!!!
Likes
3
Share
My first plant! I think the setup exceeded my expectations!! Just 60w led. 1 week to dry and know healing in glass pot! Im satisfied.
Likes
7
Share
@Messypies
Follow
This week started strong. Some small concerns due to small orange spots appearing on fan leaves which on researching indicates a calcium/magnesium deficiency. Will add a small amount of cal mag to their next feed
Likes
2
Share
Likes
31
Share
Hi guys after 10 day that the twins popped up i can tell they are growing strong!! My twins growing better than other Crystal Candy who i have. We will see what's happen this week and in the end off the week i will up date my diary. I notice one of twins cover up the other one and so i have decide to tie this. From friday i will introcuce sensi grow a+b because I think the nutrients inside the soil will be finished. For you the twins are growing good? Look at the video guys! (sorry for my english😬) DAY 14 My twins grow vey hard and in the same way. I start wirh sensi grow a+b with ec 0,8 and they appreciated. We will see the next week the height for start the bloom phase. Happy growing for all 🙏 GGG
Likes
35
Share
@Rap_a_cap
Follow
Hey Growmies, some of you had asked to me if I prepare concentrates.......Yes I do! I don't like modern rosin extraction but instead very rarely I like to smoke some oil. The following is the recipe of cannabis oil made by ancient Mustapha's process. It needs: pharmaceutical grade ethyl alcohol (96.5% by vol.) or 95% for liquors Weed A jar with rounded bottom A lot of time This oil is 5 months aged, from 20 grams of weed I've obtained 3.5 grams of product. Trim previously dried weed (20 grams) and put into a 500 ml jar. Cover with 200 ml of alcohol and leave it partially covered with cap. Let alcohol to evaporate on itself and shake the mixture 2 times a day. The most of the solution will evaporate within 10-15 days. When the solution is evaporated by 2/3 it needs to be filtered between 90 and 120 microns. Now is the time to finish and decarboxylate the solution by heating the jar by bain-marie until the green cream sticks to glass. The jar needs to be refrigerated before you remove the cream with a spatula to transfer it into a smaller jar. Store it in a dark place and open twice in a week for few seconds. You'll obtain a petroleum green/dark amber cream (the green tone will turn into dark brown by time). If the job is well done the surface will crystallize and will shine like a mirror. This cream is insanely sticky. Smoke one drop a time. The collapse is around the corner. Tips: Best results, in terms of flavour/aroma, with single strain Let alcohol to evaporate very slowly, take away some macerated weed (after at least 48 hours infusion) and add new weed/hash pieces little by little. Act as if it were a piggy bank. The final product is a very strong shit, really narcotic.
Likes
12
Share
I harvested three from the first run and I’ll upload photos of those colas when I harvest this second run. She’s starting to fill up and finally the colors I’ve read about in her are coming out!
Likes
3
Share
Big differences noticed daily now when checking we are at day 22 and rocking now in these pics see ya guys next week
Likes
27
Share
Day 28: Last night I had a real scare, I watered and by the end of the day she was drooping and looking very sick, there was no runoff at water so I feel I overwatered the little thing, thankfully this morning she has bounced back with great strength and this morning is looking healthier than ever! I'm noticing a few holes in leaves, a few spots on the leaves and a few very fine silk trails on the leaves, so I'm thinking she's got thrips 😣 next to impossible to get any pictures of the damage I'm talking about because I think I've caught the infection incredibly early, so today I'm picking up some Neem oil and I'll spray her completely at lights out , hopefully it is thrips and not spider mites because thrips this late in the grow wouldn't be too bad! If it's spidermites I'll be in a bit more trouble, thankfully flower has only JUST begun so I'm not so worried about a neem oil application at this time I'm going to let the soil dry out completely before watering again, I was dubious whether it was needed yesterday but the top inch was dry, I think I'll just wait until it's a couple of inches moving forwards Day 29: last night I drenched the leaves in diluted neem oil, I'm not seeing a lot of pest activity but there is some level, so since we're just starting to flower I decided now was the time just to blast anything that might be floating around, In ten days I'll do it again, maybe sooner if the buds are really getting going in that time Because of my overwatering scare the other day, I'm giving her another 24 hours to dry out deep into the pot, there's still a level of moisture in there and as of this morning the plant looks really healthy, really happy with how shes looking today, got 5 exposed tops which I believe will become the colas, 2 are the apex and on the same level and 3 lower ones are all on the same level. There are other potential Colas but they're hidden under the plant, I'll probable defoliate that side once the times right, unless they can break through in the next couple of days, which would be nice Day 29 update: (7 hours after lights on) opened the cabinet to find temps of 29 degrees c wasn't running extraction, soil is dry, but most importantly I noticed the top leaves praying for rain, I gave the soil a small amount (300ml) of distilled water and tap water , just to wet the soil enough to give another reason for the roots to spread through the pot, tomorrow I'll give another small water with feed and Humic acid just to top up her nutes and give her one last big hit of growth before she starts flowering properly, if we can trigger another growth spurt whilst she's still inbetween veg and flower, this is looking like a good first harvest! Day 29 Update (6 hours until lights off) following the water the plant has done her best to expose every inch of her leaves in light, she's bushier than ever and presumably getting ready to have a serious growth spurt, I watered around the far edge of the pot and let this pull through the soil, no run off because it was so little but, possibly a small feed of 1:1:1 tomorrow to top up nitrogen for any growth spurts planned ;) Day 29 Update (lights out) Today was an exceptional day for this girl, over the course of the day there's been some real developments! This evening she was foliar fed a mixture of 1:1:1 nutes and fulvic acid, a single drop in around 400ml of water, she should bounce back with an extra growth spurt with the extra nitrogen, on day 31 I will most likely be watering again with the same mixture to help push one last growth spurt before a flip to flower occurs and we move onto bloom nutes for the rest of the grow In 24 hours the fulvic acid should kick in and give one last growth spurt hopefully adding another node or two to the plant at the vest last moment, next photos i'm hoping will be a significant growth period if todays behaviour was anything to go by Day 31: Yesterday I squeezed in one last round of LST, the main stem cola was rising quite high above the rest of the canopy, I pulled that down out of the way and by the end of the day It had sorted itself out, I also spread out some of the other new cola sites to expose deeper into the plant to more light Yesterday I also watered with NPK 1:1:1 and Humic acid solution, as well as foliar fed with Bloom nutes and Humic acid again, this should help the plant through it's last growth spurt whilst allowing it to start creating flowers, today the soil will be left without water, possibly the next day too but I think it is ready for flowering to begin so I'm looking forwards to watering her with Bloom Nutes to get that process started well! Now that she's turning to flower i'm noticing the stems of each top are quite thin, I have a small fan on them constantly keeping them moving but I'm expecting to have to SCROG to provide all the support she needs, even if the stems thicken up in flower like I'm expecting, this will support the big buds I'm hoping for! Lot's a vertical growth starting the insides of the plant are starting to open up and there's very little leaf growth below the main canopy Day 31 - Whilst I watered yesterday with Nutes and Humic Acid, I'm spotting some very early signs of some flowering deficiencies, this isn't really a surprise as there has been hardly any nutrients added to the soil over the whole grow, so I've sprayed with the nutrient solution listed a move, the top of the soil was getting dry but not ready for a full water yet, just wet the topsoil through to help her transition to a higher quality nutrient, should start seeing some fairly decent growth from here on out! Day 32 - Today the soil was getting pretty dry, I diluted down my foliar feed mix a little and watered around 400ml of water with Humic, Fulvic, Bio Bloom and a few drops of 1:1:1, may have been a little too early but she's slightly showing some signs of deficiencies, foliar feeding has helped a little to keep these back but today I gave her the first feeding of specific bloom nutrients, should see her return to a healthy colour soon! She's starting to get quite tall as well, I think next few days we'll have some serious growth ongoing (as has become tradition) You can see from the images how her colour has gotten a bit lighter over the past few days, Foliar feeding has definitely slowed this and hopefully prepared her for a bigger dose of Nutrients, in 48 hours I'll be ready to water again this time with a heavier balance of nutes to really get things started for a healthy harvest Today or tomorrow she needs respraying with insecticides just to make sure nothing survived the early infestations and do ensure a pest free grow until the very end! Day 32 update: Today the flowers on what I expect will be the main 2 Colas have started forming, There's around 7 potential colas but 2 will be substantial if they're left long enough, hopefully tonight the nutrients kick in, but I'm considering another decent hit of nitrogen and bloom fert together, then water till flush, I think that will be 2-3 days off though, day 33: today she's looking all round healthier, the colours were good yesterday but today she's a much healthier shade of green for sure :D giving a decent feeding regime of flower nutes seems to have balanced her out nicely, I'm gonna leave watering today and let her dry out to give the roots another big push to grow, the other day I was digging down into the soil on the opposite side of the pot to the plant and found roots there, I'm really excited to see this girls root ball! Flowering is well on the way, HOPING for a Christmas harvest but I think it's going to be more new year when she's fully ready to be chopped, can't wait! I have pulled off 2 leaves today, they were starting to turn brown, I think the plant has cannibalised them, not because of a nutrient issue, because of a light issue, these leaves were completely shaded by the whole plant
Likes
3
Share
Am Ende wird doch alles gut… kann man so sagen! :) Nach einer Woche ohne Wasser hat die Lady nochmal richtig zugelegt und an Duft gewonnen. Jetzt 2 Wochen trocknenund ab in die Grovebags
Likes
13
Share
@KirbyFarm
Follow
This was my first outdoor autoflower experience. Very happy with the results. Buds could have had a better taste in my opinion but that is just preference.