
Likes
Comments
Share


Likes
Comments
Share

@smoking_hills9
Follow
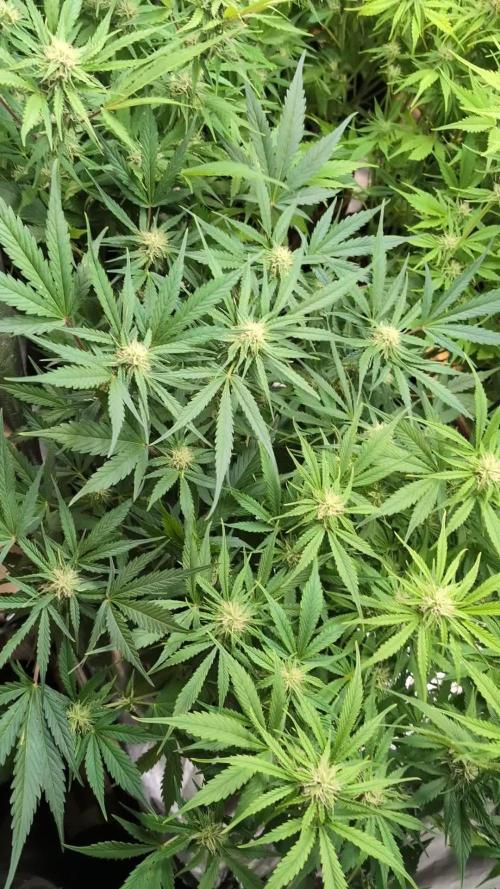
Very happy I went Original Sensible Seeds beens this grow. 🤩 All 3 autos from some special american line, and o boy , they don't disappoint.🔥 Bangers genetics 👏🏻 all trees are good size with super thick stalks. So u know what that mean. Super fat buds. Nice smell. I like it a lot 💚

Likes
49
Share


@masterofsmeagol
Follow
6/23 Due To The Two 8 Day weeks this week will only consist of five days to get me back on track. SEE LAST WEEK FOR DETAILS. I DID ANOTHER EIGHT DAY WEEK. I'LL DO THIS WEEK AS SIX DAYS. THAT WAY IM BACK ON SCHEDULE. WATERED 6/22. WENT BACK AT NIGHTCAND WATERED ANOTHER GALLON WITH 1/3 TSP Armor Si. I mixed the solution with kelp you kelp me but I dumped it out. I've mixed silica with other nutes before but I had read something earlier about bioavailability issues and I didn't want to risk it. My plants are the healthiest I've ever grown. I'm considering transplanting the large 10th planet that I'm light depping. I also need to develop my ipm and my nute schedule. Still gonna have to keep an eye onvthe water situation. Luckily I have a buddy in my corner that's co tinualkt Bern a great help.
WENT BACK OVER AROUND NOON. BEAUTIFUL OUTSIDE AND THE PLANTS WERE LOVING THIS SUN. I DEFOLIATED SOME BURNED LEAVES AND MIXED A SOLUTION IF KELP ME KELP YOU THAT I PLAN TO FEED TO THE GARDEN TODAY. IM HAPPY WITH HOW THINGS ARE GOING. WE HAVE SOME RAIN AND THINDERSTORMS COMING. I NEED TO GET MY IPM UP AND RUNNING AND THE NUTES ONLINE. I ALSO NEED TO DECIDE IF IM GOING TO TRANSPLANT THE LIGHT DEP 10th PLANET. Went back over to put the girls to bed at six and if was still 90 degrees. The water from yesterday had dissipated. The tops were dust dry. I mixed two gallons of kelp you kelp me and fed it to the garden. Afterwards I pointed qbd found a couple plants that were more open to the wind were a little lighter. I know tomorrow will be very hot. Maybe quarter inch of rain. However after that it will rain (showers) off and on for days. I wanted to make sure the girls had what the needed to make it through tjis heat wave until they get that rain. I had another gallon mixed up and I'm thinking I should've given it to them. Oh well. I'd rather underwater than overwater any day. I did notice a burnt top on the plant furthest from the tarp that the sun JUST BARELY TOUCHES when the rest are in shade. I'll just raise the tarp a little. These are tiny problems. Can't upload video until tomorrow.
6/24 Good thing u gave the plants that water. I know it wasn't much but we didn't get any rain. Suppised to get a qtr in today and another qtr in tomorrow. Then rain a couple more days. It's working our really good for my watering schedule lol. Yesterday the girls got there first dose of a bottled nute. They got two gallons of kelp me kelp you (1/3 tsp per gallon) and another gallon of just phed water. I was going to do another gallon but held off due to the threat of syring rain. Didn't get it bur it looks like the plants loved the kelp. It had reached 90 yesterday. They look better today. It's 70 at 9 today. I LST the 10th planet in the 3 gallon. It's getting huge. I should start a separate diary for those three light dep plants. Its cool as hell watching this. One of the purple punches is flowering pretty good. I probably should start another diary for them. I'll be starting to feed my plants soon. Wondering if I should pinch plants again. TUCKED THE LITTLE GIRLS IN AT SIX AND SHOT A VIDEO AND TOOK SOME PUCTURES. PLANTS LOOKED PHENOMINAL! GOT HOME AND AROUND SEVEN IT JUST STARTED RORREBTIAL DOWNPOURS! THE TYPE OF RAIN THAT BREAKS STEMS. I SHOULDVE PUT MY OTHET TARP UP BUT I DIDNT. I WISH I HAD. IM A LITTLE NERVOUS. I KNOW THESE GIRLS ARE STRONG THOUGH! TOMORROW. ILL ROLL THE RARP UP AND SECURE THE BOTTOM FOR FAST ACCESS. IM ALSO GOING TO KOOK INTO FINDING A TOP FOR MY CAGE I CAN USE IN INCLIMENT WEATHER.
6/25 That little qtr in of rain we were supposed to get turned into torrential downpours and high winds. Luckily no REAL damage. If you watch the video you'll see what I mean. I'm going to havecto be cognizant moving forward. Noticed a few chunks from leaves butvplants are still healthy. I'm surprised how well these girls withstood this storm. They are certainly resilient. The 2 purple punch 1 10th planet that I'm light depping are flowering nicely now. They missed all the commotion from the storm as they were inside. It's smelling good. I'm happy.
6/26 It's what a friend would say is "maineing") out. That mistcthe plants love. I'm surprised the plants are doing as good as they have been considering the wind. Will be adding nutes soon. Need to add extra supports too. Light dep
6/27 Brief periods or torrential downpours. Light depped 3 gallon 0lants are under an overhanfcwhete the hatsxrain can't hurt them but they still get sun. They are really starting to flower now! I'm going to begin feeding with a base nute and a flower nute I think. I'm thinking about giving the light dep some open sesame or something similar. I need to set up a nute program soon but the plants ALL look so healthy! And it's been raining! I've only watered like once or twice since they've been in the big pots. I've seen zero pests aside from a chunk missing from a grasshopper. Usually by now I'd have battled half a dozen things and be battling another half dozen. However I was posing from clones. These are seeds and boy don't I see the difference!


Processing
Likes
10
Share


@KREE8IVESTOCKLLC
Follow
going into week 4 i have no complaints, I will end up going 2-4 more weeks of VEG continue with me on my journey of the corona grow! we shall get these ladies to be completely healthy and when there done j want them to be about 6 to 7 feet tall at least 2-4 ounces per plant is my goal


Likes
8
Share


@Maggie_de_Block
Follow
Just started flower, put the light a bit higher cause she was quite bushy and wanted her to stretch a little more
Fed her with the veg nutes one last time
She's looking absolutely ready
Defoliated and LST'ed again, should have done this in veg but she hadnt stretched enough yet

Likes
27
Share


@Frosty_farm
Follow
Nothing much to say about my grow this week. Gave he a flush with pH 6.0 to kick off the week. Day 86..... Gave her a feeding today a whole gallon. Ive been doing some research and maybe I'm feeding my plants a little too much nutrients. So from now on I will be feeding a lot less and the next day I will feed just plain water. So my plants will get nutrients every 3 or 4 days. I also bought a few advanced nutrients supplements which I'll be experimenting with. Day 87... Gave her a feeding today of advanced nutrients Nirvana and voodoo juice and pH to 5.9.
Day 88.....gave her a 2l feeding today of nutrients. Also defoliated some of her big fan leaves.

Likes
8
Share

@CalGonJim
Follow
4/20 AM all the photos are looking good. The Tyson’s are done. 👍👍👍🍇⛽️
4/21 4:30AM Took small samples of BTT!!! Smoking now. Heavy hitter right off the tree. she is looking already done Grimm Seeds finish fast once flowering. Wasnt expecting that! I will grow some more and veg longer. I am RE-vegging. Ricky and Bubbles they are almost a year old and I want to keep thiem. Julian can go fu...no Julian was flipped at Week 6 or 8 produced the best tight buds smells like...'tangerines.
4/21 5:04AM VIDEOS 2 MONTEL'S, THE TALL ONE AND 1 TYSON, PUNCH PIE & GELATO 44!!!!
4/21 FLUSHED THE TYSONS WITH JUST WATER AGAIN AND WOW!!!!! LOVE THE RQS TYSON PHOTO PLANTS!!!! THEY ARE STRONG THEY CAN GROW UNDER HIGH STRESS CONDITIONS. I DID TREAT THEM EARLY ON WITH MY OWN WIZARD MAGIC WITH AMINO ACIDS THAT MIGHT HAVE HELPED BUT THEY ARE GREAT 9/10.
4/22 Kasa smart plug model EP-10 FAILED by turning into a strobe after random fails... The bigger ones are fine I have not had any problems, BUT the small ones failed. Thankfully I had them on my internet and not in the grow room!!! Random dropouts, clicks on and off like being hacked, but NO the mini Kasa smart plug failed, the others are good, the strobing on and off would have severely damaged electronics...I did NOT know that could happen! THE MORE YOU KNOW!
4/23 11AM CHOP DAY BOTH Tysons came down. They were ready a while ago. They did GREAT. Underfilled 2 gallon pots. Low light using 2 TS-100-'s at about 50 to 60 Watts. No idea how m;uch i got
4/24 3:20AM Tysons are drying perfectly, great color!!!! Video with Pink Kush and CBG by Seedsman in there


Likes
2
Share


@Sensiseeker
Follow
These plants are absolutely filling up the 5x5, if they keep it up I may have to remove one. I filled the reservoir with 6 gallons of water at midnight the other night and by noon the next day it was empty. I am putting in 6-7 gallons of water in res at a time and it is typically gone in 12 hours.
Likes
9
Share


Likes
3
Share


@Xabii
Follow
Plant is doing good, transplanted it.
Values are average of the day.
DATE - EC(us/cm)
20250402 ~1000
20250403 ~1000
20250404 ~1000
20250405 ~1000
20250406 ~1000
20250407 1438
20250408 #
DATE - PH
20250402 ~6
20250403 ~6
20250404 ~6
20250405 ~6
20250406 ~6
20250407 6.00
20250408 #
DATE - ORP (mV)
20250402 #
20250403 #
20250404 #
20250405 #
20250406 #
20250407 386
20250408 #
DATE - °C - RH% (Tent Temp/RH)
20250402 24.5 47
20250403 23.9 43
20250404 24.2 40
20250405 24.3 39
20250406 23.9 38
20250407 24.1 49
20250408 25.7 48
DATE - °C (Reservoir)
20250402 #
20250403 #
20250404 #
20250405 #
20250406 #
20250407 19.4
20250408 #
DATE - CF
20250402 #
20250403 #
20250404 #
20250405 #
20250406 #
20250407 14.38
20250408 #

Likes
Comments
Share


@Robom069
Follow
now gettin into LST and triming
stretchin antoher week, i hope they dont grow too big for the tent
1 had some leftover hesi so i used it with the canna together


Likes
27
Share


@RDWCGrowing
Follow
3/4/2023
Week 3- Day 1 of Veg (Day 31 overall)
Water Change out Day
36 Gallons in
CalMag = .5Mil/Gal = 18Mil
FloraMicro = 4.2Mil/Gal = 151Mil
FloraGrow = 3.8Mil/Gal = 137Mil
FloraBloom = 3.0Mil/Gal = 108Mil
PH DOWN = 1.72Mil/Gal = 62Mil
PPM = 546
PH = 5.88
This Grow has definitely been an interesting grow I have been playing with Over or Under since the beginning and it all started with me drowning the plants by adding too much water. I will have to make sure I watch that on all my future grows. I prayerful that this week will get me fully back on track, in my previous grows using my chart, I haven't had any issues during this week, so again prayerful that this is the week I am back on point.
3/5/2023
Week 3- Day 2 of Veg (Day 32 overall)
ROOT ROT!!!
I guess from when I drowned it I caused a lurking issue that really showed it's head today. The roots were looking not slightly bleached but looking black. I cut out what looked dead and I had to run to the local Hydro shop to pick up some items to see if I can fix it and strengthen the plants.
I picked up Mammoth Silica, ORCA, and ROOT Drip.
I completely drained the system and started it over today as well.
38 Gallons In
Mammoth Silica = .5Mil/Gal = 19Mil
CalMag= .5Mil/Gal = 19Mil
Root Drip = 1Mil/Gal = 38Mil
FloraMicro = 4.2Mil/Gal = 160Mil
FloraGro = 3.8Mil/Gal = 144Mil
FloraBloom = 3.0Mil/Gal = 114Mil
Orca = .5Mil/Gal = 19Mil
PH Down 60 Mil = PH 5.83
I also had to run by Staples I realized the paper I was using wasn't the right brightness and Lbs for the Photon App. What I needed to have 22Lbs 98 Bright. I recently saw a comparison of the different weight papers against a several hundred dollar Apage PPFD detector and with the right paper it was almost exact readings. With that my PPFD 355.
3/6/2023
Week 3- Day 3 of Veg (Day 33 overall)
Still alive!! #2 and #3 are still alive and it looks like no further damage to any of the leaves.
#2 needed 1 node topped. I will keep monitoring day to day.
3/7/2023
Week 3- Day 3 of Veg (Day 34 overall)
Well Both appear to be doing all right. I cut off the offensive leaves from #3 nothing new on shown on the leaves. I actually needed to top 1 node on #2. PH is stable, Temps are stable.. I will be changing out the water and Nutes on Saturday not waiting the 2 weeks.
3/8/2023
Week 3- Day 4 of Veg (Day 35 overall)
Well Both appear to be doing all right. I actually needed to top 1 node on #3 and 2 on #2. PH is stable, Temps are stable.. I will be changing out the water and Nutes on Saturday not waiting the 2 weeks. I think the additives are truly making a difference I think I will be adding them to all my grows from here on out.
3/9/2023
Week 3- Day 5 of Veg (Day 36 overall)
Both still appear to be on the mend Still some dark brown on a small part of the roots and I don't know if those are just dead but it doesn't look like it is spreading and I see a bunch of new roots forming. Nothing new on the leaves at all. So I think the trio that I added is helping. The plants also seem to be in raised happy position going towards the light. I still plan to change the water on Saturday and go from there.
3/10/2023
Week 3- Day 6 of Veg (Day 37 overall)
Moved the light up to 41 1/2" so 3' 4 1/2" away from the top of the Plants.
PPFD= 363
Power on my Light =62.5
Water Temp is holding steady=70.3
PPM= 534
PH= 5.92
Tent Temp= 72.5
Humidity= 50-60% I have 2 humidifiers running on INK Bird controllers monitoring it 24/7.
I will be changing out the water tomorrow even though I could let it go an extra week but I am still concerned that the Root Rot is clearing up and I don't want to risk it coming back. I want fresh Nutes/ water in the tanks.
I topped 2 nodes on #3
I topped 3 Nodes on #2
I also cleaned out some of the bottom third portion that isn't getting much light and not much growth at all.
#2: 8 1/2" tall, 18" Wide
#3: 7 1/2" Tall, 15" Wide

Likes
13
Share


@Budassgrower7
Follow
Is day 38 for this girl and I took two other leaves from her I think she is starting to make the change of stage but also is recovering from the cuts, hope she can stretch good🙏🏻🌱💚
Is day 42 I took 2 leaves more to give more ligth, and I'm hoping she take it well , she is changing stage and I hope she can stretch tomorrow im giving some flowering nutrition, she have this weird but cool shape I love it , however she looks stressed, let's see how she does 🙏🏻🌱💚
Likes
2
Share


@Cupboardgrowuk
Follow
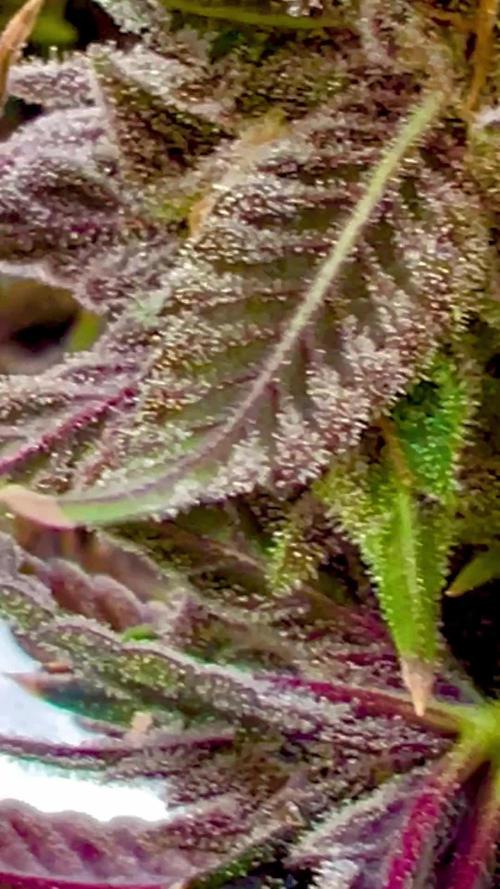
Be happy get couple ounce off blueberryz she really stinks, very fruity and starting to get frosty. Limoncello looking amazing caked in trichs strong lemon and pine smell. Bud seem to get fatter and each time I look at her which is often she's a sexy plant.
Likes
42
Share


@Jack_Error
Follow
Hi everyone, we are in the last time of this cicle, i drop only water and waiting the trycomes white, we are ready for ✂️.
Patience is the key 🙏


Likes
22
Share

@RDWCGrowing
Follow
12/25/2023-Germination Day 1
Merry X-mas 2023 I decided to start a run of SolFIre Gardens Hoodz Candyz S1. I am going to do a cup filled with RO water a touch of Hydrogen peroxide and let it sit for 24-48 hours until I see tap root then I am going to put it into a rapid rooter.. Tap root Down and put it about 1/4 of the say down the Rapid rooter.
I made some modifications to my basket on this run.. I have taken a few Pods that I use for my cloning machine and decided that I am going to try and use them as sure plants, so that I can take my water right up to the bottom of the basket this time and see if these can make my planting more consistent.
12/26/2023-Germination Day 2
Tap root achieved Planting Commencing
12/27/2023-Germination Day 3
Misted the dome lightly misted the rapid rooter and added a little water to the bottom of the pan to encourage root growth to the pan.
12/28/2023-Germination Day 4
Ground Hogs day
12/29/2023- Germination Day 5
She is up, she has broken surface, I misted the root riot, and around the bottom of the tray to try and entice root growth down rapidly.
12/31/2023- Germination Day 6
Ground Hogs Day
1/1/2024-Germination Day 7
HAPPY NEW YEARS!!.. I did it I planned it out so my planting day would fall on New Years and it worked.. Yay!!!
1/2/2024- Germination Day 8
Since the roots are not to the water yet, I am pouring one cup of water lightly on the hydroton around the lady to try and encourage root growth down to the water..
1/3/2024- Germination Day 9
Ground Hogs day, will continue until roots hit the water.
1/4/2024- Germination Day 10
Ground Hogs day, will continue until roots hit the water. I will just continue to top feed until roots are in the water.. Shouldn't be more than a few more days.
1/5/2024- Germination Day 11
Ground Hogs day, will continue until roots hit the water. I am going to change the water Sunday and kick off Week 1, I will just continue to top feed until roots are in the water.. Shouldn't be more than a few more days.
1/6/2024- Germination Day 12
Ground Hogs day, will continue until roots hit the water. I will just continue to top feed until roots are in the water.. Shouldn't be more than a few more days.
1/6/2024- Germination Day 13
Ground Hogs day, will continue until roots hit the water.
1/7/2024- Germination Day 14
Ground Hogs day, will continue until roots hit the water.

Likes
17
Share


@Buddyhighs
Follow
Day 5 of Starting my biggest grow yet.
All seed are from fast buds and are prizes from nov 22 newbie of the month.
Iam starting this grow now as I have worked my way to getting a setup I am happy with.
Will try to keep a detailed run at this dairy.
Iam Biobizz light mix substrate in 12L root nurse fabric pots under two mars hydro ts1000s running at 25%. Average temp 20c and humidity 80% this week.
Got three healthy seedling my Cherry cola don’t look to good I will germinate a seed along side her this week and see how we go.
Let’s get this work 💪🏽💪🏽💪🏽