
Likes
Comments
Share


Likes
16
Share


@DrShotzUK
Follow
Sugarlato really starting to come on well now.. small compact plant only around 50cm in height so far in 15 litre pot.
Looking like its flowers will be nice.
All round the best out of the 3 strains in the tent. Smell is moderate right now but filter is on inside the grow tent.
Updates will be coming again in a few days
DRSHOTZUK

Likes
12
Share


@Learntogrow818
Follow
Going into flower like now I think..🤔 Lol, yes it’s flower time already.🤭

Likes
11
Share


@Joshaee94
Follow
Heaps of growth this week loving the feed,I’m gonna veg her for atleast another week or 2 to get her bigger.


Likes
43
Share


@sleeve
Follow
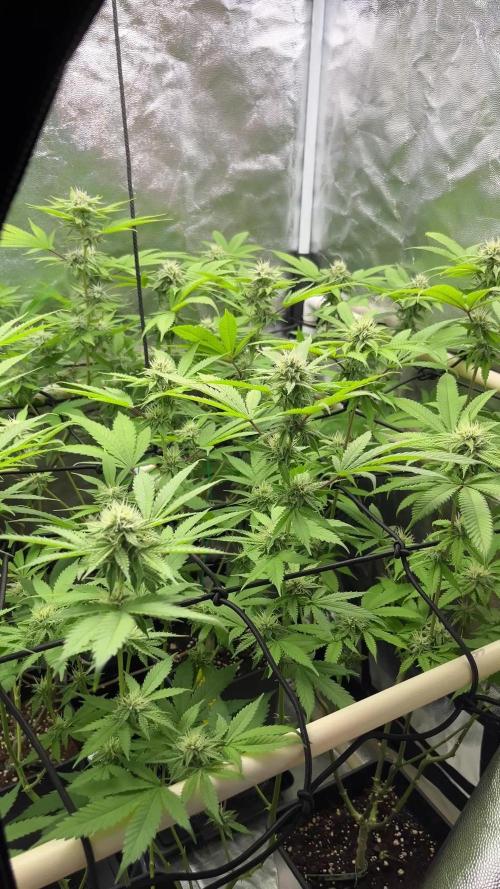
Week 2 of flower.
Transitioned into flowering nutes of the General Organics GO Box line as second week starts.
Stretching an inch to 2 inches a day right now.

Likes
17
Share


@MadeInGermany
Follow
Hey guys :-)
She is growing great and will be ready for the flowering tent in the coming days :-)
A few cuttings are taken beforehand.
Was poured 2 times with 1 l each.
I'm looking forward to the start of flowering :-)
have fun and stay healthy 🙏🏻
👇🏼👇🏼👇🏼👇🏼👇🏼👇🏼👇🏼👇🏼👇🏼👇🏼👇🏼👇🏼
You can buy this Nutrients at :
https://shop.greenhousefeeding.com/us/
👇🏼👇🏼👇🏼👇🏼👇🏼👇🏼👇🏼👇🏼👇🏼👇🏼👇🏼👇🏼
You can buy this strain at :
https://www.amsterdamgenetics.com/product/skyrocket-feminized-cannabis-seeds/
Water 💧 💧💧
Osmosis water mixed with normal water (24 hours stale that the chlorine evaporates) to 0.2 EC. Add Cal / Mag to 0.4 Ec Ph with Organic Ph - to 5.8 - 6.4
MadeInGermany

Likes
1
Share


@BruWeed
Follow
08/05 - Comenzo su primera semana en etapa de floración.
Se encuentra perfecta, sin ningún problema
Ya esta con 12/12 y su aroma se siente.
Las chalas estan perfectas.
La luz la aumente un poco mas ya que entro en flora pero se encuentra al 100%.
Crecio bastante la ultima semana, mas que nada en altura.
En estos dias estare publicando mas imagenes de como viene.


Likes
16
Share


@CanarianGrow92
Follow
The sugar Bombs are recovered from the topping last week, we will cut the next top also when they are a bit taller, we also provided some synergy mycorrhizae and some iguana grow. At the moment they are nice and green, the expectations are to flower in around 2-3 weeks

Likes
8
Share


@Kindbudz
Follow
Took 2 clones from my sunset sherbet this week towards the end of the week. There continues to be explosive growth with this plant. I plan on switching to flower in a month or so and we will find out how she really performs.

Likes
226
Share


@Kitties_and_Colas
Follow
~_~_~_~_~_~_~_~_~_~_~_~_~_~_~_~_~_~_~_~_~_~_~_~_~_~_~_~_~_~_~_~_~_~_~_~_~_~_~_~_~_~_~_~_~_~_~_~_~_~_~_~_~_~_~_~_~_~_~_~_~_~_~_~_~_~_~_~_~_~_~_~_~_~_~_~_~_~_~_~_~_~_~
9/18/21
😺 Week 4 of flower!! Everyone is looking pretty good but the mainlined plant seems to be locking out calcium again (and they're clawing slightly, this is on me, I was pushing it lol)..its early but we've increased calcium supplements by 3ml, cut all grow solutions and PK feeds consistent ..we'll update on this again midweek.. thanks for reading grow family and happy harvests!💡🌱 😽💨
Week 4 on YouTube:
https://m.youtube.com/watch?v=EL-n5MUawFY
~_~_~_~_~_~_~_~_~_~_~_~_~_~_~_~_~_~_~_~_~_~_~_~_~_~_~_~_~_~_~_~_~_~_~_~_~_~_~_~_~_~_~_~_~_~_~_~_~_~_~_~_~_~_~_~_~_~_~_~_~_~_~_~_~_~_~_~_~_~_~_~_~_~_~_~_~_~_~_~_~_~_~

Likes
9
Share


@Skybase
Follow
First days we recover from to much water and food....
3 day of no water , got to give them some ph neutraal water
Day 4 of week 4 gave them 0,5 liter of water incl some terra
Likes
2
Share


@TheWeedPimp
Follow
Has been working in the other end of the country for the last 2 weeks
Then I come home to the girl! Really booming! Flower everywhere 😍
Just support her today with some bamboo sticks
Really shitty weather windy as F
Likes
26
Share


@thomasgreen
Follow
I was very surprised at the remarkable growth of both plants.
Tree 1 gives me a clear view of the superiority of height compared to the previous week.
The copper buds clearly show the enormous size, I am trying to increase the amount of nutrition to promote the maximum growth in size and taste.

Likes
74
Share


@ThrashedTV_BakedByGlaze
Follow
Week 1 - 01/01 to 01/08 2021
HUGE THANKS TO @MARSHYDROLED and @VIPARSPECTRALED!
New surge protectors/heavy duty timers/the good cords.
The LSD-25 itself looks similar to my first run with a very slow growth compared to the other 3 strains i have going now. It is from the same tester kit so I am expecting a small plant overall but the new lights will definitely give me more overall bud.
I have all my seedlings under the P1500 from Vipar as my veg light for the first few weeks to a month. It's SO nice to not have a blurple anymore, the light is way better in my room and on the eyes. The new diodes had every single seedling grow more in 6 hours than it did in the first 7 days under the blurp LED, EVEN the LSD-25. It had no hight to it before the Vipar went in.
While the other 3 are doing better, the LSD is still going to be one of my favourites. I can't wait to smell that earthy/varnish/citrus.
I noticed a bit of spotting on the Dark Devil in my other diary so I added some Hydrogen Peroxide to the spray bottle and it cleared up. All four have been getting constant spritzing from the spray bottle to keep humidity up.
Have no doubt the new lights will make the plant/overall yield.
Thanks for stopping in! Throw down a like and/or follow so i can return the favour 🙌
--
Check out my Diary of the Year 2020 entry 🙏
https://growdiaries.com/diaries/54258-fastbuds-original-auto-sour-diesel-grow-journal-by-glazedgrow
IG: @GlazedGrow
CannaBuzz: @GlazedGrow
Likes
4
Share

@Jardin33ro
Follow
Buenas! Quiero contarles que tienen un terpeno distinto en cada ejemplar. Hay 2 que son tropicales, mas de la linea trop punch, similar a la piña 🍍. Otra es citrica pero no cualquier citrico, me recuerda al pomelo. Y otra que salio mas terpeno tangie, naranjita amarga. Todos son similares en aspecto, muy resinosos y tienen potencial!! Agregamos un ventilador extra en la parte baja para mejorar la circulacion y evitar microclimas. Un saludo Jardin33ro

Likes
9
Share


@jbirdstheword
Follow
Holy Moses! This girl is starting to pack on the weight and I couldn’t be more happy with how things are going. Unlike the blueberry, the hot weather did not affect this gal at all.
True indica genetics holding strong and now she’s packing and loading. Right now each main has started to basically develop into its own plant, structure wise.
I’ll be chopping her in multiple sessions. Taking the big mains first and letting light in to finish the rest off.
Right now the trichomes are 50/50 clear to cloudy. Hopefully the wind stays away the coming weeks because if she doubles up again I’ll be looking for support. ❤️
I was so happy with this plant that I had a friend clone her, and now we have a tent of these. Home stretch!

Likes
9
Share


@BLAZED
Follow
Week 1 (17-6 to 23-6)
17-6
Temps: 23.8 to 27.8 degrees
Humidity: 46% to 74%
Watering: #1: 73 ml. #2: 76 ml.
18-6
Temps: 24.4 to 28.1 degrees
Humidity: 56% to 75%
19-6
Temps: 23.1 to 26.9 degrees
Humidity: 53% to 69%
20-6
Temps: 23.4 to 27.7 degrees
Humidity: 46% to 73%
Watering: #1: 96 ml. #2: 93 ml.
21-6
Temps: 23.4 to 27.8 degrees
Humidity: 46% to 82%
22-6
Temps: 24.2 to 28.2 degrees
Humidity: 53% to 76%
23-6
Temps: 24.9 to 29.1 degrees
Humidity: 45% to 76%
Watering: #1: 108 ml. #2: 98 ml.
They seem happy and growing quite fast!