
Likes
Comments
Share


@Kannamar
Follow
06/04/23 Day 50
I'm quite happy despite the beginnings and doubts.
For sure I did well to not cut the unexpected plant that germinated within the clay and get out close to the normal place with her sibling!
08/04/2023 I begin to lower the EC to 1.3, 75% light. I started with GHE Ripen.


Likes
5
Share


@Gropadawan
Follow
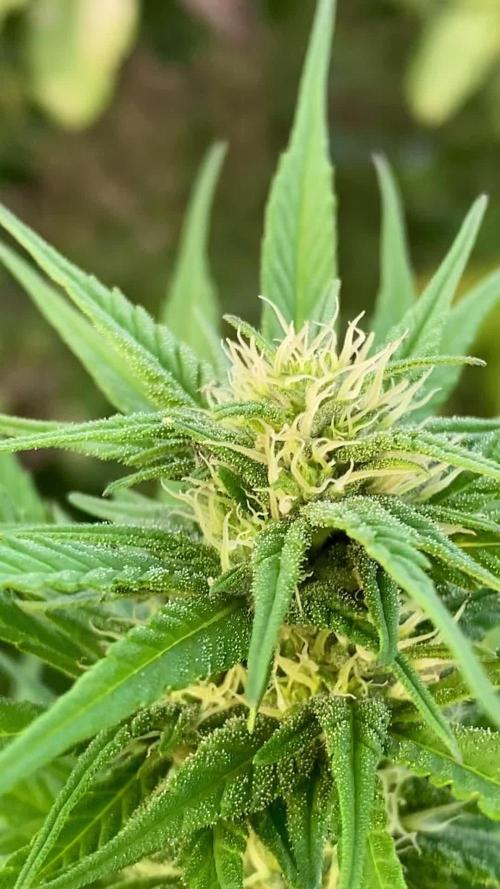
Day 46 of Flower, 93 since germination.
Starting to check the trichomes with my new wifi microscope. Looks like Lemon Extract has a scattering of amber trichome heads, but only in bud nearest the light. All other look milky and glassy. I'm thinking Lemon Extract might harvest in one week. The others, maybe two weeks.
Gave the ladies their last feeding today. Just PH balanced water from here til harvest.

Processing
Likes
2
Share


@Vet4weed
Follow
Taking it slow with the veg state to develop larger, stronger plants and it seems to be paying off. I've trimmed the lower leaves at least 3 times this week. I think I'm going to extend it out at least one more week before switching to flower state.
Early in the week I switched from blue to purple to allow the branches to push through the screen more. Then mid-week blue, to rebuild the fan leaves, then back to purple once I rearranged everyone into their optimal positions for capturing light. I see a lot of potential for multiple colas. Each time I switched to purple, I raised the light up a few inches to help them stretch. As noted last week, lamp distance is being measured from top of net (not top of plant).
I continue to add compost tea every Tuesday, which they love :-)

Likes
15
Share


@HighOhioAn
Follow
Growing for FastBuds420 has truly been an honor their genetics are truly Best in the world in my book strange our name beautifully mimicking the smells and appearances of their names. Pineapple express is one . They nailed the name right on the head. This plant truly smells just like a pineapple and almost looks like a pineapple once the fade starts one of the biggest autos I’ve ever grown truly thankful for the opportunity to grow this plant
FastBuds420. 4 Life 🌿💨💯

Likes
37
Share

@Comfrey
Follow
Dutch Passions Shaman
Beiden Schamaninnen geht es gut. Das Gießen klappt jetzt besser.
No. 1 im großen Topf bekommt alle drei bis vier Tage 10-12 Liter Regenwasser langsam über eine Stunde verteilt. Schamanin No. 2 im 17 Litertopf trinkt meistens an zwei Tagen knapp sechs Liter. Es ist feucht im Garten, der Taupunkt wurde regelmäßig unterschritten. So bleibt es wohl bis Ende nächster Woche.
Danke für‘s vorbeischauen. 🍅🥒🍇🥦

Likes
57
Share


@PEAKYPLANTERS
Follow
good evening to all, my friends
God only know what I spent to keep these gems up, but in cure a thing I swallowed another!
The too much warmth in tent has arisen a reaction of strong stress in the plant by transforming their peaks from the shape of fox's tail.
This happens in some cases when the temperature is very high in a tent and makes it believe the plant that is still full summer making it bloom and vegetate at the same time


Likes
25
Share


@DeepRootsGrowTrees
Follow
FAT BANANA 🍌 AUTO / RQS
This week she was harvested she was easy to grow from seed to harvest really no issues with this strain her buds are covered in trichomes with red hairs and smell great 👍 she's a strain you want to keep in the rotation 😉 if you like banana strains!! Stay Growing!!
Thank you for stopping by and taking a look during this grow it's really appreciated!!
Thank you ROYAL QUEEN SEEDS!!
RQS / FAT BANANA 🍌 AUTO

Likes
Comments
Share


@Batista
Follow
We are a couple who decided to plant cannabis for the first time during the covid-19 quarantine, and it helped us get through it, during and after grow =]
Before deciding to plant, we studied a lot and saw many diaries here, so we didn't have many surprises during the cycle, also because we were able to see, compare and know what to expect from our plant. It was really cool to see the result of what we had studied happening in practice, we learned a lot from Grow Diaries.
Definitely we will do a lot of different things next time, but overall we were satisfied to be able to smoke our own weed.
Grow diaries helped and motivated us a lot, both to learn new things and to organize and register our grow.
Our intention is to continue growing and sharing our experience here.
Weed love you to leave comments and tips in our diary, it helps us to learn and improve more and more. Thanks and see you all next grow! 👽😜👌
Likes
24
Share


@TerpTurtle
Follow
Week 7 flower | Pushed light intensity on these
Think about it, you're pounding on the fault line
What'll it take to get it through to you, precious?


Processing
Likes
17
Share


@greennug
Follow
shortest plant is 50cm tallest being 95cm. They are all doing wonderfully, most of autos are budding nicely and all of the photoperiods are ready to flower. looking very promising. i am changing my light schedule to 14-10 to kick these girls into flower.. this will give the plants an extra 17% (or so) a day under the lights.rather than 12-12. i cant be fussy as i only have one grow space but if my research is correct these should grow beautifully! the autos are well ahead so shouldnt affect my harvest weight too much. like i say i cant be fussy! thanks for looking

Likes
16
Share


@DoDrugs420
Follow
Mind-expanding and pleasure-inducing, Hypno Seeds presents its autoflowering version of the famous Amnesia Haze, Hazenberg AM Auto. For lovers of Sativa, this quick-growing autoflower cannabis strain will definitely be a big hit. With its incredible earthy flavors and delightfully euphoric effects, like a cannabis mantra, this strain will have you saying its name over and over again.
Tech Specs
THC 16%-21%
CBD 0.40%
Flavor Cinnamon, Lime Tree, Patchouli, Sandalwood, Walnut
Type 25% Indica / 75% Sativa
Flowering 8-9 Weeks From Germination
Height 70-130 Cm
Effect Corporal, Energy, Extra Sensual, Happy, Sociable
Genetics Amnesia Haze X Autoflowering
---------------------------------------------------------------------------------------------------------------
Grow Sponsored by MARSHYDRO
HIGH EFFICIENCY WHITE LED LIGHT: Newest SMD LED technology provide highest PAR/LUMEN output(743umol@18"), designed to replace a single-ended 250watt HPS; MARS HYDRO TS 1000W Plants Growing lamp makes you get 30% higher yield compare OLD blurple led lights, Max 2.0g yield per wattage (power draw)
LOW ENERGY CONSUMPTION GROW LIGHTING : Consuming only 150W with 342 LEDS! It saves up to 50% energy than other led grow lights. Perfect for 2.5x2.5ft,Max coverage 3x3ft. Over 90% light energy can be absorbed by plants; higher intensity and more even coverage in a MARS HYDRO grow tent, reflective area, or by crossing over using multiple TS1000
SUNLIKE FULL SPECTRUM LED INDOOR GROWING: 660-665nm Red IR/3200-4200Knm/5200-6800Knm, infinite close to natural light, best for all plants all stages growing, rapid plant response from seed to flower and increase yield & crop quality
HIGH REFLECTIVE & NOISE FREE-Fanless LED GROW SYSTEM design will make your growing life easy and quiet, quickly heat dispersing material aluminum reducing light lost to aisles and walls, increase the light intensity up to 20%, allowing your plants receive more energy and without burning your plants for maximum headroom
Get your own at https://www.amazon.de/dp/B07ZVFBR34

Likes
12
Share


@Kakui
Follow
Estuve un tiempo sin actualizar el diario porque me contagie de COVID, ahora un poco mejor vuelvo a actualizar.
Flower14, las plantas crecen bien, se cambió el LED de 480w por 3 LED de 240w, para un total de 720w y mejor distribución de la luz.


Likes
8
Share


@Dendegrow
Follow
👹 MonsterMarker – Week 7 | Flowering Start 🌸
This one is a real beast! 🚀 The roots are the most explosive of all my plants – absolutely insane growth underground 🌱. On top, she’s very stocky and strong, which makes me think there’s a lot of Indica genetics in her 🍃💪.
The smell is already super nice – deep, rich, and very promising 🌿💨. She feels like she’s building the foundation for some serious flowers.
Can’t wait to see how this monster evolves – follow along, it’s going to be fun 👹🔥.
---
👹 MonsterMarker – Woche 7 | Blütebeginn 🌸
Das hier ist echt ein Biest! 🚀 Die Wurzeln sind von allen Pflanzen am krassesten gewachsen – richtig verrücktes Wachstum unter der Erde 🌱. Oben ist sie dagegen sehr stämmig und kompakt, was stark nach einem hohen Indica-Anteil aussieht 🍃💪.
Der Geruch ist schon jetzt richtig gut – tief, reichhaltig und sehr vielversprechend 🌿💨. Man merkt, dass sie gerade die Basis für dicke Blüten aufbaut.
Bin gespannt, wie sich dieses Monster entwickelt – bleibt dran, das wird spannend 👹🔥.
Likes
20
Share


@DrGanj
Follow
budding up nicely now. One pheno looks to be growing different bud formations and is much more frosty. O stupidly didn't take a cut of this in veg so I've taken a flower cut to reveg and try monstercropping.

Likes
51
Share


@kansasscott725
Follow
Might get rid of GSC and just make more room for Trainwreck and G13 to spread.
Going to do heavy defoliation for the first time tomorrow stripping everything underneath 2nd scrog and in between bud sites. Nervous it's going to really shock the plants but hopefully a handwatered feeding tomorrow helps keep it on track.
Week Three of Flower... Baby Jesus, please give me the energy to continue watering twice a day for the next six weeks 🙏
Day 60 Update: Still some trimming to go but finally pulled the cord on GSC. Wish I had a while ago so the other plants could stretch more proper. Placed a riser under the Banana to even out the height. Going to tie down any tall sites and see if I can trigger a nice long cola down the scrog. G13 already has one forming nicely.
If it withstands all that trimming with little to no shock, I will be impressed for sure.

Likes
5
Share

@JeyGanesha
Follow
questa frostbanger auto dopo uno stress iniziali si è ripresa super bene.......