
Likes
Comments
Share


@DaGrowQueen
Follow
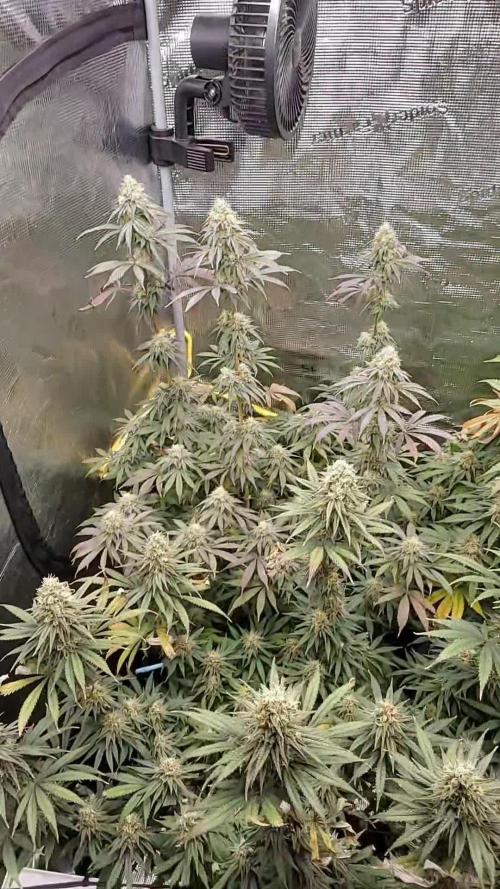
This past week I've been removing a couple of leaves here and there from each of the plants to expose some of the buds to more light, never more than two or three at a time. I upped the amount of Tiger Bloom once again and in another week or so I'm going to add my other LED light to the tent so I can really take these girls to the limit and get a nice yield. The smell as well as the trichome production continues to get stronger.

Processing
Likes
27
Share


@Fibro_Witch
Follow
Everyone got transplanted yesterday! They've been hardening off outside for almost a week. The got some Fish Emulsion a couple days ago. One night it got down to 38F, even though the weather said it would only get down to 50F! So I'm very grateful that they're so resilient.
They're not showing much transplant stress so that's good. I watered in some lime when i transplanted. I put them in with my tomatoes that I need to stake. I started putting down seaweed mulch which hopefully I will finish tomorrow.
Overall a good week and it feels good to have them in the ground!


Likes
13
Share


@Robeeriegenetics
Follow
I went ahead and transferred this week I also decided to start up my out door project things are looking good clones are Adapting well to new systems
Likes
92
Share

@squalino
Follow
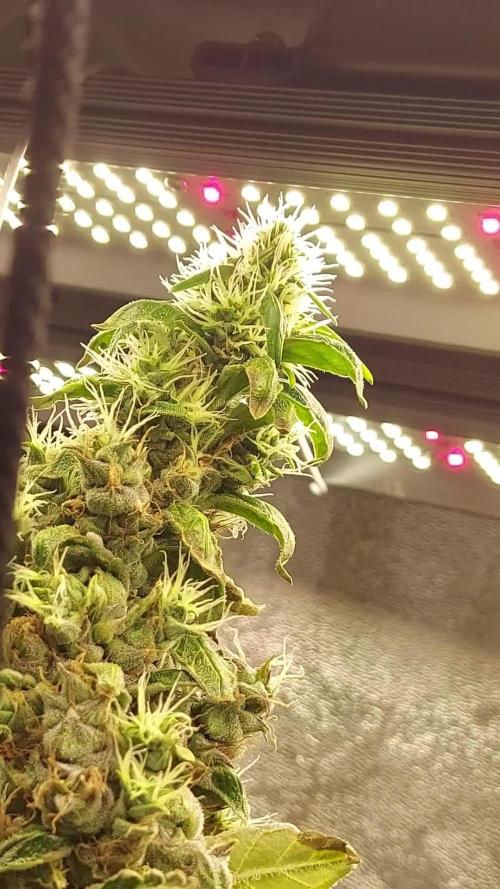
🌿 Journal de Culture : Mac 1 – "Spirit" (Plante #2) – Compte à Rebours Lancé
#Dryrocket
Date du jour : 29/06/2026
Âge de la plante : J+79 (Semaine 12)
Taille actuelle : 136 cm
Évolution :
L'Alien déploie ses tentacules 👽
C’est un grand jour dans le cycle de Spirit. La ligne d'arrivée est officiellement en vue, et la plante continue de muter pour devenir quelque chose d'absolument spectaculaire.
Nutrition & Fin de Cycle (Aujourd'hui)
Dernier repas : Aujourd’hui marque le tout dernier apport en Bio PK 5-8 de Biotabs. C'est le clap de fin pour les nutriments !
Objectif Récolte : Le compte à rebours est officiellement déclenché : elle sera coupée dans exactement 14 jours.
Le rinçage final : À partir de maintenant, c'est diète complète. Place à l'eau claire via l'Autopot pour lui permettre de puiser dans ses dernières réserves, de nettoyer ses tissus et d'exprimer son plein potentiel gustatif.
👽 Morphologie Terrestre... ou Extraterrestre ?
Des têtes hors normes :
Les fleurs sont devenues gigantesques et débordent d'une quantité impressionnante de trichomes scintillants. J'ai tellement hâte de la récolter pour voir à quoi elle ressemble vraiment une fois manucurée !
L'effet tentacules 🦑 :
C'est la signature visuelle de cette fin de session. Sous l'effet combiné de la chaleur estivale et de la proximité de la lumière intense, Spirit ne fait plus de simples "queues de renard" (foxtails). Comme on peut le voir en gros plan .les calices s'empilent et s'étirent vers le panneau LED en formant de véritables tentacules de résine. C'est le look alien poussé à son paroxysme !
Sénescence amorcée :
Le feuillage commence doucement à se teinter de nuances d'automne .. C'est le signal parfait que la plante reçoit le message et se prépare pour la fin.
⚙️ Rappel Environnemental
Substrat : Géré automatiquement par le système Autopot qui va maintenant assurer la phase de rinçage à l'eau pure.
Climat : Malgré la chaleur qui pousse les sommités à s'étirer en tentacules, la ventilation et l'extraction tournent au maximum pour maintenir l'espace sain et éviter tout problème d'humidité stagnante au cœur de ces buds massifs.
🙏 Remerciements
Un immense merci à @mia_biotabs et à @Mrs_Larimar pour ce programme de nutrition qui aura nourri ce monstre jusqu'au bout. Et un grand clin d'œil à @Dryrocket : le déshydrateur aarive aujourd'hui normalement et sera prêt, le compte à rebours de 14 jours est lancé, et j'espère que mes stocks de silice tiendront le coup face au volume impressionnant qui s'annonce !
Dernière ligne droite pour l'Alien... Le rinçage commence !

Likes
76
Share


@Canna96
Follow
Hey now, this week went pretty good, the buds are about done bulking up, and just waiting on the trichomes, I was really hoping she would be about ready, but I think she needs another week to week and a half total. The buds are rock hard, and super sticky. I have no clue what she will yield because the colas are not that thick, but there are definitely alot of them. I plan to squeeze her into rosin, and hopefully I can break the 25% mark for the first time with her, but we will see. Thanks for stopping by, I hope you enjoy the videos, Happy Memorial Day Family, Stay Safe and Blaze On!!!

Likes
74
Share


@TheFoxFarmer
Follow
Week 8 Flower
Flush flush flush 💦💦
Fading and fattening up, she's looking very frosty and smelling as beaut as ever. I like to pluck a few of her biggest, greenest leaves throughout flush as it'll speed up her fade and flush her quicker by taking away stored nutrients.
Looking forward to watching her fade!
Thanks for following and happy growing! 🐺

Likes
3
Share


@Fergie
Follow
Hey guys so here is my blue cheese mutant starting to beef right out ww . some pure dank smells coming from her am super phyced to taste this girl .

Likes
33
Share


@WeedTheNorth
Follow
Week 19
Canuk Seeds
Sweet Tooth Auto
180 watt LED
Coco
Flushy flushy!!
🇨🇦🤗🌴👌👍🙏👊

Likes
3
Share


@julian100614
Follow
Su primera semana de floración ha comenzado 🙌😎💪
Empieza a sacar sus rimeros brotes y pistilos y la planta se ve muy sana 🔥🍀
Empezamos a aplicar los primeros nutrientes de floracion y bajamos los de vegetación para que tenga un camio progresivo y no se estrese.
Estamos doblando la punta para sacar nuevos brotes aplicando la malla y un lst 👌

Likes
35
Share


@DudeGrowsWeed
Follow
Overall everything is doing great. The Cream & Cheese CBD+ has medium trichome coverage and medium density. But she is the bushiest with the most amount of sugar leaves down the stalks with the buds. I think I'm about a month away from harvest. I'm not going to rush it, but that's what my guess is for now.
Fed MegaCrop and CalMag this week as well as just straight water.

Likes
10
Share


@GERGrowDesigns
Follow
Welcome to Flower Week 3 of Sensi Seeds Mandarine Jam
I'm excited to share my grow journey with you from my
Sensi Seeds Project . It's going to be an incredible ride, full of learning, growing, and connecting with fellow growers from all around the world!
For this Project , I’ve chosen the Feminized Photo Strain Mandarine Jam:
Here’s what I’m working with:
• 🌱 Tent: 120x60x80
• 🧑🌾 Breeder Company: Sensi Seeds
• 💧Strain Info : 20-23%
• ⏳ Flowering Time: 7-8weeks

Likes
8
Share


Likes
7
Share


@RosQuare
Follow
Some light mania has me itching for projects. I have tiny pots, a bunch of free seeds and no space. Could I grow them by the window under a desk lamp? I might be able to tuck them into the tent if they actually grow for me. I want to try out some LST for cute bonsai-style trees. I’m not confident that I will have much success but this is purely a learning experiment. Let’s see how much I can abuse these autos 😅
- Sept 22 AM: Popped 3 Cookie Dog autoflower seeds into a glass of bottled spring water for a pre-soak of 14 hours.
- Sept 22 PM: Put the seeds into folded paper towel, ceramic plate, more bottled spring water, uncovered in warm room.
- Sept 23 AM: One seed has started to pop after only 10 hours!
- Sept 23 PM: The seeds have all cracked but haven’t grown tap roots yet. I planted the 3 seeds into various small pots to finish germinating in seeding mix instead so I would stop checking on them in the paper 🙃
- Sept 24: nothing happening above ground. They are in the tent with lights 24/0 so I covered them with larger pots to give some darkness. Placed pots on a heating mat.
- Sept 25 AM: the 2 seeds in the smallest pots have emerged! The were touching the plastic wrap when I checked on them so I hope they are ok.
- Sept 27 PM: 1st seedling doing good, 2nd seedling still has her seed leaves closed so I’m misting her, and 3rd.. I accidentally flipped her pot over. She’s gone.
First Impressions:
Seeds germinated in soil after 36 hours, 72 hours from when I first left them to pre-soak and let the seeds crack in paper towel 24 hours.. that was 24-48 hours faster than the other test groups that used paper towel method until tap root formed and waiting for the germinated seed to emerge.. I might skip waiting for a tap root in paper towel going forward but I do like knowing the seed is viable before putting in soil so I know if it doesn’t grow it was something I did wrong.
End of week thoughts..
Well.. I fucked around with these seeds too much, exposed the roots to light, let them almost dry out, dropped them, had the temps too low, the heating mat too hot, kicked out over.. 😅😅 I didn’t really give them a chance and yet still somehow I got 2 contenders in pint sized pots 🤷♀️the experiment continues..
Likes
6
Share


@Dennisgut
Follow
7.1 weeks
The weather is great now, much sun. The plants need bit more water, they love it.
Stay in tune
27.06.24
7.8 weeks now. The middle one don't grow in height anymore, the buds getting bigger. The right one get now the tallest, 70 cm right now.from yesterday to today just 5 cm in height grow! The left one now are in flower stage... Looking good.
Likes
13
Share

@Aircoholic
Follow
After 15 weeks, her time has come. She had a good life, despite some rusty obstacles that kept her on the smaller side, but her buds look awesome and smell great!

Likes
12
Share


@gr3g4l
Follow
esta semana es su última semana de crecimiento a 18/06h.
Por lo que parece las plantas después de la última poda dejaron de crecer a lo alto tal como lo venian haciendo y se han dedicado más a crecer a lo ancho tal como queriamos.
A mitad de semana a los 31 dias volví a podar algunas hojas de la parte superior del tallo que ya habian crecido lo suficiente. De esta manera miro de seguir retardando el crecimiento del apical y reforzar el resto de ramas.
Y me deshice también del primer par de nudos de todas las plantas.
también se ha seguido con el tratamiento con solabiol como preventivo ,
Dia 33 se quitaron los calefactores porque ya estan subiendo las temperaturas en el exterior y se añadió un par de ventiladores laterales. Aprobeché también para poner los tutores antes de que crezcan mucho más y así dejarlo preparado para la floración.
Dia 34, un dia antes de final de semana cambio de fotoperiodo a 12/12h. El tamaño de las plantas y los 9 dias que llevan en estas macetas me parecieron suficientes y es que el armario es pequeñito y no puedo abusar.
Likes
4
Share


@DonSchmoekern88
Follow
Mehr Super Cropping
Pflanze für den Umzug in ihr Blüte Zelt vorbereiten 1x1 m

Likes
57
Share


@SmokieMcPot
Follow
2 Girls 1 Cup week 8 is it?? Looks like GC is on week 4 still 🤣.
Day 49- big defol on GC tonight, mild prune on the right side also. Few strategic plucks on WG to help share the light evenly. My fingers are sticky asf and STINK like lemon/lime and gas. Changed RES yesterday, modified week 3 GHE bloom medium feed. Breakdown as follows:
5 gal tap/RO
20mL calmag
Micro - 26.5mL
Grow - 26.5mL
Bloom - 41mL
RES totals after PH corrections - 1148 @ 5.63
======================================================================================================================
Day 50- where to start.... fuck.. well, i was wondering if my TDS was accurate or not. never checked it against another meter until today... and lets just say its been OFF the whole damn time!! i tested it against two other meters. one cheapo from amazon, and one from a zero water pitcher. TDS reading from each in order from current>amazon>zerowater.. 930, 642, 616. checked online and they are all on the 500 scale. so i dialed the "current" meter back to 616 to match the brand new zero water meter. never really trusted the cheapo amazon one TBH.. went ahead and topped off with 1.5L and gave them a 1/1/2 mL shot of M/G/B to boost the RES numbers a bit. currently sitting at 662 @ 5.84. so i guess GHE calculations havent been anywhere near the ballpark like i thought. maybe they were using the same damn meter i have currently, set EXACTLY as far off as mine was from factory 🤣. IDKWTF happened there, but its a good thing i started light and worked up following their signs. even though the meter was off, it was still giving me information that was useable. should have left it where it was, but my OCD would haunt me until it was adjusted. plucked a few on WG tonight and left my fingers sticky and stinky. GC keeps stretching, refusing to hit full flower still.. Sorry Herbies, i know you all exaggerate the finish times... but come on now lol... theres no way this one would finish in the time they state online.. FastBuds Wedding Glue on the other hand... she may be short, but shes STOCKY. she'll just get fatter too. who knew i liked fat chicks??
======================================================================================================================
Day 51- few plucks here and there on WG. have to be careful now because these leaves are what's going to last the next few weeks. Can't take too many, can't leave it closed up. Since I won't be able to flush, i may do a multi harvest on WG and give GC a lil more time to hurry TF up and do her thing. I hate waisting... anticipation is building for the end. Not only to see these girls come to a finish.. but to set up the new system "correctly". Using things learned in this experiment.
======================================================================================================================
Day 53- not much to report other than the typical random strategic plucks on WG and more abuse to GC. been adding a booster to the RES every other top off. Ends up being once a day. One top off calmag'd water, one calmag'd water with a 0/1/2mL (M/G/B) per L added. Gave em a .5mL bump of M today since I've only been boosting it with G & B for the last 2 days.
*edit* my dumbass forgot to set timelapse interval from 3sec to 45sec and the vid is 1.8gb long.. going to just skip today's footage.
======================================================================================================================
Day 55- GC is trying to catch up from the looks of it. It's like 3 weeks behind schedule 🤣🤣. Was going to defol the shit out of it again, but may leave it for another day or two. Once it takes WG's sun, it's getting snipped again. Forgot to mention more GC abuse from yesterday, or the day before. Didnt take a pic so I'm leaving it up to my memory. kinda accidently, purposely, tripped and precisely stabbed the main with some pointy tweezers... about half way in, and may have accidently twisted a bit before and while pulling it out... oops.. what's a lil more stress on GC right?? Maybe I'll have to trip every so many days and see if it has a positive effect 🤣. Will try and snap a pic of GC main at some point.
======================================================================================================================
As always, thanks for stopping by and checking out my current grow experiment. Check back to see when I mess it up 🤣
check out the up to date timelapse from day 27 on @ https://www.youtube.com/watch?v=YZxJgAYve2s