
Likes
Comments
Share


@Herbangardener671
Follow
This site help keep my growing info. I enjoy viewing and hearing from all the other growers and breeders.

Likes
7
Share


@Trinidad
Follow
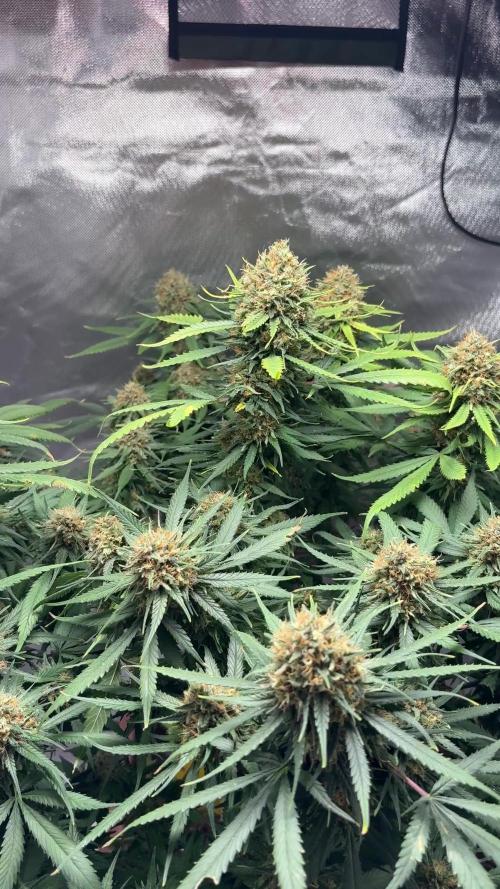
Day 67. Today I will be harvesting as I am out of space and other plant have out grown there tent. The mixture of smell as you open the tent is like a kid in adolescent without deodorant, just dank. When you smell them individually the purple haze is a really sweet and fruity smell. As for the ztrawberriez it's difficult to put my finger on it but it have fruits and citrus.


Likes
2
Share

@HUUDUUH
Follow
YEAWHH… sooo.. she is back!!
I havent post since weeks, but here we are!
8 weeks of flowering and a fiew days more
and she is ready. So beautiful, so strong.
The kit of Organo Lab helped a lot!!
(Fuel + Bokashi + Ocean Mix)
So happy with this plant, she is stunning!!
So excited to taste it. The buds are huge, hard and smells just great. :)
I think she is gonna give me something around 80 grams of dry herb. I come back here to tell

Processing
Likes
15
Share


@eldruida_lamota
Follow
Que hay de nuevo familia, os traigo la actualización de la semana de nuestras crazy cookies, increíble el tamaño que están alcanzando los centrales, hay que tener bastante cuidado con los nutrientes, si te pasas un poco te lo harán saber.
Tienen un olor bastante peculiar, estas últimas semanas desarrollará todos sus terpenos.
Ph seguimos controlándolo alrededor de 6.5 temperatura algo elevará y humedad perfecta por debajo de los 40%.
No creo que tarden mucho en estar siguen engordando y formando esas flores, la semana que viene veremos cómo avanzan fumetillas.


Likes
145
Share


@biggreens420
Follow
Going into flush this week for 2 week ph6 water with terpinator trichs are nice and cloudy hairs are less visible I think shes ready what do you guys think? a good week could do with a bit more swell buds are nice and dense pungent and extremely sticky frost is unreal looking forward to getting this girl down thanks for reading happy growing guys..

Likes
7
Share


@Salgeezi
Follow
Well they germinated in record time for me..48 hours all 4 seeds. Medium is 50/50 coco/perlite. I watered the pots a day before planting. 250Ec. Been watering when pots feel light till runoff. Heat pad I had seemed to dry out pots quick. Temps and humidity are good. I switched from H&G coco to CANNA coco this round. It seems like cannas coco fibres are smaller and are holding more water then H&G. Therefore I believe I've been overwatering This entire week! FFS

Likes
26
Share

@Ultraviolet
Follow
👋 Raising the Carbon-to-Nitrogen (C:N) ratio in the growing medium to avoid over-immobilizing nitrogen, on the flip side, being careful not to trigger early autophagy. Moderate, controlled increases in sugar support the energetic demands of flowering and act as a signal trigger, but excess sugar is more likely to inhibit flowering or damage the plant. Balance, like everything else. Visually, when the chloryphyll green gets darker, it is a subtle indicator that the concentration of nitrogen is increasing / more is being stored than is being used. Noticed when you push very high intensity lighting, it slowly fades the green as the plant degrades chloryphyll faster than it can be replenished. When the green of the leaf continually gets darker, it is an indication that the concentration levels of nitrogen are increasing, and I dont want to increase light intensity.
Slow down the release of the nitrogen. C:N ratio dictates the rate at which nitrification occurs, if at all.
The Carbon-to-Nitrogen (C:N) ratio acts as a critical biological "on/off switch" (or regulator) for nitrogen turnover by determining whether microbes
immobilize (consume/tie up) or mineralize (release) nitrogen during the breakdown of organic matter. This ratio regulates microbial activity by defining the balance between available energy (carbon) and building materials (nitrogen). The C:N ratio in a medium acts as a critical regulator of nitrification, effectively functioning as an "on/off" switch for the dominance of either autotrophic nitrifying bacteria or heterotrophic bacteria.
The shade of green in chlorophyll is subtly linked to the enzyme Rubisco through a co-evolutionary, functional relationship designed to optimize photosynthesis. Chlorophyll absorbs blue and red light for energy, reflecting green light, a process that ensures the "light-dependent" reactions provide the correct, controlled amount of energy (ATP and NADPH) needed by Rubisco to perform its "light-independent" carbon fixation. Because Rubisco is a relatively inefficient and slow enzyme—often considered the bottleneck of photosynthesis—chlorophyll and the overall structure of the leaf have evolved to manage energy distribution to prevent overwhelming the Calvin cycle.
While chlorophyll absorbs mainly red and blue light, it is not perfectly efficient, and leaves appear green because some green light is reflected or transmitted. This reflection allows light to penetrate deeper into the leaf, preventing the surface chloroplasts from becoming overloaded and enabling a more efficient distribution of energy to the high volume of Rubisco located throughout the leaf's mesophyll.
The rate of chlorophyll-driven electron transport (light reactions) is matched to the potential rate of carbon fixation (Rubisco activity). If Rubisco were faster, leaves might be darker; however, the "shade of green" represents a balance that prevents chlorophyll from producing more energy than the inefficient Rubisco can process. The green color itself is a byproduct of a photosynthetic system tailored to feed a slow, yet crucial, enzyme (Rubisco) just enough energy to maximize carbon assimilation without inducing excessive oxidative stress or inefficiency.
The shade of green in leaves is directly linked to the concentration of chlorophyll, which is in turn strongly correlated with the amount of
Rubisco (Ribulose-1,5-bisphosphate carboxylase/oxygenase) and, consequently, the rate of carbon fixation. Darker green leaves generally indicate a higher concentration of both chlorophyll and Rubisco, signifying greater capacity for photosynthesis.
Increase demand for growth or reduce rate of release. I'm looking to keep that nice, healthy green.

Likes
37
Share


@Roberts
Follow
AMS Supreme auto is doing great with the Athena nutrition, and under the Mars Hydro FC4800 light. She is drinking a lot and looking healthy. Starting to develop her aroma stronger and stronger. She looks really good. Thank you Athena, Mars Hydro, and Amsterdam Marijuana Seeds. 🤜🏻🤛🏻🌱🌱🌱🌱
Www.amsterdammarijuanaseeds.com
Thank you grow diaries community for the 👇likes👇, follows, comments, and subscriptions on my YouTube channel👇. ❄️🌱🍻
Happy Growing 🌱🌱🌱
https://youtube.com/channel/UCAhN7yRzWLpcaRHhMIQ7X4g

Likes
1
Share


@zzzzzzz064
Follow
This is the first week of flowering, at the end of last week the plants started to grow white pistils, so this the first of flowering.
this week recently started, its ongoing (02/10)
Likes
6
Share


@Sup3rNov4
Follow
Started the flush a week early as the soul has got pretty hot. Taking off the Nitrogen stripped leaves


Likes
5
Share


@Zeaiache
Follow
Después del transplante hubo un bloqueo de ph, tras estabilizar el riego se estiraron rápido y luego retomé la nutrición fuerte, pode las 4 hojas principales para estimular los satélites laterales para su futura poda apical.

Likes
4
Share


@Grower_Boris
Follow
🌿 Grow 🤝 Freunde 🌱
🔥 Update – Woche 35, Tag Blüte | DWC-Grow
Die Lady’s sehen auf den aktuellen Bildern sehr gesund, vital und schön gleichmäßig aufgebaut aus – kompakte Buds, sattes Blattgrün und ein gut gefülltes Blütendach, genau so wünscht man sich die Blüte in dieser Phase. 🌱✨
Die Pflanzen stehen jetzt bei ca. 93 cm und wirken strukturiert, stabil und gut durchlüftet – viele Kopf- und Seitenbuds bekommen gleichmäßig Licht, was man an der homogenen Blütenbildung erkennt. Die Blätter zeigen ein kräftiges Grün ohne deutliche Mängel, die Buds sind schon schön aufgegangen und die Harzproduktion legt sichtbar zu. 😍
Setup-Details:
Beleuchtung: Farmlite LED, ca. 20 cm Abstand, 12/12 Lichtzyklus
Topfgröße: 20 L DWC
Nährstoffe: Hy-Pro Hydro A/B je 5 ml, Generator 0,15 ml auf 1 L
Wasserwerte: pH 6,3, Lösung 20 °C
Klima: 26 °C Tag / 18 °C Nacht, 53% RLF
Pflanzen: aus Samen, aktuell ca. 93 cm hoch
Sponsoren-Reminder:
Danke an Thomas Benedikt, Green Growery, Hy-Pro Fertilizers und Farmlite Grow Light !
Denkt an die Rabattcodes: Green Growery: GrowFreunde20 (20 % auf Erstbestellung, Versand frei) & GrowFreunde10 (10 % auf Folgekäufe)! und 5 % mit dem Code UGL97KZF auf Amazon für die Farmlite Grow Light:
Bleibt dran – bald gibt’s die nächsten Blüte-Updates!
Happy Growing 👍
Grower Boris
https://www.facebook.com/groups/1140006947653435
#growfreunde #DWC #blütephase #hydropower #greenlovers #cannabiscommunity #happyplants #growreport 🚀🌱🌸


Likes
5
Share


@Ensign420
Follow
Greetings fellow growers 🖖 and welcome to my first grow ever. This adventure actually started several months ago when I decided to stop buying flower from dispensaries and just grow my own bud. How hard can it be!?
This is actually my second seed of this strain. The first bean sadly died due to over watering (sorry girl, RIP). I was literally watering the cube to the point where water was dripping from the bottom, then heavily sprayed the humidity dome and tray with the vents completely closed. Everyday. Multiple times. I never let the dome or try dry out. So after about 8 days of not sprouting, there was a funky smell of rot. So that was that.
Later I learned that rockwool retains a lot of water and can easily drown seeds. So a wet/dry cycle is best for rockwool germination.
So even after hours of researching and digging through forums and tutorial videos, I was still under prepared for this journey. Did not consider how delicate the germination phase is. Oh well. Lesson learned. Reset and try again!
I hope everyone is safe and stoned during this corona crisis. Just like everyone else in the world, I want this pandemic to be over with. But in the meantime, let's grow some weed! 🖖
[START OF WEEK 01]
Day 01 - Monday - 08/03/20 - Total Days: 001
-----------------------------------
- [0830]: Light Schedule: 24Hrs/0
--- Soaked cube in 5.5 PH water for 10 min. Did not shake water out.
--- NO NUTES! Only PH'd down to control the PH levels.
--- Did not use the default hole (way too deep).
--- Flipped cube upside down and made a shallow hole for the seed (less than 0.25" deep).
--- Placed seed in and pinched hole close. No additional water added.
--- Sprayed the tray and dome with straight water (5.5 PH).
--- Vents are cracked opened a for ventilation (about 1/4 opened each).
--- Distance between the light and tray was 53"
--- AC was set to 80 °F
--- Exhaust fan was set to 86 °F
--- Room average temp was at 85 °F
--- Dome humidity was at 85-99% when sprayed.
--- Allowing to completely dry before respraying.
- [2200]: Dome and tray were completely dry! Sprayed only tray and dome with more water.
Day 02 - Tuesday - 08/04/20 - Total Days: 002
-----------------------------------
- [0845]: Sprayed dome and tray in the morning. Everything was dry.
--- Hoping for the best!
- [2130]: Everything was dry again, so sprayed dome and tray at night along with a light spray on the cube.
Day 03 - Wednesday - 08/05/20 - Total Days: 003
-----------------------------------
- [0830]: Everything was dry again. Resprayed dome and tray. Slightly sprayed cube.
- [2125]: Hooo damn!! She popped! Am little stub is visible! Resprayed dome and tray again.
--- Still going 24/0 for lights.
- [+0033]: Just checked up on her and I swear she grew a bit taller! Getting excited!
Day 04 - Thursday - 08/06/20 - Total Days: 004
-----------------------------------
- [0845]: Wow! Went from a little stub to fully sprouted overnight! Everything was pretty dry again so resprayed dome and tray.
- [2200]: Tap root is visible! Over 1" long too! Just resprayed dome and tray again.
-- Going to prep for hydroton transplant tomorrow!
Day 05 - Friday - 08/07/20 - Total Days: 005
-----------------------------------
- [0930]: She keeps growing!
-- Added a bit of CalMag to the spray bottle (8 drops to 650ml of distilled water). Resprayed dome and tray. Water was at a 5.4 PH with 141 PPM.
- [1045]: Prepped the bubble bucket with 4.5gal of water. Water is high enough to reach about 0.25" above the bottom of the net pot.
--- Added 3 drops of Superthrive
--- Added 3.5ml of CaliMagic
--- Added 2ml Hydroguard
--- Then PH'd down to 5.6
--- Solution Strengh: 120 PPM
--- Water chiller is set to 20 °C
- [1100]: Transplant time!
--- Filled the net basket 1/3 with hydroton. When placed in the bucket, air bubbles are not visible, but are slightly below the surface (slight digging will reveal the water/bubbles below).
--- Removed plastic on rockwool cube and placed in basket, then filled around and covered with hydroton. Making sure to block any light from passing through the net pot and into the nutrient solution.
--- Covered with a half-bottle dome sprayed with the CalMag water from earlier.
--- Hoping for the best!
- [1300]: Raised Bucket 5" higher. Now light distance is 48" to top of bucket.
- [1820]: Lowered tent exhaust temp to 76 °F
--- Lowered AC to 75 °F
--- Raised bucket even higher so light distance is 30" to top of bucket.
- [2300]: Looking good!
--- Sprayed dome and surrounding hydroton with more CalMag water.
--- Attached timer to light! So new 18 Hrs On/6 Hrs Off light schedule.
--- Lights On: [1600] (4pm)
--- Lights Off: [+1000] (10am the next day)
--- Decided to go with lights on during the evening/night and off during the later mornings/afternoon (the hottest part of the day) to see if temps can be controlled better.
--- Please survive girl!
Day 06 - Saturday - 08/08/20 - Total Days: 006
-----------------------------------
- [0800]: Everything was dry. Resprayed hydroton and dome.
- [2000]: Here first night cycle seemed to go well! Get'n taller!
--- Dry again. Removed the dome.
--- PH went up to 6.5 so PH'd down to 5.7
--- Ran the top feed drip ring for a bout a minute to wet the hydroton and rockwool with the nutient solution.
---Too scared to leave the top feed on 24hrs (I don't want over water her and cause dampening-off). Will let dry before re-watering.
- [2100]: After closer inspection, I think she's looking a bit yellow.
--- Decided to add a bit of grow nutes to the bubbler solution.
--- Added 2ml of Sensi Grow A
--- Added 2ml of Sensi Grow B
--- Solution strength after adding more nutes: 176 PPM
--- PH went up to 6
--- I hope that the extra chelating properties of the 'PH Perfect' solution is enough of a buffer for proper nutrient uptake.
Day 07 - Sunday - 08/09/20 - Total Days: 007
-----------------------------------
- [0800]: Water dropped a bit (mostly due to evaporation) so solution strength was at 190.
--- Checked PH again. Was still at 6, so PH'd down to 5.4
--- Ran the top feed for a minute to wet the hydroton a bit.
- [0915]: Since she's looking perky but still a bit yellow. So decided to up the nutrient concentration even more before lights out.
--- Added 2ml more of Sensi Grow A
--- Added 2ml more of Sensi Grow B
--- Solution strength after adding more nutes: 199 PPM
--- PH went up to 5.8
- [1700]: Checked nutrients.
--- PH: 5.9
--- Solution strength: 202 PPM
--- Added 4ml of Voodoo Juice
--- Added 4ml of B-52
--- PH after adding more nutes: 5.9
--- Solution strength after adding more nutes: 238 PPM
- [2130]: Decided to make a new foliar spray to address the continued yellowing.
--- Started with 500ml of distilled water.
--- Added 3 drops of CaliMagic
--- Added 3 drops of Sensi Grow A
--- Added 3 drops of Sensi Grow B
--- Added 3 drops of B-52
--- Added 1 drop of Superthrive
--- Solution strength: 164 PPM
--- PH was at 5.9 and did not adjust.
--- Gave her one spray.
--- Also sprayed the surrounding hydroton.
[END OF WEEK 01]


Likes
35
Share


@Bud_Koenig
Follow
Hey, the three little ladies are doing great! Soon they’ll be transplanted into my pre-made living soil mix that I prepared 1-2 weeks ago. Let’s see how they like it!


