
Likes
Comments
Share


@TgOgFaRms
Follow
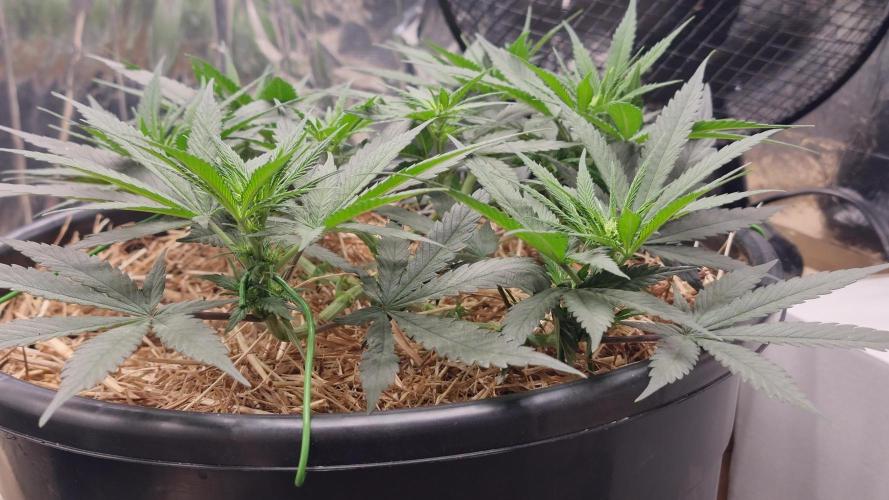
I'm thrilled to provide you with the latest update on my flourishing journey. We have now entered week 2 of the flowering phase, and I must say it has been an exceptionally productive period. The plants have undergone a significant stretch, showcasing robust growth and a remarkable level of health. 🌿🌸💪🌱
Despite the positive progress, I can't help but feel a hint of apprehension due to an unfortunate incident experienced by a fellow grower. One of their plants unexpectedly hermaphroditized during the same stage we are currently in. 😬🚫⚡️
Our collective venture involves four individuals, and at present, two of us, including myself, are in the initial week of flower. The other two participants are at week 5 and 6. Fortunately, the fourth member seems to be experiencing smooth sailing with their plants. 🌿👥💚🚢
Stay tuned for further updates as we navigate through this critical phase of cultivation. Let's remain vigilant and provide the utmost care to ensure a successful and abundant harvest. 🌿🌸🌱🌾
Happy growing! 🌿💚🌱


Likes
4
Share


@ccred
Follow
Die Blüten wachsen weiter, die Fuchsschwänze auch ... Wir haben das Regal noch um eine Bücherreihe höher gestellt aber damit die anderen Triebe auch noch Licht bekommen, muss das jetzt reichen.
Nach dem Fütterungsplan von "Crazy-Hill ist sie jetzt in der Blütenwoche 9, bekommt jetzt also nur noch Wasser (und CalMag).

Likes
14
Share


@Terpyboyz
Follow
Final product is been absolutely amazing on these clones - the jungle came out about average but the clones definitely exceeded expectations there absolute fire in comparison but still just as good hopefully I can just improve a few issues we had on this run and dial right in 100% will be so much better, next few run is going to be special I’ve got a few things lined up. From tester packs to breeders packs I can hunt from. So lots to choose from but what to keep to run will be interesting


Likes
8
Share


@Ieiogrow94
Follow
Eccoci qui...
Tutto va per il meglio, questa settimana non ho applicato stress alla piccola, ma ho guardato l'evoluzione che ha avuto dando i nutrienti.
Ora ha un odore davvero intenso ed uno strato di resina pauroso, vediamo come si riprende dalla defogliazione che ho fatto settimana scorsa.
Seguiranno aggiornamenti, grazie a tutti per il supporto🔥🌲❤️

Likes
9
Share


@TrialAndErrorGrows
Follow
Ok week 5 veg. I usually just let the plants grow through the trellis net.
This time I tried a little bit of everything. I did a fairly big trim on leaves. I tied down branches with twist ties and then lowered the trellis net overtop. I may have gone a little overboard. But looking at other peoples diary’s I am seeing a lot of techniques being used so I will giver a shot. Trial and error.
**Update**
Plants growing up through trellis nicely. After tie down and trim.

Likes
2
Share


@pareto
Follow
Everything was great. In the beginning she looked a bild small but then she really packed on from top to bottom!
The best yield and the lowest cost per gram I have gotten so far. We had great weather and she got a lot of direct sunshine. I think that helped a lot.
The bag seed was removed in week 4/5. It was either a male or hermed.
Total Runtime: 92 days
--------------------------------------------------------------------------------------------------------------------------------------------------------------------------------
Set up cost (fixed costs)
-Lamp: 40€
-Timer: 3,5€
-Pot: 4€
-Total fixed costs: 47,5€
Given 5 years (or 15 grows) usage time translates to around 3,17€ per grow in materials.
Variable costs:
-Seeds: 3,65€
-Soil: 6€
-Fertilizer: 3,50€
-Power: 21,43€
-Total variable costs: 34,58€
-Total costs per grow: 37,75€
-Cost per gram: 0,76€/g

Likes
Comments
Share

@SpliffDoc
Follow
She got flipped on day 36. Saw pistils a couple of days later. She isn't big, but she's a beauty. I think this strain would be better left to grow naturally rather than pissing around LST'ing. The response hasn't been what i expected. The proof is in the end product though so let's see😁🏻
Likes
9
Share


@41310a
Follow
Ao final da Decima Semana estamos com as folhas muito deterioradas, acredito que tenha errado em alguma parte da nutrição

Likes
24
Share


@MrPott
Follow
Everyone is B L O O M I N G. Definitely a few weeks to go and right now it's just about feeding them and making em ladies T H I C C.


Likes
24
Share


@Wicked_Stix
Follow
Was a pretty smooth week for most the girls. Showing some steady growth. I topped all of the plants around day 12 other than the slurricane 7. Ph got a little high since the nutrient level was too low to buffer it at the beginning of the week. Slurricane 7 and sugar cane are the ones that took some damage. I think they will be ok though. I upped the nutrients to 1/4 tsp per gallon and the ph has held stable since then. Should be able to start some training the middle of next week and looks like we might be going 2 more weeks on veg before flipping them to flower depending on how this upcoming week goes. Guess you will have to show up next week to find out...
Likes
1
Share


@Giorgo
Follow
So I don't know how to help her. She has big stress becouse of temperature...
Likes
35
Share


@McBubatz
Follow
2. Woche Wachstum beginnt ganz gut, sie wächst und ihr scheint es gut zu gehen 👌
Sie bekommt alle 2-3 Tage einen halben Liter Wasser, je nach Zustand.
13. Tag
Heute hat sie noch ca. 0,5 g Great White Mykorrhiza bekommen.

Likes
14
Share


@OGGrowerBob
Follow
they took 11 week from start to finish I let them go a little longer then usual all seeds were from sagseedbank.com and the lighting was from thegreensunshineco.com the ES180 my electric bill ran under $30 a month using this light in a 2x4x5 tent00
Likes
Comments
Share

@hassehujasse
Follow
LST Main-Lining White Runtz @Barneys Soil with coco to soft. Had to invent wood sticks.
She is felling well after topping. Se esta recuperando mejor de lo esperado
My wife topped her plant last day third week. plants looks good and we walking ahead
MI mujer se ha hecho topping en ultimo momento del tercera semana. entramos bien en la quarta
Processing
Likes
29
Share


@Grey_Wolf
Follow
Ginger Nut cookies & Aussie music video's 5th March 2020
Flowering Begins .......................................
My little creation is officially Flowering folks!!
After stretching upwards about 30cm all tips are developing little Budlets. I started to see minor signs of Nitrogen deficiency from a coupleof bottom leaves that
suddenly began to yellow. This is fairly normal as the plant would have needed as much (nitrogen) as it could get doing all that stretching.
I needed to feed half strength grow nutes ( professors nutrients) @1ml/L three times during the last 7 days.
Now that the stretch seems to have slowed right down I will start to add some Dr Greenthumbs Bud n Bloom mix ( aprox qtr of a cup).
I'll also keep using LST to allow as much light to penetrate as possible. 👍
**** Now for the Weekly Australian Music Videos ***
Last week I posted Links to songs from the Artist Paul Kelly , they were Sleep Australia Sleep and Dumb Things.
I hope you listened to them but that's your preference whether you choose to or not.
Anyhoo This weeks Artist is a real Blast from the Past!! The bands called Daddy Cool
and Ive selected a couple of their quite catchy tunes that were recorded way back in the 1970's
Firstly is a Classic here in australia this is....
Eagle Rock https://www.youtube.com/watch?v=oQfAZVsz6KM
And the other song is Come back again
https://youtu.be/oIG9osPPILM
I am sure these will have you bopping along to their cool and laid back Musical style.
Hope you Enjoy and please leave a like if you do
& I'll be back next week with another grow update and Aussie music Video 💪👌👍
Likes
4
Share


@Big0zGrower420
Follow
Day 35 today. Still pushing forward and enjoying the process. Lowered the humidity in the tent, gotta have the AC on full blast though. Nutrients have been a challenge but getting things worked out and staying positive.

Likes
18
Share

@Kirsten
Follow
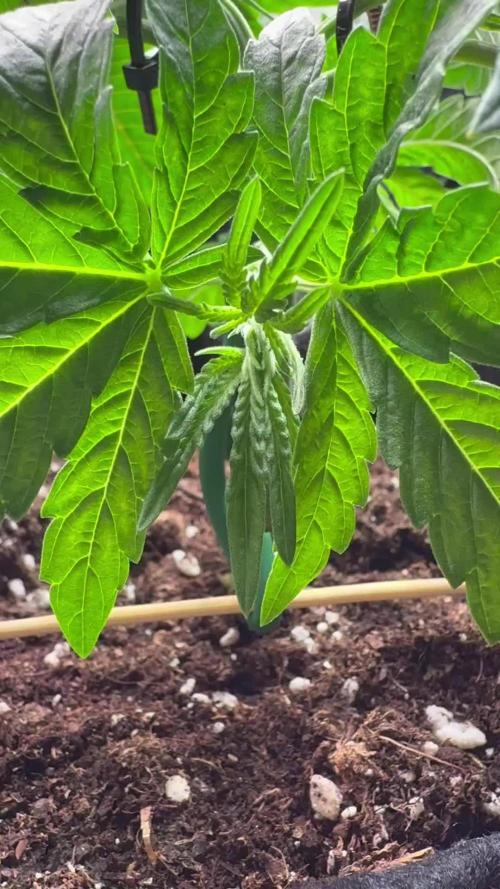
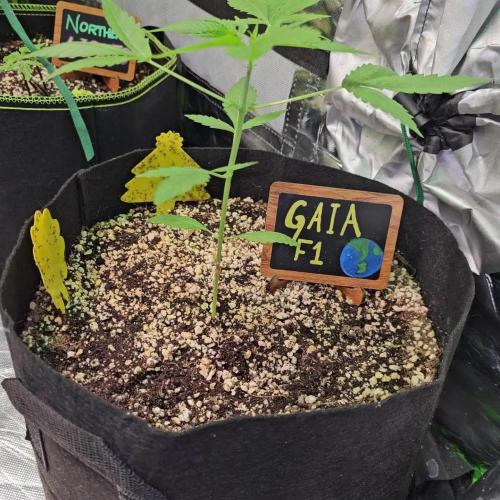
Gaia F1 is looking to be experiencing a bit of a growth spurt, which is nice to see!
Hopefully, she will start progressing a little bit more next week.
The leaves are a nice green colour looking very healthy, very pleased.
I have added an additional 100Watt UVA/UVB lamp, as the uppermost canopy of Acapulco Gold is blocking pretty much everything in the tent.
Hopefully, this will aid the shorter plants in surviving until I can harvest it. There will be so much more space and lighting. Can't wait! 😅
Here is what I did this week.
25.9.25:
I watered with 2L of dechlorinated water PH'd to 6.5 with;
💜 Sea K
PH: 6.5
PPM: 565
The fungus gnats have really increased since I did a watering of the whole tent.
I have some more sticky traps set out, and I will not water for several days.
Once it has dried the top soil, I will add some more Diatomaceous Earth to the top 5cm.
Thanks for checking in this week and see you in the comments 👌💚🙌🧡😁
Likes
4
Share


@CraigGrowsOK
Follow
Trimmed up both plants, they didnt yield too much but every single nug they did produce was coated in trichomes. Top notch bud for sure. I have several more going that Vegged alot longer and have ALOT more budsites that will be going into flower this week. They will yield much more for sure.
Processing
Likes
2
Share


@MO_Gardens
Follow
Still trucking along. I had my light turned up a bit high for the first week, I turned them down a few days ago and all the plants seemed to enjoy it. Nothing else to report really.

Likes
16
Share

@HandsomeTerpz
Follow
WEEK 13
-------------------------
🇺🇸
Terpyz Blueberry Lime Kush no major changes. WHERE are my buds?!
Still waiting… The girls are chillin', but the blooms are taking their sweet time. Patience is key but also, where the heck are the flowers? 🤔🌱⏳
Let's hope they’re just building up some crazy terp power before bursting into bloom. 💥🍇🍋🌿
Woche 13
-------------------------
🇩🇪
Terpyz Blueberry Lime Kush – keine wesentlichen Veränderungen. WOOOO bleiben meine Blüten?!
Warten, warten… Die Mädels chillen so vor sich hin, aber die Blüten lassen ganz schön auf sich warten. Geduld ist ja schön und gut aber wo bleiben die Dinger bitte?! 🤨🌱🕰️
Hoffentlich sammeln sie einfach nur richtig viel Terpenpower, bevor sie loslegen. 💥🍇🍋🌿
