


Likes
19
Share


@OldDabKing
Follow
Dropped seeds into water for 24 hours, and acclimated the fabric pots to the tents conditions. One 3gal, one 5gal, and one 7gal are going to be used for this grow to see the different outcomes of pot size.

Likes
92
Share


@DogDoctorOfficial
Follow
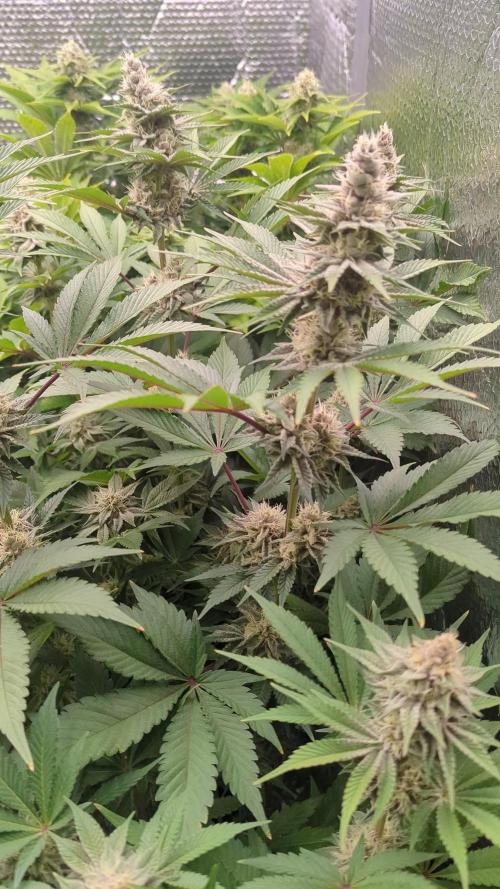
🌸 Week 3 Flower – Growing Strong, Tall, and Vibrant! 🌱
Hey Grow Fam! It’s already Week 3 in flower, and I’m thrilled to bring you this update because these plants are doing phenomenally well! Some are stretching up so tall that I might have to get creative in the coming weeks! Fruit production is well underway, and it’s absolutely amazing to watch the canopy fill out as these girls reach their potential.
Aptus Holland Pack Unboxing & New Additions
This week kicked off with a big arrival: the Aptus Holland nutrient pack! 🙌 I couldn’t wait to share the unboxing with you all; there’s a video up where I go through all the goodies, so check it out if you haven’t yet! Between the photos and videos, you’ll be able to see just how well these nutrients are already feeding these green beauties. Having a blast sharing more content lately—I’m in the zone with editing and creating, so get ready for even more shares!
🌡️ Environmental Control and Fine-Tuning the Reservoir pH
Temps this week have been holding around 27.2°C with RH at 65.2% and CO2 at 800 ppm, creating a VPD of 1.26 for ideal flower development. The lighting intensity is at 833 PPFD, and the solution in the reservoir is fine-tuned to a pH of 6.22, EC of 475, with a temp of 21.8°C.
Let’s talk pH in the reservoir: it’s a dynamic process, and I’m constantly adjusting it to keep everything at the right level. The pH tends to rise throughout the week, and each day, I work it back down, fine-tuning it to keep those plants happy and balanced. Managing pH is truly a hands-on job, and it’s worth every moment. I love staying on top of it for optimal nutrient uptake—it’s all about consistent effort and keeping that perfect range dialed in.
Leaf Maintenance & Selective Defoliation
These leaves are HUGE and gorgeous, creating a lush canopy that’s nearly too perfect! I’ve been taking a few leaves here and there, focusing on leaves that may be blocking light from reaching lower parts of the plant. Selective defoliation at this stage is key because it opens up airflow and allows light to penetrate deep, boosting energy distribution across the whole plant.
Big, healthy leaves mean we’re getting excellent photosynthesis, but a gentle, strategic defoliation can guide that energy toward those developing buds. Leaf removal is all about balance, giving the plant space to breathe and thrive while still maximizing growth in flower!
🌐 TrolMaster + App – Real-Time Precision
Huge shoutout to the TrolMaster system and the app—keeping everything in sync and at peak performance is honestly effortless with this ecosystem. The app provides a full overview of each environmental parameter, allowing me to make real-time adjustments as needed and track trends over time. The precision here is unbeatable, giving me complete control over temps, humidity, CO2, and VPD, ensuring my girls are in a controlled paradise 24/7.
What I love most is how the app records everything automatically, so I always know exactly where things stand without having to keep separate records. If you haven’t tried TrolMaster yet, it’s a total game-changer for any grow setup!
💥 Shoutouts & Gratitude
Massive shoutout to TrolMaster and Aptus Holland for powering this grow with tech and nutrition that’s second to none. And, of course, gratitude to Pro-Mix for the superb growing medium and to the seed banks behind the genetics. We’re running strong thanks to each of you.
And to the whole community—thank you, everyone, from new friends to seasoned followers, lovers to haters. Your energy, whatever form it comes in, is all part of this journey, and I’m so grateful for it all. Special shoutout this week to my brother Daggadna—head over to IG and give him a follow! And if you’re loving the journey, remember to like, comment, and subscribe—it really helps the channel grow and reach others who may also dig this content!
Discount Codes so you can save big on your next check out 💚💚💚
Kannabia - DOGDOCTOR 30% off
SeedsmanSeeds - DOGDOCTOR 10% off
CannaKan- DOGDOCTOR 15% off
terpyz.eu - DOCTOR 15% off
The Neutralizer - PORKIT5-DOG 15% off
As always thank you all for stopping by, for the love and for it all , this journey of mine wold just not be the same without you guys, the love and support is very much appreciated and i fell honored and so joyful with you all in my life 🙏
With true love comes happiness 💚🙏 Always believe in your self and always do things expecting nothing and with an open heart , be a giver and the universe will give back to you in ways you could not even imagine so 💚
Friendly reminder all you see here is pure research and for educational purposes only
Growers Love to you all 💚💚💚


Likes
6
Share


@Pompeyblue
Follow
All are going fantastic and really looking great and getting nice and frosty
Day 39F


Processing
Likes
10
Share


@Fibro_Witch
Follow
I finally got them in the garden! It was a trip getting out there, so they don't look the greatest because they're stressed.
I broadforked the bed because I have very hard clay soil and put down Ocean Forest potting soil. I have some wire support hoops for the AG19 row cover I'm going to be using for the transition. It's lightweight and breathable but it will cut down on some of the sun so they don't burn and it will also keep them warmer at night since it's still pretty cool.
And please disregard my comment about the Chamomile and Nitrogen... Chamomile sequesters Calcium, Potassium and Sulfur, not Nitrogen😜. Clover sequesters Nitrogen.
I added about 5-10% Biochar in with the Fox farm potting soil which is an excellent source of carbon and helps retain soil moisture. I added some lime to stabilize ph and try to deter lockout which I had last year. I also added mycorrhizal inoculant for root health, it helps to reduce stress in plants and helps them to uptake more sugars which is exactly what we want.


Likes
10
Share


@PolezGardn
Follow
week six flower everything looks great so far :D
buds are filling out & terps going crazy!!
Gelato 1: smells creamy
Gelato 2: smells creamy and sweet a bit like candy
I water them with 1.5l every 48h
the light I use was set to 100% and it hangs 80cm away from the tops

Likes
8
Share


@Rangaku
Follow
Defol and tied down she doubled in size , ran a flush . Keeping up the defol and spreading her out this week then another week of veg before flipping

Likes
17
Share


@balansa
Follow
no words just look at her )) just loook at heeeeeer )))))) oh i almost forgot i have a newfriend as a magnifier for my ohone and i took a woderfull video ♡♡♡♡♡♡♡
Likes
50
Share


@D33jW
Follow
🌸 Runtz - Week 3 of Flowering 🌸
Everything is going according to plan! 🌿 I’m keeping stable conditions – 25°C temperature, 60% RH,
so a VPD is around 1.3. The plant looks healthy and strong, producing a lot of white pistils, which is a great sign of proper development.
As for trichome production, it could be a bit heavier, but I’m patiently waiting – Runtz still has time to show its full potential.
Watering is done every two days, with around 1L of water mixed with nutrients. This week,
I started adding Green Sensation in low doses to fully meet the plant’s phosphorus and potassium needs, which are essential for the flowering stage.
Grow Conditions (FLO Week 3):
🌞 Light schedule: 12/12
🌱 PPFD: 750 µmol/m²/s
💧 VPD: ~1.3 kPa
Now, it's just a matter of time before it starts frosting up nicely!
Can’t wait to see how it stacks up in the coming weeks! 🔥
Likes
13
Share


@Weedig_Weedigson
Follow
Jetzt geht es zum ersten mal mit Power Buds in die Blüte. Ich bin sehr gespannt. Sonst sehen alle top aus.

Likes
10
Share


Likes
19
Share

@Theia
Follow
The Tropicana Cherry hasn’t suffered from any of the issues the three Triple Cheese in the room have. I’m guessing it’s something to do with those hybrid properties. It’s bred from Cookies, which was developed under high-power LEDs, while the Triple Cheese line is so old it might not be as stable under this kind of intensity. That’s my stoner thought, anyway. It’s also possible the Tropicana Cherry just has a more aggressive rhizosphere!
Who knows. You can see the anthocyanin influence deepening in the calyxes and sugar leaves and I think she looks stunning. The smell is sweet and fruity. This plant in particular is making some serious frost; I’ll never know if it’s the UVB unless I run two rooms with a control, but that’s not happening so I’ll just keep going with it. Beyond the protein stimulation, it’s also pretty good at killing bugs and pathogens.
The calyxes are swelling and starting to tower on top of each other. They look like they might burst—really chunky and still a way to go. o/
I’ve spent quite a lot on the environment this run. We’ve had horrid weather in the UK and high RH is a daily fight. I maintain a steady 1.1 kPa lights-off and ramp to a target of around 1.35 kPa for lights-on.
The main thing I learned this week is about immobile nutrients. Calcium being immobile is actually quite easy to spot when you’re watching for it. Since I have that Calcium Benchmark to look back on I have plans for the next run to make a source of CaSO4 available in the form of ground Gypsum mixed into my 40% amendments mix. Since I'm using the Biotabs water-only method having that slow-release Calcium should help prevent those rusty spots from showing up when I drive them hard.
There is more I’m sure but I can’t remember right now... lol
Grow well.

Likes
35
Share


@Belverde
Follow
Welcome growers
This is a very famous strain, at least in EU 🇪🇺
So, I don't have to say to much..
Honestly my phenotype has nothing special about a the taste...just a regular medium quality flowers (considerating the flavors today)
But I really enjoy the effect, make me motivated and relax at the same time 🙂
Very close to the usual effect I feal with Kush varaties..
So, for me it's great 👍
The structure of the buds is also nice and are covered of trichomes...pretty sticky too..
I have other 4/5 seeds and I think I will growing it again...maybe for find some phenos more tasty..
This strain won a lot of cups 🏆🏆🏆
We have just to find the right one 😉
So, I can raccommend with no doubt..
Yealds can also be good!
I have gived low amount of nutrients, I usually do that if I use liquids, but she was able to make a good amount of dense buds 💯
Thanks @SweetSeeds for this strain and all the work here in the old continent 💪💪🤙
And thanks GD for this space 🙏
✌️
🇮🇹
Likes
16
Share


@Mrg7667
Follow
About day 38 i am just realizing that i am stupid and been feeding the biogrow for cocoa coir 🤦♂️ way iver nuting with soil it says never to go over 1ml/L
So i will be flushing for at least 1 or two waterings. Looking for the tip burn to stop spreading and the tips to not look like there clawing


Likes
16
Share


@SAC87
Follow
Day 28:
I got home from 10 days of holidays and these girls had cruised along as if I had been there with them the whole time. They are very happy, especially the middle one. The small one on the right has always been small, is what it is. She could be a stack little shorty. Time will tell. I did a feed today, top dressed according to Gaia Green at 15 ml/ gal of media which should last approx 2 weeks. I also added a bit more 444 just to make sure there’s enough N during this stretch phase. All 3 have pistols showing and are starting to flower. I was unable to train as much as I’d have liked but is what it is. Sometimes the more indica strains I’ve done are negatively effected by topping and excess training. I removed a couple huge fans that were shading too much of the plant. I also am trying a “super cropping” of top fans to get them out of the way but still save them as a nute source if they need. We’ll see how it goes.
The Vipar spectra xs2000 is killling it as usual. As I’ve said 50 times it’s super powerful and I’ve had to raise the light above recommended height as I started to see leaf edge curl and light stress. No problem at all tho, better too powerful and raise it than too weak and have loose buds.
I did a micro top just to stop excessive apical meristem stretch and leaving all the other lower branches too low for effective light absorption or burn on the top cola.
Happy Growing 🌱


Likes
128
Share


@PapaNugs
Follow
Has been a good week for the girls. They really exploded this week. I can't keep up with the ties. They got too big to have a level canopy. Will have to adjust later this week after defoliation and lollipopping. Will be a huge week and the girls will look different next time you see them!


