
Likes
Comments
Share


@Growyourownathome2x2
Follow
Sunday the 28th of May Day 32 of 12/12 everything looking good starting to stack up nicely, front left plant is the runt of the 4 but still smelling so good 🍁😁

Likes
13
Share


@Reudiger_Grower
Follow
Dei meisten buds sind jetz schon so ziemlich reif. Vorraussichtlich wird in ein paar Tagen geerntet. Ansonsten wird zumindest teilgeerntet. Aktuell wird noch täglich gespült. Mittlerweile immerhin bei einem ec wert von 1,5 angekommen. Vor der Ernte wird noch mit Terra Aquatica FlashClean gespült damit alle Salz Rückstande rausgespült werden.


Likes
2
Share


@Bluemels
Follow
Tag 79: Ab heute gebe ich nur noch ungedüngtes Wasser mit eingestellten Ph wert.

Likes
25
Share


@EBxAH
Follow
Well week 3 started on Monday, I'm late to the party, lol. Everything is going pretty decent so far. One surprise though...they have a smell. They didn't at this stage last time. Weird, lol. I gave them a slight trim and will be done with that until flowering. They seem very happy!
✌️❤️😁🍀🎶
EB

Processing
Likes
5
Share


Likes
3
Share


@BushDoctor740
Follow
I can already tell this girl will be a healthy one.I will do some training soon as she is getting big enough to bend over.Day 20 I started LST and she is looking like a good candidate for strong healthy bushy one.

Likes
Comments
Share


@Card1Cultivations
Follow
April 21 - 28
This week was a fun week of auto pilot watching the buds fill in and the plants stretch.
Drizella has been the beast of the grow and stretched the most. But the 2nd row of netting helped keep things under control.
Carol Anne is far below that second net tier. She is for sure dealing with life as a short stunted plant. Hoping for the best outcome for her, but I’m sure she ain’t gonna look so pretty when it comes time to chop n hang her to dry.
Anastasia is beautiful and I think also dealing with stunted growth a little. Either that or her phenom is wildly different than her sister Drizella. She is just reaching the second net tier and is very bushy with more compact bud zones and colas.

Likes
30
Share


@Sonic_Y
Follow
Day 29:
Pre-flowering did start. Changing now to Hesi Nutrients. Watered them with 1,25 l. Since they are not dried completely out. Wanted to boost them into flower now!
Letting them dry out now to the half of total weight. I'm a bit nervous about the nutrients cocktail though. :)
Day 32:
music for plants:
"Jules Reidy - Trances"
"Cousin - HomeSoon"
"Yara Asmar - synth waltzes and accordion laments"
Likes
4
Share


Likes
7
Share


@Coughy
Follow
Res change today. All the goodies. Gonna top everything, maybe LST this week.

Processing
Likes
54
Share


@rhodes68
Follow
1/29 Week 5
Nothing but the kind of problems I asked for, some white tips that mean an increase of runoff is needed.
Half expected to see this as I have been varying the amount as a learning experiment. Will up to 20% for a few days
In addition will be reducing nuets slightly keeping cal-mag as is until reason to change presents itself.
Will be kind of boring the next couple of weeks at least till they get into the big tent.
1/30 Aeryn now at 15 inches
Runoff at 40% and nuets reduced to lower pot EC
Ive tossed out my old bottle of Cal-Mag I think its turned on me as these white tips did not appear until it was folded into the feed.
Just no way this dose of nuets is causing the tips to show burning.
2/1 Major defoliation last night at lights out.
Removed perhaps 25-40% or leaf mass on all plants to allow them to stay in the tent another two weeks.
It was time to learn the process anyway, took a compromise path to doing it, some recommended taking more some less, hey sounded good to me.
Plants doing very well after defoliation except for those aggravating white tips, going to be reducing Cal-Mag again to 1ml/gal and keep CT at 5ml/gal taking C-M to zero based on what I see.
2/2 Dropped Cal-Mag from feed, want to see if that has anything to do with those white tips.
Runoff is at 40-50% ppm out under 900 so dam if I know. Will continue to defoliate as we go when something pokes its head where it does not belong.
Otherwise they are beautiful, good job so far Fast Buds. 👍
2/3 man they recover fast, removed a few fan leaves that poked their heads where they shouldnt.
Add Si to feed tomorrow for stem strength
Not comfortable leaving these in veg for two more weeks, just asking for problems. So...
Plan for flowering:
Flipping this weekend so new week will still be veg.
Removing one plant from the Moya tent to the Flowering tent to relieve space pressure as both tents will be set to 12/12 and just flower them all.
Should have space in Moya to cover the few days they are in there with just three plants, have a bout 18" of light hang to work with.
Thinking of moving Aeryn as she is largest and most likely to cause issues.
Just not sure what the stretch is going to be 😳
2/4
The white tips were absolutely caused by the Cal-Mag, considering the doses and PPM that is puzzling to say the least.
Adding Si for a few feeds to get em ready for flowering as I have no idea how these are going to grow so heading off some potentials.
Plants hit 20" over night still flipping in a few days


Likes
Comments
Share

@PapaTerps
Follow
Zkittlez - Growers Choice
Day 66 - watered with 2L of RO tap water with defined above nutrients, mixed in order and pH'd to 6.3. She has finished her stretch and has developed her flower and is now focusing on bulking! That Zkittlez aroma has started to fill the tent and it's getting me so excited for her! Not much work on her this week, just a few fan leaves removed to improve light penetration and that's pretty much it, she has been super easy!!

Likes
1
Share

@Skynets_Growing
Follow
Eva is going fast in her Preflower Part and everything Looks nice. How tall she is, her flowers are there and grow, no defects until now … but I know more than you…next week will change Everything… stay tuned and look what she do next week …
Likes
1
Share


@sunshinegroww
Follow
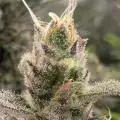
She had clean up few days ago and now ready to start pumping those nuggets smeels nice and super frosty
Likes
2
Share


@Saintvicious
Follow
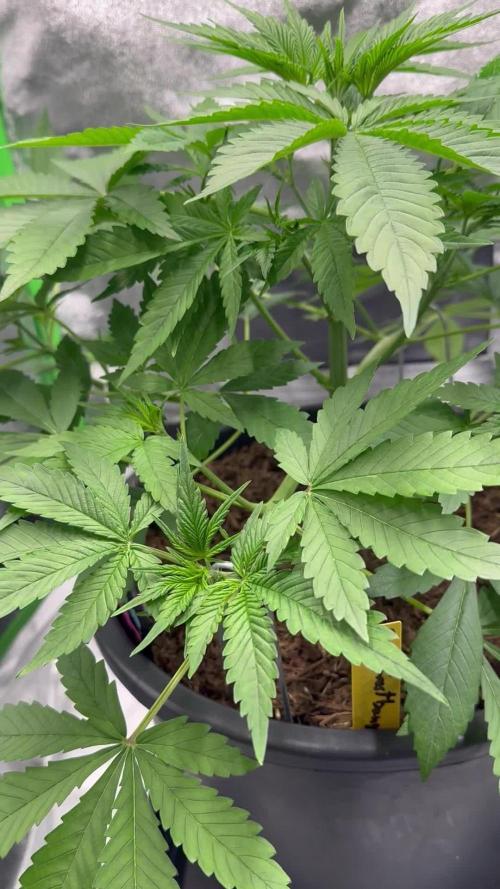
Going strong. Biggest seed in pack and she's showing. Bout to be Lst time.
Likes
Comments
Share

@Chucky324
Follow
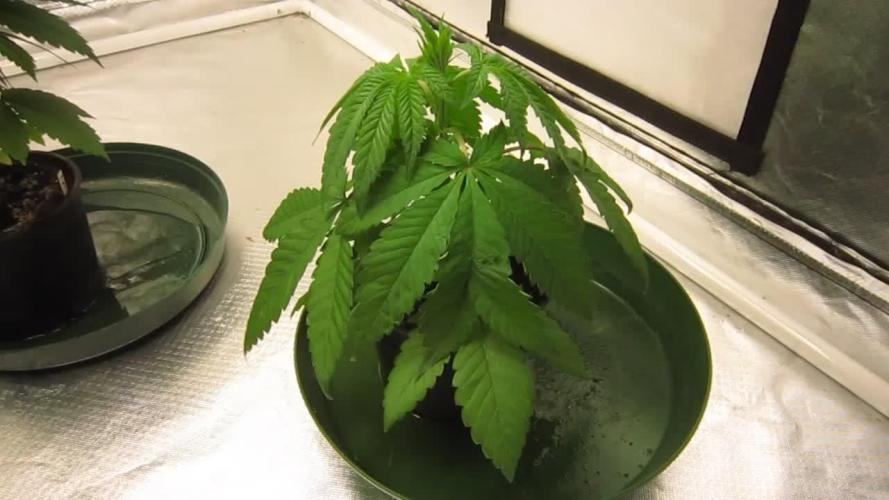
Hello This is the end of week 4 and the beginning of week 5 of veg.
This little plant was in need of water when I look in this morning. So it looks a bit wilty.
Got a big drink as soon as I realized it. She's looking good other than that.
Got a weird leaf mutation. Hope I get some more... I like different or strange. Makes life interesting.
Speaking of different and strange... I've started a new underground comic for your enjoyment.
It's Weirdo... #14... printed in 1993. Hope you like it.
OK. Be Cool.
Chuck.

Likes
43
Share


@TheCannaProphet
Follow
~ FastBuds PAPAYA SHERBET Photoperiod~
Well here we go on another journey together through 'Canna-land' and this one's kinda special... forget that, it's VERY special because this is FastBuds newest surprise for the community, a FEMINIZED PHOTOPERIOD STRAIN!🤯
I was fortunate enough to score these seeds, of which only 1000 were available and can't wait to see what this strain can do! This Papaya Sherbet, according to FastBuds, is a hybrid with a 9-10 weeks flowering period. For a more detailed and accurate description of this strain the following from FastBuds says it best:
"Combining the massive stature of Papaya (Oni Selection) with the strength and resilience of one of our best keeper cuts (Sunset Sherbet), this strain develops into a big, expansive bush adorned with numerous bud sites that later transform into a generous harvest of medium-sized buds. Papaya Sherbet flowers deliver a signature flavor of premium cannabis with subtle citrus undertones that emerge upon inhaling. During growth, her aroma makes for a sweet yet pleasantly bitter fragrance, giving you an idea of what the smoke will taste like. Notably stress-resistant, Papaya Sherbet is a great choice for growers working in challenging environments. She is very forgiving and rebounds quickly from any adversity, allowing growers the freedom to experiment with confidence that she will take everything like a champion she is. This strain embodies resilience, flavor, and abundant yields in every grow cycle."
Sounds like an epic strain and I personally cannot wait for this lady to strut her stuff!😍
________________________________________________________________________________________________________________________________________________________________________________________________________________________________________________________________________________________________________________________
The Setup:
This is going to be an outdoor grow, but I have started the Papaya Sherbet photoperiod indoors as our weather is still a bit too chilly to put a newly sprouted seedling outside (nighttime temp's dipping regularly into the 40's℉).
The plan is simple... let her grow inside under a 19/5 light schedule until the nighttime temperatures are in the mid 50's℉, which shouldn't be long. After which, she'll be moved outside and transplanted into the soil which I have already setup and inoculated with beneficial microbes from BioTabs and slow release dry amendments from Gaia Green. Once she's established herself outside she'll be given periodic top dressings of Gaia Green 4-4-4 and 2-8-4 along with worm castings and Compost Tea's. Her grow area is approx. 5'x5' and I have posts and a trellis net set up already for when she gets bigger to aid in training her. Let the fun begin!🤪💚
________________________________________________________________________________________________________________________________________________________________________________________________________________________________________________________________________________________________________________________
Weekly Updates:
9/4- The 4th week of flower is here and the FastBuds Papaya Sherbet photoperiod is looking fantastic! She's loaded with flowers that are all beginning to get frosty!
9/6- My daily watering campaign continues with me giving the Papaya Sherbet approximately 5 gallons of well water from the garden hose.
The flowers on the Papaya Sherbet are stacking away and the frost continues to accumulate!
9/8- Today, before watering the Papaya Sherbet, I did some needed plant maintenance, removing a bunch of old dead leaves, along with a handful of shade leaves that were yellow.
9/10- Well with four weeks of flower behind her now, the Papaya Sherbet photo is almost halfway through with another 5-6 weeks to go. I only hope and pray🙏 that the weather cooperates and stays cool and dry!
Thank you for checking out my diary, your positive comments and support make it all worthwhile! 💚Growers Love!💚😎🙏
Processing
Likes
5
Share


@ladyjane
Follow
8/12 - Dropped 3 seeds into RO water to germinate
8/13 - Placed seeds into moist paper towel and into plastic bag to germinate on heat mat.
8/15 - All three seeds sprouted. In the morning I prepared three 3-gallon pots with Roots Organics Original Soil and Nature's Living Soil Autoflower mix. I will be doing Super Soil method for this grow. I filled the bottom one third of the pot with regular soil, then added 1 lb of Nature's Living soil and mixed it in. Then filled the rest of the pot with the regular soil. I topped it with Mosquito Bits for added BTI for pest prevention. Finally, I wet the pots down with RO water and Organic Black Strap Molasses. After about 8 hours, I planted the three seeds and placed them in the 4x5 tent with a humidity dome to keep in moisture.
8/16 - Two of the three already have their true leaves. So, I have removed the humidity domes from those two.
8/17 - The last of the GSCs have sprouted her true leaves so I have removed her dome. I sprayed them lightly again today with RO water and molasses.
Likes
46
Share


@Stork
Follow
It was very easy to grow as a super-strong nothing can hurt her for nut burs u need to do it way over so she starts to get burns well for my first DWC I love it buds are amazing even not experienced like me can grow her perfectly I can't wait to try and smoke here 😎😎🤩😘
Likes
10
Share


@TeesTrees
Follow
Day 43 - I have started LST as this plant i know won't grow much in height, im gonna use it to teach myself techniques/perfect a technique. I hope ive done a decent job of it. Excited to see what happens over next few days.
Day 44 - im very proud of my little plant. It looks so strong after the first day of LST. Definitely surprised with the results.
Day 45 - Plant seems to be adjusting just fine to LST i do keep checking it. There is a bit of leaves overcrowding to pne side. I will probably have to move if i can!
Day 46 - I'm thinking if i need to do more LST or just leave it now to grow.
Day 47 - the plant is really starting to woden out and stretch as well. I need to see when it will flower it looks like it might do soon.
Day 48 - The plant looks well. I believe she has started to flower so i really have to get my fan and filter asap.
Day 49 - She defo started flowing and i just bent ome stem to allow more space between each other ;But they looks really good. Also entering another competition can't win if you don't partake.