The Grow Awards 2026 🏆 


Likes
Comments
Share
@RDWCGrowing
Follow
5/23/2023
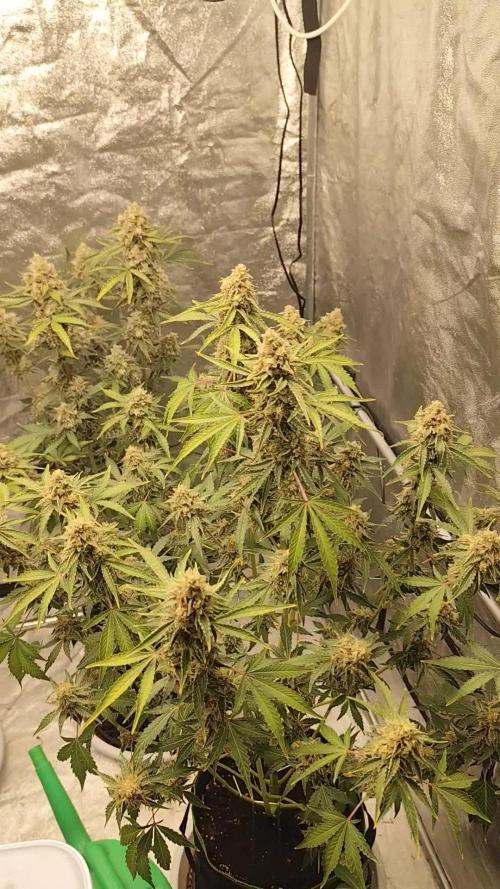
Week 7- Day 1 of Flower (Day 110 overall) (Day 49 of Flower)
There was a couple of small super small sucker buds on the lower stocks that needed to be cleaned off but that was it. Just watching them Flower!!
5/24/2023
Week 7- Day 2 of Flower (Day 111 overall)
Tucked a few fan leaves below lower buds but didn't see any blatant offenders that needed to be removed. I typically do start my checks in Week 8 but since this is a new strain I decided to go ahead and do a Trichome check just to see what was what.. Just as I thought nothing but clear glassy Trichomes. I will check again in one week....
5/25/2023
Week 7- Day 3 of Flower (Day 112 overall)
Just letting them grow today!! Smell is getting stronger I would say it is a hint of Pine and a heavier fruity smell.
5/26/2023
Week 7- Day 4 of Flower (Day 113 overall)
I did Nothing but took some pics and I enjoyed it!!!! It is nice to be able to just sit back and watch them on auto pilot.. :-) Tomorrow Water Change Day!!
5/27/2023
Week 7- Day 5 of Flower (Day 114 overall)
I admit it.. I had to defoliate a little bit.. I looked in while changing the water today and there were just a couple blatant offenders blocking the light from lower bud sites and those leaves they just had to go. Other than that I changed the water and this week is where I drop everything and start preparing them for this last phase of the grow. Loving a few of these buds they are starting to beef out very nicely.
I added 36 gallons
Mammoth Silica = .5Mil/Gal= 18Mil
Root DRIP = 1Mil/Gal= 36Mil
CalMag= .5Mil/Gal= 18Mil
FloraMicro = 3.8Mil/Gal= 137Mil
FloraGro= 2.8Mil/Gal= 100Mil
FLoraBloom= 4.6Mil/Gal= 166Mil
LiquidKoolBloom= 2.5Mil/Gal= 90Mil
TPS SIGNAL= 4.0Mil/Gal= 144Mil
ORCA = .5Mil/Gal= 18Mil
Water Temp= 70.1
Tent Temp= 76
Humidity =64 ** I have two dehumidifiers running on Ink bird controllers to try and keep the humidity down, In late in flower I like to keep the humidity above 45 but below 60.
5/28/2023
Week 7- Day 6 of Flower (Day 115 overall)
Opened the back of the tent today and boy did she need some defoliation love in the back. Other than that I took off a few little sucker buds trying to form. I did start to setup my Dry space as well as did a Trichome Check today and the brown tips are coming in nicely.
5/29/2023
Week 7- Day 7 of Flower (Day 116 overall)
Found a few baby sucker buds trying to form so I removed them. Other than that I am enjoying watching her mature.
I also started my Reverse of the Clone I took 6 weeks ago in Apr from #3. I am uploading footage of the reversing process for your viewing pleasure.

Likes
9
Share
@STAYINGONMYMAINCBATORUNTWO
Follow
Doing amazingly! Actually started flush literally today! So stay tuned to see how chunky these flowers are going to get! They smell delicious! Candy shop in my tent with all these flavours!

Likes
2
Share
@xipo86
Follow
Day 70
Pound cake & Northern lights are finisihing very good.. fatter by the day and loud smell
Lemon Cherry Cookies still 3 weeks to go.. smell to lemon is one of a kind... wow


Likes
3
Share
@julian100614
Follow
Subiendo como la espuma 🔥🔥
La planta esta empezando a formar múltiples brotes y puntas de muy buen aspecto y color 💪
Aplicamos los nutrientes de forma moderada y poco a poco para no sobrecargar a la planta ya que lleva muy buen camino 👌
Bajamos un 5% la HR y la temperatura la mantenemos como siempre 😉
Hemos sacado del armario el humificador porque con las propias hojas ya crean la humedad justa para su que esten comodas.


Likes
7
Share
@eldruida_lamota
Follow
Que pasa familia, vamos con la octava semana de floración de estas Black muffin F1 de Sweetseeds.
Vamos al lío, me quede con 3 por espacio, siempre pongo alguna semilla de más por si no abriese alguna por no perder ese hueco del indoor.
También se trasplantaron a su maceta definitiva, en este caso de 7 litros y el trasplante se realizó correctamente.
El ph se controla en 6.2 , la temperatura la tenemos entre 20/22 grados y la humedad ronda el 50%.
Tienen un aroma bastante fuerte, las flores parece que están prietas y están repletas de tricomas.
Las jodidas han estirado bastante, ya veremos que ocurre como termina todo.
Hasta aquí todo, Buenos humos 💨💨💨

Likes
56
Share
@hawkeye_diesel66
Follow
She was just lst'd a little he help bring her out and down. She gave me no problems once she snapped out of whatever she was going through foe the first few weeks. She has some good chunky buds and will have a good amount of trim and some popcorn buds that I left to make hash out of. A real pleasure to grow and can't wait to bring it back into the garden.

Likes
19
Share
@Naujas
Follow
Amazing!!!!! a wonderful girl, she managed to keep herself so beautiful and strong :) she was not visited very often :) the house has a wonderful smell of tropical fruits :) Thanks to Dutch Passion for the opportunity :)

Likes
36
Share
@MadeInGermany
Follow
Unfortunately, I had to find out that my account is being used for fake social media sites.
I am only active on growdiaries here.
I'm not on Facebook Instagram Twitter etc.
All accounts except this one are fake.
Have fun with the update.
Hey everyone 😀.
The plant develops as it should 😍.
It grows very well and very beautifully. She also coped with the topping very well, so I will top it a few more times before it finally goes to the flower tent 😃.
Until then, I wish eucb a lot of fun until the next update.
Stay healthy and let it grow 🙏🏻
You can buy this Strain at :
https://originalsensible.com/original-sensible-seeds-zkittlez~20503
Type:
Zkittlez
☝️🏼
Genetics:
Afghan Kush Indica x Grandaddy Purple x Grapefruit hybrid
👍
Vega lamp:
2 x Todogrow Led
Quantum Board 100 W
💡
Bloom Lamp :
2 x Todogrow Led
Cxb 3590 COB 3500 K 205W
💡💡☝️🏼
Soil :
Canna Coco Professional +
☝️🏼
Fertilizer:
Green House Powder Feeding
☝️🏼🌱
Water:
Osmosis water mixed with normal water (24 hours stale that the chlorine evaporates) to 0.2 EC. Add Cal / Mag to 0.4 Ec Ph with Organic Ph - to 5.5 - 5.8 .


Likes
1
Share
@Growing_Spartan
Follow
May 27th-29th
Trellis net is getting full and plants looked good, could’ve flipped to 12/12 but my smart self completely forgot about that flowering stretch so I vegged them till I saw a “good height” lmao I know but it’s my first grow leave me alone lol

Likes
17
Share
@HeartStrong_Garden
Follow
She is definitely not as big as the other, but on different nutes looks a bit cleaner. This is my lowest humidy level in a week
Likes
8
Share
@Black_Widow
Follow
Привет садоводы !
Неделя летит за неделей
Сегодня я снова поменял раствор на новый и добавил стакан заваренной сушеной крапивы, богатой микро элементами
Растение чувствует себя хорошо, за неделю еще вытянулось на 10 сантиметров
Если дотронуться до листьев со смолой , то пальцы потом сильно пахнут лимоном с лаймом
Цветки имеют небольшой размер , но я надеюсь, что они себя еще покажут !

Likes
34
Share
@Bruno_The_Stoner
Follow
Hello there, it's just 70 days of girls' lives. As you can see the plants are doing well. They welcomed the extra HPS 250watt lamp, the overall temperature went up and the humidity dropped to 40% in the day. After rinsing the plants I intend to reduce the overall dose of BioBizz fertilizers and use the last time PK 13/14.
Processing
Likes
8
Share
@julian100614
Follow
Comenzamos su 2°semana aportando los nutrientes principales Deeper Underground de Top Crop para su sistema radicular añadiendo 1ml/l al agua de pH6
Día 9: La pequeña ya alcanzó los 5cm y sigue creciendo bastante bien. Ahora lo importante es que cree un sistema radicular en perfectas condiciones.
Likes
5
Share
@weedelicious
Follow
Day 71:
Hope everything's going well for you. Unfortunately, it's still way too hot here. The outside temperature is 29°C, so it's pretty similar inside the tent. I do have a portable air conditioner, but it would have to run constantly, and that's too expensive for me. That's why I’ve increased the humidity a bit. Otherwise, they look healthy and the buds are getting bigger. I removed two leaves from the Tropical Marker that seemed a bit burned — at least that's what I suspect.
Day 74:
Today, like every two days, the ladies were watered again with 2 liters of water mixed with fertilizer and Cal-Mag. The girls are looking beautiful. The Tropical Marker is very frosty, but the Purple Kush is also getting frostier. Today, I wedged a board with a hole for the exhaust fan into my window. I hope the room will get a bit cooler now. Additionally, I temporarily hung the lamp’s power supply outside the tent.
Day 75:
Today, for once, I didn't do anything. Thanks to the new exhaust outlet, the temperature in the tent is actually 5 degrees Celsius lower. The VPD is now back at 1.6. Yesterday, I lowered the exhaust from 80% to 50% to better maintain the 60% humidity, which is working well now. The buds continue to grow, the girls look beautiful, and the smell is getting stronger.
Day 76:
Today the ladies got 2 liters of water again, this time without any fertilizer. The buds are getting bigger and the girls are looking wonderful. Other than that, I had a little chat with them and then left them in peace again.

Likes
2
Share
@Saintvicious
Follow
Flower stretch and bud sites are setting. Lots of tops from the lst. Fingers crossed.
Likes
207
Share
@DogDoctorOfficial
Follow
Day 30 Flower and this girls are growing beautifully, they are by far the smallest plants i ever grew , non or less they are stacking great and it looks like it will be one off those cases I've seen around of small plants with big buds , i just never had the pleasure off having them in my gardens 😆
The VIPARSPECTRA LED is performing fantastic for this 3x3 grow space and the ZAMNEZIA genetics they look like supper stable and so far, apart from the size, they are just beautiful plants growing and looking for they're place in this world . I do believe i will have a longer vegetative time for my next Run with this genetics.
Growers love to you all , and as always thank you guys for reading my diaries , i truly appreciate your time , your love and it all 🙌🙌🙌
And with enormous honor and pleasure that i start collaborating with Zamnezia and Viparspectra
For this run i will have the pleasure of growing some Runtz genetics from Zamnezia seeds that they wore kind enough to send me for test and review 🙏🙏🙏💚💚💚🙏🙏🙏 and for the testing and reviewing i was blessed with the VIPARSPECTRA model P2000💚💚💚🙏🙏🙏 they wore amazing and send me this LED light for me to do some testing and some reviews. Special thanks to Zamnezia and to Viparspectra for this opportunity, lets make magic together 💚💚💚🙏🙏🙏
All i grow is medicine for myself, for me and for my best friend with is me 😆 nothing to sell, so don’t even ask 😅💚💚💚
All info and full product details can be find in can find @
https://viparspectra.eu/collections/grow-lights DISCOUNT CODE 5% - DOGDOCTOR ( all store )
https://www.zamnesia.com DISCOUNT CODE 10% - GROWITGD ( just for seeds )
https://aptus-holland.com/
More info and updates @
https://growdiaries.com/grower/dogdoctor
https://instagram.com/dogdoctorofficial
https://youtube.com/channel/UCR7ta4DKLFMg2xxTMr2cpIg
💚💚💚Growers love to you all 💚💚💚
Likes
48
Share
@Northern_Ent
Follow
May 13: 10-15 C hotter than normal and low humidity means we’re having a very bad fire year. Misting plants to compensate for low humidity. Early to put seedling out but it’s warm enough even overnight for the little Gorilla Cookies Fast Flowering. Nice bags from Fast Buds are a bit too small at 4 gallons for this girl so I’ve put hot peppers in them instead.
May 19: outside full time now. Bad fire season and getting smoky and gross.
Likes
7
Share
@Baboon_Grows
Follow
Did 10l two days ago and it’s bone dry, from 5 to 10l every two days or less ,
Just a rain water this whole week .
She stacking nice , heat still burning some terps but it’s not as bad as 28C+
Clones recovered too and doing somewhat ok , glad they had little stunt so I have time to finish mom off and then repot them