The Grow Awards 2026 🏆 


Likes
Comments
Share
@Salokin
Follow
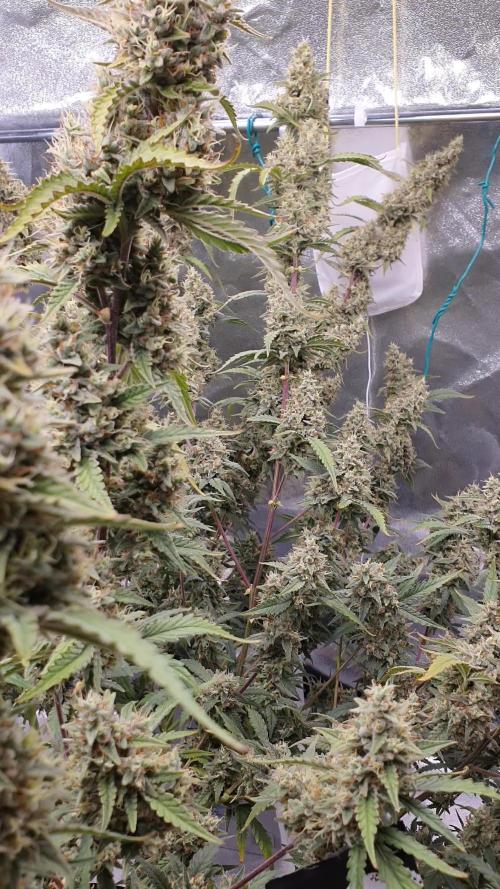
This plant was an absolute joy to trim. This plant consisted of buds and stems only, so I am actually curious what the dry weight will be.

Likes
226
Share
@HighTV
Follow
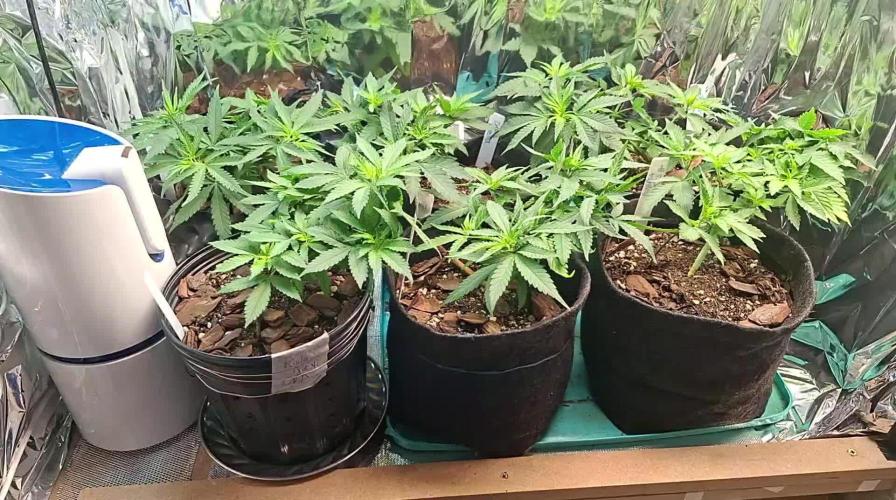
| 📅 Week 8 | Days 50 - 56
| 💡 750w 📏26' |
| ☔ 33%-45% |
| 🌡️️🌞 75 - 81 |
| 🌡️️🌑 70 - 75 |
12/28: I did a reservoir swap on all the plants and adjusted their PHs to 5.8. Humidity was getting really low So I added some containers with water and a towel dipped in to act like a wick to increase the RH. The smell has started to get noticeable so Ill have to be adding the carbon filter sooner.
12/29: Humidity has responded well and has increased to near desired levels. All reservoirs were topped off and had their PH's adjusted to 6 because they have been dropping low lately. Moved the SCROG placements a bit and adjusted the fans as well. Refilled the ambient containers of water for RH levels.
12/30: Reservoirs were topped and although only one needed a noticeable amount. All reservoirs have dropped low again and have been adjusted to 6 to compensate once more. The humidity has reached desired levels and is being stable thankfully!
02/31: I removed a few containers of water because the RH has become fairly stable. The reservoirs were of course topped off, but today they were adjusted to a PH of 5.8 instead of 6 like the last few days. Adjusted the SCROG a small amount. The plants are showing severe Mag deficiency and I will be doubling their nutrient schedule ASAP I just fear the Nitrogen toxicity, but at this points its way better than a this Cal/Mag def.
01/01: Happy New Years!! I have set up the Carbon filter because the smell is getting very noticeable. I swapped out the back right non-focus plants reservoir with the doubled nutrients and added great white mycorrhizae as well. The Focus plant and the other had their reservoirs topped of with tap water then PHed to 5.8.
01/02: I adjusted the PHs of all the plants to 5.8 after topping them off with tap water. I also adjusted the SCROG a slight bit and removed some old foliage. The RH levels are still in the acceptable rage for my setup so I will just refill the open containers and not add/remove any of them.
-
01/03: 2 of the plants including the focus plant had their reservoirs topped off. All of the plants had their reservoirs adjusted to 5.8PH. The RH dropped a slight bit, so I mixed some PHed tap water with CaliMagic to make foliar spray. Its not enough to compensate the lack of Mag in the Nutrient schedule. Tomorrow (Jan 4th) the plants will have their nutrients increased to resolve the issues. Unfortunately I didn't have enough time in the last week to do it sooner.
_____________________________________________________
This marks the end of week 8! The nutrients will be increased tomorrow and I have a feeling the next few weeks are going to show the Focus Plants buds getting plump and dark much like its non-focus plant counterparts. The focus plant has undeniably shown its Purple phenotype at this point so that mystery has been resolved. The only questions now is how fast will these plants react to the increased nutrients and bounce? I have faith in these plants to put out a respectable harvest and i'm already looking forward to future runs with this strain now that I am more acquitted to it. All of the plants will be using Great White Mycorrhizae starting with their swaps tomorrow.
Feel free to leave comments/questions below or give me any feedback to improve my diaries. If you like this Diary follow along and check out my others as well 😎

Likes
11
Share
@eldruida_lamota
Follow
Que pasa familia, vamos con la segunda semana de floración de estas Gorilla cookies Auto de FastBuds.
Tiene muy buenas reseñas y pues me animé a colocar 4 plantas.
Alimentamos nuestras plantas con Agrobeta.
Por supuesto el ph se mide en cada riego y se mantiene en 6.2 y riego en intervalos de 48h.
La temperatura está entorno al 22/24 grados y la humedad anda sobre el 50%.
Las plantas en si ya están bien sanas, tutore la rama principal para que no se fuese de madre, y así controlaré la altura.
Mars hydro:
Code discount: EL420
https://www.mars-hydro.com/
Agrobeta:
https://www.agrobeta.com/agrobetatiendaonline/36-abonos-canamo
Hasta aquí todo, Buenos humos 💨💨💨
Likes
6
Share
@LoganatorDude
Follow
Even though it says 80 Gallon pot, it’s really 400, it just glitches out when I enter 400 and converts to say only 80.
I know she looks bad! I know.
She has only been managing a nutrient lockout with horribly low pH for far too long! The Hydrated Lime has indeed fixed the pH! Resulting in my next inbound set of problems. The original soil from the second 2.3L pot she was in was too strong! She needs to get her roots out into the larger pot, but that only gives her so much more space. Plus in that larger black plastic pot, the hot dry sun at 7,000 ft in elevation, really heats up those pots! When it’s 98F later, that sounds like torture! Maybe it was enough to balance out the more concentrated stuff towards the inside of the root mass. But I don’t want her roots to stop there! The time is now for her to go into the 400!!!
The soil is 6.5 pH through and through. The peas are about to bloom! She has just avoided lockout and is picking up momentum! The 400 gives her a huge diameter for her roots! Something I sincerely hope her genetics will take advantage of. The soil is rich and alive! The temps in 400 will be so much better!
Now I must prepare for my Arch Nemesis!
The Butterfly!!!!!!
Lol
But seriously. They find my plants attractive, and decide to serve my plants as food for their offspring!!!! Not okay! Last year their success rate on my plants was a fat 0!! But they did some serious damage! I am prepared this year!! I will watch with vigilance for any butterflies around my plants specifically. I will spray my plants down regularly with diatomaceous earth! Not too much obviously! I know less is more when spraying that stuff! No mother wants to give her children food with razor blades in it!
And as always there is always next year! I can’t let a phase of mice and men get the better of me. However!!… that’s what I said LAST YEAR!!!! Lol. This year IS next year!
Anyways she looks rough right now on Day 58 but I tell yah what, she has very recently made a dramatic turnaround for the better!!
…I hope!
Happy Growing!
StrongTrees💪🌳

Likes
6
Share
@Kendoda
Follow
It’s the second week of flower and I’ve got her spread across the net.
I’m going to do a foliage feed of fish mix and alg a mic in a around 4 days as well as another 4 ml of alg a mic in 2L.

Likes
14
Share
@wolvex
Follow
Because I'm little worried about the size of the flowers and their resin, I started adding green sensation of plagron, lets see what can do. As you can see I'm waiting to the last moment to watering, in order to stress a little bit my plants and get more resin.


Likes
12
Share
@ZzTooRightOGzZ
Follow
First feeding.
Going well so far fist day of last.
Lst going well.
Likes
8
Share
@Wahalan
Follow
Bonjour 👋
Alors passage en 12/12 depuis une quelques jours, rien a signalé elles s'étire tranquillement 😁
J'ai donné comme prévu une Sun of a Peach et une frosted guava a un pote 🌱


Likes
33
Share
@FlavoursUk
Follow
Day 78 - pheno 1 was cut down, id normally hang dry the whole plant but decided to do it in branches instead. Second pheno has been left in darkness as i haven't had the time to cut.
Pheno one is hung up and drying.. Room Humidity 60/60. As soon as she's dry enough I'll finish trimming her up. Then put them into jars. Might use boveda 60% packs but I'll see. Smells strong! Will post a harvest when both plants have been dried fully an in jars. Hope you enjoy the videos and pictures.
Stay tuned.


Likes
3
Share
@Elemental
Follow
0.1) Observação Geral
Todo o cultivo foi conduzido com monitoramento constante e ajustes precisos de intensidade luminosa (DLI e PPFD), temperatura e umidade, garantindo condições ideais em cada estágio do desenvolvimento.
1) Substrato e Nutrientes
O cultivo foi realizado utilizando água mineral com pH balanceado durante todo o ciclo.
Fase vegetativa: fertilização com BioGrow.
Floração: alimentação com Flowermind.
A mistura do solo foi composta por 50% de substrato reutilizado, rico em nutrientes do cultivo anterior, e 50% de novo solo (proporção 70/15/15), resultando em uma base equilibrada e fértil.
2) Germinação – 19 de agosto
As sementes foram germinadas utilizando água mineral + peróxido de hidrogênio em copinhos de gelatina individuais. Permaneceram por 24 horas na solução líquida, seguidas de 24 horas no escuro total sobre papel toalha umedecido com a mesma água, dentro do mesmo recipiente. Os copos foram abertos apenas a cada 12 horas, em ambiente de baixa luminosidade.
Todas as sementes germinaram com sucesso.
As sementes com raízes de aproximadamente 2 cm foram transferidas para vasos de 1 litro, com adição gradual de substrato conforme o crescimento das plântulas, prevenindo o tombamento dos caules.
3) Fase de Plântula
a) Conduzida sob lâmpadas de 35W e 50W dentro de uma caixa de papelão personalizada, equipada com coolers e exaustor para controle de temperatura.
b) Aplicação de FORT (enraizador) em uma rega, após o aparecimento do primeiro conjunto de folhas com cinco pontas.
4) Topping – 10 de setembro
Foi realizado o primeiro corte apical para incentivar maior ramificação e uma distribuição mais equilibrada de energia.
5) LST (Low Stress Training) – iniciado em 13 de setembro
O treinamento começou três dias após o topping, com amarrações graduais dos ramos para promover a abertura do dossel e melhor penetração de luz.
6) Transplante – 27 de setembro
Transplante realizado para vasos de 4 litros, com rega leve e adaptação gradual à nova base de substrato.
7) Início da Floração (Troca para 12/12) – 6 de outubro
O fotoperíodo foi ajustado para 12 horas de luz e 12 horas de escuridão, marcando o início oficial da fase de floração.
8) Defoliação – 10 de outubro
Remoção estratégica das folhas grandes de ventilador (fan leaves) para melhorar a circulação de ar, otimizar a distribuição de luz e estimular o desenvolvimento dos buds.
pment.


Likes
1
Share
@kauilmayel1996
Follow
Día de corte para la gran berta...
No hice ningún flush por qué quiero probar la diferencia entre flush y no flush
Quedan algunos cogollos abajo que falta formarse
Likes
2
Share
@ChiTaN
Follow
The girls are fine 👍 We're starting a flush before harvest soon 💪 The smell coming from the tent is really awesome :)


Likes
12
Share
@Chubbs
Follow
I hope everyone's New Year is off to a great start. These two are not the tallest but sure make up for it in flower and smell. They're stacked super tight a little to close for my liking but still healthy and happy. Over all Happy
Likes
50
Share
@AsNoriu
Follow
Day 82.
Its 81 day from seed touched soil ! If leaves would be healthier, i would run them at least one more week, but it is, what it is.
They spent 24 hours in darkness and now its Trim Jail !!! ;)))
Harvest Day !
Day 88. Tried bud from each, clearest weed straight from drying rack ! Only 3 feeds makes huge difference to harshness at the beggining. Still Queen is pure Tangie, can it be seed mistake ? ;)))
Day 89. Boy i am f@ckingly surprised !!! Heather - I love You, Your team, Your strains !!!! I still don't get how, but numbers are amazing, Thank You very much !!!!
Will update this diary as cure goes, but i feel so many nice words were unspoken, felt that FB will change my view about Autos - and they DID !!!
Amazing house !
Happy Growing !


Likes
42
Share
@Red_Rockst4r
Follow
Deliciously grow, without problems - super fine and satisfactory result.
Unfortunately I forgot to weigh it wet, but I will update with the dry weight as soon as it is dry - but a good bet is that it has been about 200+ grams wet and there will probably be about 50 grams dry.
I have added some videos from before and after, the top cola was cut - and some close up photos 😘
Update: 42 grams in total 😍
She taste so damn nice, super great !!
Likes
9
Share
@Mr_nugs_lover_David
Follow
She's looking very healthy, beautiful color on the leafs, completely stunning after I got rid of the fungus gnats she's growing ultra fast, let's see what happens with this beautiful princess of mine! 😍👀💚