
Likes
Comments
Share


@JuanHaze_Arg
Follow
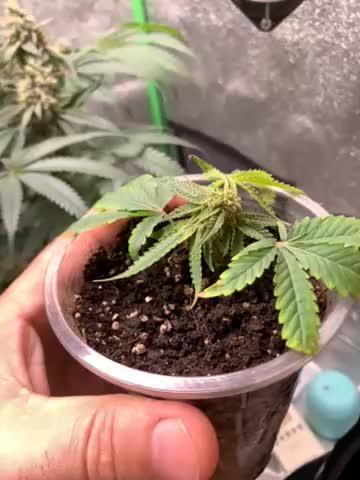
27/05 se riega con 2,5 litros de agua 50% osmosis más calmag y 50% canilla reposada por 24 hs.
La planta está completamente amarilla y perdiendo el color a casi traslúcida las hojas.
Dejé de alimentar muy temprano. El proceso de engorde está en camino. En una o dos semanas parece que está lista

Likes
14
Share


@DonPato
Follow
Fin de la semana 5, entrando a la semana 6, fue increíble la forma en que crecieron estas señoritas, sin duda haber renovado la bomba de CO2, por una nueva, completamente hecha a mano y casera (1,5 litros de agua tibia, 500 gr. de azúcar blanca granulada y 15 gr. de levadura fresca, en una botella de refresco, con un hoyo en la tapa), hizo que la fotosíntesis fuese mas apresurada, ideal para las plantas de tipo autoflorecientes, el volumen de crecimiento fue aproximadamente de un 45% y logro que ya empezaran a aparecer los primeros pistilos, estoy muy emocionado como han respondido todos los componentes agregados en este cultivo, desde el sustrato de Canna Terra Proffesional, hasta los nutrientes Top Crop, ademas de mencionar a las semillas Fast Buds y las semillas a granel de Bocanda Growshop en Temuco, Chile.
Una vez dicho eso, las plantas entraron al quirófano para hacerles su única defoliación pesada entrando establemente en floración, para ello, elimine las hojas más grandes y los micro-tallos que no alcanzaron a entrar en flora esta semana, dejando a los más aptos y fuertes, para su engorde con nutrientes orgánicos (Top Bud y Top Candy). Ahora veremos como reaccionan a la defoliacion y al regado con solo agua con PH controlado.
Saludos a todos, buenos humos y gracias por visitar este diario.
Abrazos. Don Pato!
___________________________________________________________________________________________________________________________________________________
(Eng)
End of week 5, entering week 6, it was amazing how these ladies grew up, without a doubt having renewed the CO2 pump, for a new, completely handmade and homemade (1.5 liters of warm water, 500 grams of granulated white sugar and 15 grams of fresh yeast, in a soda bottle, with a hole in the lid), made photosynthesis more rushed, ideal for autoflowering plants, the volume of growth was Approximately 45% and I have already begun to appear the first pistils, I am very excited how all the components added in this crop have responded, from the Canna Terra Proffesional substrate, to the Top Crop nutrients, in addition to mentioning the seeds Fast Buds and bulk seeds from Bocanda Growshop in Temuco, Chile.
Having said that, the plants entered the operating room to make them their only heavy defoliation stably entering flowering, for this, eliminate the largest leaves and the micro-stems that did not reach to enter flora this week, leaving the fittest and strong, for fattening with organic nutrients (Top Bud and Top Candy). Now we will see how they react to defoliation and watering with only water with controlled PH.
Greetings to all, good smokes and thanks for visiting this diaire.
Hugs. Don Pato!


Likes
1
Share


@I_Identify_As_A_Dan
Follow
Week 5 for Strawberry Gorilla by fastbuds,
She's now definitely in flower mode. She's almost the same height as Moby dick but way less leafy so I'm not expecting as much flower from here for now anyway. Don't feel the need to train her just yet whatsoever. She's a little more fragile ATM but hopefully she will stiffness up a bit now with the wind outdoors. 😇 Right after this picture i also put a decent amount of mulch on her as i believe the sun will be coming back fairly soon.
Likes
Comments
Share


@Anditsch
Follow
Drying is over, now it goes into the jars.
No Problem with mold while drying and growing.

Likes
10
Share


@eldorado1977
Follow
I was planning to trellis net this tent, but unfortunately I’ve had to water these with a lot of runoff as I had a lot of buildup in the soil. The Recharge magic powder fucked my PPMs all up so I switched back to just the Pure Blend Pro and a little kelp/humic juice every 4 waterings or so. Anyways, I don’t have a convenient way to get rid of runoff right now so I need to take the plants out to water. so I can’t trellis. I have some drain trays on the way so maybe that’ll help

Likes
8
Share


@Living_Organic
Follow
Hello, the plants are already second week flowering. Now begins the most iterous part :)
The garden is organic and for flowering I put a top dressing of guano.


Likes
4
Share


@Barcelona_Farmers710
Follow
Explosión de resina!!! Una genética que no me deja de sorprender un olor brutal a cítricos y su olor a Haze un gustazo pra la vista y el paladar sin duda esperamos impacientemente el dia de degustar este manjar!! Espero que os guste Salut y força al canut Farmers!🍁

Likes
8
Share

@zenderman
Follow
14/7/26 day 43 of flowering,beginning week 7.
second video-20 days old clone,roots forming in process,was taken bud(21 days flowering).
🌱
The clone was cut and planted directly into the soil, previously watered with Terra Vega and under a transparent dome with 18 hours of light.this method means manyfolding from one bud and ideally for scrog/LST technique.

Likes
25
Share


@eldruida_lamota
Follow
Bueno familia ya finalizamos con el proyecto de las Runtz de seedstockers, son una cepa bestial.
La verdad que el secado muy bien 9 días en Malla y a los botes, 40% humedad y 21 grados es la temperatura ambiental que han tenido en el secado, aparte deshumidificador enchufado 24 horas al día.
En resumen la cepa es muy fácil de cultivar, el germinado se me resistió igual es complicado el germinado pero el resto es simple resistente fácil de alimentar pienso que es rápida los tricomas ya estaban hechos y se me hecho el tiempo encima.
Por lo demás de miedo os la recomiendo.
Gracias a Seedstockers, Agrobeta y Mars hydro, sin ellos este proyecto no sería igual 🙏.
Agrobeta:
https://www.agrobeta.com/agrobetatiendaonline/36-abonos-canamo
Mars hydro:
Code discount: EL420
https://www.mars-hydro.com/
Buenos humos 💨💨💨

Likes
8
Share


@Tweak
Follow
GG12 is putting out buds like crazy even though she’s quite small, I think I’ll still get a decent harvest from her. The Alien OG and Pineapple Express both had a few branches that needed supercropping to keep the canopy nice and even. Stretch looks over and the 3 not named GG12 are just starting to bud out. Girls are Only getting plain water and look super healthy. Excited to see what the next week brings. Thanks for stopping by and add my grow please.


Likes
12
Share


@Kinghaze
Follow
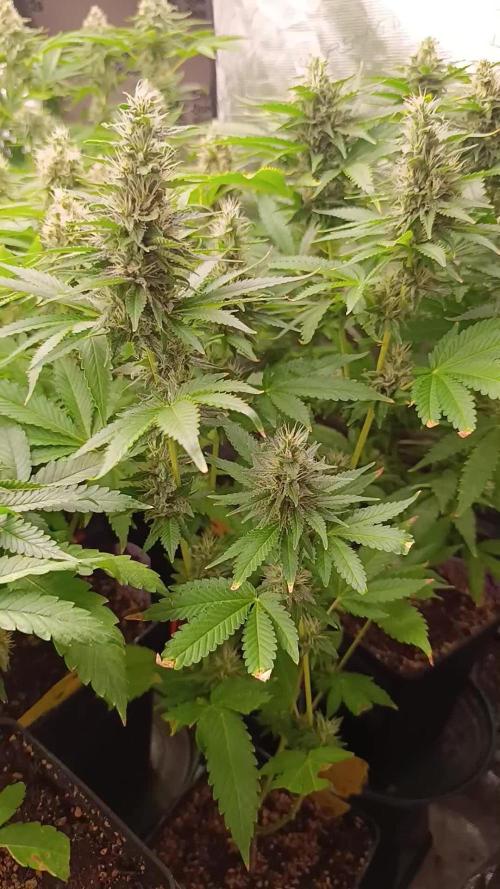
Week 7 of flower
From now on they only get flawless finish from advanced nutrients.

Likes
2
Share

@NoProbation4Weed
Follow
The Grape Candy smell on this plant is insane! the amount of resin production is also very good.
VPD around 1.4–1.6
The light hits the plants with around 900 PPFD.


Likes
17
Share


@MG2009
Follow
06/29/2022
Got my seeds today, soaking Jiffy peat pellets with bio-remedy. Once pellets are thoroughly wet I will drop seeds and begin germination.
07/02/2022
AK 2.0 are in tan pots
Bruce Banner is in green pots
07/04/2022
AK 2.0 are up, the Bruce Banner should be in the next 24 hrs.🙏🏻
07/05/2022
Today is bittersweet Bruce Banners all popped up last night this morning there is 1 and 1/2
Little pinchers killed one ate all most the whole 2nd plant I don't think she will live,😞 bright side is I still have 3 AK 2.0 and 1 Bruce Banner!😀
See you all in a couple of days or so to start veg.
07/09/2022
Down to 2 AK 2.0 and 1 Bruce Banner. Should be getting ready for veg by next week.
07/12/2022
A 2nd Bruce Banner is fighting to survive! So watering with
(BIO- REMEDY) Giving her best chance to establish good roots.

Likes
15
Share

@420DeepGrow
Follow
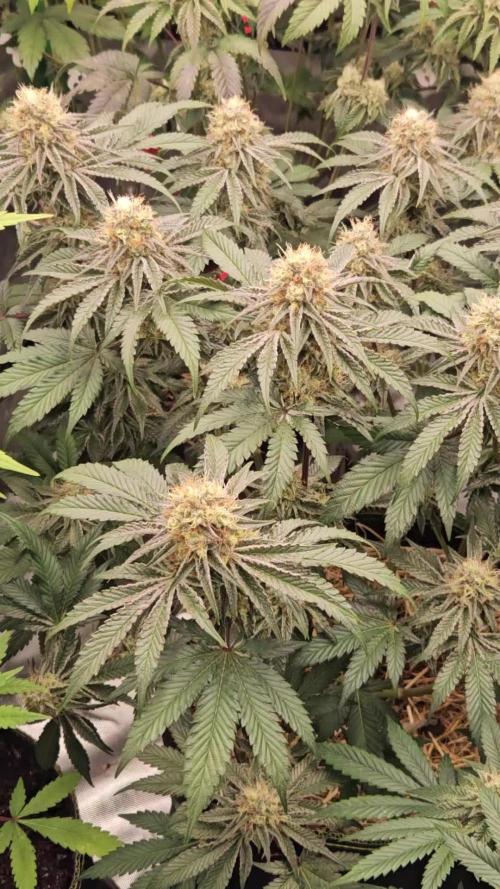
📆 Semana 6
El engorde se acelera y los cogollos comienzan a ganar una densidad notable. Los cálices continúan apilándose mientras la producción de tricomas alcanza un nuevo nivel, cubriendo flores y hojas de azúcar con una gruesa capa de resina.
La planta más vigorosa mantiene un mayor consumo de agua y nutrientes, mientras que la segunda sigue desarrollándose de forma muy equilibrada. Tras un ligero ajuste en la fertilización para reducir la acumulación de sales, ambas responden con normalidad y continúan enfocadas en la formación de flores.
⚡ EC: 1.8–1.9
💧 pH: 6.2 – 6.5
🌡️ Agua: 21°C
🌫️ Humedad: 55–60%
💡 Intensidad: 1000–1100 PPFD
🔥 Nota de cultivo: La prioridad pasa a ser mantener un equilibrio nutricional que permita seguir engordando los cogollos sin excesos. La calidad de la resina y el volumen final se decidirán durante las próximas semanas.
Seguimos creciendo fuerte 💪!


Likes
3
Share


@The_Doctor_Green
Follow
Hola a todos mis amigos.
Este diario llego a su fin, pero pronto comenzare otro, de esta misma cepa, pero para exterior, quiero probar. Que tal se comportan afuera🙌🙌🤩🤩💪💪

Likes
19
Share


@LittleBigTrees
Follow
Not much to say , had a timer issue with my dripper, for some reason it just reset its self leading to the medium drying out and going up to around 3.5EC ! Hopefully it won't cause any issues now I've brought it down to 2.2EC , I guess I'll find out over the next few days .
happy growing 💚


Likes
5
Share


Likes
42
Share


