
Likes
Comments
Share


@adam_pawloski87
Follow
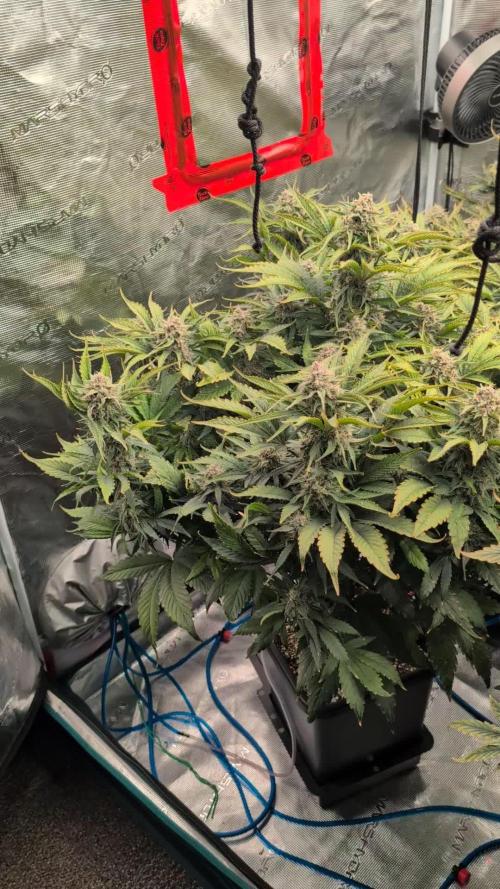
@twenty20mendocino Ateam R&D Update ~ Lets Go day 38 of flower an these ladies are looking amazing! Gettin in some nice frost a the smell is insane, so many different terps Sour , skunky , fuel , gassy funk a berries 😍so amazing! Not too much longer to go a these ladies will be ready for flush , but let’s take it day by day!! Hope y’all enjoy an have an amazing productive day ! Cheers to y’all 😶🌫️💨💨💨💨

Likes
6
Share


@Reidy_B
Follow
Everyone is thriving! Things are going fairly well. Had a rough start but now everyone is living their best life! 🤩

Likes
12
Share


@russrahl
Follow
Everything is looking good so far. Plants have really exploded in growth since the flip and are filling out the screen nicely so far. We will keep tucking till she stops stretching and hopefully get most of the screen filled. We flipped her a bit early In the screen fill stage do to a shortage of stock so we need a quick turn around on these girls cause even in Canada with legal weed it’s hard to find good medical grade that’s not ridiculously priced at a legal store. Wayyyyy cheaper to grow our own. Water was changed out at beginning of this week as well and nute’d at 3/4 strength with Remo flowing lineup and UC root at full strength. These girls are also the early version so should be 45 days or so apparently.... we will see...lol


Likes
Comments
Share

@HinduGod
Follow
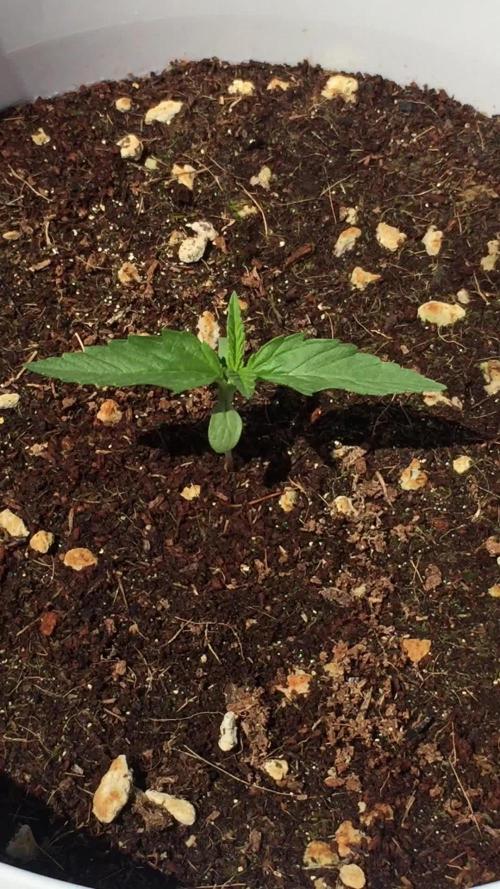
WOW LOOK AT DAT!! DA SUNGOD HAS BEEN HERE FOR 6 DAYS DA RAINGOD 1 DAY!!! DA SEEDLING IS 1.5 INCHES AFTER 7 DAYS!!!!!!!
PLEASE COME AGAIN!!!!


Likes
9
Share


@SlickCityOrganics
Follow
Debating on cutting Blackstrap on Friday. Not seeing much amber. But lots of cloudy trichomes. But we will see in the next days if any amber will show. Peach Crescendo is frosty. Can't wait to taste it. We will see. Fat bastard just doing her thing. Smelling fruity and gassy. Just giving them water till harvest. Ppm is kinda high on Fat Bastard.


Processing
Likes
8
Share


@BigBaby420
Follow
Started with 2 Sour Chelumbians and 2 Lemon Haze Autos. Neither of the LH autos wanted to live so I started a bubba kush and a white widow to be in the same tent. They will be about a week apart in life

Processing
Likes
7
Share


@HylianGrass
Follow
Starting week 3, this strain grows like crazy!! The conditions are looking good, i am now giving her full nutes since she took more than well the last half-dozed nutes. Very nice lush green with no signs of deficiencies! One the root found its way to the tank wich surprised me be how fast she broke through the bottom hole
Likes
26
Share


@C_More_Budz
Follow
Another good week of growth very luscious green and you can tell the roots are expanding. The GROBUCKET system has been activated lol the soil deep down is moist to the right level. I will still continue to top water to continue to inoculate the nutrients until I feel there fully taken into the soil but other than that my environment has really been consistent for the most part. It’s safe to say they are all in Veg and I will let them go another week before I do any training or stress them out a lil. LINK FOR YOUTUBE IS BELOW
THIS IS THE LINK TO MY YOUTUBE WHERE I WILL BE UPLOADING DAILY
https://youtu.be/aYn0BZbI1SI

Likes
27
Share


@Grey_Wolf
Follow
C.O.P AUTO
Dutch Passion Seeds Critical Orange Punch Auto
Day 52 From Germination
31st March 2020
Hi everyone I hope you are all keeping safe . 😀
C.O.P auto is doing well in her little possie in the growtent next to the fan 😃 She's pretty much on cruise control and I just add water and a few supplements when she looks thirsty
A very easy to grow auto plant so far I must say 👌 Ive started to notice some smell coming thru now , not quite orange but definately something like that 👍
That is all for this week thanks for stopping by 👊
Likes
5
Share


@I_Identify_As_A_Dan
Follow
Week 7 for Moby dick by Fastbuds
Outdoor weather has been getting colder compared to last week, specially night time temps sometimes down to 10 degrees. But shes still pushing 😎 about 140cm tall atm & i think she will maybe add another 10/15cm to that😂 BIG GIRL
Aphid situation seems to be under control with me spraying her at sun rise & afternoon (only when shes in shade) Have ordered some products to clean up the space that will arrive monday & some plant products too incase the issue gets worse.
Very excited to see some flower production on her, finally getting some build up of white hairs going on here.
Likes
4
Share

@Grow_for_Happiness
Follow
This Blueberry Slime may be the best looking plant in the tent. Nice naturally flat canopy with buds sprouting everywhere. Thick strong branches to hold the impending bud load. Already starting to frost and the smell is just too good, fruity and stanky. Barely any tip burn with the regular nutrient feed levels. Hearty AF. My top 3 favorite strain to grow and smoke. I
ncreased lights to 100% (+10%) to help bring the edges up to 550 umol/s with canopy average being 625 umol/s.

Likes
19
Share


@GoldenWeedGrower
Follow
@18/06
Trying to get under control the raising EC.
Tomorrow I will made the res change for the final stage.
EC: 1.7
PH: 6.1
@19/06
New res: 11L with 3ml/L of Flash Clean (a.k.a. Flora Kleen)
Putting the plant in the new res I saw some little bugs in the container. Hope this is not a problem.
I'm going to make the flush until 7-10 days for final ripening.
Tomorrow I will add to the res about 2ml/L of Ripen until the end.
Today parameters are:
EC: 268
PH: 6,2
👍👍👍👍👍👍👍👍👍👍👍👍👍👍👍👍👍👍
Lesson Learned:
AVOID THE BUGS WITH THE YELLOW TREES
👍👍👍👍👍👍👍👍👍👍👍👍👍👍👍👍👍👍
@20/06
Added 40ml of Final Part (Ripen). This res wil run until the end, before the final flush.
EC: 1550
PH: 5,45
@21/06
Added 2l with 7ml of ripen and PH+.
EC: 1524
PH: 5,8
@22/06
Changed res only ripen and PH+
EC: 1250
PH: 6,4
@23/06
Added only fresh water and balancing PH
EC: 1354
PH: 6,27
@24/06
Added 1l with 4ml of ripen. She seems quite close to the finish
EC: 1290
PH: 6,01
@25/06
Added 2l of fresh water as PH is lowed and EC is raised.
EC: 1226
PH: 5,67
@25/06 h230:00 Ready for the next week, maybe the last one ?
Let's see.. Good Luck to myself


Likes
120
Share


@CBD_Sweden
Follow
Hi all the happy people here in GrowDiaries.
This is my second cultivation ever and it will be fun to try a bigger space than my closet grows
First, I'm just going to say I'm done with the construction of my new growroom.
I put some pictures on the construction here in week one.
The room is 2.14 meters by 1.7 meters and has a ceiling height of 2 meters.
It provides a floor area of 3.6 square meters.
I use a 54 Watt Lightwawe T5 for germination and 2 Pcs 400 Watt HPS lamps.
I have a channel fan that replaces the room air about 40 times an hour to get a comfortable theme in the room, the air enters a fresh air intake from the outside.
The air is purified through a carbon filter to then leave the room to the rest of the basement.
Then I use that heat to heat the rest of the basement.
I will use 8 pcs 15 liter Autopots to grow with and a 100 liter water tank that supplies the pots of water and nutrition.
I will grow completely organically in soil and will watercure my buds to get the best possible medicine for me.
But there are no cultivation rooms to be displayed here, so I continue with what is most important.
I am very excited to see how the new growroom will work and how this CBD Fast Eddy plant from Royal queen seeds will turn out.
CBD Fast Eddy Automatic is combining Cheese x Juanita la Lagrimosa x Ruderalis, Fast Eddy is a rapid growing, flavourful, and CBD-rich auto strain that goes from seed to harvest in 8-9 weeks, produce generous yields, and induce a clear, mellow, and most importantly, functional high.
THC: 9%
CBD: High
Yield Indoor : 400 - 450 gr/m2
Yield Outdoor: 80 - 130 gr/plant
Height Indoor: 60 - 100 cm
Height Outdoor: 80 - 120 cm
Flowering: 6 - 7 weeks
Harvest month: 8-9 weeks after sprouting
Genetic Background: Cheese x Juanita la Lagrimosa x Ruderalis
Type: Sa 50% In 40% Ru 10%
Effect: Clear, Painrelief
Climate: Mild
-----------------------------------------------------------------------------------
2017-09-18. Week 4 starts and she is in flower. She is 36 cm high and looking really healthy.
---------------------------------------------------------------------------------------------------------------------------------------------------------
2017-09-19. 2 new fans is installed in the grow room. Added pic and video.
---------------------------------------------------------------------------------------------
2017-09-20. Kl 10.00. New video. The girl is 38 cm high and doing great.
Kl 23.00. Did some massive defoliation, added video and pics
------------------------------------------------------------------------------------------------
2017-09-22. The girl have recovered well after my massive defoliation. She is 39 cm high now and have received 2 liters of water and nutrition today.
Processing
Likes
6
Share


@Ashbash
Follow
Not giving them Any nutrients now until chop which should be in a few days. Seeing lots of amber on the Royal Gorilla, not so much on the Green Gelato, but still present in small amounts.
2 days until 10 weeks total flowering.
Letting the plants fall and rest on the side of the tent isnt ideal, but its the only way i could have saved them from the heat.
Check out my stardawg diary for what heat can really do to a plant....gonna upload another week soon and there is HUGE damage to the plant that didnt auto.
These smell lovely anyway, cant wait to try them!
Processing
Likes
4
Share


@Skillgrower
Follow
Inicio da 4° semana vamos no dia 20 com muita força, adicionei agora ao plano de alimentação rinho skin e sensizym para limpar as raizes para pernanecerem brancas e engrossar os ramos strain vigorosa 100% indica estou a gostar
Como da pra ver no video houve um pequeno acidente a fazer lst, uni onde rasgou e pus papel vegetal a volta a segurar bem, vamos ver se ela cura.. continua com boa cor e nao se foi abaixo nem uma vez! Esperar uns dias, se nao curar vou cortar e fica um top acidental kkk
Ja curou o pequeno corte que tinha no ramo principal, decidi exprimentar fazer um supercrop, é a primeira vez espero que tudo de certo..
Em geral esta ser uma boa semana nada a apontar nestas meninas, a ir muito bem! 😏😁

Likes
9
Share


@TiRobotProds
Follow
Parfait elle se comporte bien les bourgeons gonfles énormément. Une odeur fruité se dégage de la tente.Les engrais bio RQS organic sont excellents elles font un super travail sans excès ni de carence. Rajout de guano au dessus du terreau pour l'explosion floral ☠️☠️ a bientôt pour plus d'informations.
