
Likes
Comments
Share


@SlowpokeFuegobud
Follow
🍪 🍒 🍰🍩 🎀🍪 🍒 🍰🍩 🎀🍪 🍒 🍰🍩 🎀🍪 🍒 🍰🍩 🎀🍪 🍒 🍰🍩 🎀
Welcome to week 14, dear growmies!! 😘
This is the harvest day in week 14, please everybody stand up for the uncomparable, the luminous, adorable, the one and only BREAK-UP CAAAAKE!!! 🎉 ❤️
WOOOHOOOOO!!!
Now we bake a cake.. 😎
Thanks for showing up and supporting me and the girls, bless you, growmies!! 😘 ❤️
Shouts go out to my sponsors @GreenBuzzNutrients, thanks so much for your support!! 💚 💚 💚
If anyone would like to try their amazing organic products, you can find a generous discount code of 25% in my weekly comments! 😜 🙏
If you want a recommendation which product to get first.. BIGFRUITS!! 😍 I love the tasty terps with this one!!
https://greenbuzznutrients.com/
Thanks also of course @Kannabia, for the beautiful genetics!! 🧡🧡🧡
Pouring all my love into this grow, thank you for joining in, growmies!! 💚 💚 💚 😘 ❤️ ❤️ ❤️
Wishing you all the best for your beautiful gardens!🌱 🙏 Grower love!! 💚
_________________________________________________________
Strain Info:
https://www.kannabia.com/en/feminized-cannabis-seeds/break-up-cake
We need to talk
You’ve got to celebrate everything in this life, and that includes love and heartbreak. Since you’re all familiar with Wedding Cake feminised marijuana seeds, we’ve put a Break-up Cake in the oven at the Kannabia Seed Company – because things don’t always go well, and we sometimes need a friendly seed to lean on.
Break-Up Cake has a base of Girl Scout Cookies, one of North America’s best-known strains, which is earthy with a very potent indica effect. And we top it off with a delicious Cherry Pie which, in addition to giving it an elegant dark attire, adds a silky, deeply sweet flavour of cherries and berries. Look no further – it’s the perfect cake.
This seed will be celebrated for its ease of cultivation and abundant production. It’s one of the best investments you’ll make this year. But if it’s going to be memorable for one thing, it’s for its sweet complex flavour that’s full of contrasts. If we have to break up, let’s do it sweetly and amicably, right?
How to: Break-Up Cake
Break-Up Cake is an “all-terrain” marijuana seed, which will adapt to the place you allocate to it. An ode to independence, it’s a plant with only the most basic needs that knows how to grow by itself.
It’s a pale branching plant with tremendous dark green leaves, purple tips, and an icing sugar coating of trichomes. Its immense buds are some of the stickiest ones we’ve found in our seed bank recently.
Indoors, it needs 60 days of flowering to give no less than 600 grams per square metre. Use a Screen of Green method without hesitation, or plant it using hydroponics if you want to obtain the full benefit of its potency.
Outdoors, it reaches two metres in height with a harvest of 800 grams per plant, which is reason enough to give it a go. Like a good break-up cake, this plant doesn’t need to live with a partner, and knows how to live well in a Guerrilla plot. Between 25th and 10th October is its moment.
Taste and effect of Break-up Cake
Very relaxing but not causing lethargy, it’s a good indica-dominant plant. Its effect is mellow (we’re too old for childish games). It calms the consumer but it also gives rise to creative moments. Head on up to the top floor, later to make your way, little by little, down to the kitchen later (where you might want to give in to temptation if you need to stimulate your hunger).
The flavour is full of nuances. It will remind you of a vanilla sponge or cheese cake: you’ll notice a cherry topping, something sweet that you can’t quite distinguish, and an earthy undertone on a biscuit base… You’ve got to sample it to know it.
_____________________________________________________________________
SETUP:
80x80x180 cm Zelsius
240W Full Spectrum LED IR UV dimmable
DW240H-A6-HS
Heatsink color red
LED Chips:
512pcs SAMSUNG LM301H + 24pcs Osram 660nm + 8pcs Osram IR 730nm + 8pcs UV 385nm
Color mix: 2700K + 4000K
2,8umol/J
Driver HLG-240H-C2100B
Coverage: veg 5x3ft / flower 4x2ft
Product size: 628x205x68mm
Green Buzz Nutrients
Shouts go out to my sponsors @GreenBuzzNutrients, thanks so much for your support! 💚 💚 💚
If anyone would like to try their amazing organic products, use code GD42025 for generous 25% discount (for orders of minimum 75€) ✨
https://greenbuzznutrients.com/
Biobizz Lightmix
custom exhaust fan 320/270cm³/h
Carbon Active Granulate 240cm³/h
tab water pH 8 - EC 0,25 with Calmag to 0,5
Advanced Hydroponics pH minus Grow + Bloom to pH 6.2
🍪 🍒 🍰🍩 🎀🍪 🍒 🍰🍩 🎀🍪 🍒 🍰🍩 🎀🍪 🍒 🍰🍩 🎀🍪 🍒 🍰🍩 🎀

Likes
3
Share


@PiloPuntog
Follow
cuarta semana de floracion.
me gusto mucho el main-lining hasta ahora, es comodo, facil de acomodar las ramas, tienes más posibilidad de controlar la humedad al tener menos hojas desde abajo del scrog.

Likes
1
Share


@MrPerlite89
Follow
Very satisfied with this week girls looking strong and healthy going into Bloom also ethos genetics get back at me I need to know if you ever had a problem with one of your seeds just won’t to know no fussing it’s all lov


Likes
16
Share


@DevilishCherryBlossoms
Follow
Smell extra strong when snipping some leaves down !
6/10
Dry done
Cure start

Likes
25
Share


@Prototype0181
Follow
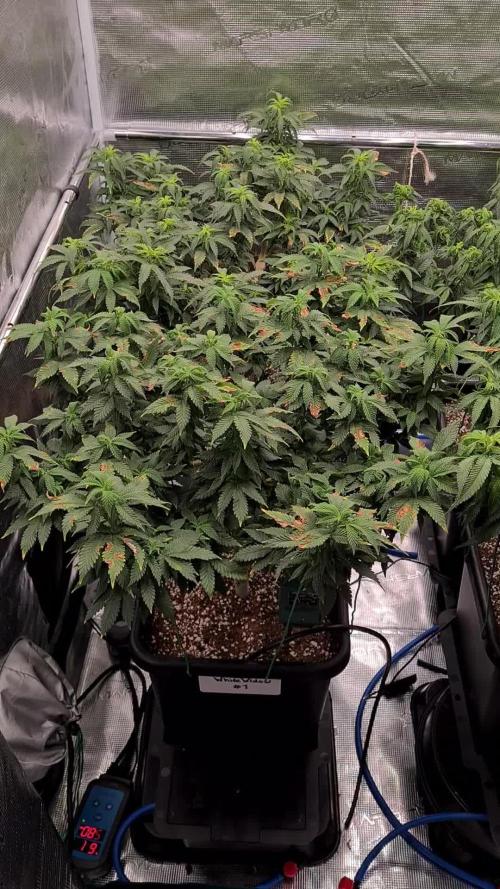
The Rosso Corsa is devoloping good. She's the biggest among the strains so far 😎 she has a little burn on 1 of her leafs deu to me no being carefull.


Likes
3
Share

@psychonaut420
Follow
The start of week 3 veg I’ve been LSTing the plant I notice development drastically every 12hrs and now just starting to spot the development of side branches and new nodes I am following shogun nutrient schedu
Likes
8
Share


@DonPerion1983
Follow
So flushed for a week now and harvested all but one plant! Personally think I timed harvest time on a few plants wrong as they seem quite dark! Also picking at fan leaves very late on certainly didn’t help on two of the plants but overall for my first grow quite pleasing but know a lot can be improved on for my next grow! Personally also added canna pk13/14 to late into flowering time
Harvest
2 x sensi skunk fem
1 x auto gsc
1 x auto bcn
Remaining sensi skunk plant is currently in darkness for 72 hours before being harvested!

Likes
9
Share


@Chubbs
Follow
What up everyone. I hope all are having a great weekend. These ladies are doing good now, since I got the ph back on track. I did switch from grow to Bloom nutes this week adding a pk booster to the feed. I'll be doing a defoliation and lollipoping this coming week since I didn't want to last week with the ph imbalance i was having, I thought it'd be to much. All in all Happy Growing as they're looking good.

Likes
14
Share


@TheBulldozerSicily
Follow
Venerdì 26 ottobre 2023
Inizio controllo 702 ec ph 5
Aggiungo 25 lt demineralized
54 Grow 36 Micro 18 Bloom 30 rhino skin 30 enzimi 20 calmag
985 ec ph 5.2
Martedì 31 ottobre 2023 skip a 12/12
Inizio controllo ec 986 ph 4( troppo basso)
Cambiano acqua
75 lt demineralizzata ec 141 ph 5.7;
Aggiungo ( x 60lt) +2.5lt rubinetto
120 Grow 120 micro 90 bloom 75 enzimi 75 rhino skin
Ottenendo ec 1237 ph 5.6
Likes
119
Share


@Roberts
Follow
Divine indica is growing great. I am topping her today. I also will be removing the 1st node growth as well. Everything is looking really good. She has made it to her own grow space now. She is growing fast and strong. 🤞🏻it continues. Thank you Divine Seeds, and Spider Farmer. 💪🏼🤜🏻🤛🏻🌱🌱🌱
Thank you grow diaries community for the 👇likes👇, follows, comments, and subscriptions on my YouTube channel👇. ❄️🌱🍻
Happy Growing 🌱🌱🌱
https://youtube.com/channel/UCAhN7yRzWLpcaRHhMIQ7X4g
Processing
Likes
32
Share


@Platinouuu
Follow
noto que estan comiendo mucho, osea se secan rápido que es que estan comiendo bastante de lo comun. Las ojas tornandose color amarillo para cambiar a color vino. se ven muy bonitas y estan fewlices. No he cambiado mucho entre los nutrientes (Té y Recharge), he sostenido alimentarlas simples y he tenido muy buenos resultados. muy contento con todo, sigas adelante, buenos humos y feliz 2021


Likes
43
Share


@Pearl
Follow
Mixing a ratio of
4ml start
5ml Katana
/ 1 litre water at PH of 6.2
Mix well and spray onto paper towels to soak,
Fold paper towel in half & place seed inside & fold to cover so the seed is in darkness,
Place damp paper towels with the seed inside a zip lock sandwich bag.
I only had to wait 28 Hours and the seed had split
She was planted into her 1st pot last night.
Happy days, looks like a very good start 🏆
😵💫🤘🏼

Likes
9
Share

@BLAZED
Follow
Week 13 (9-9 to 15-9)
9-9
Temps: 18.8 to 27.6 degrees
Humidity: 48% to 67%
Watering: Both 600 ml.
Decreased the light intensity from 50% to 40%
10-9
Temps: 19 to 24.2 degrees
Humidity: 51% to 58%
Watering: Both 500 ml.
Dry Weight #1 3.2 kg. #2 2.8 kg.
11-9
Temps: 16.5 to 22.5 degrees
Humidity: 50% to 62%
Watering #1: 1000 ml. #2: 1400 ml.
Dry Weight #1 3.5 kg. #2 3.0 kg.
12-9
Temps: 18.5 to 23.6 degrees
Humidity: 50% to 55%
Watering: Both 500 ml.
Dry Weight #1 3.8 kg. #2 3.4 kg.
13-9
Temps: 19.9 to 23.1 degrees
Humidity: 49% to 59%
Watering #1: 500 ml. #2: 1000 ml.
Raised the light to 65 cm distance of the top canopy.
Dry Weight #1 3.8 kg. #2 3.4 kg.
14-9
Temps: 19.5 to 23.4 degrees
Humidity: 50% to 60%
Watering: Both 500 ml.
Dry Weight #1 4.2 kg. #2 3.8 kg.
15-9
Temps: 20.5 to 24.7 degrees
Humidity: 54% to 61%

Likes
35
Share


@GreenHouseLab
Follow
This is the end for this girl, another few days based on trichome then complete darkness for 48 hrs. Such a beauty to grow. Last uploaded file is a video of her sitting in the dark, really shows how her dark coated buds.
Cheers and Happy Smokes 💨 💨


Likes
45
Share


@Bud_Spencer
Follow
Hi Grower!
92 Days Complete
33 Days Flower
The plant makes me sweat a lot, at first I made 2 small mistakes, but they forgave me the way it looks. It's something else like an autoflower, even if I use the fertilizer for it. Unfortunately, I don't have a supersoil mix at home. Today I used a mixture from BioNova again to get the whole thing going. I really hope that I can get you to the finish line!
Grown under Spiderfarmer SF-1000
Use Discount Code: Budspencer420
on www.spider-farmer.com

Likes
8
Share

@Grow_Mary_Green
Follow
Hi meine lieben, 🤗
Die Sämling-Phase hat begonnen...
In dieser Phase braucht es am meisten geduld, da der sämling noch recht empfindlich ist.
Wie mein Ablauf in dieser Woche genau aussah, habe ich hier für uns Dokumentiert. Ich wünsche dir viel Spaß & Happy Growing 🌱🤗:
______________________________________________________________________________
Umgebungswerte der Woche:
- Temperatur: 24°C
- Luftfeuchtigkeit: 80% - 75% zum Ende der Woche
- VDP (Room): 0,65
Tag 1:
- Licht eingestellt: PPFD: 100 µmol
- Lampen Entfernung auf 60cm
- Lichtzyklus: 18/6
Tag 2:
- Pflanzen Höhe gemessen: 5cm
- Licht eingestellt: PPFD: 155 µmol
Bewässert 👇(Nur Wasser):
- Volumen: 65ml
- PH-Wert: 6,0
- EC-Wert: 0,5
- Temperatur: 20°C
Tag 3:
- Nur beobachtet
Tag 4:
- Nur beobachtet
Tag 5:
- Licht gemessen (aktuell): PPFD: 165 µmol
- Pflanzen Höhe gemessen: 9cm
Tag 6:
- Nur beobachtet
Tag 7:
- Licht gemessen (aktuell): PPFD: 175 µmol
Bewässert 👇(Nur Wasser):
- Volumen: 200ml (120ml hätten auch gereicht)
- PH-Wert: 6,0
- EC-Wert: 0,5
- Temperatur: 21°C
Run-Off gemessen 👇(Drain):
- Volumen: 100ml
- PH-Wert: 6,0
- EC-Wert: 2,25
- Temperatur: 21°C
Likes
16
Share


@Archieballs
Follow
Missed last week so the measurements for their feeding was for 8 weeks this week they got PH water only 3 liters each. These girls are in their final stretch they will get one more feeding and then start the flush. They get fed or watered every 4 days as needed. Ultimate #3 which has been the dwarf since the beginning has wind burn from the fan had to readjust the fan and move the lights up so the other two don’t get fried. They are looking and smelling good and their buds are coming together nicely. As with the last batch of Ultimates they aren’t sticky yet they seem to wait to really develop that stickiness until just before harvest.
