The Grow Awards 2026 🏆 


Likes
Comments
Share


Likes
2
Share
@CheeRz
Follow
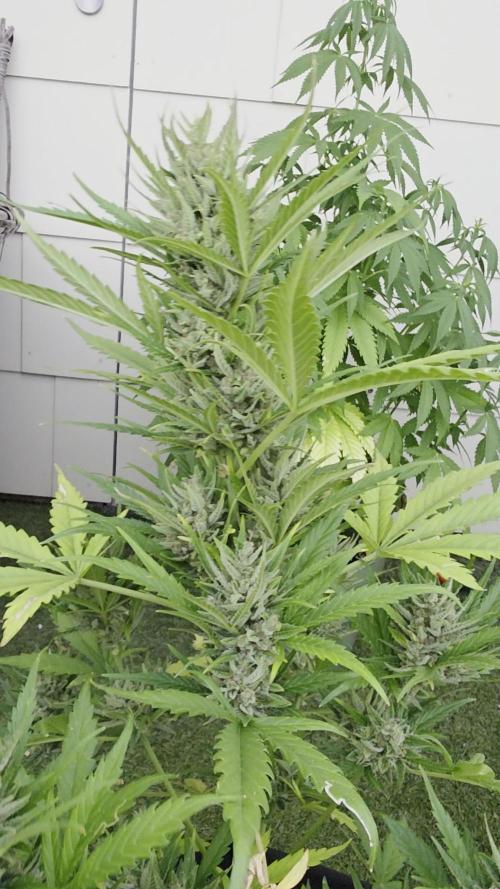
These are the last days of the outdoor ladies before they are harvested. Currently, the weather is still very nice and sunny. However, it's already very cool at night.
Likes
44
Share
@RakonGrow
Follow
Note :
+ jegliches Zubehör wird in der GermniationsWoche aufgelistet . Zeitraffer Videos folgen immer nachträglich.
+ videos werden so geschnitten das nur ein geschlossenes Zelt erscheint , ergo Fehlen paar reale Minuten (ca 1 Std) .
Day 57:
+ 2.0 Liter Flaschenwasser
+ + Dünger für Blühte
+ + + Canna Terrar Flores (Achtung wirkt wie PH-)
+ + + Canna Boost
+ + + Cannazym
+ + + Canna PH+
+ + PH 5.91
Da es heute heiss ist , wird wie Gestern laufen . Bis 19:00 Uhr wird das Licht reduziert und dann DLI nachgeholt.
Day 58:
Da es immer noch heiss ist , wird wie Gestern laufen . Bis 19:00 Uhr wird das Licht reduziert und dann DLI nachgeholt.
Day 59:
+ 2.0 Liter Flaschenwasser
+ + Dünger für Blühte
+ + + Canna Terrar Flores (Achtung wirkt wie PH-)
+ + + Canna Boost
+ + + Cannazym
+ + + Canna Rhizotonic
+ + + Canna PH+
+ + PH 5.91
16h jetzt mit 1000 PPFD und jeweils 1 Stunde Sonnenaufgang und Sonnenuntergang.
Day 60:
Mal ein bissel Größenvergleiche gemacht .Das Clipper Feuerzeug ist 7.5 cm hoch .
Day 61:
+ 1.75 Liter Flaschenwasser
+ + Dünger für Blühte
+ + + Canna Terrar Flores (Achtung wirkt wie PH-)
+ + + Canna Boost
+ + + Cannazym
+ + + Canna Rhizotonic
+ + + Canna PH+
+ + PH 6.01
Day 62:
Das Wetter bleibt stabil, damit bleiben die Growwerte auch stabil. Bisher Läuft das 1000 PPFD Spitze und 750 PPFD Sekundätriebe ganz gut . Ihre Freundin die leider ein Wasserschaden erlitten hat (tja da war wohl irgendwas im Wasser was ein Regenbogenfilm erzeugt hat , im schlimmsten Fall Waschmittel) nimmt der einen Seite zwar licht, aber geht halt nicht anderes bei nur einer Lichtquelle . Ich fahr halt gleich ein doppel Experiement mit dem Licht. Bisher aber holt sie ganz gut nach mit 900-1000 PPFD auf die ziemlich gleich hohe Krone .
Day 63:
+ 1.75 Liter Flaschenwasser
+ + Dünger für Blühte
+ + + Canna Terrar Flores (Achtung wirkt wie PH-)
+ + + Canna Boost
+ + + Cannazym
+ + + Canna Rhizotonic
+ + + Greenhouse Feeding BioEnhancer
+ + + Canna PH+
+ + PH 6.01

Likes
5
Share
@Kickdrum
Follow
Came home from vacation to gorgeous ladies and their light fragrances. More to follow soon.

Likes
99
Share
@TheFoxFarmer
Follow
Week 8 Flower
Flush flush flush 💦🚽💦🚽💦
It's extremely important to flush for at least 14 days when using synthetic nutes, or any bottled nutes in my opinion. The aim is to make her cannibalize (fade) as much as possible before she's chopped. By doing this, she's using up her stored nutrients, causing the leaves to eventually die. The better the flush the cleaner the smoke 👌💨 even when in an organic set up, the plant needs to be nicely faded before being harvested. Otherwise she's still full of nutrients. I still feel I'll be able to get an even better flush when I eventually make the switch to RO water, as my tap water holds a ppm value of approx 150. It's not too much, but 0 is always better.
She was taken down on Day 57 flower, after a 16 Day flush. I didn't want to take her any further as she was quite stressed being so close to the light. So to avoid getting seeds I waited until she had a beautiful fade before giving her the chop ✂️ I always take my girls down about 30mins before the light turns on so there is minimal chlorophyll production in the plant. This is to ensure the best smell, taste and overall burn after drying and curing.
A subtle but very sweet-ish tropical fruit skin kind of smell to her. Her buds are super dense and covered in trichomes. I trimmed off all fan leaves and then each branch was hung in my drying box and placed in a cool area. She was dry after 6 days and ready to be dry trimmed and jarred for curing. I'll post those pics with the harvest update!
Thanks for following and happy growing! 🐺
Likes
7
Share
@Canna96
Follow
Hey now, hope everyone is having a great weekend. This week went great for the 5 mainlines. I got the final toppings completed for all the ladies, I got them done on the Sundae Driver and Red Hot Cookies on day 38, and the Durban Nights, Green Crack, and the Bubble Runtz topped on day 40 for the final time. At this point there is not much more training left to do, just some minor LST to try and keep all 8 tops per plant level, and some minor defoliation along the way. I am planning to Veg them for 1-2 weeks and flip to flower probably sometime in week 8 depending on how fast they grow. I do have them all on milk crates which are 10" each so I will place them on the floor and adjust the light power probably about the time I flip to flower to accommodate the stretch.
I am still feeding GH nutrients, silica, cal mag, and maxi grow. I will transition to flower nutrients approximately one week after flipping to flower. I have found that it is important to continue feeding plenty of Nitrogen through the stretch. The only way I would transition sooner is if I was running out of vertical space.
Still very pleased with the Spectrum X from Medic Grow. I am running her at 69% and the plants seem very happy and healthy. The heat and humidity are finally letting up in my region so it is nice to be able to open some windows and drop the temp outside the grow tent.
I hope everyone has a great weekend, Thanks for stopping by, Stay Safe and Blaze On!!! 💪
Website: https://medicgrow.com/
https://growdiaries.com/grower/medicgrowled

Likes
3
Share
@Joaka
Follow
se ve un incremento en tricomas, ya el olor esta muy penetrante. ademas algunos brazos se doblaron lo que provoco que las amarrara para poder sostenerlas. en la proxima semana se sacara todo nutriente que contenga nitrogeno, dando ya el engorde final.
Processing
Likes
18
Share
@Silverback_Guerilla
Follow
11/9:
I took some photos and added a 35w 3500k LED to the top section and have it pointed towards the backside of one of them and my little Stardawggy.
11/10:
Today, I super-cropped about 10 different mains and branches on various plants. The canopy is now much more even.
They'll be ready for a feeding tomorrow.
11/11:
I fed them all about 1/3 gallon each with big bloom, tiger bloom, beastie bloomz, cal-mag, bembe, humic acid concentrate, myco/tricho, signal, and a little grow big.
11/12:
I spent a couple of hours tying down branches and tucking leaves to get more light down into some of the plants, and rotated the edge plants.
11/13:
I rotated the edge plants and added a TNB Naturals CO2 enhancer to the closet. I raised the thermostat on the ac infinity to 86f, so as not to exhaust it all, but with the cold air intake, it's rarely even coming on anyway.👍
11/14:
Their buds are swelling up nicely! I fed them again today because I'm still seeing some signs of potassium and phosphorus deficiencies. I went 1/2 strength with the grow big, but full strength with everything else...
11/15:
Last day of week 6 and I'm happy with their progress. I plucked off the dead shit and tried to reposition some of the lower branches to get more light. Took some photos and shot some budporn video..sexy ladies!😍
Likes
22
Share
@Nuggetnerd_420
Follow
My own blended recycled living soil water passion love & respect only.
...... added soil biology includes Wallace wonder organics myco fungi .. extreme gardening AZOS ... and synergro ... along with my own farmed castings also inoculated
Likes
5
Share
@LOKO_Grower
Follow
LST again & again. My Gagarin Auto gives powerfull branches on both sides. Seems like it wants to start flowering. That's pretty early)
Likes
12
Share
@UK420hydrogrow
Follow
Ok had a lot going on this week with various issues affecting plants in flower tent but managed to take few pics and keep u guys updated on this grow feel free to comment or give me any advise I'm a newby out of his debth

Likes
Comments
Share
@GrowVater
Follow
Die kleinen sind ein wenig trocken gelaufen.. dennoch gut entwickelt.
Likes
3
Share
@stolen_cheese
Follow
Die Pflanze hatte ordentlich durst und hat direkt 10 L bekommen, das sollte erstmal reichen. Zusätzlich wurde sie mit einer hohen Dosis Pflanzengeflüster (Harpin-Protein) besprüht, so früh in der Blüte ist das noch okay, das war aber insgesamt die letzte Anwendung davon.
Einige untere Triebe und Blätter wurden entfernt, manche Triebe wurden via Super Cropping "neu positioniert", sodass das Zelt ordentlich ausgefüllt wird. In der Vegi hatte ich zu wenig Zeit um mich ordentlich um die Pflanze zu kümmern, daher musste das jetzt stattfinden. Hoffentlich ist das nicht zu viel Stress gewesen.
Eingesprüht wurde die Pflanze mit 4 g / 1 L Pflanzengeflüster, bis sie Tropfnass war. Der Rest wurde auf andere Pflanzen verteilt.
Der Drain in der Wanne bleibt und sollte bald aufgesaugt sein - die Färbung davon kommt von der Erde selbst.
Processing
Likes
20
Share
@Silverback_Guerilla
Follow
2/10:
I watered today with about 3/4 gallon each, plus cal-mag, signal, bembe, armor si, a little open sesame, and their final dose of endoboost.
The short one is budding up nicely, but the taller one is still stretching. The short one looks to be considerably more indica than the other.
2/11:
Wife home sick today....postponing construction project to raise the lights.
2/12:
Today, I tackled the project to raise my ceiling another foot. In addition to that project, I installed and hooked up my new AC Infinity 6" intake fan. It's pulling in fresh air from the soffit vent on the eave of the attic, and currently feeding the garden with 46f fresh air. I'm able to easily maintain daytime temps in the lower 70f's now. I am able to drive the nighttime temps as low as I want. The only issue is that the outdoor RH varies quite a bit, so I ordered a 30-pint dehumidifier to put in the top of the closet.
I sprayed everybody with boomboom spray to try and mitigate the light burn damage that is likely to ensue.
2/13:
The taller one is still stretching a little bit, but the 2-footer is just budding up.
2/14:
I fed them today with about 3/4 gallon each including grow big, big bloom, tiger bloom, cal-mag, signal, bembe, humic acid, and I switched over from Open Sesame to Beastie Bloomz. Raised the lights another couple of inches. I did some training on them and defo'd a little bit.
2/15:
Installed the new dehumidifier and rigged the continuous drain on it...works great.
2/16:
I rotated the edge plants and removed some old leaves. I added another 22w 3000k 4' bar light under the canopy.
2/17:
I rearranged the garden and defoliated a little bit. That's it for week 8-

Likes
7
Share
@ChitownCannaChica
Follow
I have to water this plant a ton! Hard to get the water to seep in.
Going to be a tough one!
Probably will start with low dose nutrients soon

Likes
17
Share
@4chuk
Follow
Oct.16 - Week 2 begins.
I need to stop editing my diaries high.
Oct. 18 - Looks like a slight calcium deficiency on the oldest leaves, I'll watch the newer leaves for spots before I increase CaMg though.
Oct. 20 - I have been watering with 20ml twice a day, growth rate seems to have increased, but still developing spots so I will increase CaMg today.
Oct. 22 - It's growing pretty well considering how sick it seems. Time lapse uploaded.

Processing
Likes
1
Share


Likes
5
Share
@Dunk_Junk
Follow
Still going through flowering.
She has stayed short and stocky throughout since week 3/4 actually. About that time I remember watering her with nutrients that must have been too acidic. I'm pretty sure I omitted add ph up. 😭 The damage was done, growth all but stopped. As she is an auto flower there is no time to 'save' her and grow a big plant, so we will go to the end with what we've got.

Likes
39
Share
@Hazecat_420
Follow
Se regó foliarmente con Big One para estimular la floración. Y se comenzó con Voodo Juice para estimular raíces además de Top Bloom para ya comenzar de lleno con la floración. Seguimos ...
Likes
4
Share
@Osavv_OTGUK
Follow
Again thank you so much to barneys farm for letting me grow there seeds


