


Likes
15
Share


@bhanga_garden
Follow
12/6 Update - seed is germinated and ready to grow! I will post a new weekly update tomorrow!
So I had to scrap this plant - it was just growing too slow and it was unfortunately not a health plant. I decided to remove the plant altogether and have started a new seed. Since this plant will be four week behind its neighbor in the tent I will have to modify my approach to training on this one. I typically mainline - mostly just to utilize the space in the best way that I can. This time around I think I will just top it maybe once or twice and then let it recover for two weeks then flip to flower and manage out the lower branches from there. It will be kind of fun to do a side by side with these. The neighbor plant is super healthy and is almost ready for its first topping, I did however go through today and remove all of the growth from the plant (other than topping) so that should slow that one down quite a bit and give this new plant some what of a chance to catch up.
Also - check out the worms!!! I pulled out that plant and reached down into the soil just to see what the worm activity was looking like - I pulled out this little ball of freshly hatched worms!
Barney's Farm Gorilla Zkittles - Feminized. I'll be growing just one of these plants in this 2x4x5 tent. It will be growing side by side with another plant but I wanted to be able to document them separately.
This is my fourth grow using this set up, I'm excited to document the process this time around!
The seed broke ground today! Photos and time-lapse coming soon!


Likes
5
Share


@Ensign420
Follow
Greetings fellow growers 🖖 and welcome to my first grow ever. This adventure actually started several months ago when I decided to stop buying flower from dispensaries and just grow my own bud. How hard can it be!?
This is actually my second seed of this strain. The first bean sadly died due to over watering (sorry girl, RIP). I was literally watering the cube to the point where water was dripping from the bottom, then heavily sprayed the humidity dome and tray with the vents completely closed. Everyday. Multiple times. I never let the dome or try dry out. So after about 8 days of not sprouting, there was a funky smell of rot. So that was that.
Later I learned that rockwool retains a lot of water and can easily drown seeds. So a wet/dry cycle is best for rockwool germination.
So even after hours of researching and digging through forums and tutorial videos, I was still under prepared for this journey. Did not consider how delicate the germination phase is. Oh well. Lesson learned. Reset and try again!
I hope everyone is safe and stoned during this corona crisis. Just like everyone else in the world, I want this pandemic to be over with. But in the meantime, let's grow some weed! 🖖
[START OF WEEK 01]
Day 01 - Monday - 08/03/20 - Total Days: 001
-----------------------------------
- [0830]: Light Schedule: 24Hrs/0
--- Soaked cube in 5.5 PH water for 10 min. Did not shake water out.
--- NO NUTES! Only PH'd down to control the PH levels.
--- Did not use the default hole (way too deep).
--- Flipped cube upside down and made a shallow hole for the seed (less than 0.25" deep).
--- Placed seed in and pinched hole close. No additional water added.
--- Sprayed the tray and dome with straight water (5.5 PH).
--- Vents are cracked opened a for ventilation (about 1/4 opened each).
--- Distance between the light and tray was 53"
--- AC was set to 80 °F
--- Exhaust fan was set to 86 °F
--- Room average temp was at 85 °F
--- Dome humidity was at 85-99% when sprayed.
--- Allowing to completely dry before respraying.
- [2200]: Dome and tray were completely dry! Sprayed only tray and dome with more water.
Day 02 - Tuesday - 08/04/20 - Total Days: 002
-----------------------------------
- [0845]: Sprayed dome and tray in the morning. Everything was dry.
--- Hoping for the best!
- [2130]: Everything was dry again, so sprayed dome and tray at night along with a light spray on the cube.
Day 03 - Wednesday - 08/05/20 - Total Days: 003
-----------------------------------
- [0830]: Everything was dry again. Resprayed dome and tray. Slightly sprayed cube.
- [2125]: Hooo damn!! She popped! Am little stub is visible! Resprayed dome and tray again.
--- Still going 24/0 for lights.
- [+0033]: Just checked up on her and I swear she grew a bit taller! Getting excited!
Day 04 - Thursday - 08/06/20 - Total Days: 004
-----------------------------------
- [0845]: Wow! Went from a little stub to fully sprouted overnight! Everything was pretty dry again so resprayed dome and tray.
- [2200]: Tap root is visible! Over 1" long too! Just resprayed dome and tray again.
-- Going to prep for hydroton transplant tomorrow!
Day 05 - Friday - 08/07/20 - Total Days: 005
-----------------------------------
- [0930]: She keeps growing!
-- Added a bit of CalMag to the spray bottle (8 drops to 650ml of distilled water). Resprayed dome and tray. Water was at a 5.4 PH with 141 PPM.
- [1045]: Prepped the bubble bucket with 4.5gal of water. Water is high enough to reach about 0.25" above the bottom of the net pot.
--- Added 3 drops of Superthrive
--- Added 3.5ml of CaliMagic
--- Added 2ml Hydroguard
--- Then PH'd down to 5.6
--- Solution Strengh: 120 PPM
--- Water chiller is set to 20 °C
- [1100]: Transplant time!
--- Filled the net basket 1/3 with hydroton. When placed in the bucket, air bubbles are not visible, but are slightly below the surface (slight digging will reveal the water/bubbles below).
--- Removed plastic on rockwool cube and placed in basket, then filled around and covered with hydroton. Making sure to block any light from passing through the net pot and into the nutrient solution.
--- Covered with a half-bottle dome sprayed with the CalMag water from earlier.
--- Hoping for the best!
- [1300]: Raised Bucket 5" higher. Now light distance is 48" to top of bucket.
- [1820]: Lowered tent exhaust temp to 76 °F
--- Lowered AC to 75 °F
--- Raised bucket even higher so light distance is 30" to top of bucket.
- [2300]: Looking good!
--- Sprayed dome and surrounding hydroton with more CalMag water.
--- Attached timer to light! So new 18 Hrs On/6 Hrs Off light schedule.
--- Lights On: [1600] (4pm)
--- Lights Off: [+1000] (10am the next day)
--- Decided to go with lights on during the evening/night and off during the later mornings/afternoon (the hottest part of the day) to see if temps can be controlled better.
--- Please survive girl!
Day 06 - Saturday - 08/08/20 - Total Days: 006
-----------------------------------
- [0800]: Everything was dry. Resprayed hydroton and dome.
- [2000]: Here first night cycle seemed to go well! Get'n taller!
--- Dry again. Removed the dome.
--- PH went up to 6.5 so PH'd down to 5.7
--- Ran the top feed drip ring for a bout a minute to wet the hydroton and rockwool with the nutient solution.
---Too scared to leave the top feed on 24hrs (I don't want over water her and cause dampening-off). Will let dry before re-watering.
- [2100]: After closer inspection, I think she's looking a bit yellow.
--- Decided to add a bit of grow nutes to the bubbler solution.
--- Added 2ml of Sensi Grow A
--- Added 2ml of Sensi Grow B
--- Solution strength after adding more nutes: 176 PPM
--- PH went up to 6
--- I hope that the extra chelating properties of the 'PH Perfect' solution is enough of a buffer for proper nutrient uptake.
Day 07 - Sunday - 08/09/20 - Total Days: 007
-----------------------------------
- [0800]: Water dropped a bit (mostly due to evaporation) so solution strength was at 190.
--- Checked PH again. Was still at 6, so PH'd down to 5.4
--- Ran the top feed for a minute to wet the hydroton a bit.
- [0915]: Since she's looking perky but still a bit yellow. So decided to up the nutrient concentration even more before lights out.
--- Added 2ml more of Sensi Grow A
--- Added 2ml more of Sensi Grow B
--- Solution strength after adding more nutes: 199 PPM
--- PH went up to 5.8
- [1700]: Checked nutrients.
--- PH: 5.9
--- Solution strength: 202 PPM
--- Added 4ml of Voodoo Juice
--- Added 4ml of B-52
--- PH after adding more nutes: 5.9
--- Solution strength after adding more nutes: 238 PPM
- [2130]: Decided to make a new foliar spray to address the continued yellowing.
--- Started with 500ml of distilled water.
--- Added 3 drops of CaliMagic
--- Added 3 drops of Sensi Grow A
--- Added 3 drops of Sensi Grow B
--- Added 3 drops of B-52
--- Added 1 drop of Superthrive
--- Solution strength: 164 PPM
--- PH was at 5.9 and did not adjust.
--- Gave her one spray.
--- Also sprayed the surrounding hydroton.
[END OF WEEK 01]

Likes
2
Share

@DanisgrowD
Follow
Hi Growmies!
This two lil ones look like ready to me, im bout to harvest them and probably in a couple of weeks ill share my review with u, them and probably las papaya alive is thriving, but im still a lil concerned about those low branch buds, they look less ready than the center. What you guys think?
💨🏻

Likes
58
Share


@ndsgrow
Follow
Flower Day 8:
Week 1 of flower is behind us, and the plants have already put on some nice growth in both height and volume. The stretch is staying pretty moderate, just as you’d expect from an Indica. Exactly as @SensiSeeds described.
I raised Hindu Kush #3 (back right) by about 5 cm since she fell a little behind the others during the stretch. Now they’re all on the same level again, giving the light a better chance to reach the entire canopy.
As expected, the pots are still heavy enough, but I’m keeping an eye on them and checking regularly anyway.
_______________________________________________________
Flower Day 10:
Everything is going according to plan so far. The plants are growing uniformly, and the stretch is still in full swing. Raising Hindu Kush #3 seems to have worked out well for her.
Today, they received their usual nutrient solution again with a feed EC of 1.2 and a pH of 6.5.
Let’s see what week 2 of the stretch has in store for us!
The runoff shows me that I'm currently watering with an optimal nutrient balance.
_______________________________________________________
Nutrients: 💧
• 3,5–4 L per plant
• 1 ml/L @Plagron Power Roots
• 1 ml/L @Plagron CalMag Pro
• 2 ml/L @Plagron Terra Bloom
• pH: 6.5
• EC: 1,2
Run off: 💧
• EC: 1,2-1,5 mS/cm
• PH: 5,6-5,8
• Current Conditions: 🔥
• PPFD: ~600–700
• Light distance: 55 cm
• Temperature: 24°C
• RH: ~55–60%

Likes
1
Share


@Xico_Beloteiro
Follow
Great harvest but I believe I can do a lot better with what I learned. See the next round coming soon, one last seed on the tube.
The last pictures I'll be able to post from Sweet seeds hahahaa the harvest just vanish. As a rule of thumb, I saved the top buds for last and manage to do these pictures for their contest.
Enjoy.

Likes
5
Share


@BombBuds
Follow
Erntezeit!
Getrocknet wurde 9 Tage bei ~55% Luftfeuchtigkeit und 20 grad.
Trocken getrimmt.
Alle Popcorn nugs und Verschnitt zu Hash weiterverarbeitet.

Likes
12
Share


@eldruida_lamota
Follow
Actualizamos familia, con la cuarta semana de floración de estas Wedding Cake de RoyalQueenSeeds.
Tienen un color bien verde sin carencias por el momento y se ve que están sanas, las plantas están en macetas de 7 Litros definitivamente, con tierra top crop, con una altura similar a 50 cms.
Empiezan a formarse las flores y cada vez hay más pelos blancos.
Añadí también tiras de color azul / amarillo para prevenir y controlar mejor el tema plagas.
El riego que aplicamos son 800ml de agua cada 48 horas y el ph se controla en 6.5, la temperatura la tenemos entre 22/25 grados y la humedad ronda el 55% gracias al humidificador.
El ciclo lo cambiamos a 12h de luz/ 12h de oscuridad, el mismo día que escribo esto el foco está al 100% de potencia. Me gusta subirlo muy progresivamente, las manías.
- os dejo por aquí un CÓDIGO: Eldruida
Descuento para la tienda de MARS HYDRO.
https://www.mars-hydro.com
- los nutrientes directamente desde https://agrobeta.com/agrobetatiendaonline/36-abonos-canamo
• Estoy muy agradecido por el aprecio y la acogida a todos los que me seguís, tanto a seguidores como a marcas que apoyan todos estos proyectos, aquí seguiremos cultivando y aportando nuestro pequeño grano de arena a este gran sector.
Hasta aquí todo, Buenos humos 💨💨💨

Likes
5
Share


@BasedBuds_89
Follow
Bud sites have popped up everywhere! Cutting back on nitrogen and grow entirely, will only be using a tiny amount of Micro and Big Buds nutrients for the remainder of this grow. Loving the results. Will commence Lollipopping today.

Likes
22
Share

@wolfvb
Follow
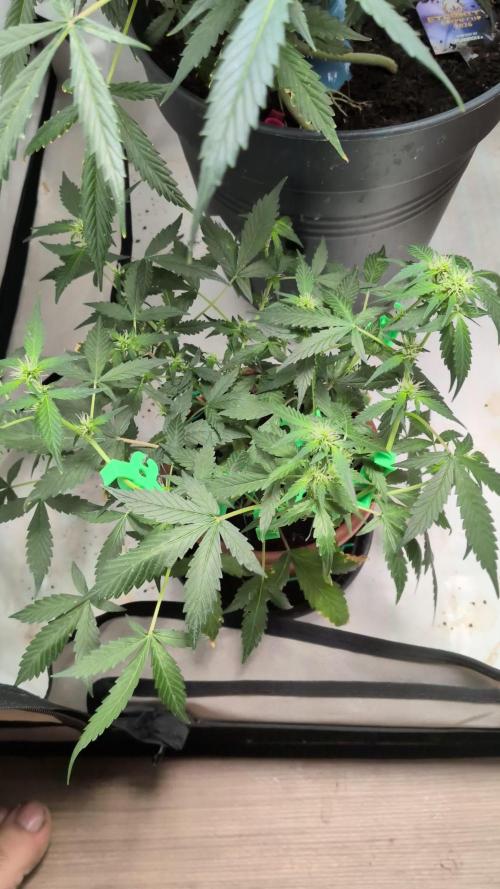
Week 7 Update: Welcome to the Jungle! (Flowering has officially begun)
General Observations:
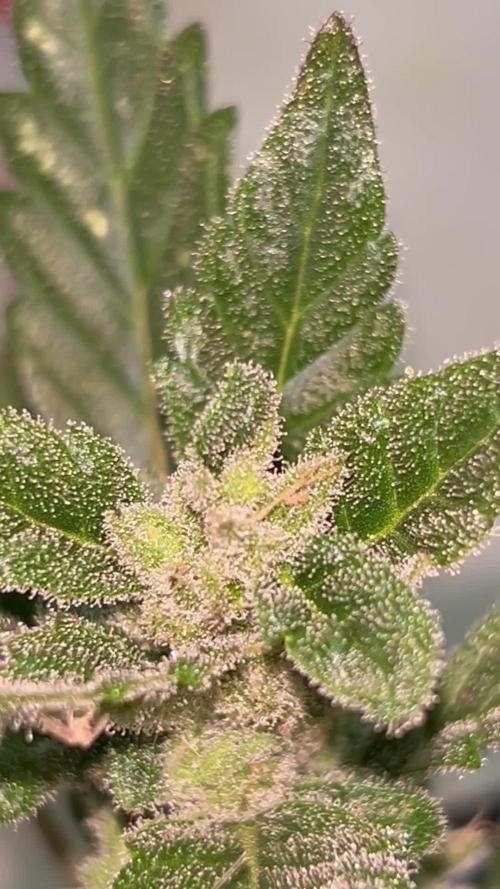
Week 7 is here, and the stretch is on! The plant has officially transitioned into the flowering phase. As you can see from the photos, bud sites are developing rapidly all over the plant, and there is an explosion of white pistils (hairs) at every top. The plant seems incredibly happy and vigorous right now.
Training & Canopy Management:
The Low Stress Training (LST) has been paying off massively. You can see in the close-up shots how the green LST clips and wire ties have successfully kept the main stem bent and the canopy even. Because of this, multiple colas are reaching the top of the canopy and getting an equal share of the light. The stems are thickening up nicely to support the future buds. I'm keeping a close eye on the clips and wires to ensure they aren't choking the stems as they grow thicker.
Plant Health:
Overall health is excellent. The foliage is a lush, dark green, indicating that nitrogen levels have been solid through the vegetative stage. No major signs of stress, pests, or deficiencies. The leaves are praying upwards, which means she is loving the light and current environmental conditions.
Next Steps for this Week:
Nutrients: Now that she is heavily developing flowers, I will be adjusting/continuing the bloom nutrients to give her the Phosphorus and Potassium (P-K) she needs to swell those buds, while slowly easing off the Nitrogen. (Edit this part based on your actual feeding schedule)
Defoliation: I might do some very light defoliation of the lower, shaded leaves that aren't getting light, just to improve airflow and direct the plant's energy strictly to the top colas, but I don't want to stress her out too much during the stretch.
Environment: Keeping humidity in check as the bud sites get denser to prevent any future issues.
Looking forward to seeing these little puffballs swell up over the next few weeks! Happy growing! 🌱✌️

Likes
44
Share


@Cogollo_eu
Follow
**Encontrarás la traducción a español al final de la descripción**
From/Desde: 19/04/19 || To/Hasta: 25/04/19
From day/Desde día: 57 || To day/Hasta día: 63
You can find the Money Maker Diary here:
** Podéis encontrar el diario de las Money Maker aquí:**
https://growdiaries.com/diaries/25667-gorillamakingmoney-gorilla-vs-money-m
-----IMAGES & VIDEOS-----
1 - Before defoliation
2 - Defoliation
3 - After defoliation
-----WEEK SUMMARY-----
(Following text was translated with tools and reviewed, sorry for mistakes, misspellings or nosense things)
As you can see I've done a defoliation this week. Yes, I have really gone over the top, I have removed many more leaves than I had, and the tails of the plants has not come to join at all due to the failed defoliation.
Being the first defoliation I do, I did not really know what I was doing and I went crazy. Now that it has been several weeks since I made this defoliation, I realize that I should not have removed the leaves from the nodes of the tails, because they have stopped growing and have not joined with their superior parts. Anyway, the plants are beautiful today and although they could be much better I feel very happy with them.
I know I've made 2 fatal mistakes in this grow
- The first has been the massive defoliation badly done, defoliation yes, but with head ... do not follow my example.
- The second failure that I see today, is that I did not leave enough growth time (18/6) after having made the last pruning and that has made the tails have been a length much less than what would have been desired, I think that 2 more weeks of growth would have been perfect.
-----WATERING CALENDAR-----
20/04/19 - 1,250 ml with Sensizym, Silica, Rhino Sk, Bud Ignitor, Big Bud, Bud Candy & Bud Factor-x @ PH6.4 & 1.2 E.C.
23/04/19 - 1,250 ml with All week nutrients - (Silica, Sensizym & Bud Ignitor) @ PH6.5 & 1.5 E.C.
*****ESPAÑOL*****
-----IMÁGENES Y VÍDEOS-----
1 - Antes de la defoliación
2 - Defoliación
3 - Después de la defoliación
-----SUMARIO SEMANAL-----
Como podéis ver esta semana he hecho una defoliación. Si, efectivamente me he pasado de listo, he quitado muchas más hojas de las que debía y las colas de las plantas no ha llegado a unirse del todo debido a la fallida defoliación.
Al ser la primera defoliación que realizo, no sabía muy bien que hacía y me lancé a lo loco. Ahora que han pasado varias semanas desde que realicé esta defoliación, me doy cuenta de que no debí de haber quitado las hojas de los nodos de las colas, pues estos han dejado de crecer y no se han unido con sus partes superioras. De todas maneras, las plantas están preciosas a día de hoy y aunque podrían estar mucho mejor me doy con un canto en los dientes.
Se que he cometido 2 errores gordos en este cultivo
- El primero ha sido la defoliación masiva mal realizada, defoliación si, pero con cabeza.... no sigáis mi ejemplo.
- El segundo fallo que yo veo a día de hoy, es que no dejé suficiente tiempo de crecimiento (18/6) después de haber realizado las últimas podas y eso ha hecho que las colas hayan quedado de una longitud muy inferior a la que hubiera deseado, creo que 2 semanas más de crecimiento hubiera sido perfecto.
-----CALENDARIO DE RIEGO-----
20/04/19 - 1.250 ml con Sensizym, Silica, Rhino Sk, Bud Ignitor, Big Bud, Bud Candy y Bud Factor-x @ PH6.4 & 1,2 E.C.
23/04/19 - 1.250 ml con todos los nutrientes semanales - (Silica, Sensizym y Bud Ignitor) @ PH6,5 & 1,5 E.C.

Likes
Comments
Share


@Rizzokicksbuds123
Follow
New home bigger pots finish of this training and flip them
Likes
53
Share


@DogDoctorOfficial
Follow
Greetings, fellow green enthusiasts! Week 3 unfolds like a crescendo in the cultivation symphony, and my Blackberry Auto is not merely growing – she's flourishing into a botanical masterpiece. Join me in this chapter of lush greenery, where every leaf tells a story of meticulous care and bountiful growth.
A monumental shift occurred this week as I sensed the roots had embraced their space, and with that confidence, the AutoPot Aquavalve was turned on. It's a momentous occasion; from now on, my Blackberry Auto dictates her own hydration destiny. The Aquavalve ensures a precise, gravity-fed watering system, allowing the plant to drink at her leisure. It's a botanical utopia where hydration meets autonomy.
As a gesture of extra love, I treated my thriving Blackberry Auto to a Nutrispray shower. While not a necessity, it's my way of pampering her with a nutrient-rich mist – a spa day for the botanical queen. Every droplet whispers, "You're cherished, and your journey is celebrated."
The dance of low-stress training persists, a ballet where leaves are gently coaxed into the perfect formation. Blackberry Auto, the prima donna of this green theater, responds with unparalleled elegance. Each bend not only shapes her structure but also encourages a bushier, more productive plant. It's a dialogue of symbiosis, where I guide her growth, and she graciously accepts the choreography.
Blackberry Auto's aesthetic prowess is on full display – her color is a vibrant tapestry, and her structure an architectural marvel. It's not merely a prediction; it's a prophecy of a beautiful, robust plant reaching towards the zenith of its potential. Each leaf is a stroke of nature's brush, creating a masterpiece before our very eyes.
As I share this journey, I extend my heartfelt gratitude to the creators of the genetics – thank you, Fast Buds, for gifting us Blackberry Auto. To my sponsors who make this journey possible, your support is the fertilizer for this green endeavor. A tip of the hat to Grow Diaries for providing a platform to document and share the magic. And to the community, your camaraderie adds depth to this horticultural narrative. Together, we cultivate not just plants but a shared passion for the botanical world.
Stay tuned, green comrades, for the forthcoming chapters of Blackberry Auto's odyssey. The journey continues, and each leaf unfurls a new verse in the poetic saga of cultivation.
Genetics Blackberry Auto @Fast_Buds
Food - @aptusholland @aptus_world
As always thank you all for stopping by, for the love and for it all , this journey of mine wold just not be the same without you guys, the love and support is very much appreciated and i fell honored and blessed with you all in my life
Likes
11
Share


@NiBaMeCa420
Follow
unprecedented how fast they grow they grow on average off 10 cm per day which I have never experienced on soil but had many problems to keep the pH under control I do notice that less is more on rdwc now that I have reduced the nutrition, the pH remains a lot more stable 4 days ago they transferred to 12 12 now comes the fun part I also ordered a co2 set so from next week we will add co2 to the space

Processing
Likes
8
Share


@Weedganja420
Follow
Esta cepa ha doblado su tamaño en poco mas de una semana!
En unos dias la pondre a 12/12 horas de luz para empezar a ver sus llamativas flores :)


Processing
Likes
13
Share


@GrowGuy97
Follow
Flower day 17 - All the ladies are looking great, starting to see a lot of bud sights & the smell is definitely getting stronger everyday I open the tent! Thanks for following & happy growing friends!🌱✌️🏼
Flower day 19- Got a bigger dehumidifier because I was having problems on days I would water the humidity would go through the roof at night so to prevent mold I bought a bigger dehumidifier but now it is throwing off so much heat the tent is pushing 90 degrees F at some points throughout the day so I’m not exactly sure how to fix the issue! Will definitely not be running so many plants in the next run for the 5x5! Hopefully things get better!😅😅


Likes
8
Share


@skaterblasted
Follow
Lamp Brightness: 100% @ 16" - estimated 914 PAR
(GMO 2 tallest plant so top of this is used for 16" light distancing)
Feeding schedule once-a-week, other waterings strictly water-only
Watering volume varying up to 3/4 gallon per day
Day after feeding, soil is given a sst + fresh organic kefir whey 4oz+ per gallon
(kefir grains grown in local organic grass-fed milk)
IPM once-a-week visual inspection - no foliar applications
note: lowering humidity this week, beeswax coated hemp twine used to tie up some heavy branches on GMO 1
Likes
6
Share


@StonedandSteady
Follow
#AutoWhiteRussian and #AutoMontreal *Fems* breed by Team #DivineSeeds #DivineSeedsSquad #DivineSeedsBreedingCompany Looking Magnificent and Amazingly Great in thier 3rd week of Veg Growing under the #Growatt600w and in my #TopoLite 24×24×48 Grow Tent! I'm also using #TNBNaturals #TheEnhancer Co2 Despersal Canister and using thier Ph⬆️⬇️ for my Decolinated Tap Water!
#AutoWhiteRussian breed by Outstandingly Awesome Team #DivineSeeds #DivineSeedsSquad #DivineSeedsBreedingCompany
Yo!!! This Lil Beauty popped open in under between 16-18 hours of Germination using this Wet Papertowel Method, this New Heat Mat, Baked potato ToGo Container and Regular Tap Water Helped Tremendously! Heck Yeah Growmies and Growmets!!! Let's Grow!!!
DivineSeeds:
#AutoWhiteRussian
Origin:Afghanistan
Type:Indica/ Sativa/ Ruderalis
Flowering:65 days
THC:24 %
Harvest:400-600 g/m2
Height:100-150 cm
#AutoMontreal breed by Top of The Line Team #DivineSeeds #DivineSeedsSquad #DivineSeedsBreedingCompany
Yo!!! This Lil Beautiful Bean Popped under between 20 hours of Germination using this Wet Papertowel Method, this New Heat Mat, Baked potato ToGo Container and Regular Tap Water Helped Tremendously! Heck Yeah Growmies and Growmets!!! Let's Grow!!!
DivineSeeds:
#AutoMontreal
Origin:Canada
Type:50% Indica/ 40% Sativa/ 10% Ruderalis
Flowering:65 Days
THC:23%
Harvest:550-750 g/m2
Height:120-160 cm
https://divineseeds.net/
https://instagram.com/divine.seeds?igshid=osxe2v7en33v
I love and Appreciate Everyone!!! Thanks Again Team! Cheers Famz!!! Much Props and Much Topz!💯


