


Likes
12
Share


@Amboss
Follow
2te Woche beginnt.
Bisher läuft es glaube recht gut …
Die kleinen wachsen brav …
Habe mal 2 weitere Nutrients hinzugefügt und Versuche den VPD Wert irgendwie konstant zuhalten 🙈👍
Dank 4 Blumat Classic pro Topf reicht ab und zu bisschen sprühen aus dem Befeuchter… heute das erste mal die kleine Pflanze abgedeckt und ganz leicht von oben die trockene Erde mit den neuen Nutrients zusätzlich befeuchtet.
Mal schauen was sie so bewirken …

Processing
Likes
16
Share


@Mr_Motalovah
Follow
Hello Growers and Tokers! 👋 👩🌾 🧑🌾.🔥💨
Finally got that transpant done.
Added a bit of root juice to help out the transplant.
Won't be adding nutes until next week, directly bloom nutes..
Took waaaay to long to transplant. They didn't get any growth becuase of the bad weather these past weeks.
Very bummed out about that. Two of the are already in prefower.. the tiniest i hope grows a bit more..
can't really ask for much more given the bad weather and that they're autos..
I'll for sure be doing a re run with this strain with better stable conditions.
Take care out there!
One love!


Likes
2
Share


@CannaIGrow
Follow
Plant is growing well. Probably the prettiest one outta the bunch so far.
Likes
13
Share


@NSABND
Follow
Day57 hot summer day 😎👍🙏
Day58 cloudy and normal temp 😳😵
Day59 cloudy and cold temp 😵😵😕
Day60 the sun came back but late 😩😵
Day61 sun and warm weather 😁🙏👍


Likes
2
Share

@xipo86
Follow
Day 56
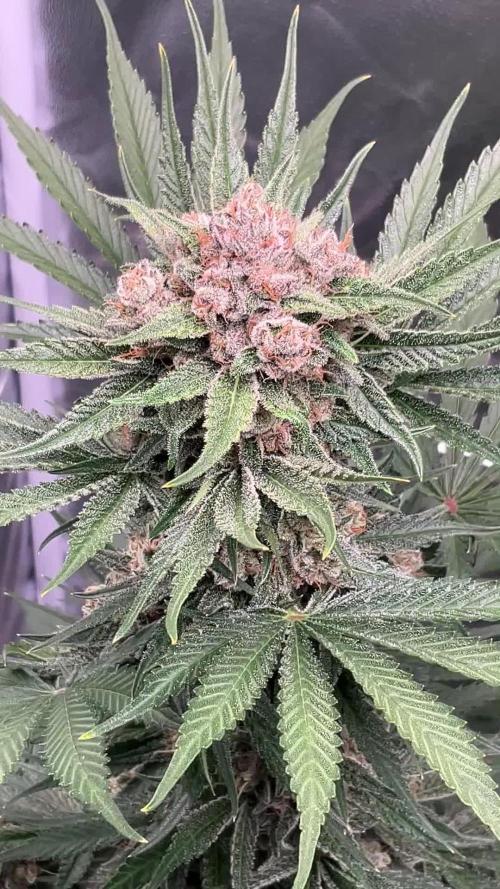
Smell gettin loud in the tent. Looks like lemon cherry cookies Will be a purple pheno 😊😊😊


Likes
1
Share


@GaliforniaWeeds
Follow
7/9/29 día 1 de floración
Esto arranca amigos, por desgracia lo hace con unas temperaturas altísimas, con maximas de incluso 32 grados debido a la ola de calor que estamos sufriendo. Ya hemos montado el sistema de riego y lo hemos preogramado para regar durante 1min cada 4h durante el día. La solución la hemos preparado con los productos Cyco arriba descritos, con una ec de 1 y un ph de 6,1. Por otro lado nuestro jardín. Esta iluminado por 4 barras led 100w de solux, y un lec solux de 630w aunque por el momento está a 315w debido a las altas temperaturas. Para empezar la floración lo hacemos con una defoliación y una poda de ramas bajas. Estaremos atentos a cambios en las pequeñas para intentar mantener en cada momento la alimentación adecuada, sin carencia y sin excesos. No te lo pierdas!!
9/9/20 día 3 de floración
Buenas, nuestras pequeñas se aclimatan bien a la nueva alimentación y a su nuevo medio. Aumentamos la ec del tanke a 1,1ec y seguimos manteniendo el ph a 6,1. Por otro lado las temperaturas parece que disminuyen por lo que pasamos el lec de 315w a 415w, manteniendo así unas temperaturas diurnas de entre 26 y 27 grados. Esperemos que continúen descendiendo hasta poder mantener las temperaturas a 23 grados durante todo el día. La humedad ronda el 40% y estaremos atentos para que no suba de ahí. Deja tu like y síguenos para no perderte nada. Buenos humos!!
11/9/20 día 5 de floración
Nuestro cultivo avanza sin demasiados cambios, durante estos días se aprecia que las nenas aumentan su altura más rápidamente y los brotes se multiplican.seguiremos atentos para que todo siga su curso. Buenos humos.
Likes
14
Share


@SamDo
Follow
🇺🇸 Week 7 - Grow Journal of Mother Gorilla (Royal Queen Seeds) 🇺🇸
On the Way Back to Full Strength!
After two tough weeks with overfeeding and water stress, I’m finally happy to see my plant bouncing back. The roots had taken a hit, and last week, I noticed my filter was way more clogged than usual. I believe the dead roots were broken down and flushed out, most likely thanks to Cannazym. I added it specifically to help decompose the damaged roots, and it seems to have done its job.
Today, I checked the roots and saw that they have stopped browning and are beginning to return to a more normal color. They were previously quite dark, but now they’re showing signs of improvement. The root mass hasn’t regained volume yet, but I think it’s still eliminating waste. It’ll be interesting to see if more debris accumulates in the filter or if it remains clean from now on.
Another great sign: my nutrient solution level has dropped, meaning the plant is feeding properly again. At the same time, my EC has decreased, confirming that it’s actively absorbing nutrients. This recovery is also visible in the canopy: it has become denser, allowing me to slightly top some central shoots that were growing past the screen and to continue working on the SCROG.
The only minor issue this week was pH fluctuation. Over the weekend, it rose to 6.6, but I recalibrated it to 5.9 today. I suspect this is due to the plant still shedding dead roots, which could be affecting its balance. Either way, I’ll be changing the nutrient solution soon, which should stabilize things further.
Current Grow Parameters:
• Strain: Mother Gorilla (Royal Queen Seeds)
• Light Cycle: 18 hours
• Humidity: 70%
• pH: Adjusted back to 5.9 after peaking at 6.6
• EC: Down to 1.1 after briefly reaching 1.3 - 1.4
• Training: Light topping in the center + SCROG work + selective defoliation for better light penetration
Final Thoughts:
Things are improving, but we’re not fully there yet. The plant is regaining strength, the roots are clearing up, and it’s feeding well again. I’ll keep a close eye on its next developments, especially root mass expansion. Excited to see how things evolve next week!
See you next time for another update!
⸻
🇫🇷 Semaine 7 - Journal de Culture de Mother Gorilla (Royal Queen Seeds) 🇫🇷
On est en train de revenir à la pleine forme !
Après deux semaines compliquées marquées par une surnutrition et un stress hydrique, je suis heureux de voir que la plante repart dans le bon sens. Les racines avaient bien souffert, et en observant mon filtre la semaine dernière, j’ai remarqué qu’il était bien plus encrassé que d’habitude. J’en conclus que les racines mortes ont été détruites et évacuées, sûrement grâce au Cannazym. J’avais ajouté ce produit pour faciliter la décomposition des racines abîmées, et cela semble avoir bien fonctionné.
Aujourd’hui, en observant les racines, j’ai constaté qu’elles ont arrêté de brunir et qu’elles commencent à retrouver une couleur normale. Elles étaient auparavant bien sombres, mais leur état s’améliore nettement. Pour l’instant, la masse racinaire n’a pas encore repris en volume, mais je pense qu’elle élimine encore des déchets. Ce sera intéressant de voir si mon filtre continue à accumuler du dépôt ou si tout est désormais propre.
Autre signe encourageant : le niveau de ma solution nutritive a bien baissé, ce qui indique que la plante se réalimente correctement. En parallèle, mon EC a également diminué, preuve qu’elle absorbe bien les nutriments. Cette reprise se reflète aussi visuellement : la canopée s’est densifiée, ce qui m’a permis de légèrement étêter certaines têtes centrales qui dépassaient du grillage et de continuer mon travail sur le SCROG.
Le seul petit point de vigilance concerne le pH, qui a fluctué. Ce week-end, il est monté jusqu’à 6,6, mais je l’ai recalibré aujourd’hui à 5,9. Je pense que ces variations sont dues au fait qu’elle se débarrasse encore de ses racines mortes et qu’elle n’a pas encore retrouvé un équilibre complet. De toute façon, je vais bientôt renouveler la solution nutritive, ce qui permettra de repartir sur une base stable.
Paramètres de culture actuels :
• Variété : Mother Gorilla (Royal Queen Seeds)
• Photopériode : 18 heures de lumière
• Humidité : 70 %
• pH : ajusté à 5,9 après une fluctuation jusqu’à 6,6
• EC : descendu à 1,1 après être monté à 1,3 - 1,4
• Taille & palissage : léger topping central + travail sur le SCROG + retrait de quelques feuilles pour une meilleure pénétration lumineuse
En conclusion :
Les choses s’améliorent, mais ce n’est pas encore complètement gagné. La plante reprend de la vigueur, les racines s’éclaircissent et elle recommence à bien se nourrir. Je reste attentif aux prochaines évolutions, notamment sur la masse racinaire. Hâte de voir comment ça progresse la semaine prochaine !
À la semaine prochaine pour un nouveau point !
🤘😎


Likes
12
Share


@Trippin66
Follow
Hi growmies
well found, today the vadi are still full of water so no watering
pheno 2 mimosa is demonstrating her hulk genes too bad pheno 1 can't do the same too much stress for her two feline attacks were too much even runtz suffered only one but in a too premature phase by the way yesterday while I was trying to make it open a little I patched it the plant shows that it is not elastic perhaps a little silica would do me good but I will use it in the next stressful event in another race I implemented on Monday when I watered green sensetion and sugar royal for the two mimosas that the small runtz and the zenzation are now flowering which is doing well even if in two weeks back it reacts well to the lst I hope it can reach large sizes in the next week and then start flowering when it wants
for runtz and zenzation the usual mix remained, calmag 4mlxlt, rizotonic 40mlx10lt and whiteshark 2 spoon x 36lt ph 6.2/6.3 added the scrog net in which the mimosa is having a lot of fun
I'm very sorry about how the other plants have suffered from stress, the feline demon has been banished from the room where the girls sleep
but I won't give up, I'll bring the result home in mid-December, we'll see what nature and my ability are able to do
have a good week and cultivation everyone thanks for the comments and likes never stop growing👍🏼✅
Likes
33
Share


@burnerac
Follow
Day 113: Decided to add one gallon pH6.5 water with nutrients. This should be the last feed.
Day 114: tent hotter than I would like. Exhaust fan full speed. Cleaned up more leaves. Hopefully can make two more weeks but I am a little concerned.
Day 115: gave one gallon pH6.5 water with 2 tablespoons of Herculean Harvest. Removed a few leaves. The urge to defoliate is huge.
Day 116: removed some more leaves. May harvest this weekend instead of the next.
Day 117: no water added. Removed a lot of dried up leaves. I would be worried if it weren't for other ak47 journals showing the same yellowing leaves toward harvest time.
Day 118: no pictures
Day 119: added one gallon pH6.5 water with 2 tablespoons Herculean Harvest. So want to harvest but will wait 4-7 days.


Likes
26
Share


@MG2009
Follow
02/01/2021
Going to sprout my last 2 Bluedreamatic seeds from
(fast buds). Will be sprouting in mini greenhouse on heat mat. Once seedlings are ready they will be moved under 1000w MH for veg and flowering.
10+hours later they are on bottom of water and time for paper towels in baggie.
02/03/2021
1 seed sprouted and I dropped the other in soil 🙏 I hope because it disappeared! So got at least one Bluedreamatic on the way hoping to see other one sprout in mixing tray.
02/05/2021
She's above ground! Day #1 , currently under 150w compact flourecent 3 way bulb when first true leaves form
(Not single finger let)I will start veg cycle under 1000w MH see you in 3-4 days for weekly update.
topped seedling pot with vermiculite 1/2-3/4 inches
leaving the cotdtyledons 1/2-3/4 inches above surface. Roots should fill up this container quickly, moved under1000w MH light for vegging. Seedling is 3-4 ft away from light but also off to the side no serious heat just about room temperature. I could not feel heat from light where I put seedling, comfortable on your skin is good for plants.
02/11/2021
It's day #6 above the soil, she is doing well already grown 2" above where I topped with vermiculite. At lights out I put her in humidity dome with my tomato seedlings main area of grow gets very cool at night,so I try to keep her at a better temp 72°f.
Likes
3
Share


@BigDaddyK
Follow
Repotted into 18l pots , these are the final , you shouldn’t really repot autos ( start them in final pots ) , but I have 😜
Watering @ 7 litres per pot with above nutrients , I put a bucket underneath to catch the runoff , ph out was 6.3
What you can see , is that even the best performing soil , doesn’t compare to worst performing DWC

Likes
247
Share


@PremiumBudsEU
Follow
Hello growmies 🙂
The flowers got a golden color,
it smells very strongly of lemon 🍋🍋 😍
This girls are very thirsty and hungry, i have to water them every 1-2 days.
I think they are happy for now so i will let It stay like it is until next Weekend.
Thanks for stopping by friends, I really appreciate your support, I hope you're doing well, stay healthy 🙏💚

Likes
9
Share


@LetsGrowSome
Follow
Starting off week 9 now. Pistols starting to change to amber. Buds still fattening up. Did notice some other plants starting to have a bit of a calcium deficiency as well as the center plant that's been acting up a bit. Added 1 tablespoon of gypsum to 4 out of the 5 plants. Continuing to use just rain water for now. Hopefully in a few more weeks it will be harvest time.