


Likes
Comments
Share


@DrewbieDoobieNoobie
Follow
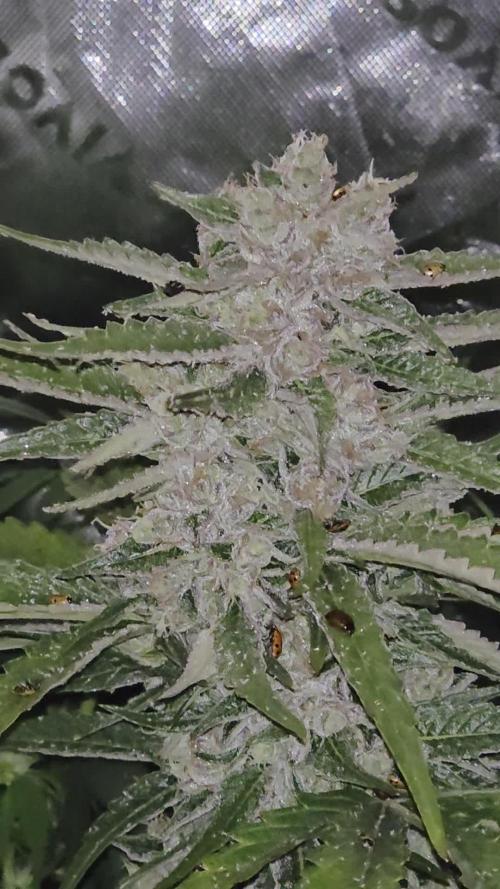
Flower time is here. Transition Feeding as above 3/7/19 I will still irrigate during the week with PH 6.0 water with 1 mil CAL MAG and 1 mil SILLICA /gal I'll be using DJ Short's 11 on 13 off light shedule as I was using a 6/2 x 3 veg schedule I might a well keep it exotic. I have been reading that it will help bring out the flavor, smell and appearance of the buds at the cost of a small sacrifice in yield. Because this is my medicine I will have plenty off the 6 plants, and I'm looking for quality over quantity. As far as I can tell I have not seen any detrimental effects of the 6/2 light shedule it is the same amount of light as 18/6 I just broke it up in 3 parts. It did help keep the heat down. I found I did not have to water as often as well. Would the plants have been bigger had they had and 18/6 I don't have the data to confirm or deny that. All I know is that the plants are doing their thing and they look healthy to me so maybe for the home grower in a hot area this method might work for you. I wanted to try it and I'm just sharing my results with this amazing community of growers. As always I will be uploading more images and Time-lapse at the end of the week. Cheers to all yall😇


Likes
20
Share


@sellem
Follow
Harvested after 7 weeks of flowering, beginning week 8. Last week nothing much happened, they refused to uptake any more water. Didnt flush, pumped them to the max 'till the end.


Likes
2
Share


@AestheticGenetix
Follow
7/1/25 Very classic Gelato Shaped nugs. Very very strong gassy nose to her. Large chunky buds.
Have no complaints besides struggling with mass leaf death on this plant for some reason and can't seem to figure out why or what to do to fix it.
maybe its a genetic sensitive to the heat or the humidity
Likes
21
Share


@w33dhawk
Follow
Moin ihr growmies, ich hatte diese Woche kaum Zeit was zu machen ausser ein wenig lst und Blätter entfernen Bilder hab ich auch kaum Zeit für gehabt bin aber zufrieden mit dem Fortschritt ich denke mal noch so 2 bis 3 Wochen dann stelle ich auf 12/12 um........


Likes
46
Share


@Stork
Follow
Day 50
Add 7L water
PH 6.3 - 5.8
EC. 1.5 - 1.3
TDS 760 - 660
DLI/20h 36
PPFD 500
Water 25.0c
Day 51
Add 5L water
PH 5.6
EC.1.4 - 1.2
TDS 670 - 590
DLI/20h 37
PPFD 525
Water 23.0c
Day 52
Add 10L water
PH 5.9 - 6.0
EC.1.3 - 1.1
TDS 650 - 550
DLI/20h 37
PPFD 525
Water 23.0c
Day 53
Add 10L water
PH 5.6 - 5.8
EC.1.2 - 1.0
TDS 580 - 500
DLI/20h 37
PPFD 525
Water 23.0c
Day 54
Add baking soda for PH and 10L water add: revive and calcium 1L/ml
PH 5.0 - 6.0
EC.1.0 - 0.9
TDS 530 - 450
DLI/20h 37
PPFD 525
Water 23.0c
Day 55
Add 9L water + Nirvana + B52 1L/ml
PH 6.1 - 5.9
EC.1.0 - 0.8
TDS 480 - 410
DLI/20h 34
PPFD 470
Water 23.0c
Day 56
Add 20L water + 5ml Revive
PH 6.0 - 6.0
EC 0.9 - 0.6
TDS 430 - 290
DLI/20h 34
PPFD 470
Water 23.0c
Likes
55
Share


@valiotoro
Follow
Veryyyy excited to try this tester from Fast Buds🤩🤩
For this test I’m gonna do one in coco & perlite
One in light soil & one in super soil!!🤠
3 different EC solution & 2 different PH
As always I’m gonna PUSH the plants to the maximum💥
Germination in a glass of water with hydrogen peroxide 24h💧
All the seeds have germinate 😎
Likes
22
Share


@Changman
Follow
Wow week 8 and Pineapple Express#2 Fem seems to be flipping to flower.Our Elixir CBD Auto is in full flower and continues to give off these peppermint vibes, this is definitely a medical strain and even though shes so small i have learnt alot from being sure to keep your Autos in full sun at all times during the vegetative stage ro ensure maximum yeild.From what ive gathered is that the strain itself isnt a big yeilder and due to the fact that she has not had enough sunlight we will end up with the small head you see here.The Good news is i still have one seed of hers left and next time i will be planting her will be in season😁.Our Hindu Kush Auto continues to flower beautifully and her smell? Nothing short of incredible😍..Our Purple Kush CBD Auto has impressed me most of all, she seems to have reacted so well to the training and the nutes as well as the minimal sunlight conditions.She stands at about 17 cm in length and her side stalks are about 10 cm in length..Our Girlscout Cookies Auto has exploded and is overtaking her grow bag rapidly, hopefully her training and folage removal has worked in allowing her to grow even larger now...Our Blue Cheese and Granddaddy Black are growing up quick and with all our strains having now received some light folage removal i expect they will use that extra energy to really bust out.


Likes
7
Share


@TJHeadley
Follow
Topped on October 27. LST October 29th. Everything seems to be going good so far
Likes
53
Share


@DogDoctorOfficial
Follow
Hey Grow Diaries fam,
Welcome back to another update on our PCR adventure! We're at Week 9, which marks Week 4 of the flowering stage, and things are getting exciting!
Overview
The PCRs are flourishing, and the transformation is nothing short of spectacular. The tent is buzzing with energy, and every day brings new developments. The buds are swelling beautifully, and the trichome production is off the charts. This week has been all about maintaining optimal conditions and ensuring our ladies get everything they need to reach their full potential.
Environment and Conditions
Tent: 3x3, cleaned and prepped from top to bottom to ensure a pristine environment.
Lighting: ViparSpectra P2000, delivering a perfect spectrum for this stage of growth. The balanced PAR output and efficient energy use keep our girls happy and thriving.
Watering: TDS at 410, pH 5.8, and water temperature at 21°C. This ensures the nutrients are perfectly balanced and readily available.
Nutrient Regimen
We’ve kept up with our Aptus Holland feeding schedule, and it's paying off big time. Here's the current mix:
Nutritional Spray: Aptus Holland NutriSpray to keep those leaves lush and healthy.
TopBooster: Replaced StartBooster with TopBooster to promote flower development.
P-Boost: Added to the mix for that extra phosphorus kick, crucial for blooming.
K-Boost: a must for them to go fat as we like.
The results speak for themselves – lush green foliage and robust bud formation.
Defoliation
At the end of this week, we performed a mass defoliation. It's always a bit nerve-wracking, but the results are worth it. Removing excess leaves ensures better light penetration and airflow, reducing the risk of mold and pests. Plus, it allows the plant to focus its energy on bud production. And let me tell you, after the defoliation, the PCRs look sexy as ever with their long legs and sculpted structure!
Clones Update
Our clones are thriving, showing the longest and whitest roots I've ever seen. We treated them with a water mix that included K-Boost and Mycor Mix at 1 gram per liter. This combination has worked wonders, promoting vigorous root development and overall plant health.
Reflections
This week has been a testament to the importance of a clean environment and precise nutrient management. The PCRs are responding exceptionally well, and I couldn’t be more thrilled with their progress. We're well on our way to an incredible harvest, and I can't wait to see these beauties in full bloom.
A huge shout out to:
Aptus Holland: For the top-notch nutrients and constant support. You guys rock!
Art Genetix: For creating such an incredible strain. The PCRs are truly something special.
Grow Diaries Community: Your support and feedback are invaluable. Keep the positive vibes coming!
Here’s to another fantastic week of growing! Stay positive, keep pushing forward, and enjoy every moment of this beautiful journey.
Genetics - P.C.R. @Art_Genetix_Team https://artgenetix.world/
Nutricion @aptusholland https://aptus-holland.com/
LED Power @Lumatek and @viparspectra
As always thank you all for stopping by , for the love and for it all, i fell blessed to have you all with me for one more love journey Thank you Thank you Thank you , you guys are great and have been amazing , thank you for everything !
#aptus #aptusplanttech #aptusgang #aptusfamily #aptustrueplantscience #inbalancewithnature #trueplantscience #dogdoctorofficial #growerslove
With true love comes happiness , Always believe in your self and always do things expecting nothing and with an open heart , be a giver and the universe will give back to you in ways you could not even imagine so !
Growers love to you all

Likes
3
Share

@DogDoctorOfficial
Follow
Folder 13 — Blue Waffle — Pheno A
Week 2 Vegetation — A New Home Beneath the Surface
Welcome back, growers!
This week marks one of the biggest milestones since germination.
After spending the first week establishing a healthy foundation inside the starter container, Blue Waffle Pheno A has officially moved into her permanent home—a Plagron 8L Premium Coco Grow Bag, where the next stage of her journey truly begins.
Transplant day is always exciting. While the leaves tell us how a plant is feeling above the surface, it’s the roots that reveal the real story. And this week, that story was a very encouraging one.
⸻
The Environment
The Zamnesia ecosystem continues providing a stable and comfortable environment for these young ladies.
Current room conditions:
• Temperature: 29°C
• Relative Humidity: 68%
Airflow remains unchanged from last week:
• Extraction Fan: Level 5
• Circulation Fan: Level 4
Lighting also remains steady, with the LED running at 27% intensity, drawing approximately 86 watts from the wall.
At this stage, consistency is far more valuable than chasing rapid growth. Stable environmental conditions allow the plants to focus their energy where it matters most—building roots.
⸻
Feeding Program
Now that the plants have entered their coco home, the hydroponic feeding strategy officially begins.
The nutrient solution remains intentionally simple:
• Plagron Hydro A
• Plagron Hydro B
• Plagron Hydro Roots
Reservoir parameters:
• EC: 1.26 mS/cm
• pH: 5.83
• Solution Temperature: 23.1°C
Hydro Roots continues playing an important role during this stage, encouraging the rapid development of fresh roots as the plants begin colonizing their new substrate.
The objective isn’t explosive top growth just yet.
Everything starts beneath the surface.
⸻
Transplant Day
Last week the Plagron Premium Coco Grow Bags were slowly hydrated using distilled water, allowing the coco to expand evenly while creating a perfectly moist environment before receiving the plants.
Rather than forcing the transplant into a dry substrate or flooding the bags at the last moment, the coco had an entire week to stabilize.
When transplant day arrived, the process couldn’t have gone smoother.
Using the original nursery pot as a guide, I carefully created a perfectly sized cavity inside each coco bag. This simple step allows the entire root ball to slide into place naturally without compressing or disturbing the surrounding coco.
Sometimes the smallest details make the biggest difference.
A gentle transplant means less stress.
Less stress means faster recovery.
⸻
A Look Beneath the Surface
Before placing Blue Waffle Pheno A into her new home, I couldn’t resist taking a closer look at her root system.
And I’m glad I did.
While the roots haven’t completely filled the container yet, they are beautifully distributed around the entire root ball. Bright white feeder roots are visible across every side, with countless fine root hairs actively exploring the growing medium.
This is exactly what I was hoping to see.
There was no need for a heavily root-bound plant before transplanting. In fact, moving them at this stage allows the roots to continue expanding naturally instead of beginning to circle around the nursery pot.
Healthy roots don’t need to be massive.
They simply need to be active.
Blue Waffle Pheno A is giving every indication that she’s ready to explode into her new environment.
⸻
Blue Waffle Pheno A
Above the substrate, Pheno A continues to impress.
The compact structure remains intact, with tight internodal spacing and excellent symmetry across the canopy.
The leaves display a healthy green colour, while the petioles have started developing subtle purple pigmentation—a characteristic that can often appear naturally in younger plants depending on genetics and environmental conditions.
Most importantly, the plant showed virtually no signs of transplant shock.
Only a short time after moving into the coco bag, the leaves remained upright and turgid, while fresh new growth continued emerging from the center.
That’s always one of the best signs a grower can hope for after transplanting.
It means the plant is already getting comfortable in her new home.
⸻
Looking Ahead
With the transplant now behind us, the next objective is allowing the roots to colonize the entire Plagron Premium Coco Grow Bag.
As the root system expands, so too will the canopy.
The coming weeks should bring noticeably faster vegetative growth as Blue Waffle Pheno A begins taking full advantage of the increased root volume and hydroponic feeding schedule.
For now…
Healthy roots.
Healthy leaves.
Healthy future.
Exactly what every grower hopes to see.
⸻
Thank You
A huge thank you to everyone following along on this journey.
Special thanks to:
• Zamnesia for the incredible genetics, equipment, and complete ecosystem that make this project possible.
• Plagron for supplying the Premium Coco Grow Bags and the Hydro nutrient line that now powers this grow.
• GrowDiaries for providing an amazing platform where growers from around the world can learn from one another.
• And finally, thank you to every member of this incredible growing community. Whether you’re just starting your first grow or you’ve been cultivating for decades, your support, advice, and passion make this hobby something truly special.
The roots have found their new home.
Now it’s time to watch Blue Waffle Pheno A reach for the sky.
Growers Love and Keep Growing. 🌱💙🍁
Likes
39
Share


@GermGrowFox
Follow
Schnipp schnapp. Weitere Updates nach der Trocknung und zur Vorbereitung für das Fermentieren.
29. März
Ein Teil der Orions wurde bereits zum fermentieren gelegt. In kürze gibts ein Update zum finalen Endprodukt.

Likes
2
Share


@TTerpz
Follow
Fed with nutrients on 4/16/25
Watered with 6.8 ph plain water on 4/18/25
Day 5: fade began
4/20/25: fed with nutri
Likes
10
Share


@Big_Dennis_Budz
Follow
Tweaking the feed every watering, increasing the big bud and dropping the voodoo slowly
Likes
3
Share


@PineappleMuffinMan
Follow
Big thicc buds. Hard to imagine what these will look like at the end in about 3 more weeks. Used twine over the last few weeks to individually tie up about 15-20 branches to the three stakes I put in. A trellis would’ve helped a lot, but she’s sharing a room with plants earlier in flower now, which is why I decided not to use one a few weeks back.

Likes
11
Share


@Greenconcept
Follow
la bimba cresce bene,manca poco alla sua fioritura. lei non è dopata ma stimolata nelle sue fasi con concimazioni biologiche mirate. L'obbiettivo è fare fiori duri, compatti e brillanti, non gonfi dal chimico.
Non ha mai sofferto carenze, pianta con 16 rami tutti principali e tanta massa fogliare. Non teme il sole a 40 gradi del mediterraneo, anzi gli piace.
Buona giornata amici coltivatori,alla prossima settimana
Likes
9
Share


@TheBulldozerSicily
Follow
Belle e robuste già alla seconda settimana, infatti le abbiamo toppate per portarle tutte alla stessa altezza,aspetto massimo un altra settimana e mando in fioritura, voglio farle crescere con più aria libera nel box questa volta.
15/10
Ho toppato dinuovo 2 piante, per restare tutte alla stessa altezza,

Likes
4
Share


@Green_Thumb
Follow
Popped my first 3 seeds in! Parked the led right up on the pots. Decided to order a 1200W led along w/ my 600W for better coverage.
Likes
4
Share


@QixxGrows
Follow
Day15 - Day17: I had some difficulties to get the humidity right. It was either too high or fluctuating too much. I ended up getting a timer for the plug and running the humidifier 15mins every hour. To help with air flow, I have the main duct fan running 4 times a day for an hour. To ensure that there's airflow around the plant, I have a fan in the light as well as a smaller clip-on fan that runs during light hours. I'm not sure how the camera moved on day17... I only watered it mid-day.
Day18: The timer on the humidifier and Duct Fan is now keeping the humidity in a good space. VPD now under control
Day19: The Vivosun controller perfectly adapted the lighting schedule to an hour earlier, to ensure 6hrs of darkness. UInfortunately the RPi kept it's 04:00 schedule (makes sense). So I captured an hour of darkness. Adapted everything. Will have 18hrs again from Day20 onwards.
Day20: In the next days I'll lift the camera higher for a better view of what's happening up top. My mesh-netting-dingsbums will arrive and I'll use this as a platform for the pi+camera.
Day21: I'm not sure if I like this angle. I'll only keep it like this until she goes into veg-mode. It at least shows the new nodes growing from different perspective
