
Likes
Comments
Share


@BLAZED
Follow
Week 18 (30-6 tm 5-7)
30-6
Temperatuur: 31.4 graden (licht aan) 22.5 graden (licht uit)
Luchtvochtigheid: 69% (hoogste) 50% (laagste)
Ik heb de trichomen bekeken en heb besloten haar nog een dagje langer laten staan.
Watergift: Geen.
1-7
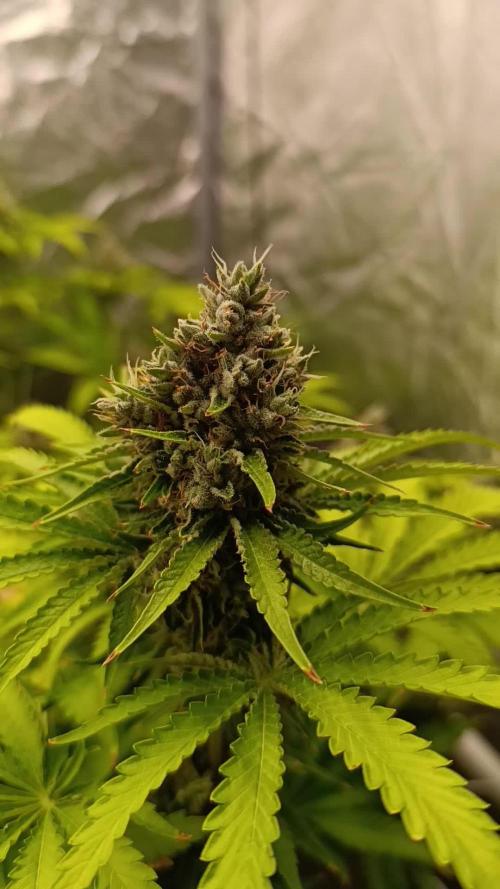
Vandaag heb ik de trichomen opnieuw bekeken en die zien er goed uit! Veel cloudy en best wel wat amber.
Ik hou echt van deze trichome foto's, echt mind blowing hoe dat er uit ziet!
Dus vandaag gaat de schaar er in!
2-7
Ik heb besloten om een wet trim te doen zodat als ze droog is ze gelijk in de cure pot kan.
Geloof het of niet, maar ik ben wel 12 uur lang bezig geweest om alles te knippen 😅
Op 1-7 ben ik in de middag begonnen en in de vroege ochtend van 2-7 was ik klaar.
Het natte gewicht van de buds is 283 gram, en het natte gewicht van de trim is 61 gram.
Ik ben nu al super tevreden met het gewicht! Dit is meer dan het dubbele aan gewicht vergeleken met mijn eerste grow.
De buds zien er ook echt mooi uit. Ik schat dat het tussen de 50 en 75 gram droog gaat zijn. Ik ben benieuwd, nu een paar dagen drogen!
Droogtent:
Temperatuur: 23.4 graden (hoogste) 21.2 graden (laagste)
Luchtvochtigheid: 59% (hoogste) 42% (laagste)
3-7
Droogtent:
Temperatuur: 23.2 graden (hoogste) 21.5 graden (laagste)
Luchtvochtigheid: 50% (hoogste) 41% (laagste)
4-7
Droogtent:
Temperatuur: 23.1 graden (hoogste) 22.1 graden (laagste)
Luchtvochtigheid: 53% (hoogste) 46% (laagste)
5-7
Na 3 dagen is ze droog genoeg om te curen. Wel heb ik iets te lang gewacht want de LV in de jar geeft nu 57% aan.
Ik hoop dat dit over een dag wat om hoog gaat. Nu een paar weken curen en dan kom ik met de rook verslag 😁
Ik zal binnenkort ook even berekenen wat de gram per watt is, aangezien ik de lamp niet de gehele grow op 100% had staan.
Het droge gewicht van de buds is precies 75 gram, en het droge gewicht van de trim is 19 gram.
Samen maakt dat 94 gram! (De trim gebruik ik om een CBD cake of bubble hasj te maken)
Ik wil iedereen bedanken voor het volgen van dit avontuur! Tot de volgende keer!

Likes
20
Share


@eldruida_lamota
Follow
Como estáis familia? Yo flipando y es que todo lo que provenga de cheese me encanta, farm cheese del banco genofarm, repleta de polen,parece los Pirineos en pleno enero cuando nieva.
Es una cepa increíble el problema que le veo es su olor penetrante, apesta enserio es muy fuerte su olor, seguimos alimentándola con advanced nutrients quitamos todos los adictivos menos overdrive y la base sigue dando caña y si no mirar su color.
Todo este proyecto e de agradecerlo a mars hydro que sin ellos no es posible este proyecto, enserio este led es bomba.
Ph controlado , humedad por debajo de 50% temperatura entorno a 27 algo alta pero no hay problema alguno.
Muchas gracias a todo el equipo de mars hydro de nuevo, agrobeta que aunque no participen los productos en el diario si van hacerlo en un futuro, y gracias a vosotros que sin grow diaries y sin todos vosotros usuarios , tampoco es posible, así que gracias, muy buenos humos 💨💨💨.


Likes
9
Share


@timbarin
Follow
159
Its been a rough week in flowering. She got super shocked and also I added way too much nitrogen. Because of that she was on water only diet for last week including today. Getting 2l per day to remove the extras. She wil get regular food in a day or so. Also today the watts goes to 200.


Likes
1
Share

@OGbros
Follow
Tutto procede nella norma
Continuo a dare 9l d'acqua ogni 2 o 3 giorni a pH controllato e con i soliti fertilizzanti
L'odore inizia a farsi intenso, lo trovo molto dolce
Ci sono diverse punte bruciate e penso sia dovuto agli UV (per ora 1 minuto ogni 2 ore a luce accesa), quindi non penso che aumenterò l'esposizione, al massimo l'ultima settimana o proprio gli ultimissimi giorni, ci penserò ...
Edit
Ho trovato della muffa su una delle cime apicali
Starò via una settimana spero che il problema non si diffonda troppo
I parametri ambientali non erano ottimali per la comparsa ma è arrivata comunque
Peccato, in aggiunta all'ermafroditismo farà danni, si poteva fare meglio....

Likes
6
Share


@Jungle_James_Grows
Follow
She's starting to fade out now, and budding up nicely. Not seeing much purple coming through yet. She's getting nice and fat and smelly now.
Trying out a macro lens thingy.

Likes
17
Share


@FireRGB
Follow
Seit ca 10 Tagen nur mehr Wasser. Herbst ist voll im Anmarsch! 🤓 Freue mich sehr. Den Pflanzen geht es sehr gut. Sie wurden seit Anfangs der Woche nur von unteren Topfseite gewässert. Meine Theorie dazu das der Dünger der sich im Boden noch enthält richtig genutzt wird. Gestern wurde von oben gewässert. Mir ist somit auch aufgefallen das die Pflanzen nicht mehr so durstig sind. Ich denke mir ich werde noch ca. einen Wochen ergänzen. Ich machte die Pflanze von oben bis unten in Herbstfarben sehen. Hoffe mein vorhaben es noch länger hinauszuziehen stellt sich positiv heraus.
Processing
Likes
13
Share


@Green_Blood
Follow
On the final few days of a 10 day flush.
Will be chopping down this week to harvest and hang dry.
Really excited to try this one. The smells in the room are unreal.

Likes
15
Share


@ho99o9
Follow
Looks like i got EightShooter=)
81 day - last day light. 3 next days shooter shall be in full darkness!
Happiest 4.20. HARVEST))


Likes
9
Share


@Atom_x_Andromeda
Follow
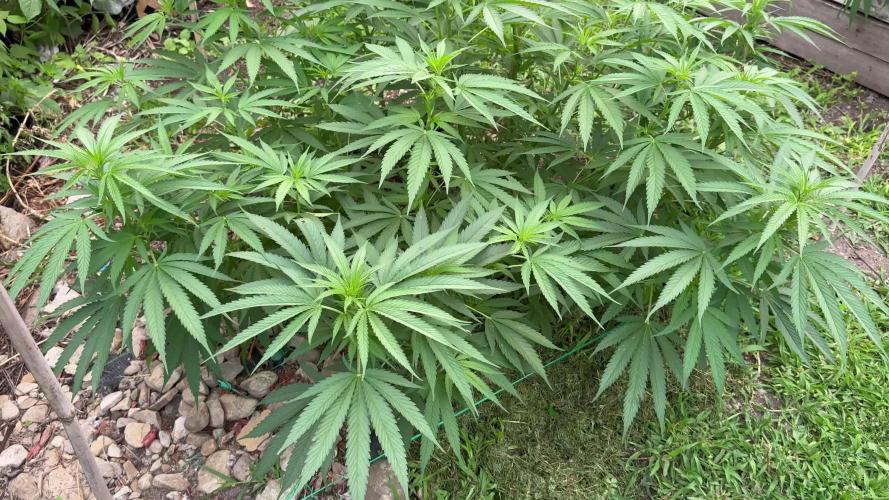
Plants are loving life Got a exhale bag There made in a town in the state i live in thats BA Hows The Girls Lookin 2 You Guys, i need advice im an outdoor guy so all this building my environment is new to me


Likes
77
Share


@Ukfarmer420
Follow
So I finally got there in the end, here we have 3 x sherbert mimosa and 2 x gelato cake.
Classing this as week 1 as I repotted today so this is what I'm using.
Light = bloomplus bp2500
Exhaust is a ac infinity 6inch with digital controller
Inkbird humidity controller with a ram 5l humidifier. Veg only!
Soil= biobizz light mix
Nutes= biobizz roots 1 week using the 10 week schedule at half dose this run.
Ph= 6.4
Room humidity is 70%
Temp is 28°c
Happy growing guys 💪💚
Grown under the bloomplus bp2500
The 4 smaller ones are in light mix
And the middle one is in all mix hence its got nute burn.
I have fed them 4ml of biobizz roots to a litre of water. I made a 2l bottle to share between them at this point.
Tomorrow I will start them with the following biobizz nutes as follows.
2ml per litre of fish shite
2ml per litre of bio heaven
2ml per litre of acti Vera
2ml per litre cal mag
I mix the cal mag on its own and feed separately.
Happy growing guys 💚💜
Last pics of this weeks progress just put on, what a growth spert in 6 days 😁💚💜

Likes
18
Share


@BudMunchies
Follow
09/03: Im pleased with their progress this week. They did indeed start growing nicely after their slow recovery adjusting to the removal of the humidity domes.
I have my light at 60% and still about 18 inches away.
My humidifier is never getting the humidity pas 59 when i want it to be in the mid 60s. And so i ordered the big AC Infinity humidifier and hoping it will do a better job.
I was low of my typical nutrients and so i decided to try something new and bought an Advanced Nutrients stack. Going with the three part and B-52 and will mix in Big Bud, Overdrive, and Bud Candy later in the grow. Excited to see how this works out as i have seen a lot of great grows on here with these nutrients. I am just following their feeding chart recommendations until I dial in what i like.
I plan to transplant them to their large 7 gallon auto pots sometime this week. Maybe as soon as tomorrow.
09/05: Transplant day! Today I transplanted them to their final 6.9 gallon pots. They all had great root systems that had not reached a root lock yet. I added some dynomyco to the transplant holes to help with root production.
I will continue to water from the top for about a week before turning on the autopot drip system.
09/08: Decided to do an aggressive topping today, this was done at the 2nd to 3rd node, depending on the plant. I have not yet decided how i want to train them, but this will leave me with options while i decide over the next week. I know it looks like i took down half the plant, but trust me, we good. I may actually go with a form of main-lining that ive wanted to do for a couple years now.


Processing
Likes
4
Share


@doitforlovenotmoney
Follow
one plant Corn bread.. is 17 months old.. the rest are 2-two months old. first week of documentation.
start of 3rd week of flowering..16th day of flowering
having an insect problem. showered plants with neem oil and soap
need to get rid of mites and aphids
need to better the feeding regimen
need to prune and re arrange plants
-----as for the room i need to cut two more 6' holes in central duct to place exhausts for third and fourth flowering lights and carbon filters. hook up portable a/c in storage room..use plastic wrap to seal in room .. exhaust heat from a/c out of seconadry window and make n intake from the bottom of the wall with the doorplace air filter over hole...collect water from a/c dripping


Likes
85
Share


@SlowpokeFuegobud
Follow
🍬 🍓 🍧🍭 🍋 🍹
Hello and welcome to week 1, dearest growmies!! 😘
Sherbet Schwarzenegger is the tallest girl, and she came with 3-fingered leaves right away! (well one 3 and one 2-fingered 😅) 💪 So vigorous!! 🌱
Thanks APTUS Holland for supplying me with the nutes for this grow! 🙏 ❤️ I cannot wait to try them!! 🌱 🌞
Thanks @Sweet_Seeds for the beautiful genetics!! You guys rock!! 😘
___________________________________________________________________________________________
Strawberry Cola Sherbet F1 Fast Version®️
This is an ultra-fast flowering, photoperiod-dependent, feminized strain with red flowers. It is also a first filial generation (F1) cross between a photoperiod-dependent elite clone of the famous Californian Sunset Sherbet and the autoflowering strain Strawberry Cola Auto.
Strawberry Cola Sherbet F1 Fast Version®️ (SWS106) is an indica/sativa polyhybrid, although it is predominantly indica. The plants have large, dense buds covered with lots of highly aromatic resin.
This strain has a very pleasant, potent, and complex aroma, with shades of red fruits and cola, earthy and woody hints, and fresh, citrus undertones.
It has a happy, relaxing effect that stimulates reflective introspection, concentration, and insight.
Data Sheet Strawberry Cola Sherbet F1 Fast Version®️
Variety: SWS106
Indica: 80%
Sativa: 20%
THC: 18-22%
CBD: 0,1%
Indoor Yield: 450-600 g/m²
Outdoor Yield: 400-650 g/plant
Indoor Blooming: 7 weeks
Purple Flower: approximately 75% of the specimens
Effects: Stimulating, Happiness, Relaxing
Taste: Earthy, Citrus, Cool
https://sweetseeds.es/en/f1-fast-version-seeds/3237-strawberry-cola-sherbet-f1-fast-version.html
____________________________________________________________________________________________
Setup:
140x70x200 cm Spiderfarmer tent
2x Monkey 16W fans (not oscillating)
1x Secret Jardin 30W
1x box fan 50W oscillating (on lowest level)
LED
Full Spectrum 320W AGLEX AGL-320W-MA
5,6 kg
foldable, dimmable
864 pieces Samsung LH301H
864umol/s
2,7umol/J
full spectrum white + RED 660nm + IR 740nm
wavelength range 380-780nm
covering 3x4ft
APTUS Holland - https://aptus-holland.com 💚
Green Buzz Nutrients https://greenbuzzliquids.com/ 💚
❗ Use code GD42025 for generous 25% discount (for orders of minimum 75€)
Biobizz Lightmix + coco + wormcastings + perlite
Carbon Active Granulate Filter 125/360 cm³/h
PrimaKlima exhaust EC 125-400/240 cm³/h
Likes
7
Share


@Albeginner420
Follow
Day 70 of flower, the leaves are starting to fade thanks to the flush. If some Amber trichomes shows up i Will chop next week at day 77, by now the trichomes are almost all cloudy. The smell Is citrus-like and very strong. Dulcis in fundu i expect an heavy yield by the cookies looking at those buds.

Likes
48
Share


@MadeInGermany
Follow
Hey everyone 😁.
Today I start the next aeroponic round 😃.
Since the last 3 runs were with my Gelato (Black Pheno) from Zamnesia, this time I will put my Kosher Tangie Kush Phenotype from Amsterdam Genetic in the Growtool 0.8 😃👍.
Of course, the Gelato (Black Pheno) will continue to be used 👍.
The entire system was cleaned with alcohol and everything checked for functionality :-).
I took 6 cuttings from the little Kosher Tangie Kush mother, of which only one remains in the end (the best).
As always, the water was mixed with osmosis water.
The following was added:
Canna Rizotonic: 3.5 ml per l
Cannazym: 2.5 ml per l
Canna Cal / Mag: approx. 0.2 l per l.
Since this time I want to do a ScrOG with a single plant in the Areo system that fills the whole tent :-).
similar to the second gelato run where I did the ScrOG with 3 plants 👍.
The clones were placed under plastic hoods and sprayed so that they had enough moisture to root.
Now they get 10-14 days to root, then we'll see which one is left over :-).
I wish you all a lot of fun until the next update.
Stay healthy and let it grow 🙏🏻🍀.
You can buy this Strain at
https://www.amsterdamgenetics.com/product/kosher-tangie-kush/
Type:
Kosher Tangie Kush
☝️🏼
Genetics:
Kosher Kush
X
Tangie
👍
Vega lamp: 2 x Todogrow LED CXB3590 COB 55 W
1 x Sanlight S2W 62 W
💡
Flower lamp : 2 x Todogrow LED CXB3590 COB 55 W
1 x Sanlight S2W 62 W
💡 ☝️
Grow Aero System : Growtool 0.8
☝️
Fertilizer:
Canna Aqua Vega A + B , Canna Aqua Flores A + B , Rizotonic, Cannazym, CANNA Boost, Pk 13/14, Canna Cal / Mag, Canna Ph - Grow, Canna Ph-Bloom
☝️🌱
Water:
Osmosis water mixed with normal water (24 hours stale that the chlorine evaporates) to 0.2 EG. Add Cal / Mag to 0.4 Ec Ph with ph- to 5.2 - 5.8
💦 💧

Likes
44
Share

@THcHunteR23
Follow
C’est une belle grosse !
Finalement les variétés Go Fast commencent leur fleuraison de façon un peu plus prématurée que la normal des photopériodes. Peut être la récolte à la fin septembre !!

Likes
80
Share


@Mrs_Larimar
Follow
I had alot of Fun with this Grow, and a lot of Growers, had a Story about the Strawaberry Cough. Thank you all for sharing that with me!!! I learned alot about the heritage of this Strain and its appearing in Movies and Music. Mr. Kushman itself had a great Story about Strawberry Cough, and how he got them as a Present
But back to the Grow
fast Germinating, Germiating Rate 100 Percent, fast grower, and then the Journey began......
One Pheno turned out with Cottoncandylike Buds , The other Pheno with Fistsized Dense Buds
Booth showed a wonderful Scent, and they were a Pleasure to look
One Plant is still growing
Thank you @Miister_lee , for the opportunity to grow them
And LEGALIZE WORLDWIDE
