The Grow Awards 2026 🏆 


Likes
Comments
Share
@Gorrilla420
Follow
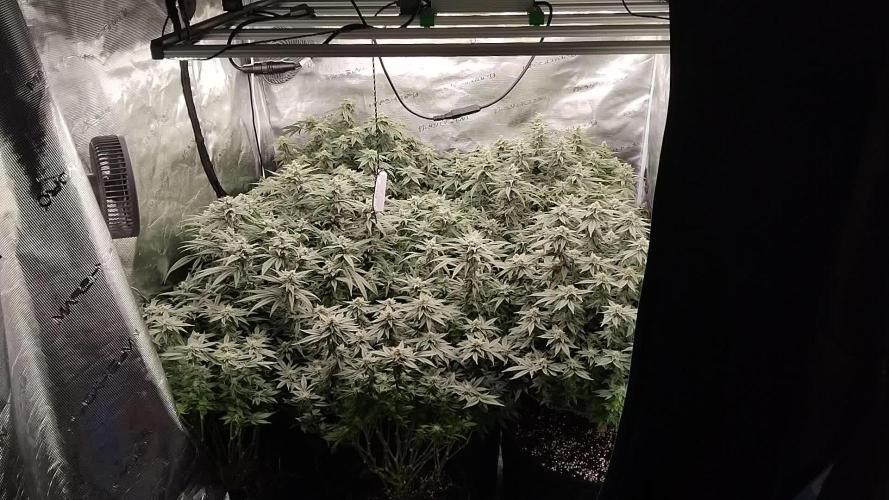
She’s started to actually grow now not getting stunted by slugs. Put down some organic slug pellets and some copper tape to try keep them off. Just have plenty of plain water this week. Will top her again this week and try get her bushed out.
Not had much sun this past week or 2 hoping it comes out these coming weeks before any flowering. Wanting a monster this year.
That’s all this week, happy growing 🌱


Likes
17
Share
@RDWCGrowing
Follow
Week 3 Day 1 8/26/2023
Water Change Day!!
Added:
36 gallons of Water
TPS SILICA GOLD-.5mil/Gal
Root Drip- 1mil/Gal
CALMag- .5mil/Gal
GH FLoraMicro-4.2mil/Gal
GH FlroaGro-3.8mil/Gal
GH FLroaBloom-3.0Mil/Gal
ORCA-.5mil/Gal
She continues to be my Mutant!
Week 3 Day 2 8/27/2023
Topped her a little and took a little from the bottom. The PH was just a little high so I added 4mil PH down to get it to 5.86.
Week 3 Day 3 8/28/2023
Topped her a little and just enjoyed her individuality.
Week 3 Day 4 8/29/2023
Topped her a little, and started cleaning up the lower 1/3, I am starting with the fan leaves that are touching the clay and some of the lower, lower portion but leaving the stems for when I take clones.
Week 3 Day 5 8/30/2023
The temp has been getting to 79-80 the last few days and I don't like it that high. I lowered the light to 29 inches and decreased intensity to reach the 350ppfd for the plants. By dropping the light it should also drop the temperature.
I took a few bottom leaves as I start my clean up, leaving the lower stems for clone material for now.
Week 3 Day 6 8/31/2023
Found out why the temp had been getting so high in my tent and my grow room, the controller for my other light for my other tent was malfunctioning and overheating. I guess this was the unknown contributing factor to the sudden increase in temp, how am I sure about this, because the light no work no more. I am working with Spider-Farmer Warranty since the light was under a year old, very sad day yesterday was to replace my SE 7000 on my breeding plant which was in week 9 of flower with a VS2000 I am thinking I am going to have to cut my losses.
On a good note she looks Amazing full on Growth Spurt happening, I adjusted the PH up slightly to get it from 5.81, to 5.89.
Tomorrow Measurements incoming.
Week 3 Day 7 9/1/2023
She is looking Mutanty this morning! I took off some lower leaves cleaning up the bottom 1/3.
Processing
Likes
2
Share
@mingokoon
Follow
Skywalker one and another Skywalker have stretched quite a bit in last week. About an inch and a half a day. I have a better light on order so hopefully it will prevent stretching in the future. Every day I move the fan leaves around to expose the buds that are growing. It should be an interesting crop in a few weeks
Dec 9: S1 stretched to 24 inches. I will try to increase all the 2.5 of bloom (gave this to Pot 3 with S2 which is stretching about 2 days after S1)

Likes
31
Share
@MMSC16
Follow
Nov 13 - Day 94 - More bulking up, girls are holding water longer. Watered Older plant at 7.45PM. Started defoliating withered leaves with trichomes, I'm keeping those for now, and will combine with bubble hash trim.
Nov 14 - Day 95 - Both pots aren't super light so I'll wait until tomorrow and water both at the same time. Starting to think about drying and harvest, I suspect there to be a fortnight between each harvest - but unsure if I can afford the tent space with next run growing. I think I'll water either as lights turn off (if humidity wont rise) or first thing on Nov 15.
Nov 14 - Trichomes are milky with the speckle of clear and amber. Lets hope the lagging cola fattens up in the week to come.
Nov 14 - WATERED Younger plant at 10.30PM.
Nov 15 - Watered Older plant at 3PM
Nov 16 - Watered Younger plant at 5PM
Nov 17 - Woke up to 80F. Likely at higher temp for 1 hour before noticing. Defoliated a few leaves, including one or two with trichomes, of which I've saved.
Nov 18 - Watered Older plant at 6AM. Younger plant pot is light at lights off- will water first thing in the morning. Also removed dead tips and accidentally chopped a healthy fan leaf. I was hoping to chop today, but it might be another week before the younger plant is ready.
Nov 19 - DAY 100 - Watered Younger plant at 10.30AM. Trichomes are developing nicely, I suspect 1 more week with younger plant which makes me wonder when to chop older plant.
Likes
Comments
Share
@Topshelf_only
Follow
All moving along nicely .front grandmommy not bulking up like the others but other then that no real concern with 3 to 4 weeks left.


Likes
9
Share
@Naujas
Follow
thank you to the divine seeds team for the chance :) the girl is growing little by little:) I will keep her at home for another week, and then she will travel to nature :).

Likes
8
Share
@Pifferson
Follow
This week was fun, had nutrient lockout on the one plant some signs on others.
Decided to flush from the top with two plants which is a terrible idea with autopots; the minerals build up in the soil and all I did was wash them down.
The plant that was looking the worse had some lower branches die after this so I cut them out.
Reached out to autopot and they were a huge help, flushed from the Rez and then brought my nutrients way down. I only just got an ec meter but I was at 3200 ppm when I started the flush and 150 by the time I added nutrients back in.
The two plants that I flushed from the top aren’t in great shape but they’re still alive, only 2 more weeks to go so hopefully this didn’t have too much of an impact on quality!


Likes
2
Share
@Grisly
Follow
Harvest 2025
Grand totals:
Flower - 2893g / 103oz / 6.5lb
Kief - 63g
Trim - 3150g
Plant totals:
Dr Grinspoon - 165g
Auto Glueberry OG Field1- 7g
Runtz - 2g
Auto Glueberry OG Field2 - 94g
Early Harvest Total: 268g
===================
C99 Fast Flowers - 128g
Sugar Cane South - 199g
Sugar Cane North - 74g
Medi Bomb #1 - 438g
Critical Cake Wreck - 534g
Blue Cheese Field + Raspberry Pebbles Field - 725g
Blue Cheese Camp - 341g
Rickie’s Hash Plant - 186g
Main Harvest Total: 2625g


Likes
2
Share


Likes
101
Share
@DreamIT
Follow
🍓🍌🚗 Red Strawberry Banana Auto by Sweet Seed 🍓🍌🚗
🍌8.8
🍌9.8
🍌10.8
🍌11.8
🍌12.8
🍌13.8 It resumes with the updates yeeeeah !!!! I have developed 18 branches at the moment, and I will stop here, now I wait for it to come into bloom, very ready to give my best. yeah !!! Super Big Up for the Sweet Seeds sponsor who continuously produces these wonders 🤘🤘🦄🦄🦄🔥
🍌14.8
__________________________________________
❓ Are you new to the world of the cultivation and don't know where to safely buy your seeds?
😮From SweetSeeds you can find award-winning, sweet, fast, fragrant, beautiful, and delicious genetics !!!
✅http: //bit.ly/SweetSeeds_
__________________________________________
👀 Are you looking for a good lamp to start with? 👀
🌞Viparspectra has something more than the others, take a look at their site.
⏩ Use "GDVIP" for an extra discount or "ViparDreamIT" for an extra 5 %% discount
👀 Search for it on Amazon
✅Amazon US: https://amzn.to/30xSTVq
✅Amazon Canada: https://amzn.to/38udUVe
✅Viparspectra UE: bit.ly/ViparspectraUE
👀 Watch my ViparSpectra XS1000 unboxing on YouTube, leave a like and write to the channel 🦄
✅http://bit.ly/UnboxingViparSpectraDreamIT
______________________________________________
📷🥇 Follow the best photos on Instagram 🥇📷
https://www.instagram.com/dreamit420/
🔻🔻Leave a comment with your opinion if you pass by here🔻🔻
🤟🦄💚 Thank you and enjoy the growth 💚🦄🤟

Likes
7
Share
@RFarm21
Follow
Week 5 november - 11 november
5 november - transplant in the final home, 5gallon pot
the humidity in the last few days has been very high

Likes
36
Share
@pifflestikkz
Follow
Day 165
14/10/24 Monday
De-chlorinated tap water pH 6 with calmag today
Starting to see new growth showing purple and dark tones 🤩🖤
Picture and video update 📸💚
Day 167
16/10/24 Wednesday
Another feed today using de-chlorinated tap water pH 6.
I may as well make it last out this week and see how she is again. I'm thinking she may end up being a 10-12 week flower because of size.
Picture and video update 📸💚
Day 169
18/10/24 Friday
De-chlorinated tap water pH 6 only today. She is starting to put weight behind her buds now...
I went through and did a deep lollipop and defoliation because of what happens to Euphoria in my previous diary, I am not risking mould again!!!
She is doing well!
Her colours are coming through nicely now.
Day 171
20/10/24 Sunday (End of week)
Another feed to finish the week 💪 she is taking it like a champ.
De-chlorinated tap water pH 6 after nutrients.
Likes
58
Share
@brownbae420
Follow
Day 78
— Not praying as hard but still look beautiful
— Buds stacking nicely
— Trichs - triching out!
— Vibe: 😎
Day 79
— My most enjoyable grow yet
— Stacking buds
— Vibe: 😜😍
Day 81
— Nutes mixed
— Just in awe of these fat little ladies
— Vibe: 😍
Weekly Avg Readings
— Lights 12/12 - Level 10
— Temp: 70 (ideal) | 72.8 (avg)
— Humidity: 60% | 61.0%
— VPD: 1.2 | 1.06 kPa
"No time for negativity." —Berner415


Likes
26
Share
@deepsheeba
Follow
Ok my dear fellows. I've upgraded my tent in a 1m X 2m. With this setup and a high potent dehumidifier I should be able to keep the humidity low.
Unfortunately this high humidity was going too kill two other crops. With this setup I should reduce that risk again.
So the RHC is now together with the others. She is bulking a lot. There have been a little discoloration on the upper leaves. It might have been the light too strong. This is weird because I'm providing 1500 ppm CO2. All the other parameters are ok so it must have been a little lack of water some days ago. Smell starts to be very noticeable BUT it doesn't reminds me weed but instead citronella. I thought that's why I don't see mosquitos in the room.
To the next week
*Changed nutrients ratio to meet to lower the EC but keeping PK at the level of (40ppm - 100 ppm).
*Next upgrade will be a tower fan to increase the airflow
Likes
19
Share
@ArtisticGrown
Follow
Why hello, if you are still here thank you for the love & support. I cant believe we are already on the start to week 3 of bloom!
This lady here has been streching the last 2 weeks! During the first week of bloom I gave her nutrients with both bloom a & b as well with bud candy! Then water in betwen watering. Shes been needing watered everyday in this 10 Gallon pot! So im very careful with the nutrients and keeping a close eye on her! Ive also used dried coconut powder with irrarated, ph balanced water. To help the roots absorb the nutrients and really up take!
Im beyond ready to see what week 3 brings us! Ive been behind on defoilation only taking about 3 to 5 leafs a day just to try to get other coals light!
If you have any question feel free to ask! Much lovee lets go guava!!!
Likes
32
Share
@Silverback_Guerilla
Follow
FRIDAY 1/18:
I flushed Agnes with a gallon of sledgehammer plus calimagic, and fed a half-gallon of nutes to Agatha and Alma.
SATURDAY:
Foliar fed a few times.
Agnes still looks like shit..
SUNDAY:
I foliar fed them a few times.
I'm gonna transplant Agnes into a 5 gallon pot tomorrow. She must have root problems. I hate transplanting after they've been in flower this long, but I see no way around it if she's gonna produce any decent buds for me.
MONDAY:
I foliar fed them a few times today. I mixed up some happy frog soil and coco coir at about a 3:1 ratio, then mixed in about 4 cups of perlite and some bat guano, then transplanted Agnes into a 5 gallon fabric pot using that lighter mix to fill the pot. I watered her in with some flower's kiss foliar fert...hope she likes it.🙏


Likes
17
Share
@CanadianFillmore
Follow
Welcome back growfessors to another episode of growfessor theatre! 👽🌳💚
Week 8F begins for the ladies of the 4x8, last round of feeding before the flush.
LSD has gone crazy over the last week, insane bulk-up in her buds, from top to bottom, in by the stock and out to the tips, she's just bulky, dense, sticky, frosty and incredible! By far, the best looking results from any of my LSD grows.
Green Crack also looks incredible and the rest of the ladies, while doing awesome, will be their final grow in my garden.
Thanks for stopping by growfessors, tune in next week for another episode! 👽🌳💚

