
Likes
Comments
Share


Likes
31
Share


@JuicyFruit
Follow
If anyone has any advice on how to improve this grow please comment below. thanks for checking out my diary!
End of week 3/Day 27:
ive been flushing alot before giving nutrients to the plant and it seems to be working, plant health is slowly improving again! Started LST a few nights ago and my plant has lost its christmas tree shape :'D the canopy is more flat and more light is getting to all growth on the plant so im happy!
I started giving some rhizotonic near the stem to help with the plant being stressed. it definitely helped make big roots too!
So excited to try some buds! another month or so yet :)
Day 28 - 20/10/19
LST is amazing! i have almost all the growth getting a decent amount of light! im going to enjoy shaping the plant over the next week or so!
Day 31 - 23/10/19
Still doing a light LST, most of the canopy is getting enough light now and the main stem is still growing more nodes.
After getting some advice from a grower with the same model of light as me i now know i can hang my light a lot closer to the plants. im going to get rope rachets hooked up in the next week so i can adjust hang height.
I also got an indoor chilli starter kit and planted jalapeño, cayenne and habanero seeds in some nice small terra cotta pots :) and i posted a few pictures to show the setup :) just cant wait until the whole tent looks more like a garden hahah :)
12 hours later -
Added a video to show progress
Day 32: 24/10/19
woke up this morning and the quick one grew upwards out of the LST :) the top has developed and looks more like an industrial weed plant now which is really exciting! ive been following a water schedule and accidentally gave a few more hours of rest to the plants last night and they have stopped drooping more or less.
Re-lst'd the plant so all growth is receiving light and measured the space between the plant and grow light. its about 60cm/24Inches away which will do fine. Quick one is 18cm with LST, if i measure the stem itself its about 21-22cm tall - about 9 inches.
Other than that the chillis will take up to 2 weeks to germinate, ive been keeping the moisture up around them with a mix of Rhizotonic/Water (1ml/1L) and also sprayed some on the soil as ive found it actually helps seeds germinate quicker with more strength or life in them.
Will update soon for week 5 and considering the smoke is so bad in my town you get an urge not to smoke it i am so excited to be near the finish line :) roll on medicine!

Likes
5
Share


@MMorrelo
Follow
harvested in day 68. fast eddy was easy to grow. i couldnt stand that smell when harvesting, very strong, but my friend liked it. Diesel spice. smoke report will follow after 1,5weeks. will update the comment, just wanted to show some pics now. also guys from what you see did i harvest it to early or in time?
update:
saw powdery mildew, used h2o2 bath to clean it, mold is terribly bad for lungs and overall health. put the vent to dry water from cleaning, hope all be fine and powde00
Likes
15
Share

@DogDoctorOfficial
Follow
Sour Diesel — The Little Survivor
Harvest & Trimming Report — Part 1
Before starting this report properly, we once again want to apologize for dividing the harvest documentation into multiple parts.
Even when plants are smaller than the giants we have shown recently, we still believe every genetic deserves proper documentation, proper explanation, and enough time to tell the full story from seed to final medicine.
That means:
- harvest,
- drying,
- trimming,
- curing,
- smoke review,
- terpene analysis,
- and final reflections
all deserve their own moments.
And honestly?
That is exactly what GrowDiaries is about for us.
Not just showing finished buds.
But documenting the entire journey honestly.
The beautiful parts.
And also the difficult ones.
---
This week, we are talking about the smallest and most unhappy girl from the room:
Our Sour Diesel.
And honestly…
in a room full of different genetics sharing the same environment, same feeding schedule, same lighting, same humidity and same rhythm, it is impossible to make every single plant perfectly happy all the time.
Some genetics thrive.
Some tolerate.
Some struggle.
And this Sour Diesel definitely struggled more than the others during this run.
Compared to the monsters surrounding her inside the 8x8 room, she stayed smaller, more sensitive, and clearly less comfortable with the overall conditions.
But here is the important part:
She never gave up.
And neither did we.
Sometimes the easiest thing to do is remove the weak plant and move on.
But when we have:
- the space,
- the patience,
- the time,
- and the love for growing,
sometimes it is worth allowing plants the opportunity to recover and finish their journey.
And honestly?
We are very happy we did.
Because despite all the struggles, this little Sour Diesel still delivered beautiful medicine.
---
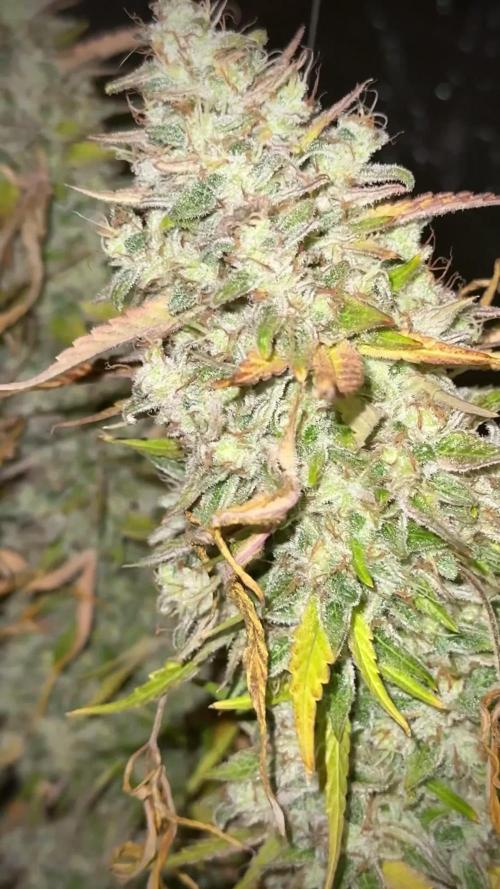
By Week 15 from seed, she was finally ready.
Not the biggest plant.
Not the frostiest in the room.
Not the highest yielder.
But still beautiful in her own way.
Dense little flowers.
Strong aromas already developing.
Beautiful trichomes.
Classic Sour Diesel energy hidden underneath the stress she experienced.
And because the entire room was coming down together, her time also arrived.
Could she maybe have stayed another week?
Possibly.
But in a mixed-room environment, timing becomes a collective decision.
And honestly, we were happy with where her trichomes stood:
mostly cloudy,
a few amber,
still some clear heads,
but overall exactly inside the window we personally enjoy harvesting our medicine.
---
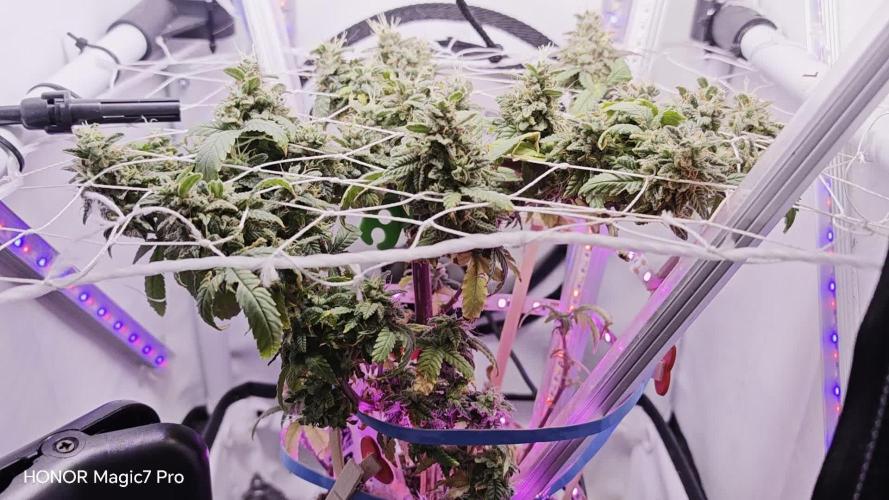
After harvest, we broke the plant down branch by branch and placed everything carefully onto drying racks.
Drying conditions stayed similar to the rest of the room:
around 20°C and 60% humidity.
Slow.
Controlled.
Patient.
Exactly how we like it.
After roughly 7–10 days, once those little branch snaps finally gave us that beautiful “click” every grower loves hearing, trimming time arrived.
And honestly?
For a smaller plant, this became a very peaceful trimming session.
Trim bin on stage.
Gloves on.
Zamnesia curved scissors ready.
Mr. Baggy supervising operations as always.
And one by one, we cleaned her carefully.
Those curved scissors truly make a difference for us because they allow easy access deep into compact flowers while preserving structure and avoiding unnecessary damage to the buds.
Small details matter during trimming.
Especially with resinous flowers.
---
And despite being a smaller harvest…
this girl was still sticky.
Very sticky.
The gloves quickly started collecting resin, giving us beautiful finger hash that we rolled gently into small charas-style balls to enjoy later.
And honestly?
One of the most beautiful parts of hand trimming is exactly this connection.
Feeling the resin.
Feeling the texture.
Understanding the plant directly through touch.
No machine replaces that.
The trim bin also collected a nice amount of resin-rich material through the screen, which we later gathered into another small hash ball.
Not massive amounts.
But beautiful medicine nonetheless.
And honestly?
That always makes us happy.
---
Final dry result:
54.2 grams.
And while some growers may look only at numbers, we honestly prefer looking at stories.
Because this plant easily could have been discarded much earlier in the run.
Instead, she recovered, finished, dried properly, trimmed beautifully, and now rests curing safely inside one of the Zamnesia vacuum metal containers.
For smaller personal jars like this, we absolutely love these containers because:
- they preserve aromas very well,
- reduce unnecessary air exchange,
- protect terpenes,
- and keep special flowers separated for long-term enjoyment.
This became one of those “open only sometimes” jars.
The kind of medicine you revisit quietly from time to time.
---
We also decided to press part of this Sour Diesel to explore her resin potential.
But…
we will save that entire conversation for Part 2.
Because that story deserves its own moment.
And honestly?
There are lessons there worth sharing.
---
For now, we simply close this chapter feeling grateful.
Grateful that we kept her alive.
Grateful that patience won.
Grateful that even the “unhappy plant” still found a way to become beautiful medicine.
Sometimes plants teach us more during struggle than during perfection.
And this Sour Diesel definitely reminded us of that.
---
Huge thanks once again to:
Zamnesia for the genetics,
Plagron for the nutrients,
Future of Grow LEDs for the lighting,
GrowDiaries for the platform,
and every single person following these journeys.
The OGs.
The silent followers.
The new growers.
The skeptics.
The lovers.
The haters.
The accidental visitors.
If you are here reading this…
you are part of the story too.
And honestly?
We appreciate all of you.
Part 2 coming soon:
Smoke review, curing evolution, terpene profile, rosin discussion, and final thoughts about this little survivor.
The journey continues.
As always, this is shared for educational purposes, aiming to spread understanding and appreciation for this plant. Let’s celebrate it responsibly and continue to learn and grow together.
With true love comes happiness. Always believe in yourself, and always do things expecting nothing and with an open heart. Be a giver, and the universe will give back in ways you could never imagine.
💚 Growers love to all 💚
Quick little side note before closing this update:
Apologies if some of the photo sequences appear slightly out of order or jump a bit between stages. With hundreds of files, multiple cameras, daytime/nighttime shots, trimming sessions, macros, and documentation spread across different moments, sometimes the gallery decides to dance left, right, up and down on its own 😄
But honestly… maybe that chaos is also part of the real grow room energy.
Nothing here is over-polished or artificially perfect.
Just real plants, real moments, real documentation and real passion for the craft.
Thank you all for following along through every step of the journey 🌱

Likes
10
Share


Processing
Likes
5
Share


@Cousinrandy
Follow
repotting to 11 liters..needed to be done...right in the heatwave...
i lost a few pounds
Likes
7
Share


@Soskar69
Follow
This is the final week of this girl. She has done well, the colas are big and juicy. Nothing much to say, I'll harvest her this friday. I'll update with my impressions.


Likes
37
Share


@Vegetoo420
Follow
Hey hey ! I left my girls during 4 days without watering due a hospitalization !
I discovered this girl like this when I opened the room and she exploded !!
Day 3 : floweeeers comin !
Day 6: little defoliation and 🍭 lollipop on this girl : she’s clean now !

Likes
Comments
Share


@BeggarsBelief
Follow
So everything took off in flower, I was super harsh with the defoliating which initially I regretted, but was surprised with how they packed out during the following weeks. In general it's impressive how hardy these plants are. Even the outdoor grows yielded some quality. Add some more nuets (overdrive and carbo load), before flushing about 14 days before harvest, next time I'll do this earlier and really the Runtz could have gone another week but my drying needs to happen in the same space as my growing for now. Apologies for the quality of image, I'm just using my phone and some bits I have to document, I collect records too, so expect weird noises lol. Build a rotating plat from a lazt susan I found, has been the best piece of kit added this season.

Likes
3
Share


@CannaGods
Follow
Now we are going to week four, the plants have started to really vegetate, I have seen rapid growth in cannabis and other plants before, however, this strain is growing very large at a tremendous pace.
I am having no issues so far, I am doing very light training and I started using pH down, as the plants ingest the nutrients the pH is rapidly rising. I hope to preserve perfect pH within the next week and continue on. I have been adding a gallon of water every three days to keep the reservoir at the right level. The plants are receiving a constant PPM of 400.
Not only am I seeing five-finger leaves but I am also seeing seven-finger leaves. The plants are looking very healthy and there are no issues at all so far.
I have Started to train the plants and started mainlining, I have also slightly defoliated the plant. This Plant is overgrowing the free seed from seedsmen.
( in hindsight I have never gotten any good free seeds from seedsmen)
Science:
There are a few ideas in this grow journal that I am toying with.
The first idea is putting low-voltage conduction through the roots of the plants, I strongly believe that stimulating the the roots with electricity will induce larger and stronger vegetation.
The other idea is blasting the plants with low decibel sound waves. We will see.
There is another idea I have with string LED lights. However, I'm going to keep some of my secret sauce to myself.
Processing
Likes
142
Share


@MadeInGermany
Follow
Hi everyone :-)
This week the buds developed super ;-) All are beautiful 😍.
Super genetics 👍.
Blue Cheese pheno 1 is slowly coming to an end :-)
This week I will start to use up the remaining nutrients and harvest in 10-14 days ;-)
Everyone else needs something else :-) have fun with the videos, stay healthy 🙏🏻 and let it grow 🌱


Likes
4
Share


@HirdoWeirdo
Follow
Hi everybody!!
Time is passing out and we ended also 6th week.
I have still troubles with minators and while with other plants neem’s oil work great, for this lady it didn’t do his job. However she is super healthy and has a super sweet smell which is increasing day by day (Could this be why parasites find it so appetizing?).
During last week we have had several storms and I have not been able to move it, however it has resisted very well to the rain and wind. The size of this bubblegum is still small, but her look is delicious. I hope she will meet my expectations regarding the quality of the smoke!

Likes
13
Share


@Rikymaru66
Follow
Amazing high. And the bud never smelled like hay. Not even at 85% rh . Still had smelled berries and gas.
I am still curing on it and I am very happy with the results. Buds are hard as rock. Not having a big long cola but many big buds, was also good, good trichome production. When smoked cali kush and gorilla glue terpenes profile are felt instantl. It is a delifghyful experience that comes in wjth a cerebral high and turns later into a relaxed body high that leaves you smiling
Likes
11
Share


@Kitties_and_Colas
Follow
Both girls were up-potted into their final pots, one in a 5gal fabric pot and one in a 6.5gal plastic container. I planted them in fresh FFOF with a few handfuls of perlite and stopped feeding (water and 3ml/gal cal-mag only), both girls seem happy and look healthy albeit small for their age...i did a heavy defoliation on the bigger of the 2 plants and will do the same to the "runt" next week...
Edit: 5 days after transplant and brown spots have appeared, I believe it to be calcium lockout, possibly a PH drop after switching to a hot grow media..i removed effected leaves, applied a top dressing of dolomite lime (tablespoon each) and watered 1 gallon PH'd to 7.5..will update


Likes
23
Share


@HideAndFly420
Follow
Day 50 (22 of flowering ) flowering is really bloom ing now, i’m playing a little with lamp distance cause is a 100 watt non dimmerable so i hope to increase light to bud, they need now.
Now she really needs a lot of feed. I give 1 lt every2 days.
Day 51 (23 o flowering ), another 1 lt full.
Now she’s eating 1 lt every 48 hours, and when she need it anyway. But she need à lot more thème before.
Day 53 I had to supercrop this branch that was too close to the heat ventilation. I hope it will save the branch and increase maybe that bud.
Today another 1 lt of feeding, and I think that from the end of this week is going to need more.
Let’s go!
Likes
7
Share


@Greenislandfr
Follow
La gorilla Zkittlez a commencer ca croissance en box 400W pendant 3 semaine, j'ai demander à un ami de commencer la croissance dans sa box pour voir la différence avec mes autres fem que j'ai commencer en intérieur. La différence est vraiment incroyable je pense que la variété est pour quelques chose mais débuter la.croissance en box et finir en extérieur est vraiment très bénéfique pour le rendement et n'afflue en rien négativement sur la qualité au contraire


