The Grow Awards 2026 🏆 


Likes
Comments
Share
@elsolo1
Follow
- Third week
Came back from my trip and she really shot up
PH was down (around 5.5) so she absorbed a good amount of nutrients while I was away
Changed reservoir with a dosage of Base A- Base B- Vege- Silica- using 1.0 ML per Liter
Roots are nice but I'm starting to think she might have some sort of rot going on, going to introduce Peroxide in the water to help her out
No sexing yet, I'm assuming she's a female (hopefully)
Did some small LST in order for the bottom line to grow a little bit
Likes
10
Share
@Adkguerrilla44
Follow
All in all i ended up with almost 2.5ozs of some super nice rock hard buds and another oz of some larfy smaller buds i made into cannaoil with coconut oil!! I will grow her again for sure but next time i will start it in my big tent and let her stretch her arms and legs out and see if i can get a monster!!!

Likes
10
Share
@carlitoshaze44
Follow
Otra semana más
Creo esta semana hoy día 27
Anunciando así el próximo día 28 inicio de esta quinta semana de floración del calendario de mis niñas,semana en la que comienzo subiendo la cantidad de comida y con ello de agua para mis niñas.
En los últimos riegos de la cuarta semana fui subiendo hasta alcanzar los 1700.
Las plantas mayoritariamente lo aceptaron,así que con ello subiré esta semana hasta alcanzar los 2000.
No defoliaré ninguna planta
Hoy ajuste la luminaria a una altura de 30cm con respecto a los 45 de la anterior semana.
Esta semana pegarán un buen apretón con la subida de PK,y la ayuda de los azúcares.
Seguimos con muchas lluvias y una humedad muy alta que dentro del armario se combate entre ventiladores extractor y desumificadores pasivos de sales de silicio.
Que me mantienen un 35% menos de la que tengo en el exterior llegando muchos días a los 45/50% de humedad.
Tengo que añadir que vivo a un kilómetro de la playa.
Día 28
Di un pequeño fumigado, de agua con ajo y jabón potásico en la entrada al cuarto de cultivo.
Como preventivo ante cualquier insecto que quiera acercarse atraído por el aroma.
Hoy e podido ver que el último riego de 1700EC,no causó ningúna sobre fertilización apreciable en el cultivo casi nula,viendo esto en el siguiente riego subiremos a 1900Ec.
Día 29
Primera impresión al abrir el armario es que había una humedad alta dentro del almario.
Un 72% que una vez encendí el pequeño desumificador de 8l de casa,a mejorado a 53%
Hoy compré la gama de completa de aptus.
Iré añadiendo alguno de estos componentes de la fase de floración,para ver qué tal se combinan con la gama de plagron.
Hoy le metí un riego de 55litros,una Ec de 1900
Sin carga de pk,desorbitada.
Este riego me centro en los azúcares junto con algunos aditivos como silicio,aminoácidos,azúcares,encinas,sulfatos y manteniendo el nitrógeno en pequeña parte el potasio y el fósforo,calcio y magnesio que nunca falte en cada riego!,las lámparas están bajas y a toda potencia.
Quiero en estos días conseguir mejorar con grandes empujones .
Saludos compañeros!
Día 30
Todo bien,todo correcto y me alegro!,buenas tardes,buenas noches.
El cultivo aceptó muy bien la subida de EC 1900,esta variedad come de buena manera!.
De esta manera seguiremos subiendo para ver,hasta donde llegan.
Obviamente no vamos a sobrecargarlas,pero vamos a ver hasta donde llegan.
El siguiente riego lo haré trabajando con pk,mineral y algunos aditivos más orgánicos-minerales.
Tengo que decir que el aporte del té frío de plátano junto a la melaza le habrán venido fantástico también a las lombrices!
Día 31
Todo perfecto dentro del cultivo ,veo que las 9 semanas de floración son fijas..
Un gran punto a favor,es que el clima empieza a ser más favorable a partir de este fin de semana..
Subirán más las temperaturas y las lluvias van a detenerse por unos días.
Espero contar con una humedad ambiental más baja para poder seguir tranquilo con el desarrollo de las flores.
Dia 1
Lo comentado en el día anterior,bajo la humedad ambiental,tenemos buenos parámetros!
Una temperatura con luz de 21 grados y una nocturna de 16.
Va aumentando mucho la resina!,eso me gusta!
Hoy le metimos una EC2100 en el riego.
Mañana veremos qué tal lo reciben las niñas.
Va aumentando de buena manera el engorde,no me puedo quejar!
A ver si llegamos al 1,7g/w que es el rendimiento que se está obteniendo con esta configuración en los cuartos de los compañeros! Sin Co2 obviamente.
Día 2
Ya veis,todo viento en popa!
Hoy hice una prueba en el cultivo con el riego ya que en el último riego cogió aire el sistema.
Aún sigue así,en el día de mañana lo purgaré.

Likes
38
Share
@GODSGIFT_2005_JM
Follow
For LIQUIDS & NUTES ******GREEN BUZZ NUTRIENTS***** organic.
Also i’m using their LIVING SOIL CULTURE in powder form!
MARSHYDRO ⛺️ has large openings on the sides which is useful for mid section groom room work. 🤩
☀️ MARSHYDRO FC 3000 LED 300W
💨MARSHYDRO 6” in-line EXTRACTOR with speed-variation knob, comes complete with ducting and carbon filter.
Likes
17
Share
@RakonGrow
Follow
+
Day 36
2.5L ...
attentione , dry out ://
Day 37
recovered !!! added some shorts
Day 39
2.0L Pantine
Day 40
Pantinchen dry out , 2.25L , lets see !!!
Day 41
all are verry happy !!!
Pantine needed 2.25L (50% Vega + 50% Flores +25% more CalMag) and running
Likes
2
Share
@EtnoGrow
Follow
here already a little more grown and applying the techniques lst apical pizzicato experimenting, Seeing how the techniques are manifested, some were done poorly, so their results were somewhat strange or curious, if they did, you judge, errors such as not cutting the apical trying to do the pruning, poe error from fmi and only cut the tiny growing leaves that's why you will see those rare leaves


Likes
8
Share
@eldruida_lamota
Follow
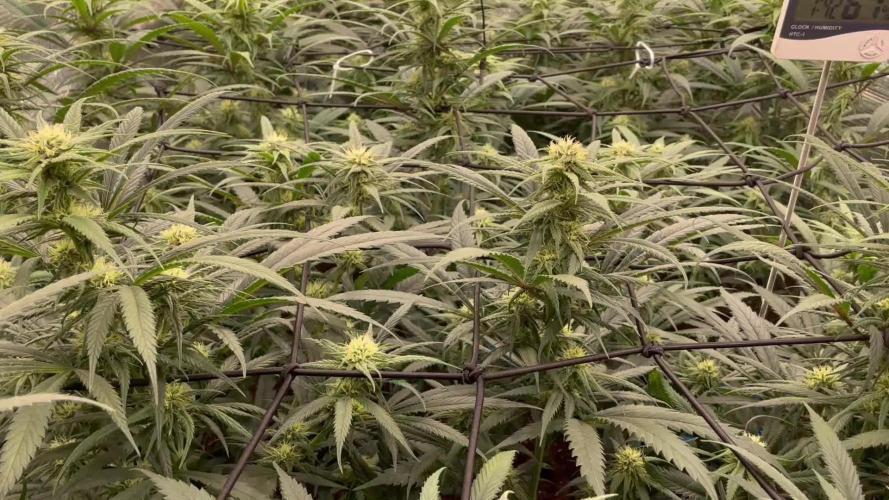
Que pasa familia, vamos con la quinta semana de floración de estás Zkittelz de Seeds Mafia.
La humedad está entorno al 50%, y la temperatura la tengo entre los 22/24 grados.
Controlamos en ph en cada riego a 6.2.
Y el agua que utilizo de riego suele estar estancada entre 24 / 36 horas, hasta aquí todo bien, tienen un buen color, ya van progresando y floreciendo a buen ritmo, vemos cómo avanzan estas semanas y como avanza el progreso de las flores.
Mars hydro:
Code discount: EL420
https://www.mars-hydro.com/
Agrobeta:
https://www.agrobeta.com/agrobetatiendaonline/36-abonos-canamo
Hasta aquí todo, Buenos humos 💨💨💨

Likes
5
Share
@Mr_nugs_lover_David
Follow
Amazing amnesia smell, very powerful and strong, just like her sister, looks like this genetic by gea is super stable, both phenos 1 and 2 have the exact same pungent strong amnesia smell and the resin production is 🔝, very sticky flower and super dense and hard as well guys let's see what happens at the end! 💛💚❤️👨🌾

Likes
35
Share
@farahweed
Follow
I used overdrive fertilizer again this week.
My God, girls get more beautiful like this.
The last weeks make me very happy.😍🌷💐💥⚘️👽👽🎍
From now on, I will be very careful because the more I improve the conditions, the better results I get
Especially the temperature difference between night and day.
humidity
Box ambient temperature
👊👊💧♠️


Likes
13
Share
@XanHalen
Follow
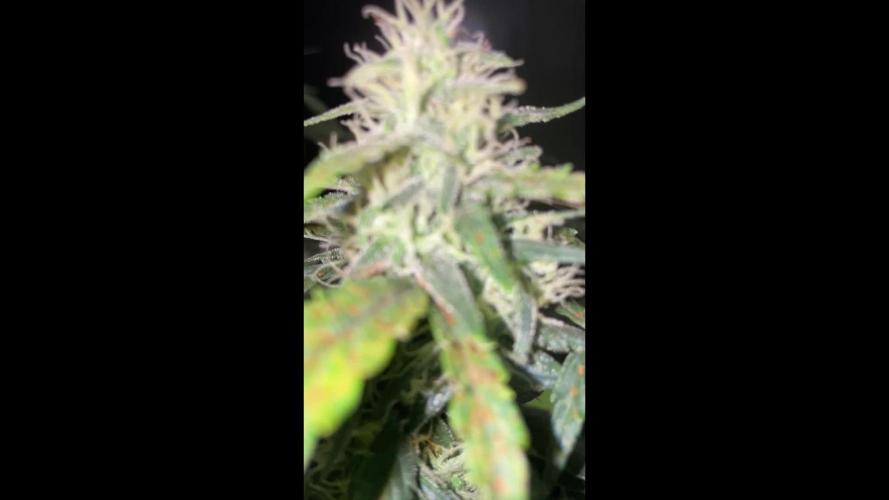
Apr 09:
Things are chuggin along, i think light may have been a factor in the brown spots, seeing similar symptoms on one of the other plants but very very minor in comparison....
I think it was too little calmag, i may have locked them out mid veg by using high concentration of nutes without watering till runoff (i now know, that is a no-go), and light stress. i have had them under 850-1050 ppfd when flipped to flower...
one of them is loving the light, one is big and bushy (had to defoliate later than i wanted), and one has good bud structure but pistils seem thin, and growth seems slower (the one with the brown polkadot party on its body) so thinking it may be stunted.
either way, im seeing denser buds, and im learning the ropes, thats enough for me :)
Apr 12:
Last feed day...
Trichomes look just about ready, will do 2 runoff waterings 48hrs apart, then 24-36 hr darkness...
Will try to post trichome pics....
Super excited to see the improvements from this run vs last run...!

Likes
7
Share
@TheGreenHoodlum
Follow
2 phénotypes totalement différents! Une avalanche de trichomes et une odeur de paradis! Cette gorilla cookies est magnifique, vivement la dégustation!!
Le poids humide est approximatif
Qu'en pensez-vous les amis? Des conseils pour la prochaine session?
Peace Love and Let's Grow!
Ps: je vais essayer de poster plus de photos d'ici quelques jours

Likes
11
Share
@MistaOC
Follow
29.11. Blütetag 43
Gestern nochmal leicht mit Dünger gegossen.
auf 10L
22ml CalMag
20ml Canna BioFlores
10ml Canna BioBoost
——————————————————————
05.12. Blütetag 49
So langsam geht es dem Ende zu.
Ab jetzt wird nur noch mit calmag gegossen.
Ich denke hier sind die 56 Tage Blütezeit echt realistisch.
——————————————-

Likes
92
Share
@DogDoctorOfficial
Follow
🌱 Week 1: The Journey Begins! 🌟
Hey Grow Fam! 🙌 We’re off to an epic start with our TrolMaster adventure, and I’m already feeling the love for the setup, the seeds, and the growth happening in the room! So, let’s dive right in and get into the details of this exciting week!
🌿 Germination Update:
Our first Gorilla Melon seed from Fast Buds didn’t sprout, but no worries—round two was a success! 🦍🍈 The second seed has germinated and is looking full of potential. I’m throwing in a Sweet Seeds Papaya Zoap into the germination station too, so we’re keeping this exciting lineup going strong! Germination is such a key part of the journey, and having a healthy start is what it’s all about.
🔧 Room Build & TrolMaster Setup:
The build is coming along beautifully, and I gotta say, the TrolMaster system is blowing my mind! Everything’s under control like magic 🎩✨, and the TM+ app? Wow, just wow. I mean, I can literally be in the bathroom and still keep an eye on the plants—check all the metrics, adjust settings, and fine-tune what I need, all from my phone! 😂💧 This level of control is next level. I’m loving how smooth and seamless it makes managing the room. The gear is just unreal, and seeing it all come together is truly something special.
🌱 Nutrition Talk:
As for feeding, we’re starting light but smart! I’ve begun with 0.15ml of Regulator and 0.25ml of Startbooster per liter for now. I always believe in starting easy and ramping up as the plants develop. These early stages are crucial—balance is everything. For the time being, I feel this is more than enough to keep the babies happy and healthy. 🌿💧 The Regulator is working wonders in maintaining plant structure and health, while the Startbooster is fueling the early root and vegetative growth, laying down a solid foundation for the weeks to come. It’s about getting it right from the start—too much too early can be a killer. Keeping it steady with precision, that’s the goal!
Big Shout-Outs:
To the amazing team at @TrolMaster, @Fast_Buds, @Sweet_Seeds, @AptusHolland, and all the incredible sponsors—I’m beyond grateful for the support! 💚 And to my GrowDiaries fam and followers, you guys make this journey what it is—thank you for the love, and I’m so honored to have you along for this ride. 🙏
We’re just getting started, and I can’t wait to show you what’s next. Stay tuned for more updates, epic builds, gear reviews, and plenty of insight. Don’t forget to follow me on GrowDiaries, YouTube, and IG for exclusive content, and let’s make this grow the best one yet! 🌿🔥
Growers Love to All 💚💚💚
P.S.- A deep dive into the Full Spectrum Quantum Sensor (MBS-PAR):
The Full Spectrum Quantum Sensor (MBS-PAR) is an essential tool for any serious grower looking to optimize their light environment. This sensor measures photosynthetically active radiation (PAR), which refers to the spectrum of light that plants actually use for photosynthesis—typically between 400 and 700 nanometers and more depending .
What makes the MBS-PAR sensor special is its full spectrum capability, meaning it accurately detects not just visible light but also far-red and UV light—which are crucial for maximizing plant growth, development, and flowering. With this tool, I can monitor the exact intensity of light my plants are receiving, making sure they’re getting the optimal levels for every stage of growth.
By using this sensor in my grow room, I’ll be able to ensure that the light distribution is uniform across the canopy. Plus, it allows me to fine-tune the light output from my ThinkGrow LED setup, ensuring my plants are thriving under the best conditions. Whether it’s increasing light during the vegetative phase or fine-tuning it for flowering, the MBS-PAR sensor helps me keep everything on point. And the best part? I can monitor it all through the TrolMaster app, ensuring I can make adjustments whenever needed—even if I’m not in the grow room!
This level of precision means healthier plants, better yields, and maximum efficiency. It’s a game-changer for taking the guesswork out of lighting and getting closer to growing perfection! 🌱💡
Growers Love to All 💚💚💚


Likes
6
Share
@Bamboleon
Follow
Going good with some potash burning, and i left with flova bloom
Complete Organics is real PK booster
Processing
Likes
Comments
Share
@Canha_Patch
Follow
This week is looking good and the babies are coming along great, I'm loving the way pheno 1 is so symmetric, large and in charge!
I started out this grow with a bit of a hick up because of the pandemic but I tell you one thing, foliar feeding saved my plants!
I foliar feed my seedlings at around 200ppm I use some micro nutes, along with amino mix to foliar feed. The foliar feeding definitely makes the plants more robust, they end up feeling hard and strong! I Usually foliar feed until I flip to flower then no more!
Processing
Likes
24
Share
@MadeInGermany
Follow
Hi everyone 🤗.
The buds continue to grow 😀👍.
It starts to smell really good 😍.
The bud structure also looks very nice, and is already covered with resin 😎.
This week they continue to get 4-5 ml / l water from the Canna Bio Flores.
I hope you enjoy the update, stay healthy 🙏🏻 and let it grow 🌱😃
You can buy this Strain at :
www.Zamnesia.com
Type:
Runtz
☝️🏼
Genetics:
Zkittlez x Gelato
👍
Vega lamp: 2 x Todogrow Led
Quantum Board 100 W
💡
Bloom Lamp : 2 x Todogrow Led
Cxb 3590 COB 3500 K 205 W
💡💡☝️🏼
Soil : Canna Bio
☝️🏼
Nutrients : Canna Bio
☝️🏼🌱
Water: Osmosis water mixed with normal water (24 hours stale that the chlorine evaporates) to 0.2 EC. Add Cal / Mag to 0.4 Ec Ph with Organic Ph - to 6.0 - 6.3
Processing
Likes
23
Share
@SativaSteve88
Follow
Another week down few more to go can't wait!! First ever attempt of growing my own so really impatient to see the final results now and get to the finish line, that said all has went well upto now other than the size they reached haha, really started putting on weight now it seems and they smell lovely, excited to see the buds fatten and progress over these last few weeks up until harvest now, started 5 liberty haze also they are just coming upto 3 weeks now so check that diary out to, any comments info tips for the final stages appreciated


Likes
18
Share
@DogDoctorOfficial
Follow
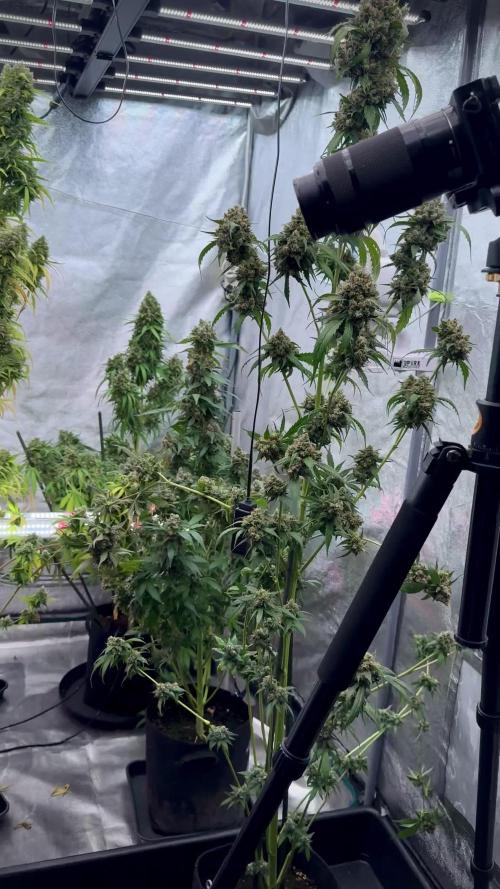
🌸 BlueBerry — Week 8 Flower | Shining Toward the Finish Line
Here we are, my dear readers — Week 8 of flower. The room feels magical. Our BlueBerry girls, both phenos, are in their full glory — dense, fragrant, and sparkling with resin. From seed to now, it’s been a journey of patience, learning, and pure joy. The final stretch has begun, and you can feel it in the air — harvest is not far away, maybe one or two weeks more.
✨ The Girls
Both BlueBerry #1 and BlueBerry #2 are magnificent. Thick colas stacking from top to bottom, glistening with frost under the lights. The pistils are slowly turning color, and the aroma is deep, sweet, and nostalgic — that unmistakable BlueBerry essence that makes this classic a legend.
The trichomes are swelling beautifully, and bud density is impressive. The girls are holding up thanks to the yo-yos — these branches are heavy, bending under the weight of their own success.
⚙️ The Gear
This week, let’s give a shout-out to the gear making this symphony possible:
💡 Lighting Setup
We are running a mix of powerhouses — the ThinkGrow Model One and the ICL 300 inner canopy lights.
Together, they create a perfect, even spread — deep canopy penetration from the ICLs and full-spectrum brilliance from the top lights. The inner canopy lighting has really proven its worth, driving light deep into the plant’s heart and boosting bud formation all the way down.
🌬️ Airflow & Extraction
Two 6-inch extractors keep the air moving — one AeroFan, the other Spider Farmer, both with carbon filters for clean, fresh air.
The Spider Farmer extractor runs through its own GGS controller, while the AeroFan is perfectly synced with the TrolMaster Tent-X system, ensuring ideal airflow at all times.
🎥 Monitoring & Control
Our guardian eye — the TrolMaster camera — keeps a close watch, allowing remote monitoring of the girls in real time. The entire ecosystem (lights, fans, sensors, and camera) is fully integrated, giving us control and data precision from anywhere.
🌿 Environment & Feeding
Temperatures stay warm — around 29°C — while humidity fluctuates around 55–60%. It’s hot, yes, but the airflow and light balance keep things steady enough for the girls to thrive.
We’re continuing with our nutrient mix featuring Aptus Holland and Plagron products. The recipe is fine-tuned now — the balance between power and gentleness, giving the plants the final push to perfect those trichomes and terpene profiles.
💧 What’s Next
As we near the finish line, we’re watching closely:
• Trichome maturity is the main focus now — we’re waiting for that milky-to-amber dance.
• Flushing is coming soon, preparing the soil and the plants for a clean, flavorful harvest.
• Aroma intensifies daily — the room feels alive, sweet, fruity, and full of promise.
💙 Gratitude & Reflection
From germination with The Cannakan method, through every transplant, every tweak, every experiment — it’s been a story of care and curiosity.
Huge thanks to Zamnesia for these legendary genetics, to Aptus Holland and Plagron for their nutrient support, and to TrolMaster, ThinkGrow, Future of Grow, Spider Farmer, and AeroFan for helping make this environment as close to perfect as we can dream.
And of course — thank you to everyone reading, supporting, learning, and growing with us. The haters, the lovers, the curious souls — all of you are part of this. 🌍💚
🌸 What to Expect (and Not)
Expect swelling buds, deeper aromas, and trichomes that’ll make your camera cry tears of joy.
Don’t expect miracles overnight — the last weeks are about patience, precision, and presence. This is where you let nature finish her masterpiece.
📲 Don’t forget to Subscribe and follow me on Instagram and YouTube @DogDoctorOfficial for exclusive content, real-time updates, and behind-the-scenes magic. You won’t want to miss it.
• GrowDiaries Journal: https://growdiaries.com/grower/dogdoctorofficial
• Instagram: https://www.instagram.com/dogdoctorofficial/
• YouTube: https://www.youtube.com/@dogdoctorofficial
⸻
Explore the Gear that Powers My Grow
If you’re curious about the tech I’m using, check out these links:
• Genetics, gear, nutrients, and more – Zamnesia: https://www.zamnesia.com/
• Environmental control & automation – TrolMaster: https://www.trolmaster.eu/
• Advanced LED lighting – Future of Grow: https://www.futureofgrow.com/
• Root and growth nutrition – Aptus Holland: https://aptus-holland.com/
• Nutrient systems & boosters – Plagron: https://plagron.com/en/
• Soil & substrate excellence – PRO-MIX BX: https://www.pthorticulture.com/en-us/products/pro-mix-bx-mycorrhizae
• Curing and storage – Grove Bags: https://grovebags.com/
⸻
We’ve got much more coming as we move through the grow cycles. Trust me, you won’t want to miss the next steps, let’s push the boundaries of indoor horticulture together!
As always, this is shared for educational purposes, aiming to spread understanding and appreciation for this plant. Let’s celebrate it responsibly and continue to learn and grow together.
With true love comes happiness. Always believe in yourself, and always do things expecting nothing and with an open heart. Be a giver, and the universe will give back in ways you could never imagine.
💚 Growers love to all 💚