The Grow Awards 2026 🏆 


Likes
Comments
Share
@BudArt
Follow
Getting solid and developing a lot of orange pistils and the tricomes are lookings super frosty. About 2 weeks left then out to the moon we go!!! Hope its a good grade (quality high), I decided to make Velevet because the flowers looked beautiful to not try out. This will be the last feed then flushed for the next feed. Going to drench it until it reaches a desirable ppm level in the soil. That would make it start eating itself sucking out all the nutrients providing a smooth smoke and a great after taste. When you dont flush you get a better taste and why would you want to smoke nutrients? Gotta make the leave turn yellow then you know its good. This is almost the end and thankfully its been going good so far, see you soon!!!


Likes
15
Share
@Huckleberry39
Follow
This is the start of week 9 and she is doing GREAT!! Pistols are turning nice and pretty 😍! Buds are fattening nicely, and the thing im most proud of, no sighs of defiency!! She is a very good plant to grow. And is going to give me some very nice smoke!!

Processing
Likes
6
Share
@LiLi_garden2020
Follow
been really busy.. all is going very well.. got new dairies coming soon from those seedlings🌱 I just started...
And 4 Hindu kush will be my first Scrogging...
My main plant look unhappy cause he got to settle in New pot
Likes
4
Share
@DarbGrowDiaries
Follow
All 3 girls made it, one of them seems to be a bit slow.
I noticed they all grew a bit slow and I assume this is due to not using any DYNOMYCO mycorrhizal inoculant.
Will definitely try it again on the next run to test it.

Likes
11
Share
@Fullmeltalchemist
Follow
D56/F8 - 11.14 - Doing great! Loving the new Blumat Tropf system I installed for both of my tents. Starting to show sex and the very beginning of preflowers
D59/F11 - 11.17 - 👍 covered some vertical distance this week for sure. Back to having big ole leaves! :)
D60/F12 - 11.18 - <3

Likes
2
Share
@Bncgrower
Follow
Second week of flowering completed, they are all very beautiful and healthy. I apologize for the poor quality of the photos, I've been very busy lately so I haven't been able to give them much attention. Luckily I automated the watering process, otherwise it would be very difficult days. But completing the initial 21 days, I will do a good defoliation and take photos of them separately.
Peace be with you all!✌️🙏
Likes
11
Share
@NiBaMeCa420
Follow
unprecedented how fast they grow they grow on average off 10 cm per day which I have never experienced on soil but had many problems to keep the pH under control I do notice that less is more on rdwc now that I have reduced the nutrition, the pH remains a lot more stable 4 days ago they transferred to 12 12 now comes the fun part I also ordered a co2 set so from next week we will add co2 to the space

Likes
141
Share


Likes
8
Share
@Lazuli
Follow
Shes about to blow up so i fed her 10 liters today with 1.2ec (1000-1200ppm)
Thats 1ml/l calmag and 1.2grams/liter drypart bloom, also put the ph UP because this nutrient is very sour. I had to add about 7-8 ml in my water because i use rain.
Likes
10
Share
@Bud_vista
Follow
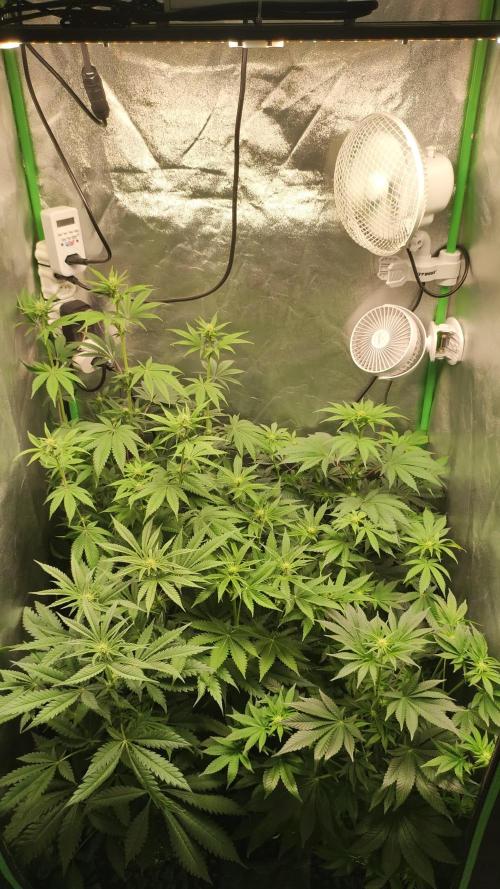
Welcome to week 7 growmies!
She’s doing great in her second week of flowering!
She is still stretching and got a bigger defoliation at the end of week 6.
For the start she’s getting only ph regulated water from top and some nutrients from bottom. There a little signs on the leaf tip why I skip nutrients for one watering cycle.
On mid of week 7 she’s still stretching and first orange pistils shown up. On weekend she’s getting another defloration and another round of nutrients.
Likes
88
Share
@NAS_Garden
Follow
🌺🌿 Week 2: The Blossom Ballet! 😅
The second week of Flower unfolds, and our girls show no signs of slowing down—it's growth on steroids! 😅
Individual Progress:
🌱 #2: A bit of an eager beaver, #2 ventured into flowering a tad earlier, resulting in a slightly smaller stature compared to its companions.
🌱 #3 & #4: A synchronized duo, trailing a few days behind #2, they're catching up at their own pace.
🌱 #1: Taking its time to savor the pre-flowering moments, #1 lags almost a week behind the early bloomer, #2.
Blossoming Dynamics:
It's a mesmerizing dance of growth dynamics, each plant following its unique rhythm. As they weave and twirl through the second week of Flower, the garden becomes a canvas of varied heights and stages.
The stage is set for a blooming ballet, and the anticipation for the individual personalities of #1 - #4 to unfold is nothing short of captivating! 🚀🍊🌸
Likes
6
Share
@Northern_Ent
Follow
July 19: second week of force flowering for Mimosa Shot. She’s doing fine and height wise has mostly caught up to the other plant in the wagon.
Defoliated the understory to remove small buds and most fan leaves. Left some big fan leaves down below but took most out to improve airflow.
July 21: doing fine.
July 22: Foliar spray with Epsom salts and potassium silicate in the morning. The magnesium in the Epsom salts seems to help with the yellowish new growth.
July 23: added another loose Scrog net layer this morning. Tying the net to water bottles to open up canopy to sunlight.
July 25: watered yesterday with some leftover water from steaming beets for dinner. That water likely had lots of N because beets are high in nitrate and the plants look really green today.

Processing
Likes
7
Share
@710_Squish
Follow
This will be her first full week in flower. She has started to produce sugar leaves. It's pretty exciting to see trichomes this early in bloom.

Likes
20
Share
@Barbagrows
Follow
Day 86 -
Major training session on both ladies today. Things were getting too crowded with 4 photos (80+ days veg) and 2 autoflowers that both seem to have around a month left in them.
Topped all upper branches and stripped most of the undergrowth, leaving only 2-3 nodes on every branch. Took me over an hour to do all four plants but in the end tings look much better in the tent. Now onto a hopefully short recovery on all plants.
Day 89 -
Both ladies are recovering from last training session. New growth is all lush and green. Very happy with both phenos of the Strawberry Chemdawg OG that I got. Remembering that I still got another bean makes me even happier!

Likes
12
Share
@Jays_Not_Here_Man
Follow
This was an easy grow, and had some amazing results. This is some of my best homegrown to date ❤️ the ladies were easy to manage, no PM, pests or disease. The root balls were enormous, wasn’t much soil to recover. They got heavy in the end from the weight but managed to stay upright for the most part. They were big stretchers , prepare for that, scrog was a good way to go but some of the eager beavers got away from me, which ended in some massive colas. Overall easy to grow, no surprises and you won’t regret the results! 10/10 ❤️👊🤤

Likes
7
Share
@KannaKullektiv
Follow
Hiiigh friends 🙌
Welcome to week 9. 😍
The plant's sun protection becomes more and more present and the odor becomes stronger. The tall lady is now the smallest but has the fatter buds. It remains exciting.. 😊
See you next week. 👋
Arturo for KannaKullektiv
🙏
Processing
Likes
21
Share
@LittleBigTrees
Follow
The plants were so crowded I decided to put them into a Larger tent to allow some light to the lower bud sites and to help lower the humidity amongst the plants. I'm sure they will love the extra space.
The light has now been raised 20cm (20cm taller tent)
Allowing me to turn out right up which is 45000 lux in the centre right below it.
I will up the bloom to 2ml/l this coming week.
Likes
14
Share
@BB_UK
Follow
Ever since I turned to mars hydro I have double sometimes nearly quadrupled my yields I first had with eBay lights (meh) I have never looked back since and gained so much respect from the community and the breeders too! And to hold the sponsors I do shows me that I am doing something right and I show appreciation to all who support! And that’s why I take a different effort to be fair and document you all! Even though I’m aware your businesses I just can’t be bias when it comes to the greatest I think you all are! Thank you for choosing me! (No I’m not the only one) just showing the love back as best as I can! 💚💚💚💚💚 thank you


