


Likes
Comments
Share


@McDavis
Follow
Esta semana una de las plantas presentó rápidamente un amarilleo de sus hojas debido a unos ácaros de raíz que se le estaban pegando y un estrés de golpe, eso hizo estresar la planta y no quise que el problema llegara hasta los cogollos, le faltaba más o menos 1 semana, pero están olorosos y resinosos, aún faltan 2 plantas en el armario esas van por una 12 semana, y son los cogollos con mas tricomas de la cosecha 😮💨

Likes
2
Share


@TheBudWhisperer
Follow
Solid week. All the clones responded really well to the new res. And they didn’t fully transition the first time so were quick to start re-veging. We’re flipping to flower now to try and keep plant heights down and root mass smaller.
*Notes: hopeful to see some quality representation from at least a couple of these clones once the run in the main tent starts to turnover. Still genetically firing from the hip but there’s usually at least one of those prized purple and pink hue phenos in every run of this strain. If I can keep that trait prevalent throughout later generations of this cross - it’s a win.
Likes
67
Share


@GanjaReaper
Follow
Welcome back everyone,
As you can see are almost all seedlings growing. Some where still in the soil.
Might happend when giving water(seedlings can turn or get deeper), checked it out and they are alive and well.
All pictures are from day 4.
The humidifier had been added, so I had to adjust the room.
I spotted a corner of the room that gets dryer faster. I adjust the fan for now and see what happens.
Corners are always hard to get perfect. Sometimes the light, air, watering doesn't come there properly.
Seedlings don't need much nutrients, neighter do autoflowers. with normal soil I would recommend to only give water for 1-2 weeks, since it holds nutrients in it as well.
But since I'm using Cocos for this grow, I might have to add some basic nutrients in the upcomming week.
For this week I gave/give only water turns and Startbooster/rhyzotonic turns.
Update day 5:
- Lowerd the lights to avoid stretching, they are now at 75cm distance from lamp to pots.
I want them at 40-50 cm, but I don't want to rush it.
- Added another layer of cocos to avoid the soil from drying up therefore the roots from dying.
This will happen because of lowering the lamps down, the soil will get exposed more to heat.
As you can see, the humidifier is doing his thing haha. Pictures and videos where taken without the lights + fans on.
because of that, it will look like this. Still fun thought.
Arround 7 seeds didn't reach the surface yet, lets hope they make there way up soon.
Enjoy!


Likes
57
Share


@Clutch
Follow
Hey everyone
A fantastic week here. No rain, temperatures around 27°/32° Celsius
and nights are not colder than 16° with low humidity. Sounds perfect huh 😃
This week the buds really started bulking up. A good smell too and not to stinky so far. I'm glad with that to be honest 😂 no need to attract the neighbors.
Gonna make some daylight pictures too tomorrow. Just got home from late shift. Sun just went down while doing this update 🙂
I gave a good feeding this week. All nutrients were 4ml on 4 to 5L of water (6,4Ph)
No signs of nutrient burn and i guess the PH in the soil is right. One leaf is showing brown marks and is dying but that's the only leaf for 3 weeks now. Guess she doesn't receive enough light or the plant used it as food when there wasn't enough water left.
LST is good but i really see mistakes in the lower canopy. Some buds don't receive enough light. I cut away a few leaves but i don't wanna do too much.
Trial and error year for sure.
Will learn and know a lot for the next grow 😃
This girl has 3 to 4 weeks left i think.
Next week will probably be the last feeding. Will wait to see how she develops.
Gonna water in one more time with Neem Oil too.
So far so good. My easiest grow ever 🙂 (I jinxed it now 🤦♂️)
Happy growing everyone 🙏
Likes
44
Share


@Prototype0181
Follow
It's been fun to see the 2 different pheno's develop of this strain, but now the Indica dominant one isn't going up anymore. I hope in the stretch phase she catches up with the rest. Switched to 12/12 on the 10th of november


Likes
44
Share


@GODSGIFT_2005_JM
Follow
For LIQUIDS & NUTES ******GREEN BUZZ NUTRIENTS***** organic.
Also i’m using their LIVING SOIL CULTURE in powder form!
MARSHYDRO ⛺️ has large openings on the sides which is useful for mid section groom room work. 🤩
☀️ MARSHYDRO FC 3000 LED 300W
💨MARSHYDRO 6” in-line EXTRACTOR with speed-variation knob, comes complete with ducting and carbon filter.


Likes
8
Share


@Bread_n_Buds
Follow
Our Permanent Marker by Zamnesia is a beauty that has started upwards and is not stopping anymore.
** Remember that we are growing a plant worked with the techniques indicated and another left to grow without pruning to preserve its speed; in the previous/next diary you will find the other plant of the same variety.
Here the plant has let itself go straight and free and is thanking us very well by giving us some very very beautiful flowers.
We are in a 100% organic configuration, the soil is recycled Promix + 1/3 fresh soil + 10% Perlite + RQS Mycorrhizae Mix (4 g in the mix, 1 g under the small fiber pot).
We switched to the advanced flowering program a couple of days ago but last week we still did not give green sensation. We fertilize with: // 1 ml/l Sugar Royal - 3 ml/l Alga Bloom - 1 ml/l Power Buds - 1ml/l Green Sensation
We sprayed 5 ml/l Vita Race Foliare once a week.
For all the info https://plagron.com/
All nutrients are available from Zamnesia: https://www.zamnesia.io/it/531-growshop/476-fertilizers
We always have the excellent mycorrhizae from RQS that run through the soil. https://www.zamnesia.io/5778-mix-micorrhiza-easy-roots.html
Try this variety, it is a top strain of recent years very high level of thc ---- // https://www.zamnesia.io/it/12508-zamnesia-seeds-permanent-marker.html
Brief description of Zamnesia // Here is a good opportunity to enrich your genetic library with another award-winning variety: Permanent Marker was crowned Strain of the Year 2023 by Leafly, thanks to its intense aromas, high levels of THC and its physical vivacity. Originally created by JBeezy and Seed Junky Genetics, our team managed to secure a cutting of this modern top cultivar, so you can grow it comfortably at home, whether indoors, outdoors or in a greenhouse. Permanent Marker fits perfectly in any environment!
The whole world of growing and more is at Zamnesia: just take a look at the site and you will find "all the best that nature has to offer" in various shapes and colors.
-- // www.zamnesia.com

Likes
10
Share


@Cocogrow1234
Follow
Week 4 flower : everything’s looking nice still got the lights about 7-9” from top of canopy without any issues . The humidity has gone up to 50% in day and I can’t really get it any lower I’ve already got a dehumidifier so don’t want to get another one . I would like to lower to 40-45% and lower for last 2 weeks but can’t see that happening .
I’ve started the pk from end of week 4 (day 28 )at 1ml per litre this took my ec to 2.2 I will see how it goes and maybe up it to 1.2-1.5 and I’m going to use the pk for 7-14 days then I will start the flush
I also lowered the silicone to 0.5ml per litre
3x blue cheese plants are on the left but has spread over
and 1x sunset sherbet on the right
Likes
4
Share


@WuTangVibez
Follow
I am really Happy with this Strain, it's growing so beautiful, this week she Streched so much and started now to pack up as well. You can see even the first signs of frost coming up. I hope you Like my Grow. Im looking forward to some beautiful Buds in the near future !
Processing
Likes
15
Share


@Messypies
Follow
Lovely growth on the buds this week. Struggling to smell at the moment due to my filter but once out of the tent it is smelling beautiful


Likes
141
Share


@Tropicannibis_Todd
Follow
💩Holy Crap Growmies We Are Back💩
Well growmies we are at 14 days in and everything is going great 👌
👉 Shes a short chunky little plant 👈 We got some very pretty colors already 😍 👌
Lights being readjusted and chart updated .........👍rain water to be used entire growth👈
👉I used NutriNPK for nutrients for my grows and welcome anyone to give them a try .👈
👉 www.nutrinpk.com 👈
NutriNPK Cal MAG 14-0-14
NutriNPK Grow 28-14-14
NutriNPK Bloom 8-20-30
NutriNPK Bloom Booster 0-52-34
I GOT MULTIPLE DIARIES ON THE GO 😱 please check them out 😎
👉THANKS FOR TAKING THE TIME TO GO OVER MY DIARIES 👈
Likes
8
Share


@JamaicanDream_420
Follow
La semana no fue mal, seguimos pero incrementando nutrientes,ya que entramos en la fase de que necesitan comer, he entutorado todas las ramas para proporcionar apoyo,he tenido que hacer lst a una Northern light porque se iva de altura
Likes
1
Share


@lemoncake420
Follow
They’re on day day 35. The Ak rushed in front of the others, she’s getting frosty. The one in the back (super lemon) is taking her time, just beginning to flower. I’m bottom feeding them, in a bucket of water. They seem to like it, I water every other day. Thinking about some defoliation
Likes
5
Share

@Stoney_Stark
Follow
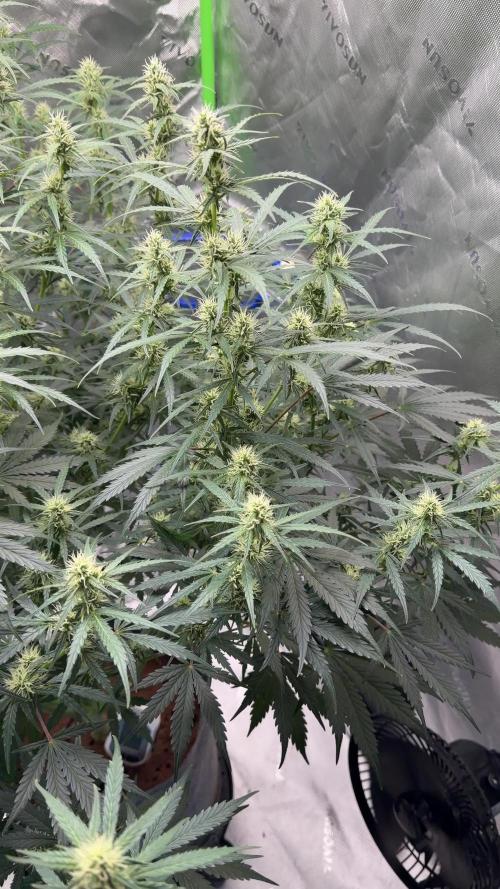
Week 9 Update — Gorilla Zkittlez (Flowering Progress)
Dates: 11/17–11/20
Medium: Coco
Water Source: RO
Grower: Stoney Stark / Little Lilly Farms
⸻
🌱 Feeding & Dry-Back Strategy
This week she only received two feedings as I’m pushing a longer dry back to strengthen the root zone and slow vertical growth.
🗓️ 11/17 & 11/20 Feeding (1 gal each)
• 4 ml Green Sensation – PK booster to enhance flower density and terp production
• 0.5 ml Silicium Bloom – Adds structural strength, helps the plant handle high-intensity light
• 14 ml Coco A – Base nutrient providing nitrogen + essential micros
• 18 ml Coco B – Boosts phosphorus & potassium for flowering development
• 4 ml Pure Zym – Enzymes that break down dead root mass & improve nutrient uptake
• 8 ml Royal Rush – Metabolic stimulant for increased vigor and resin output
• 5 ml Ruby Fulvic – Improves nutrient absorption & overall plant energy
• pH: 5.8
• PPM: ~1300
⸻
💡 Light & Canopy Management
She stretched harder than expected late into Week 9 and grew too close to the light. I had to raise the fixture, but I’m officially out of headroom — the light can’t go any higher.
• Light was raised as high as possible
• Canopy now sits just below the fixture
• Watching closely for light stress or foxtailing
Despite this, she’s handling the intensity surprisingly well.
⸻
🌿 Plant Structure & Health
She’s built like a monster this week:
• Extremely thick main stalk — easily one of the thickest of the run
• Lateral branches are sturdy and holding weight well
• No signs of nutrient burn even with 1300ppm
• Dry-back is helping keep internodes tight and reduce stretch
I’m genuinely impressed with how thick the trunk got — she’s built for heavy buds.
⸻
📸 Overall Impression
Gorilla Zkittlez is stacking nicely as Week 9 wraps up. Flowers are continuing to swell, the plant is still drinking steadily even with reduced feedings, and structure is strong enough to support chunky buds without additional stakes yet.
Likes
1
Share

@Badbreath
Follow
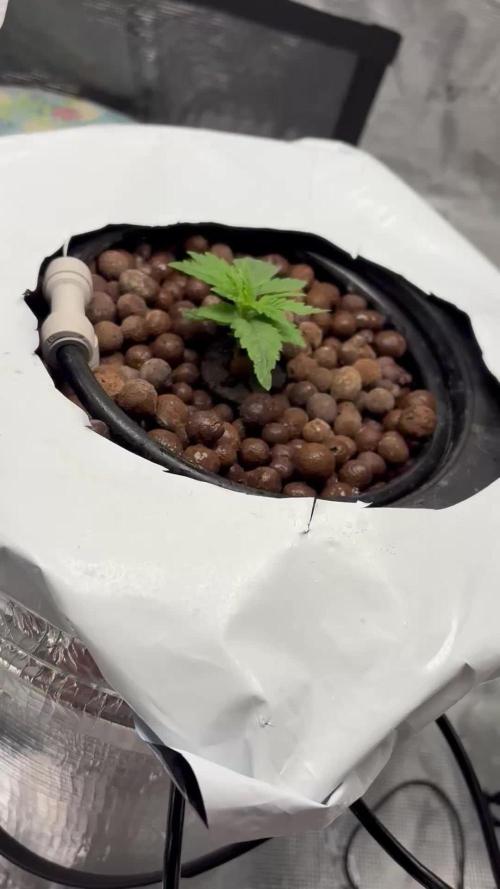
2/9. Rötterna har hittat ut, great white har kickat in,
Fattar inte varför mitt pH värde går upp till 7.5 när jag har pH perfekt näring och ro vatten. Får fortfarande justera med pH ner 2-3 gånger och dagen. Annars verkar hon trivas
Likes
6
Share


@SAC87
Follow
Hey Growers.
These girls are just flying along on cruise control. Growing like mad and beefing up nicely. I’ve got the second carbon filter going to tame the smell that was pumping out all my windows 😆
All I’m doing is too dressing with Gaia Green 284 and watering with a bit of monster bloom, a little goes a long way!! These girls are loving it. I’ve dimmed the SF4000 down 5% as I’m trying to imitate fall and I find the terps are stronger when they aren’t cooked off by intense light in late “fall”.
Happy Growing 🌱

Likes
18
Share


@TheCannaProphet
Follow
~ FASTBUDS TESTER #2206 ~
Well friends, here we go on another 'canna-venture' together!
The grow room has had a complete remodel and some upgrades done to it including brand spanking new 4x8 and 4x4 tents and a Trolmaster Hydro X controller along with a new Control Panel.
This tester strain is one of six tester strains that FastBuds has graciously provided me with and I'm looking forward to seeing what this girl has to offer when she's grown to her full potential!
One drawback of 'testers' is I have little to no information on it other than its number and that it's an autoflower... 🤪 But, it's ALWAYS a blast growing them for me because not knowing a lot allows me to just concentrate on the essentials: Light, Environment, Water, Nutrients and possibly a bit of LST... not complicated, just basics like keeping a constant temperature and RH in the tent at a level that gives a good VPD, watering when almost dry and maintaining proper light levels according to their stage of growth.
____________________________________________________________________________________________________________________________________________________________________________________________________________________________________________________________________________________________________________________________________________________________________________________________________________________________________________________
~THE SETUP~
~Initially seeds were lightly scuffed, then soaked for 3 hours in 78℉ distilled water after which they were transferred to moist paper towels laid out in a Jiffy Pellet plastic starter tray with lid. Underneath the tray was placed a Vivosun Heat Mat with Controller that was set to 78℉ where they stayed until their tap roots emerged.
~Planted into Jiffy Peat Pellets that were hydrated with distilled water warmed to 78℉ with a 7.0 ph.
~Once roots emerge from the Jiffy Pellet they're transferred to their fabric pots.
~Grown 100% organic in a 4g Gronest fabric pot and a 3g fabric pot by Wraxly filled with Mother Earth 70/30 Coco/Perlite medium and initially amended with Dr. Earth 4-4-4 / Earthworm Castings / Dr. Earth Flower Girl 3-9-4 and Coast of Maine Stonington Blend Organic Plant Food 5-2-4.
~19/5 light cycle for the entire run with supplemental UVA added during flower. Lights are controlled by a Trolmaster Hydro X controller set for a 15min Sunrise/Sunset simulation.
~Top dressing every 3-4 weeks with slow release dry amendments and Earthworm castings.
~Straight water ph'd @ 6.2-6.8 when needed and bi-weekly Compost Tea's.
____________________________________________________________________________________________________________________________________________________________________________________________________________________________________________________________________________________________________________________________________________________________________________________________________________________________________________________
Weekly Updates:
12/1- I soaked both seeds for 3 hours in 78℉ distilled water after which they were transferred to moist paper towels laid out in a Jiffy Pellet plastic starter tray with lid. Underneath the tray was placed a Vivosun Heat Mat with Controller that was set to 78℉ where they stayed until their tap roots emerged roughly 24 hours later.
12/3- Today their tap roots were about 1/2 to 3/4" so at 11 am I transferred them into Jiffy Peat Pellets that were hydrated with distilled water warmed to 78℉ with a 7.0 ph using a tine off of a plastic fork as a 'mini trowel' to make a hole in the pellet and to gently cover the tap root, leaving only the seed head slightly exposed. This method accomplishes most of the initial work the seed has to do by eliminating having to orientate itself, push it's root down and head up. By 10pm the #1 seed had her cotyledon leaves opened and the #2 isn't far behind!
12/5- Well this is Day ONE for the #2 FBT #2206 and the second day for her sister! I'll keep them in the covered/heated Jiffy tray until I see their roots beginning to emerge from the peat pellet, then I'll transfer them gently into their respective fabric pots. The #1 will be going into the 4g Gronest pot from FastBuds and the #2 will reside in a 3g pot by Wraxly, which I'm trying out for the first time.
12/7- Yesterday I checked the #1 tester and she had roots starting to emerge from her pellet so I transferred her into her 4g Gronest pot. After making a hole in the medium for the peat pellet, I coated the entire surface with Xtreme Gardening Mycos then placed the pellet in the hole and planted her in. Lastly, I watered her in with about 4oz of de-chlorinated water with 3ml/g of FishShit added which was then ph'd to 6.4 @ 75℉ after which I placed a humidome over her for 24hrs to ensure that the humidity stays constant.
The #2 tester is doing great and I'm confident that she should be ready to transfer into her fabric pot in the next couple of days!
😎💚 Thank you for checking out my passion in life! Please visit as often as you wish and I hope you enjoy this journey as much as I know I will! Grow Strong! 💪😎🤙

