
Likes
Comments
Share


@DrJekyll_MrKush
Follow
Just bought some "predatory mites" to kill bad mites and it's working!
I've spread half of a bottle in all my babies soil and the situation changed in like 3 days, not even one bug stayed alive.
I've used also the Neem oil to prevent flies to go on their leaves and they are fine now.
Starting LST, let's see how they will react.
Keep you updated folks!
Have a wonderful week!

Processing
Likes
120
Share


@CBD_Sweden
Follow
2017-09-11. Kl 12.00. Week 4 starts. I have cleaned the whole room for the new week and gave the girls water and nutes. Added videos and pics. Girl is 21 cm high.
----------------------------------------------------------------------------------------------------
2017-09-12. Kl 10.00. New pics and video. She has grown from 21 cm to 25 cm in 23 hours.
-------------------------------------------------------------------------------------------------------------------------------------------------------
2017-09-15. KL 10.00. New pics and video. The girl is 30 cm high and has grown 9 cm the last 4 days.
----------------------------------------------------------------------------------------------------------------------------------------------------
2017-09-16. Kl 10.00. She is growing like crazy and needs to get defoliated every morning. I added 2 new videos and gave her 2 liters of water and nutes.
----------------------------------------------------------------------------------------------------------------------------------------------------------------------------------

Likes
Comments
Share

@ElCapitol
Follow
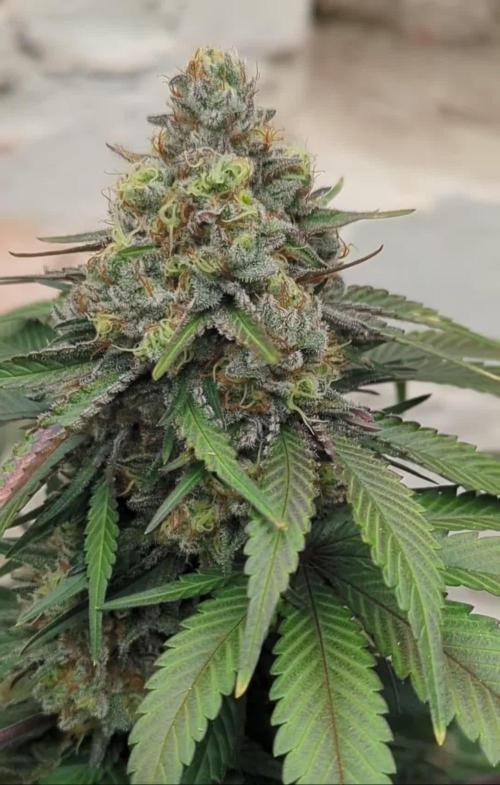
That's the hard work all done. Few weeks on plain water and I think these girls are about ready. Lights are on 100% and they're reacting with some nice purple hues. Out of the three strains I have running these look the biggest tightest buds. Beautiful aromas from them too. Apart from my over watering they've been a very easy grow. Would recommend these to beginners happily. Big buds, easy grow, not too much stretch. They look great in my opinion. They're absolutely stacking the trichs on. Couldn't fit any more on. Few cloudy ones appearing. I usually wait for mainly cloudy with a lot of amber. I like a heavy stone from Indica dom strains.
I've out a video on, hope it's come out OK.


Likes
18
Share


@DaddyPrime
Follow
4/8 frosting up more and more and buds plumping up but not much. I feel its key to note that ine of the plants is more short stocky and the other has greater internodal spacing

Likes
17
Share


@420DeepGrow
Follow
Gracias al equipo de Kannabia Seed, Marshydro, XpertNutrients y Trolmaster sin ellos esto no sería posible.
💐🍁 Moby Dick 🐋:
Criada a partir de dos parentales icónicos, como es el cruce de White Widow y una Haze pura G13, este choque de titanes provoca un híbrido que golpea a las puertas de las sativas más fuertes disponibles en el mercado.
Estamos ante una criatura impresionante en todos los sentidos, con ejemplares que florecen en solo 9-10 semanas en interior y arrojan un peso en lonja de 550 gr./m²
Al igual que su padre Haze, nuestra Moby Dick ofrece agradables notas cítricas, pero con efluvios de vainilla y eucalipto, una mezcla de aromas que genera una combinación intrigante, que puede llenar cualquier habitación con una fragancia inolvidable.
El sabor es muy parecido a su olor, con toques de limón agrio que harán que tu lengua cosquillee al inhalar, convirtiéndose lentamente en un humo dulce y terroso, con pinceladas de madera e incienso que se adhieren al interior de la boca al exhalar.
💡TS-3000 + TS-1000: se usaran dos de las lámparas de la serie TS de Marshydro, para cubrir todas las necesidades de las plantas durante el ciclo de cultivo, uso las dos lámparas en floracion para llegar a toda la carpa de 1.50 x 1.50 x 1.80.
https://marshydro.eu/products/mars-hydro-ts-3000-led-grow-light/
🏠 : Marshydro 1.50 x 1.50 x 1.80, carpa 100% estanca con ventanas laterales para llegar a todos los lugares durante el grow
https://marshydro.eu/products/diy-150x150x200cm-grow-tent-kit
🌬️💨 Marshydro 6inch + filtro carbon para evitar olores indeseables.
https://marshydro.eu/products/ifresh-smart-6inch-filter-kits/
💻 Trolmaster Tent-X TCS-1 como controlador de luz, optimiza tu cultivo con la última tecnología del mercado, desde donde puedes controlar todos los parametros.
https://www.trolmaster.com/Products/Details/TCS-1
🍣🍦🌴 Xpert Nutrients es una empresa especializada en la producción y comercialización de fertilizantes líquidos y tierras, que garantizan excelentes cosechas y un crecimiento activo para sus plantas durante todas las fases de cultivo.
Consigue aqui tus Nutrientes:
https://xpertnutrients.com/es/shop/
📆 Semana 2:
Fantástica semana, estan creciendo de una forma espectacular gracias a la ayuda de @marshydro, @xpertnutrients y @trolmaster.
Se puede apreciar un tercer nudo aunque la aplicación de cola de caballo y el estar en una maceta pequeña ha influido en el tamaño de ella, se recupera muy rápido 😁.
Esta semana espero trasplantar a la maceta definitiva.
Potencia de la lámpara: 50%

Likes
85
Share


@Tropicannibis_Todd
Follow
Start of day 49 ...... Nov 27 Start of week 7 ........ 23 DAYS INTO FLOWERING
Check out the full grow video on latest weekly update
Super Exceptional Growth Daily
Still adjusting LST when needed and leaf tucking.......
Water Only when needed but its drinking more every otherday and adjusting lights when needed......
Rain Water Only .......
( DAY 54 AND IT SHOWS ZERO DEFICIENCIES ) IM ALSO DOING VERY LITTLE, SLIGHT DEFOLIATION
( DAY 49 AND RESIN PRODUCTION HAS STARTED )
( DAY 54 AND ALL IS GOOD , THERE FATTING UP )
I hope you enjoy my growlog...

Likes
28
Share


@OGgrows
Follow
what a great phenotype. Very easy to grow. bittersweet citrus flavor. very nice and fresh. great strain


Processing
Likes
12
Share


@Dutch_Grower
Follow
Everything okay, sprayed some Silicum Boost again this week.

Likes
35
Share


@MrSpooky882
Follow
Heute gedüngt und ebtlaubt, dafür das alles gar nicht so gedacht war siehts gut aus, bisher ist Anesia top es riecht auch langsam nach candy 🤤🤤😅😁 bin gespannt was draus wird 😅
😏
Fertilized and leafed today, for the fact that everything was not intended that way, it looks good, so far Anesia is great, it also slowly smells of candy 🤤🤤😅😁 I'm curious what will happen 😅😏

Likes
2
Share

@Growfather1
Follow
Hello everyone,
The tangerine dream is doing well and will receive in the weekend her first defoliation since switching to 12/12.
I started adding pk13/14 to the feed today 1ml on 8 liters of water i will raise it to 2,5ml per 10 liter by next week.
Let's see how she looks next week, thanks for stopping by and have a nice week.
Best regards,
Growfather

Likes
15
Share


@Shizzlemanizzle
Follow
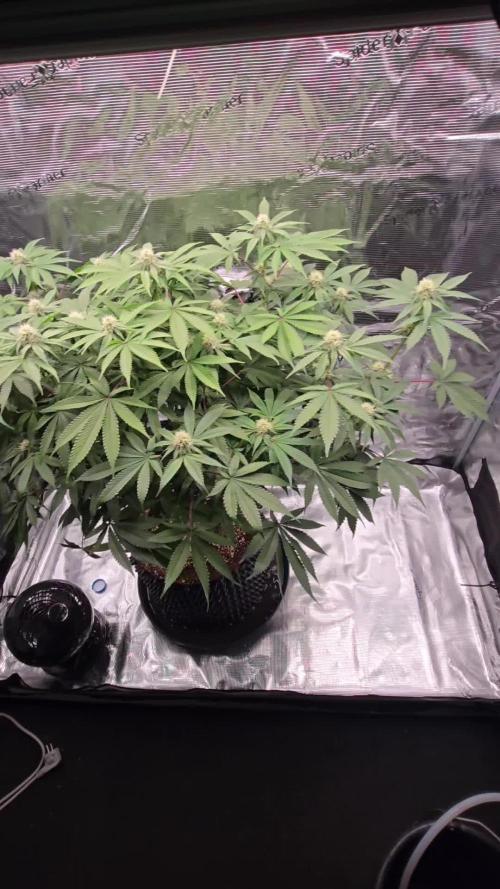
Topping was great ! Starting now with LST using a wire but gently don’t want to harm the plant they opened up pretty good 🙏🏽 I am increasing water by looks.

Likes
4
Share

@GermanTree
Follow
Video-OG Kush/ Video-Frozen Black Cherry/ Video-Black Ridge Strawberry/2x Og-kush/2x frozen black cherry/ 0x black ridge strawberry (i was to high to remeber making pictures xD
Harvest Report coming soon...
Likes
32
Share


@Grey_Wolf
Follow
Double Grape attempt #2
mephisto genetics double grape
7th January 2021
I have two very distinctly different phenotypes of Double grape 😎
the taller one is really sativa like with it's thin leaves and stretched appearence , whilst it's sister plant is squat
in stature and has thos classic wide leaves from it's Indica parentage.
However so far they both Smell very similiar so I dunno what to make of that but it can't be a bad thing as the smell is very Nice 👌
Not much else to report so will leave it at that.
Thankyou for stopping by 👍


Likes
6
Share


@rvabudman
Follow
It has been primarily smooth sailing minus accounting for low humidity, but that doesnt appear to have bothered the plants. Finally taking some up close bud shots. I have never been much of a picture taking person (a bit of a shaky hand lol), so bare with me in future weeks.

Likes
2
Share


@Enki_Weed
Follow
Tag 14
Die erste Woche der Keimung war… sagen wir mal, eine echte Herausforderung. Und auch in die zweite Woche starten wir mit einigen Schwierigkeiten. Der pH-Wert im Gießwasser tanzt immer noch Tango und will sich einfach nicht stabilisieren lassen. Alle sechs Stunden muss ich ran und nachjustieren – ganz schön zeitaufwendig!
Auch die Temperaturen sind noch ein Thema. 27 Grad sind einfach zu hoch, und da die kleinen Pflänzchen noch keine schattenspendenden Blätter haben, heizt es ordentlich auf. Ich habe mir aber mit Kühlpacks beholfen und das Gießwasser auf angenehme 22 Grad runtergekühlt. Hoffentlich mögen das die Wurzeln! Immerhin: Die Wurzelbildung scheint gut voranzugehen, jede Pflanze hat jetzt schon ein kleines Wurzelnetz entwickelt.
Um jeder Pflanze die besten Startbedingungen zu geben, habe ich ihnen jetzt jeweils ein eigenes Licht spendiert. So kann ich die optimalen Werte für jede einzelne einstellen. Ob das alles so klappt, wie ich es mir vorstelle, wird sich in den nächsten Wochen zeigen. Aber wir starten optimistisch in Tag 14!
Was steht heute auf dem Plan? Ich werde die pH-Werte im Auge behalten und schauen, ob die Kühlpacks die Wassertemperatur stabil halten können. Außerdem werde ich die kleinen Pflanzen genau beobachten, ob es ihnen gut geht.
Bis die Tage


Likes
7
Share


Likes
3
Share


@Farad9650
Follow
Feeding weekly general hydro ponies at 3/4 of half strength about 3 gallons per pot
Likes
Comments
Share


@Phenophilgrow
Follow
In the second Week i started to give them a few nutrients. Maybe a bit too much, as you See in the last 2 Videos.
Since its very cold (-5°C) in Germany i've put a heating cable losely around the pots to Heat Up the soil a bit.
