
Likes
Comments
Share


@Young_agronomist
Follow
Всем привет 👋
Сегодня 02.10.23- и 94 дня от прорастания и 34 12/12.
На данный момент это мое любимое растение !
Она имеет множество крепких веток и ровный навес . Шишки и листья супер липкие …просто жесть)
Растяжка замедляется .
Я продолжаю изредка убирать большие листья и радоваться проделанной работе .
Спасибо за отличную генетику

Likes
22
Share


@MadeInGermany
Follow
Flowering day 3 since time change to 12 / 12 h
Hey guys .
My cutting heating broke 3-4 weeks ago, which was fixed immediately and everything went wonderfully.
Now, 3 days ago, the central heating broke down in the entire room, so that at night I only have temperatures of around 13 degrees :-( .
One or the other lady is slowly starting to see a phosphorus blockage, as this can no longer be absorbed at temperatures below 15 degrees, like many other nutrients :-( .
A friend looked at the heating yesterday and came to the conclusion that a real company had to do it, which is by no means possible for a stranger to enter my room.
I quickly ordered heating mats for all the boxes so that the ladies could at least get warm feet.
That's all I have this winter full can do .
Let's hope everything will be fine 🙏🏻.
As soon as the heating mats are attached in the coming days, I will post them in the pictures.
Now for the update.
Despite the severe cold, the ladies are still doing well and have made good progres .
The ladies only had to be watered once this week, each time with 1 l, because it absorbs the water very slowly because of the cold and I don't want to overwater it.
I took every single plant in the pot to take a close look at their roots.
These are snow white and look very healthy 🙏🏻.
It was also the last time neem oil sprayed so that the last trips are finally gone.
Otherwise everything was checked and a lot of planning was done, like I do with the heating mats.
Since a friend had the same problem in one winter and the heating mats got 10 degrees plus on the pots, I am very confident that it will at least bring something for the last cold month 😃
🙏🏻.
I've started flowering even if some are still a bit small, but otherwise they'll get too wide from training and end up taking up space :-)
until then have fun and stay healthy 🙏🏻
👇🏼👇🏼👇🏼👇🏼👇🏼👇🏼👇🏼👇🏼👇🏼👇🏼👇🏼👇🏼
A thank you for this wonderful strain goes out to
Herzog
https://instagram.com/herzog030?utm_medium=copy_link
and the Exotic Seeds team
You can buy this Nutrients at :
https://greenbuzzliquids.com/en/shop/
With the discount code: Made_in_Germany you get a discount of 15% on all products from an order value of 100 euros.
You can buy this Strain at :
https://www.exoticseed.eu/
Water: Osmosis water mixed with normal water (24 hours stale that the chlorine evaporates) to 0.2 EC. Add Cal / Mag to 0.4 Ec Ph with Organic Ph - to 5.8 - 6.4
👆🏼👆🏼👆🏼👆🏼👆🏼👆🏼👆🏼👆🏼👆🏼👆🏼👆🏼👆🏼

Likes
4
Share


Likes
13
Share


@MARLEYtheDAWG
Follow
Changed my light cycle to 20/4, need to add a heater for when the lights are off as I've noticed the temperature drops really quickly and moving my intake tubing into a warm room wasn't cutting it.
I defoliated some leafs that were obstructing light which seems to help as they have certainly bushed out..
Starting to each get there own distinct smells and looks.
I've started to add 2 tea spoons of epsom salt and green tea to my feed which the plants seem to like, time will only tell I suppose and this is a learning journey for me so why not try different organic methods 💚
Really excited to see how these turn out and smoke something I know exactly what's been put into it 😍


Likes
14
Share

@UnorthadoxDude
Follow
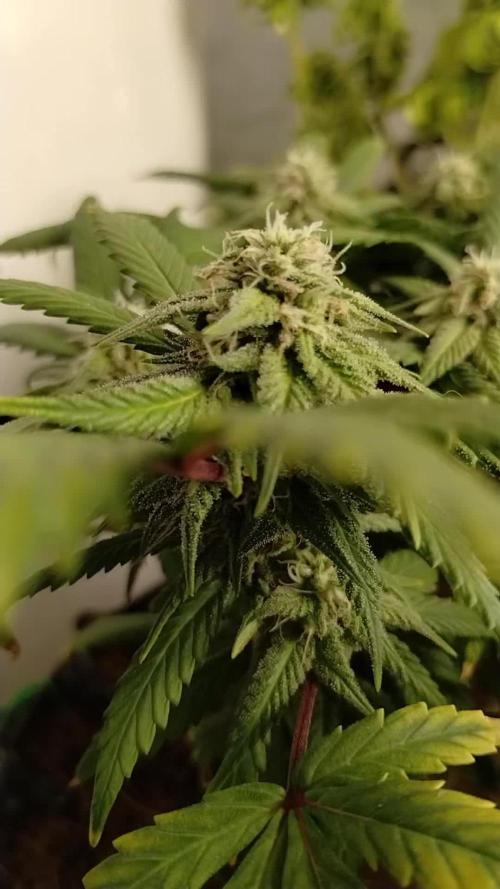
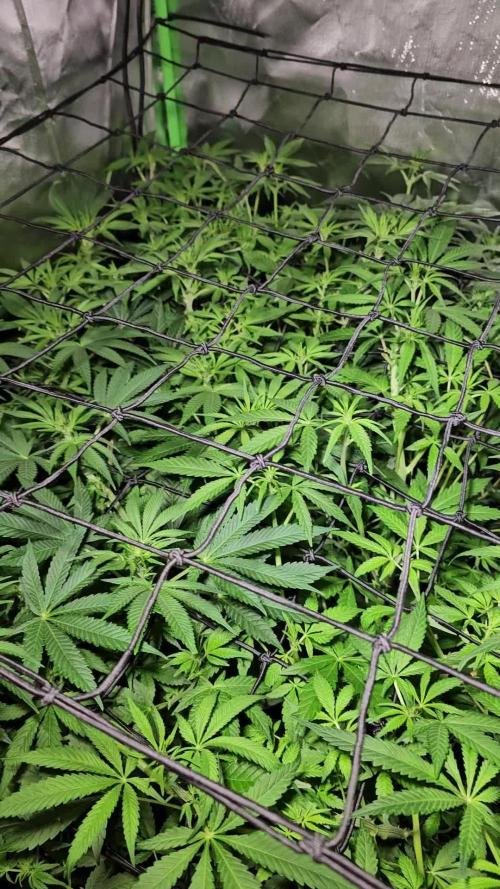
Week three of flower is here and the pistils are popping out all over the place now.
The final tuck was done on day 14, two days ago. From here I am just letting them grow out, the second net is just to support the colas as they develop and pack on weight.
Day 16 of flower: Photographed and took a video.
More updates to come later in the week.
If you are on X, please follow me @Unorthadoxdude


Likes
44
Share


@RakonGrow
Follow
Note :
+ jegliches Zubehör wird in der GermniationsWoche aufgelistet . Zeitraffer Videos folgen immer nachträglich.
+ videos werden so geschnitten das nur ein geschlossenes Zelt erscheint , ergo Fehlen paar reale Minuten (ca 1 Std) .
Day 71:
Da Phase III , zeigen sich nun deutliche Mangelerscheinungen . Einige Blätter werden aufgefuttert :))
Day 72:
+ 1.75 Liter Flaschenwasser
+ + Dünger für Blühte Generative Phase III
+ + + Canna Terrar Flores (Achtung wirkt wie PH-)
+ + + Canna Boost
+ + + Cannazym
+ + + Canna Rhizotonic
+ + + Canna PH+
+ + PH 5.82
Day 73:
Trichome sind schon OK . Viele Bernsteine . Ergo 8 Stunden Dunkelphase als Erntevorbereitung.
Die Schwester bleibt noch im Zelt und hat dafür Besuch bekommen von der Apple Fritters dessen Platz im 160cm x 60cm x 60cm zu klein wurde.
Final : Komplett Entlaubung . Cut . UpSideDown into the Darktent .
Danke an alle Likes und Watcher und Follower . Es hat viel Spass gemacht und mein 2. Grow ist entscheident besser geworden als der Erste !!!
Wir sehen uns nach dem Trocknen und vor dem Curing .
+ + + + + + + + + + + + + + + + + + + + + + + + + + + + + + + + + + + + + + + + + + + + + + + + + + + + + + + + + + + + + + + + + +
Day 74: ZOE'S SCHWESTER
+ 2.0 Liter Flaschenwasser
+ + Dünger für Blühte Generative Phase II (Düngeplan siehe Germinations Woche)
+ + + Canna Terrar Flores (Achtung wirkt wie PH-)
+ + + Canna Boost
+ + + Cannazym
+ + + Green House Feeding - BioEnhancer (vorher 8 Minuten im lauwarmen Leitungswasser aufbereitet)
+ + PH 5.9
Day 75: ZOE'S SCHWESTER
Heute werde ich mal etwas defloration betreiben da es doch recht dich ist und ich mir etwas sorgen mache was im inneren so abgeht .
Leichte Entlaubung abgeschlossen .
Day 76: ZOE'S SCHWESTER
+ 2.0 Liter Flaschenwasser
+ + Dünger für Blühte Generative Phase III (Düngeplan siehe Germinations Woche)
+ + + Canna Terrar Flores (Achtung wirkt wie PH-)
+ + + Canna Boost
+ + + Cannazym
+ + + Canna Rhizotonic
+ + + Canna PH+
+ + PH 5.9
Day 77: ZOE'S SCHWESTER
Heute macht das Wetter mir unter 55% Luftfeuchtigkeit und ich kann kühlen. Bringt zwar gar nichts in der letzten Phase. Aber so ist es halt. Ich geh also Baden und lass die Tür offen ;)) Da ich hier noch 1 am Trocknen hab und eine Nachbaring im Zelt die auch gerne mehr Feuchtigkeit hätte , muss ich jetzt zwischen pest und kolera wählen . lieber für die Ernte oder lieber für nahende Ernte oder ganz auf den Neuling ... Ich hab mich für die Ernte entschieden , die sollte nie und nicht Schimmeln :))
Woche 11: Day 78: ZOE'S SCHWESTER
Die 11 Wochen seit Samensetzung sind rum . Sie macht sich gut . Und die Trichome sehen auch schon sehr nett aus . Aber noch ist das Trockenzelt nicht frei . Also bekommt es noch Licht bis das Zelt frei wird .
Woche 11: Day 79: ZOE'S SCHWESTER
+ 2.0 Liter Flaschenwasser
+ + PH 7.49
Woche 11: Day 80: ZOE'S SCHWESTER
Sieht super an den Spitzen aus. Ein Meer aus Trichomen. Kollege meinte das muss Schimmel sein. Microskope strafte Ihn mit lauter Trichomen.
Woche 11: Day 81: ZOE'S SCHWESTER
Trockenzeit wird eingeleitet . Morgen dann ins Trockenzeilt für paar Stunden längere Nacht und dann UpSideDown zum Trocknen aufhängen .
Woche 11: Day 82: ZOE'S SCHWESTER
Ist trocken genug , ab ins Dunkelzelt .
Woche 11: Day 83: ZOE'S SCHWESTER
Totalentlaubung , UpSiteDown . Trockenzelt. 480g nass mit Baum.
Woche 12 :
Trockengewicht 90g
Likes
15
Share


@FishTankGrow
Follow
Day 32 - Heater was blowing directly on a couple of the leaves that turned brown. Cut them off. Raised lights up again. I think my development is a little slower than others but I have had a lot of trial and error.
Day 33 - added tomato rack for LST. growing nicely.
Day 34 - Stopped nutes as I was getting a little leaf burn in lower leaves. Looks good otherwise. Lights are dialed in.
Day 35.- This is what too much light looks like.
Day 37 - Switched to the grow light. Moved the heater. Growing nicely.
Day 38 - Lights dialed in REDUCED water. Stopped watering for 2 days.
Day 39 - Full Lights on now. Put more holes in the pot. Draining nicely now.

Likes
218
Share


@DevilsBud
Follow
NEW WEEK 7 OF FLOWERING
CRITICAL BY RQS
Woohoo soooooo excited 💪🏻🤯🤘🏻
I am normally not so excited with certain things but these grows have definitely made me get excited every new week . It also calms me down a little bit with stress and helps calm my nerves somewhat. Also normally not very talkative to others but with the nice community of growers we have here it makes you want to start conversations and it helps knowing you get trolled etc .
Tomorrow First day update
Day 42 of flowering Critical
Hallo guys/girl's not a lot to say it's a waiting game now critical will be cut down earlier then the cookies gelato will . i can take 100 of the same photographs but it gets a bit boring so I will update every day but maybe not ram it full with photos . The Critical are doing good getting very nice looking buds but has a way to go for sure and they are drinking a lot! I made Video again so enjoy 🤘🏻🤘🏻
Come look at my other diaries! I appreciate it a lot 🤘🏻
visit www.marshydro.eu
for your best gear and use the PROMO CODE: DEVILSBUD
And you will get a nice discount.
Day 43 flowering Critical
This morning with lights out i gave a nice batch of advanced Nutrients It's overdrive time . So far so good humidity good temp good plants looking good. What those grower want more 😎 . The marshydro TS-1000 is doing a great job nothing to complain about top notch TS series has all the new light functions and technologies with affordable prices and different sizes to fit all kinds of grow scenarios and grow needs. Their aluminum reflective hood design is our patented design, to decrease light loss and increase light efficiency.
Come look at my other diaries! I appreciate it a lot 🤘🏻
day 44 flowering critical
Nothing really to say other then it's going good and smell like a
Day 45 flowering Critical
Critical looking good i am really excited about the cookies gelato because we don't have it here . But the buds on the critical are looking very nice . gave this morning the nutrients they need .today i got package delivered and i was stunned what was in it 🤯🤯🤯🤯🤯🤯🤯🤯 i will reveal later on but holy hell that made my day and probably week 😂😂 only thing i can say is 8X5
Day 46 flowering Critical
Also the Critical are drinking good a little Les then the other ones but gave the Critical 1L pH 6.6 water. Also learned i wish lesson to not remove ScrOG netting this far in. Trying to cut netting From the middle and went for the critical plant to cut around plant didn't like that and was waving all the way the wrong way so i ditch cutting netting further rookie mistake but only one little bud got lost in the process . At least i learn not to do that again lol try to video the tricomes on snapped little Bud
Come look at my other diaries! I appreciate it a lot 🤘🏻
Day 47 flowering Critical
One critical that i cut out of the net is dangling a little but but nothing to worry about yet maybe after the buds get heavier but now it's still safe 👍🏻
Day 48 end of week 7 flowering Critical
It was more interesting week for the critical cutting the net this far in the grow not a good idea but have learn from it.
On to the next Week Growmies
Also want to thank everybody for the comments likes etc you know who you all are 👍🏻😍👍🏻
visit www.marshydro.eu
for your best gear and use the PROMO CODE: DEVILSBUD
And you will get a nice discount.
Likes
2
Share


@Cannatech
Follow
The plant is literraly touching the ground now and the buds are not only big now they are getting a lot of density to them and the smell is getting very strong a lot like widow but with almost a sour twist. Mouth watering for sure.

Likes
20
Share


@GrowinHome
Follow
Day 78.
Now this is the canopy I was looking for! I am so excited🤩
Look at the difference with the last update post 3 days ago! All because I changed the blue/white light to red.
2 more days before we go into flower.
Day 80 the scrognet is in!
Today I placed the scrognet and changed the timer to 12/12.
Lets flower these gorgeous ladies!
Yesterday I removed some new grown side shoots again. The next defoliating will be done after the first few weeks of flower.

Processing
Likes
8
Share


@Max1973
Follow
Day 14 - Clay balls arrived, all looks good.... 😎
**the rust and damage on the first leaves is nothing to worry about,
the ice cream container water level dropped below the root level, fixed it,
but was cool to learn how fast hyrdo dmg can occur.... 👍
Day 17 - Lookin good... vid....
👍😎👊

Likes
32
Share

@MadeInGermany
Follow
Info:
Unfortunately, I had to find out that my account is used for fake pages in social media.
I am only active here on growdiaries.
I am not on facebook instagram twitter etc All accounts except this one are fake.
Have fun with the update.
Hi everyone :-) .
This week she has continued to develop very well.
She reacts very well to the training :-).
It was poured twice with 1.2 liters each this week.
Everything was cleaned and refilled.
Stay healthy 🙏🏻
You can buy this Strain at :
www.Zamnesia.com
Type:
Runtz
☝️🏼
Genetics:
Zkittlez x Gelato
👍
Vega lamp: 2 x Todogrow Led
Quantum Board 100 W
💡
Bloom Lamp : 2 x Todogrow Led
Cxb 3590 COB 3500 K 205 W
💡💡☝️🏼
Soil : Bio Bizz Coco
☝️🏼
Nutrients : Green House Seeds Company Powder Feeding Bio
☝️🏼🌱
Water: Osmosis water mixed with normal water (24 hours stale that the chlorine evaporates) to 0.2 EC. Add Cal / Mag to 0.4 Ec Ph with Organic Ph - to 5.8


Likes
27
Share


@pifflestikkz
Follow
Day 50
Friday 17/05/24
I attempted to try mainline her, failed 😅
But I think I'm learning the fundamentals of this method.
She seems to have exploded since I did it. The tops seem to have a surge of energy.
Seeing sex all over plant now😁 female first tell signs are awesome to see 😍
Feed today.
Day 52
Day 9 Flower
19/05/24 - Sunday.
Water today with calmag- Finally seeing her slap them female pistils out, and turn a nice vibrant green on her tops indicating the pre flower/flower stage.
Since trying the mainlining and lollipopping, she really has thrown out awesome new growth development.
Continually pulling tops back down via lst to encourage an even canopy.
Day 56
Day 13 flower
23/05/24
Light water with calmag
Wow, this one loves pre flower stress. Her stretch is starting, I've stopped plucking and snipping till required now.
The tops are throwing so many bud sites out it's incredible.
Likes
47
Share


@hannabis420
Follow
10/10 indoor grow, highly resistant strain, quick to flower after only 5 weeks of veg... light stress being too close to the lights caused fox tailing buds...live and learn!

Likes
9
Share


@DonFazool
Follow
Day 57 : AK was fed 2L with just Sensi Bloom A&B @ 2ml/l and Carboload @ 1ml/l . I backed off the Overdrive as i don't think it is time yet. The buds are still really forming and i don't want to burn this one as bad as cheese is showing.
Day 58 : I found out that i've probably been feeding too much cal-mag. I spoke with AN and they told me that their Sensi products have enough cal-mag that i didn't need to be adding it. I've started seeing tip burns only in the past few weeks. I think adding the Carboload and Overdrive may have pushed it over the top with the extra cal-mag going in each feed. Lesson learned.
Cheese is on water from this point on. I figure she'll be ready in the next 9-10 days. Need to start checking the trichomes as soon as my pocket microscope arrives in the next few days.
Man am I ever glad I didn't kill AK off because it was taking too long to flower. That plant is going to be a monster. It has so many side branches and bud sites. And it's starting to put off some kind of funk. Giddy up !
Day 59 : Pocket microscope came in today. Can't wait to check the trichs later on. Cheese is really starting to smell more and more. 8 more days until she gets chopped. AK is fattening up nicely. She'll finish in 11-12 weeks for sure.
AK was fed 2L this evening and is fattening up more and more each day. Cheese is getting close.
Day 60 : Cheese got 2L of water, had a good look at the trichomes and this plant is pretty much ready to go. I should have started the flush earlier but i didn't have the microscope yet. Checked various parts of the plant and I am seeing mostly cloudy with a small amount of amber trichomes. I'm going to let it go 4 more days to try and give it at least 10 days of flush.
Day 61 : Fed AK 2L, brought the base nutes down to 1.8ml/L and started Overdrive. I'm seeing some brown pistils starting to show up. Buds are filling out nicely each day.
Cheese is getting frostier every day now. Only a few while pistils left per bud, many of them starting to curl inward. Not seeing any yellowing yet. Been almost a week of just water. 4 more days and she's coming down !
Day 62 : Fed cheese 2L water this morning. That plant is looking really incredible. So much frost ! 3 more days until chop chop
Day 63 : Fed AK 2L, buds are filling out quite nicely. Some of the pistils are turning brown. Buds are not as fat as they are on cheese, however this AK seems to be a sativa phenotype so the smaller buds are expected. We'll see what the Overdrive does.
Cheese is 2 days away from chop chop ! So much frost.
This concludes week 9 !

Likes
49
Share


@masterofsmeagol
Follow
8/29 Knowing I was going to have to yo to the hospital er again this morning with my wife I got up early and watered. We are supposed to get an inch of rain tomorrow but the bags were totally light. If I was going to be around I might've held off watering. Instead I watered everything one gallon and figured the rain will make up for the other 10 percent hopfully that will do it.
8/30 Rained overnight. Plants were soaked. Flowers are swelling. I defoliated a shit ton of yellow leaves the other day. I still don't think I have anything fungal but I'm keeping an eye u e out and am considering doing an application of plant doctor. We are suppised to get an inch of rain tonight and tomorrow I guess. My biddy said i shouod cover my plants because next week is going to be "great growing weather" but with the rain and then the sun it could be a recipe for disaster since I have some large flowers. I got my father's leaf blower running but it was leaking gas. Brought it to the repair shop and a buddy let me borrow his for thus storm. I and hit the plants with it this morning. It is super strong though. I need to be careful not to blow it right out of the bag!!! Or break branches. Of course after u left it started raining lightly. A nice rain that plants like but it's stopped. I'm wondering if I should go over and blast them again to keep them dry but I know it's going to rain off and on and it'd going to rain tonight. I'll check the weather and decide from there. So far things are going good. Still have some yellowing leaves and a few normal pests but that is to be expected.
UPDATE: Stopped raining so I went over
and shook off the plants then put the leaf blower to them. I made sure to get the interiors before I went and had shook things again by hand. Storage us low bur i took a video. Cant upload toll tomorrow. Buds are growing at an insane rate but im losing some fan leaves that just yellow and die. Im sure its senescence but its still wortisome. We are supposed to have a real good week of growing weather coming so I hope that doesn't change. I'll update tomorrow. That leafblower works awesome though.
8/31 Went over to an extremely sunny windy morning. I didn't even need to shake plants or use the leaf blower since I did it after it Rained last night. I'm worried the wind night dry my bags out today so I'll be sure to keep an eye on them. I defoliated a shit ton of leaves but apparently it's just senescence. I need to check the last time I fed. Trich development is going good. The smell was incredible this morning! Each strain has its own unique smell to it. We are supposed to have a real good week for growing so I'm looking forward to it. May do a preventative plant doctor app but I think it will be alright. I'll keep this updated.
UPDATE: Went over around one and plants were bone dry. The wind was RIDICULOUS! I added a few individual stakes and tied a couple loose branches. I got my tarp out and considered covering the cagecto protect from the wind. However I didn't have time to sanitize if and they had already been through it all night and day alwuth no breakages. Plants are strong and supported well. At least I hope. Plus the tarp would block the rest of the direct sun the plants are getting right now. The wind looked like it dud its worst and the trellis and supports held. I did add extra supports higher up the plant to prevent breakages. Found a moth larvae (yellow) and squished him. Also found some aphids but a few lady bugs and three lady bugs larvae so I think I'll be OK. I am really excited for this year. Flowers are really exploding! FORGOT TO PUT THE MOST IMPORTANT THING. WATERED EVERYTHING TWO GALLONS EXCEPT THE 10. WHICH GOT ONE.
9/1 Forgot my phone on the daY I really needed it. It rained last night. The wind was the strongest i've seen in years. I would've tarped the cage but i couldn't find any of the bungee cords or zip ties. Probably good I didn't. No breaks. One plant had dark brown splotches ALL over the leaves! I picked them all off and took pictures and will consult my commercial buddy. I researched and asked a question on here. If it's septoria or something that could ruin my gorgeous garden I'd rather just junk the plant. It's big but it's the furthest behind flowering and I would not be heart broken if I had to get rid of that for the others. This week is supposed to be the best week we've had all summer so I'm expecting major growth. I'll update after conferring with other growers and making a decision. Looking online it seems like it could just be lack of nutes with the co dictionary we've been having. It IS time to feed and I haven't been feeding much. We'll see what he says.
UPDATE: AFTER RESEARCH AND CONSULTING WITH OTHER CONMERCIAL GROWERS I BELIEVE THAT THIS IS A NUTRIENT DEFICIENCY. I READ THAT RAPID TEMP FLUCTUATIONS AND HIGH WINDS CAN EFFECT THINGS LIKE THIS. IT DOES NOT APPEAR TO BE SEPTORIA (WHICH I'M EXPERIENCED WITH). I WAS THINKING ABOUT DOING AN APPLICATION OF PLANT DOCTOR BUT SINCE IT WAS SO FEW DAYS DURING THESE CONDITIONS IM GOING TO WAIT AND MONITOR THE PLANT. I DEFOLIATED ANY LEAF THAT WAS SUSPECT. FOUND AND KILLED A BUD WORM. I THINK THEY ARE STILL DIEING FROM THE BT. IT WAS LIKE STRETCHING UP FROM THE TOG OF A BIG NUG LIKE, "HERE I AM COME OUT ME OUT OF MY AGONY." ALSO FOUND LADY BUGS AND BEETLES AND THEIR LARVAE. IVE SEEN TGE VERY LOWER SECONDARY BRANCHES GET STRIPPED ON A COUPLE PLANTS BUT THATS WHY I LEFT THEM THERE. IF THEIR ARE EARWIGS THEY CAN HAVECTHE SHIT THAT I WAS GOING TO LOLLIPOP ANYWAY BECAUSE THATS WHAT THEY USUALLY GO FOR. THEY ARE DEFINATELY STRAIB DEPENDANT TOO. THEY LOVE ANYTHING BLUEBERRY BUT DONT TOUCH THE REST. MAYBE THERE IS JUST A COUPLE IN "THAT BAG". ILL HAVE TO GO AT NIGHT AND CHECK. IM EXCITED. MY FLOWERS ARE EXPLODING IN SIZE AND TRICHOME PRODUCTION. SEEIMG THAT I THINK THIS IS A NUTRIENT ISSUE AND MY FEEDING DAY WAS TODAY I FED EVERYTHING 1.75 PINTS OF NUTRIENT MIX TO EVERYTHING BUT THE 10 GALLON WHICH GOT LIKE 3/4 OF THE POWERADE BOTTLE. PLANTS SEEM HAPPY AFTER I FEED SO MAYBE I SHOULD UP THE FEEDING SCHEDULE. SINCE THE SOIL WAS ALREADY MOIST AND IT RAINED YESTERDAY I FED WITHOUT WATERING. HOPFULLY THAT WILL BE OKAY. I'VE DONE IT BEFORE.
Went back over at six and WOW! After this nice sunny day buds have swollen. Plants seemed to love the nutes. I think the nutes in my soil are fairly depleted so I just needed to adjust my feeding schedule. I didn't notice anymore calcium deficiency looking spots and I had defoliated a lot of leaves. Super excited moving forward. Pistols are changing color on one 10th p phenome and retracting into buds. This is is the fun time. As long as I can avoid the rot.
9/2 Says it didn't rain last night but my plants are dripping wet. If course the leafblower kept dying so I had to shake everything by hand. Hope that's good enough. Gonna be real sunny. Bags still had some heft to them. I'll check them later. Found a few leaves with what looks like the calcium deficiency on the sane plant and I just removed them. I really don't think it's anything to worry about. I'll update later.
UPDATE: Went back around 10 and everything looked good and was dry. Brought the leaf blower to be fixed. Should have it by the end of the day. Found and killed another pillar and some ants. Took a picture of a lady bug/beetle. This sunshine is making my buds explode!! I was thinking about checking again tonight but I think I can wait and water tomorrow. Bags are still fairly heavy. I did take another couple leaves off the plant that lopks like it might have a deficiency or something. The stalks are bigger than the bottom of a baseball bat. A couple almost like the fat end. Some 9f the best plants I've grown. I also took three short videos of a plant of each strain. Maybe if it's short it will upload quicker. Happy growing! UPDATE: I was back and forth today. I did some pruning and defoliation and then I noticed that my canary was light as hell. I waited until night and went back and had a couple starting to droop so i watered everything 2 gallons except the 10 and tub got 1. Everytime I see them it seems like they are bigger
9/3 Used the leaf blower this morning to get the dew off the buds. I shook them by hand before that. I'm noticing like a little army of lady bug larvae so any aphids I have are not going to be a problem. I have adults as well but is the babies that eat 10x what the adults do. I'm hoping they'll wipe put any bud worms. The weather is great this week all sunny. Making the buds explode in size and increasing terp production. This is the strongest smelling cannabis I've grown. Each strain. Has its own unique "funk" to it. Purple punch is really sweet and floral smelling. 10th planet is more gassy. I need to get some yellow sticky traps. I saw a couple fungus gnats on my canary. A late blooming blueberrycheese. It's the one that dries out the fastest but is more sativa leaning and drinks TONS of water. I have two that are that phenome. Losing yellow leaves but exploding with flowers. Noticed a couple more leaves with that calcium deficiency looking leaf. I just defoliated it. I'm really happy where I'm at right now.
9/4 Plants were covered in water this morning and the leaf blower wouldn't start. I shook everything off by hand. Each strain hasits own STRONG unique scent. One tenth planet phenome smells like bubble gum. I think I've got like two weeks and some of the flowers on ONE plant should be done. I'm planning to take the top half and then letting the bottom mature longer of its not whete I want it to be. The weather has been gorgeous. Sunny today. I'll need to water tonight I'm sure. UPDATE: WENT OVER AT 3PM AND PLANTS WERE DRY. WATERED EVERYTHING 2 GALLONS BIT THE 10 AND THE TUB. THEY GOT ONE. FLOWER DEVELOPMENT IS VISIBLE FROM MORNING TO NIGHT. I HAVE A TENTH PLANET THAT I BELIEVE WILL BE READY FOR HARVEST (AT LEAST THE TOPS) WITHIN A COUPLE WEEKS. PISTOLS ARE RETRACTING AND TURNING ORANGE ON THIS PHENOME AND RED ON THE OTHERS. I AM LOVING HOW THIS STRAIN LOOKS GROWING. I HAVE REAL HIGH HOPES FOR IT. I FAILED TOO MANY TIMES UPLOADING THE VIDEO AND PICTURES I TOOK SO ILL DO THAT TOMORROW. I CANT BELIEVE THE SWELKING GOING ON AND THE AROMA! THIS IS SUCH A WONDETFUL YLTIME OF YEAR. STILL FIND8NY SMALL SPOTS OF WHAT LOOKS LIKE CAL DEFICIENCY IN THAT ONE PLANT. IM STILL UNCERYAIN WHWT TO DO WITH THAT ONE.


Likes
9
Share


@Silverlok
Follow
Hey guys,
Nothing special happened.
They are still looking fine and doing a good job!
As you can see, i lollipopped them yesterday. Maybe a little bit too much! :D But i think its okay
Greetz
