


Likes
10
Share


@TheThiccBud
Follow
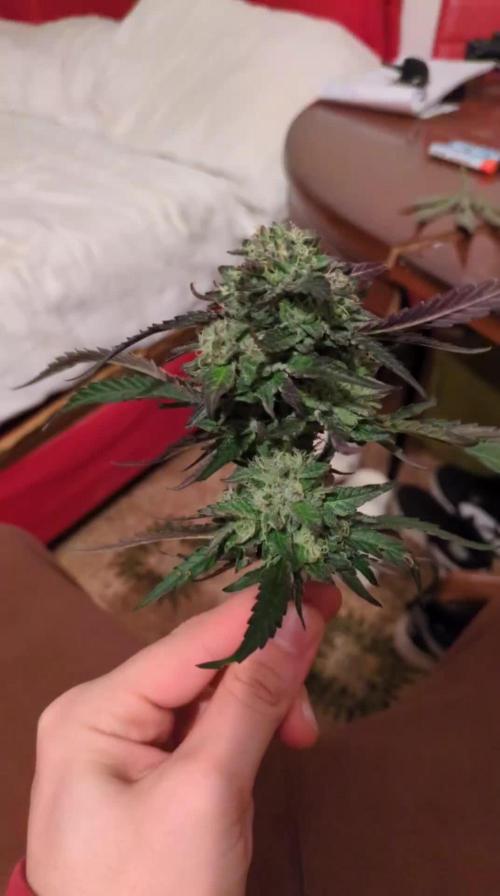
not much to say 😅 flowers become THICC, it is remarkable that the BUD becomes violently frosty and it looks like a good harvest 😍😇


Likes
22
Share


@Mr_Mister
Follow
Han llegado a 1 metro de altura sin contar la maceta.
Riego día si día no, están bebiendo entre 1litro y 1,25. Empiezo con canna flush para ayudar a la limpieza de raíces ya que me es imposible sacarlas del scrog para regar y drenar. Desde ahora solo agua.
La planta que tuvo un comienzo amorfo (al fondo a la izquierda), es la única sin apical ni FIM, parece que va un poco detrás de la maduración respecto a sus hermanas con apical/FIM.
En unos 10 días más o menos cosecharé las que estén maduras.


Likes
26
Share


@420DeepGrow
Follow
Sorprendido por la noticia de mi primera colaboracion con MarsHydro 😊🙏 y muy sorprendido tambien por el envio de las semillas por parte de Sweet Seeds.
La marca numero uno en focos 💡, carpas de cultivo ⛺️, extractores 🌬️ y demás aparatos que necesitas para tu cultivo.
Para esta aventura arrancaremos con 💡Mars Hydro TS 1000 Full Spectrum LED Grow Light 150W Regulable y 1 semilla autofloreciente a un ciclo de 20/4.
Verdaderos 150w con este TS1000, la mejor luz de cultivo LED para principiantes.
Ofrece una luz adecuada para 2-4 plantas 🌱. Su precio razonable, la marcada mejora del rendimiento y el control variable de la producción la hacen amigable para los nuevos cultivadores. Todo un tesoro para cualquier cultivador que este comenzando.
Usaremos tambien una carpa de 60x60x90, de nuestros amigos de MarsHydro, una carpa para los más exigentes.Con una solapa de cremallera mejorada, dobles cremalleras de metal con forro,reflectante diamante tipo Mylar, postes de metal para una estructura mas solida, no se puede pedir nada mas.
Garantizando una respuesta en solo 24 horas tanto si has usado antes la marca como si no.
Que decir de Barney's Farm uno de los mejores bancos de semillas a nivel mundial, con cepas que te sorprenderan.
Barney´s Farm, MOBY DICK ha evolucionado una vez más siendo cruzado con nuestro BF Super Auto #1.
Producción final impresionante, genética fuerte, robusta y perfectamente equilibrada creando una planta de energía Sativa dominante altamente resistente al moho.
La versión de Moby Dick Auto es ahora más compacta, con un ciclo de crecimiento autofloreciente más corto, pero poco se ha perdido en sus capacidades de producción, potencia y sabor.
💡 MarsHydro TS1000:
https://www.amazon.com/gp/product/B07PLY1WKK
⛺️ 60 x 60 x 90 MarsHydro:
https://www.amazon.com/dp/B081PN2QDN/
🌻 Moby Dick Auto:
https://www.barneysfarm.es/moby-dick-auto-562
Cuarta ,semana floracion. La etapa de crecimiento fue muy corta, simplemente riego con agua y pulverizo también con agua de vez en cuando.
Apliqué humus de lombriz a si que ire suave con los nutrientes
📅 Dia 29: Riego con nutrientes EC 800
📅 Dia 30: Descanso
📅 Dia 31: Descanso
📅 Dia 32: Riego con nutrientes EC 750
📅 Dia 33: Descanso
📅 Dia 34: Descanso
📅 Dia 35: Riego con nutrientes EC 450

Likes
18
Share


@djghost
Follow
So alles schön getrocknet ergebniss auf der wage ist ok aber nicht das beste aber die qualität ist 1a 2 von 3 phenos waren rot 1 ganz normal grün und schmeckt eher nach Skunk die anderen 2 sehr fruchtig halt wie beschrieben.
1g pro 1 watt trocken gewicht ......


Likes
7
Share


@TheGreenLeopard
Follow
nice week this week. very noticeable transformation. I have a yetti purple berry kush in there which smells just amazing. this week i tried, for the first time, some under canopy LED. 2nd day with it today as i write this. they really took it well. perked up and kept at it. the color and hue is starting to come through. Super happy with this tent. I think its worth the effort to create an organised space to give yourself the best chance possible. you will see the difference in approach form Auto tent and then photoperiod tent.

Likes
10
Share


@Cheeba_Inu
Follow
As of day 14, the Blackberry Kush is still exhibiting it's abnormal leaf growth. I've only ever seen this on another genetically purple strain, so I am curious if there is a connection. If anyone has seen similar issues in their own plants let me know!
It's growth hasn't been too bad, and I am sure it's going to continue to take off over the next week! I usually top my plants between day 14 and 21, so i am hoping it is growing vigorously enough to prevent any stunting.
I haven't seen any adverse effects from temporarily switching to my plentiful dry cal-mag, so I am happy about that so far! I am still adding a similar EC worth of Cal mag (.5) so it's good to have dialed in a rough equivalent.
I hope everyone is staying safe, and happy growing! 👍🌱
Day 15: the leaf growth continues to be very screwy, and even if it's at least partially a genetic issue I continue to triple check all my practices and parameters. The PH drifts up mildly in my reservoirs between cleaning/remixing of nutrients, but it is going from roughly a 5.8 up to a 6.2 (at worst) with no change in the EC/PPM. Between the lack of EC drift and lack of smell, I don't think there are any major bacterial issues. The outflow PH is also acceptable (5.8) and the outflow EC is around .2-.3 above inflow, which is also acceptable. I dug into the coco a little bit, and the medium is not oversaturated with water (it is always a bit "fluffy" with good drainage and never compacted) and the roots are white and healthy.
With the healthy vigorous growth of the other Blackberry in the same conditions, it brings me back to this being at least partially a genetic issue. I looked through grow questions of other diaries for similar leaf issues, and it seemed that most were either blueberry or blackberry strains from a range of breeders. This could be purely a coincidence, but it does make me wonder. The grows with similar issues seemed to otherwise have no commonalities in how they were grown. I am going to keep trying my best with this plant regardless, so I hope it pulls through alright!
Day 17: being very careful with my PH and keeping it a bit lower, to rule it out as a possible cause of the twisted leaves and less vigorous growth. I am keeping it between 5.5 and 6 for the time being to make sure there is no lock out of micro elements like boron. As per the comments, I am being more accurate be using a pH pen as opposed to drops which I may have misjudges.
I topped the plant, which is definitely a risk! But I am hoping for some healthier leaves to come in, and the plant hasn't stunted so far! It has grown the number of nodes it should have for its age, it just not as filled in and lush as I would like it to be.
Day 19: I have been monitoring PH especially carefully, taking a few measurements per day and keeping it between 5.6 and 5.8 (a little on the low side). The runoff is consistently under 6 as well. EC and other conditions have stayed where they should be as well. I reduced any PH drift by running the air pump for the res 24/7, instead of just for mixing and before fertigations to rule that out. But I haven't seen any overall improvements for the leaves so I am reverting back to my theory of a genetic issue with this particular plant. It's growing larger and it's stems are thickening, so I'm just going to keep it growing as well as I possibly can and see what it yields!

Likes
7
Share


@Young_agronomist
Follow
1️⃣26.08.23-57 день жизни этого прекрасного растения 🌱
Все идет отлично почки растут и дефицитов не наблюдаются )
Незначительное закисление дренажа , но это не страшно .
В конце недели он получит обильный пролив .
Likes
20
Share


@DeepRootsGrowTrees
Follow
KRITIC AUTO by KANNABIA
Week #9
Week #6 Flower
No issues this week she's doing 👍 she's really focusing her energy into her buds as the have stared becoming dense they look amazing and smell great!! Stay Growing!!!
Kannabia.com KRITIC AUTO

Likes
4
Share


@Ourweedfarmuk1
Follow
Hi guys it’s been 2 weeks since the last update. She has been growing at a nice steady pace. Not too much lateral growth but she is getting wider.
Have used a few garden stakes for lst & have been leaf tucking and defoliating selectively.
She is also in pre flower low lights already at 24/0 and have been giving a P/K spike in her nutrition to initiate flower. She is responding well to the feeds.
No topping so she will be growing in all her glory how she is meant to grow.
She’s stout and bushy and hasn’t given me any problems at all.
Leaves are a nice rich green so she is all good no deficiency that I’ve noticed.
What a strain! This was the first Autoflower I ever grew some years back so this is sentimental to me.
I’ll be back next week now that we are off to the races.
Thanks to fastbuds for the genetics.
Won’t let you guys down
Let’s grow!!!!
Likes
4
Share
@Guerrilla_grower777
Follow
23/10/2025 18:10
20.1°C 55%RH
After a very cold and rainy week today temperature raised above average,air is pretty dry and plants smells more than ever
This strange hot day made hunters come back after a chill period with no shots in the background,also this time was really near my spot(i thought he was finding us😰)
Video #1 Coco fresh chilling in the Wind
Video #2 Coco fresh 84 days from seed
This plant is on the ripening phase of course,crystals are covering everything and the runtzy smell Is coming strong with a sub flavour almost identical to the Coco Milk
The buds are pretty solid and sticky but not sticky as hell,because she's pushing so hard i will keep her until the 5/11 full moon,also not a single spot of mold at all
Cannot say the same for her sister
#3 Coco Milk 96 days from seed
This one Is slowly dying and will be harvested soon
Fall colours on every bud and some leaves looks very ugly but it's at this time that the smell is stronger and more defined
Now i can clearly say that she has a GSC aroma in the background and i found out Is on her lineage so It makes sense
Checked the trichomes too and they're pretty much white with almost no new ones,at the touch them buds are so greasy that after that everything Is sticking to my fingers
At the end there's a bad brown looking bud i cut It means next time i will cut her,right now i'm deciding if totally or leave the bottom buds one more week
Video #4
Flash video on the Coco Milk flowers focused on the last bud full of mold at the top 😭🤮
Luckily after a long check it's the only one in both plants
Video #5
24/10/2025
Fresh trimmed nug from the last time now Is 27/10 and i just smoked a fat one of this deliciousness
I can't believe i made this with my hands,It tastes Better than more indoor i smoked
It has everything i want from a good weed,distinct aroma of dessert gassy and Milk which Is unbelievable,present in every toke with a big oil ring and a super white ash
Smoked 1.5g and didn't cough a single time even if the puff Is rich and makes you blow a lot of smoke,It just comes down the throat like a caress
Forgot to make a video of the joint but in the next days there will be a lot of weed to smoke and i will make one for sure
Video #6
First sample of the Coco fresh,beautifully coloured but not ready yet
Checked the trichomes to see if there Is some amber and there Is one amber trichome every 200/300😂
A lot of trasparent ones also ,i wonder if this one will be ready for real on the next full Moon
Pic #1
Close up on the Coco fresh apical Bud
Pic #2
Climate in the spot,absolutely not aligned with this fall period and time of the day,better for me😋
Pic #3 Coco fresh and Pic #4 Coco Milk
Next two visits at the spot and will be the very end of this guerrilla grow season

Likes
1
Share


@EgoDeath
Follow
Really loved this plant and how it grew other then the fox tails, Unfortunately I had to move this weekend and just couldn’t continue growing her and moving at the same time. She still had a good 1-2 weeks left but what is there looks really good will update when she finishes drying.


Likes
36
Share


@pifflestikkz
Follow
Day 99
09/08/24 Friday
Feed today, using de-chlorinated tap water pH 6, no plagron products this week due to seeing nute burn.
But she has bounced back yet again from a heavy defoliation and topping last week.
Trying to keep her small enough to flip in the tent 🤞
Day 100
10/08/24 Saturday
Picture and video update ✌️ 💚
Day 101
11/08/24 Sunday
De-chlorinated tap water pH 6 today again with calmag.
Day 102
12/08/24 Monday
De-chlorinated tap water pH 6 today again with calmag and Plagron PK13-14 5L 10% run off
Just trying to maintain her still untill my dragon has finished 🤦♂️
Thriving 😍✌️💚

Likes
3
Share


@Thirteen13
Follow
Looking really good. And got like this crazy mango smell like that solero icecream ... 🤤🤤 They are in day 38 blooming now.. So 17 to 20 more days till pey