
Likes
Comments
Share

@budnbrewski
Follow
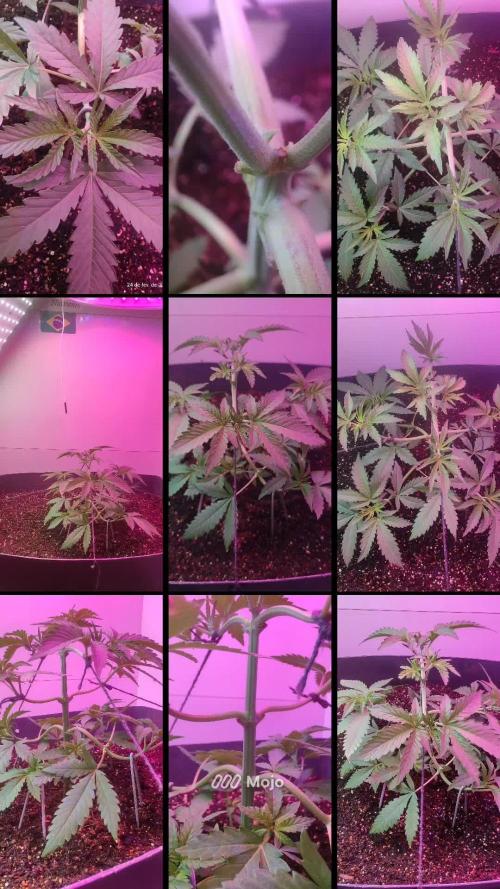
I made these seeds myself, letting the Male pollinating the Female in the same tent. I dropped pollen with a paintbrush on 2 different occasions, then shook the male over the female a couple times as well.
Harvested most the seeds after the female plant died of thirst, around Bloom Day 65-67, but some earlier around Bloom day 53-55.
These seeds were soaked then direct sowed. Originally using 6 seeds but settled on 10. Success germination rate of 100%.
Bred by Dark Horse Genetics, purchased Chem Berry D from Parkland Flowers then reproduction by moi.
Who knows where this project will go. I collected a whole bunch of seeds, they seem to be very healthy.

Likes
6
Share


@TerpTurtle
Follow
Week 4 flower 4x4 #1 | Scat Queen, Oreoz, Cookies and cream
, Week 1 flower 4x4 #2 | Scat Queen & GYAT

Likes
73
Share


@Roberts
Follow
Lilly x White Widow is doing great. She is bulking nicely with a frosty coating. She really loves the Spider Farmer G5000/UVR40 lights. She is due for a solution change soon. I may try to stretch it out till bulking is over. I want her to be juiced to fill in good, and dense. Thank you Spider Farmer, Athena, and Ripper Seeds. 🤜🏻🤛🏻🌱🌱🌱
Thank you grow diaries community for the 👇likes👇, follows, comments, and subscriptions on my YouTube channel👇. ❄️🌱🍻
Happy Growing 🌱🌱🌱
https://youtube.com/channel/UCAhN7yRzWLpcaRHhMIQ7X4g
Spider Farmer Official Website Links:
US&Worldwide: https://www.spider-farmer.com
CA: https://spiderfarmer.ca
UK: https://spiderfarmer.co.uk
EU: https://spiderfarmer.eu
AU: https://spiderfarmer.com.au
G5000 Light Amazon Link:
amzn.to/4643esa
UVR 40:
https://www.amazon.com/dp/B0BR7SGTHS
Discount code: saveurcash (Stackable)

Likes
24
Share


@DeepRootsGrowTrees
Follow
SWISS DREAM ROSE🌹 CBD AUTO
KANNABIA SEEDS
WEEK #5 Overall June 23rd-30th
Week #2 Flower
This week I had to adjust the feeding a little as she got a few burn spots on the leaves new organic soil and nutrients so learning what the plant wants and doesn't want.
Stay Growing!!
Kannabia.com
SWISS DREAM RIDE🌹 AUTO


Likes
5
Share


@DaddyPrime2
Follow
5/07/24 day 15
I was worried with how small she is, I started her a little early for outdoor so she hasn’t been getting proper lighting but she’s not too far behind other plants at this age. Hopefully she’s set her roots deep and is ready to grow upwards
5/11 she’s loves the sun so much. I was worried about her but she’s gonna be fine 🌱
5/12/24 I gave her a tsp of Terp Tea Grow 711. This last week she had grown very well, she has 3 nodes total and is working on more


Likes
13
Share


@gadjoo
Follow
🔵⚪️🔴
Quand est-ce que la plante va arrêter de grandir ? La légende dit "Jamais". Je ferais la défoliation cette semaine je pense. Le bio-filtre est installé. Je monte l'engrais Bloom à 4ml/L. Pulvérisation du "Blooming H", un stimulateur de floraison, hâte de voir le résultat, surtout vu les prix des boost chez cette marque. J'utilise un "nano spray gun" pris sur Aliexpress pour 13€. Le PPFD va de 400 pour les têtes les plus basses à 1500 pour les plus grandes. J'espère que les photos vous plaisent !
🦅🇺🇸/🇬🇧🦁
When will the plant stop growing? The caption says "Never". I will do the defoliation this week I think. The bio-filter is installed. I increase the Bloom fertilizer to 4ml/L. Spraying "Blooming H", a flowering stimulator, looking forward to seeing the result, especially given the prices of boosts from this brand. I use a “nano spray gun” bought on Aliexpress for €13. The PPFD ranges from 400 for the lowest heads to 1500 for the largest. I hope you like the photos!

Likes
22
Share


@BruWeed
Follow
☘️08/11 - Empieza su primera semana en Etapa de Floración.
☘️Me sorprendió lo rápido que creció en altura en pocos días.
☘️Su desarrollo viene de forma correcta sin ningún tipo de inconvenientes.
☘️Estos días seguiré subiendo más imágenes de como viene su crecimiento.


Likes
10
Share


@MrJones
Follow
Original Sensible Seeds White Chrystal Meth Auto
🔸🔸🔸04.20.23🔸🔸🔸
Day 51 - Above Ground - Target 65 Days
📝Saturday 06.10.23 - As this week comes to an end, I am seeing signs that the plants need a bit of calcium, so today was a topdressing day with a 70/30 blend of Bloom to Grow, watered in with H20 PG to 6.2 with CalMag at 5ML per Gallon of H20.
📝Thursday 06.08.23 - Watering with H20 PH @ 5.8/6.5 the buds on these girls are just getting crazy fat!, the new light setting is doing very well, and the plants are praying hard, and the Medic Grow Smart 8 Flowering Setting 1.
🔸🔸🔸🔸🔸🔸🔸🔸🔸🔸
▪️Grown By: MrJones
▪️Medic Grow Smart 8 LED / Settings 60% & V1
▪️@medicgrow420
▪️@originalsensibleseeds
▪️@gaiagreenorganics
▪️Soil - ProMix HP
🔸🔸🔸🔸🔸🔸🔸🔸🔸🔸
📝The taste and aroma of White Crystal Meth Auto are equally appealing as her shining stunning looks and hard-hitting effect. The taste and aroma are a throwback to the Old School, Skunky with herbal and citric tones, and overall a great strain for making hash or rosin. These tantalizing flavors and aromas are conjured up from an exquisite formation of terpenes the earthy myrcene and the floral essence of terpinolene being the dominant, a mix of caryophyllene and pinene combine their tones to produce the musky citric scent.


Likes
10
Share


@yamadafakka
Follow
Alweer het einde van week 3 bereikt zonder problemen. Na de snoei aan het begin van de week, hadden de dames zich de volgende alweer hersteld en waren de topjes alweer fors groter.
Ik ben echt tevreden over de genetica van de Powerplants.
Ze drinken inmiddels ook veel meer bij de 0,5 liter per dag staan de potten de dag eropgewoon weer droog!
De voeding gaat naaar e.c. 1.8 en ik voeg op iedere 10 liter ook 10 ml (Fmax) xl cell bij. Ik ben benieuwd of er mensen ervaring hebben met een hogere dosering?
Antwoorden graag in de comments!
Ik had nog wat spiegeltjes over en die heb ik maar aan het cob frame bevestigd om het strooilicht terug te kaatsen. Baad het niet, dan schaad het niet zeg maar.
Ook de ventilatie een upgrade gegeven met een grote zwenk ventilator aan het plafond.
Ik ga denk ik ook maat wat roof wantsen aanschaffen als pestcontrol, voordat ik last krijg van ongenodigde bezoekers!

Likes
28
Share


@Haoss
Follow
A new plant was born, thanks to the seeds of Sweet Seeds, I hope the best girl will grow up


Likes
2
Share


@Monks_Garden
Follow
It down half the closet sherbet autos half left got about 2-3 weeks on them. Any questions feel free to ask n comment 🤙

Likes
2
Share

@Nocone_Purple
Follow
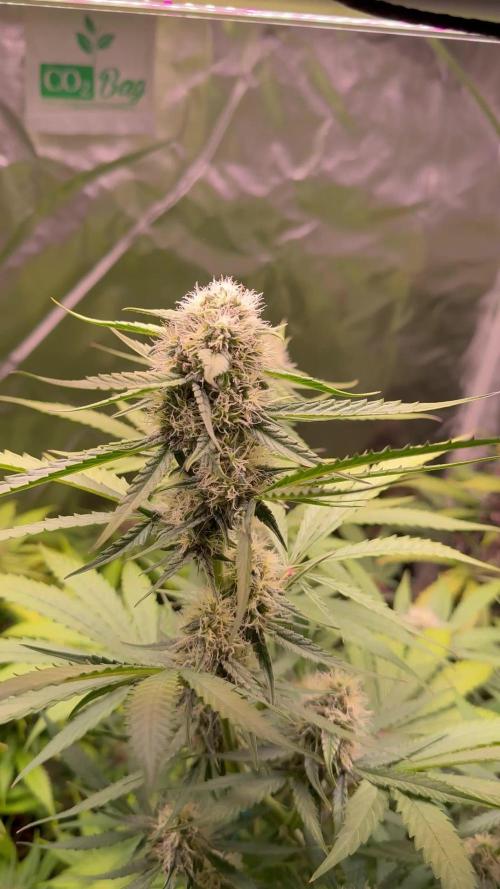
This week the Epsilon F1 is moving deeper into mid-flower. The bud sites are stacking well along the branches and calyx development is becoming more visible. Trichomes are starting to cover the flowers, and the overall structure looks very healthy. At this point I’m still running Big Bud in the feed, since the plant is in the phase where it needs maximum phosphorus and potassium to build size and density. Overdrive will come later, once the flowers are more developed and closer to ripening. For now, the Epsilon F1 looks on track and should start to gain serious weight in the upcoming weeks.
Processing
Likes
39
Share


@King_Geedorah
Follow
Had to start a new week early for the good news!! TRANSPLANT WEEK!!!! Let me just say that in such a short time these roots have grown crazy!! I have been using intermittent watering techniques letting it dry out thoroughly and doing a deep slow watering. Turns out that the deficiencies I was seeing was not from the mixture that I was using but from the fact that the roots were searching out new soil!. Dec 18 Plants are Great!! No transplant shock 😲 Jaeger and mimosa both grew 2 inches in two days! I'm needing to get them to flowering soon going to give it a few days. I topped mimosa and pp several weeks ago and they are fully recovered. December 18th received my care package from NPK industries of their raw line super stoked to use it and going to utilize on one plant to track grow progress versus the Humboldt secrets! Stay tuned!!
Dec 21. Watered all of them with nute mixtures. Decided that from now on PP is going to be only NPK products so I can compare their growth and flower development am so excited!! LST all of the plants to equal sizes and down to the tallest branches I see lots of potential cola forming! I also defoliated to give the buds a bit more light.
I received some Great White Micro and am getting some big foot from the PNW I'll be cutting into the roots and doing a real review after I chop. I have experience with mycelium and can give this a good opinion!


Likes
8
Share

@k0nz1
Follow
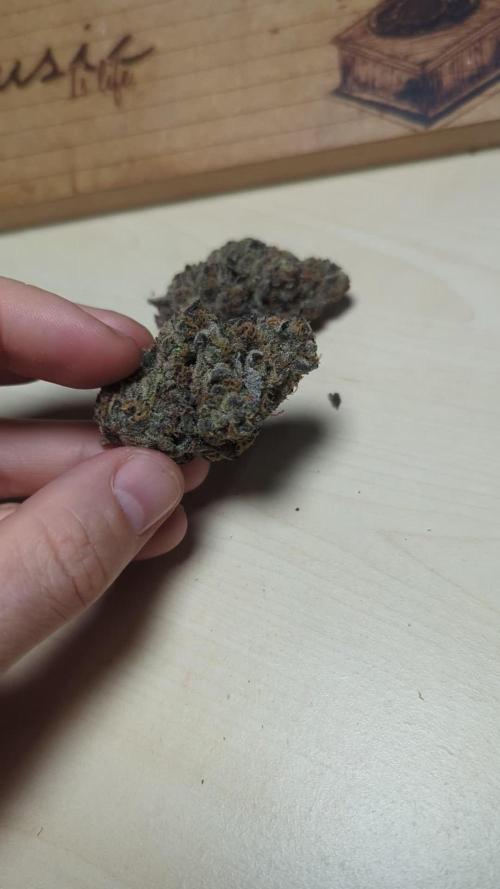
Hang dry 12 days by 60/60
Then cured with the new vivi cure Packs. They did a great Job. Final product is super smooth and tasty.