The Grow Awards 2026 🏆
Likes
Comments
Share
Gracias al equipo de Sweet Seeds y a Marshydro, sin ellos esto no seria posible. 
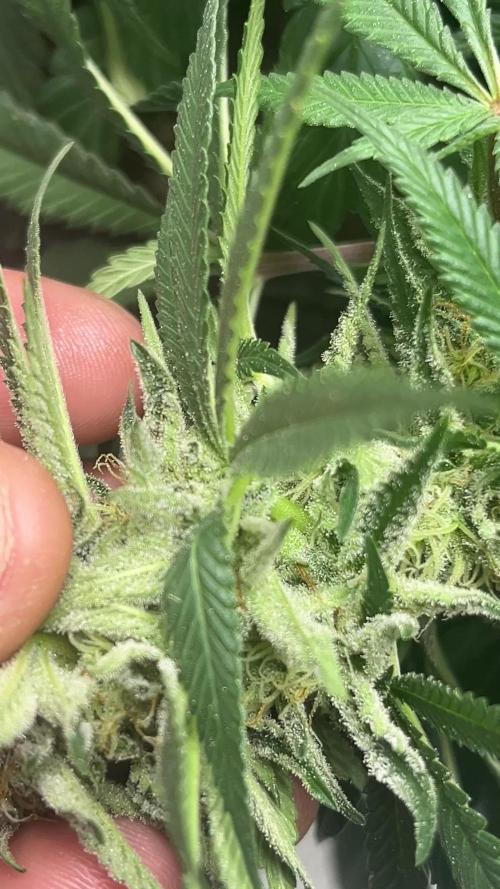
Excelente hibridación de dos de nuestros mejores clones élite de genéticas procedentes de USA. En el cruce interviene un clon seleccionado de San Fernando Valley OG Kush, caracterizado por un agradable y complejo aroma con fuerte presencia de limón procedente de la Lemon Thai que interviene en el cruce original de las OG Kush. El otro clon élite que interviene en el cruce es una Kosher Kush, otra genética OG Kush muy apreciada en la zona de Los Angeles y alrededores (California). De aroma muy agradable y penetrante, con tonos originales OG Kush muy alimonados y tonos de disolvente, pinceladas de especias, maderas y ciprés azul. El aspecto de las plantas es de híbrido índico-sativo con predominancia sativa. Estas variedades americanas con fuerte presencia del terpeno limoneno son muy apreciadas en USA para la realización de extracciones cannábicas. 🌻 🚀 Consigue aquí tus semillas: https://sweetseeds.es/es/semillas-fotodependientes/2345-san-fernando-lemon-kush.html 💡 Mars Hydro TS 3000, como la lámpara de cultivo LED más grande de la serie TS, ofrece suficiente cobertura para un área de 4 × 4 pies con un precio asequible y rendimientos de calidad; a cambio, se puede aplicar tanto al cultivo doméstico como al cultivo comercial. Potencia - 450w Cobertura Vegetal – 5×5 pies Cobertura de flores - 4 × 4 pies La opción abrumadora para la mayoría de los productores que la aplican en tiendas de campaña. Consigue aqui tu lámpara: https://marshydro.eu/products/mars-hydro-ts-3000-led-grow-light/ 📆 Semana 9: Finalizando la etapa de engorde, esto va que vuela 😍, la resina esta cada vez mas presente ❄️ , los cogollos comienzan a madurar Esta semana estará el TS-3000 de MarshHydro al 80% y 30cm de distancia. Se estan desarrollando mejor que nunca, con una floracion mucho mas rapida, noto una gran mejoria gracias al Marshydro TS-3000. Continuo con defoliaciones Estoy impresionado con esta planta 😍🔥😎 A partir de ahora agua, creo que pronto estara lista
Likes
11
Share
A principios de semana se aplico poda apical en las 6 plantas y ayer defoliación.
Likes
2
Share
Flower starting up nicely already starting to turn purple these ladies are looking great. Starting to feed with some bloom but still giving low doses of Veg nutes in the 1st 2 weeks for growth
Likes
5
Share
GERGrowDesigns Welcome to Veg Week 4 of Divine Seeds Auto AK-47 XL I'm excited to share my grow journey with you all as part of the Divine Seeds Autoflowering Competition 2025. It's going to be an incredible ride, full of learning, growing, and connecting with fellow growers from all around the world! For this competition, I’ve chosen the Feminized Automatic strain: Auto AK-47 XL Here’s what I’m working with: • 🌱 Tent: 120x60x80 • 🧑‍🌾 Breeder Company: Divine Seeds • 💧 Humidity Range: 60 • ⏳ Flowering Time: 59Days • Strain Info: 21-24%THC • 🌡️ Temperature: 26 • 🍵 Pot Size: 0.5l • Nutrient Brand: Narcos • ⚡ Lights : 200W x 2 A huge thank you to Divine Seeds for allowing me to be a part of this amazing competition and Sponsoring the Strains. Big thanks for supporting the grower community worldwide! Your genetics and passion speak for themselves! I would truly appreciate every bit of feedback, help, questions, or discussions – and of course, your likes and interactions mean the world to me as I try to stand out in this exciting competition! Let’s grow together – and don’t forget to stop by again to see the latest updates! Happy growing! Stay lifted and stay curious! Peace & Buds!
Likes
13
Share
@Lazuli
Follow
because shes so huge i can not move her an inch.. so no flush happened and i went straight in to ripen feed. I hope she finishes up by next week because i have to cut buds away every day with mold. Lol its still going to produce a lot
Likes
1
Share
🗓️ Week 5 – Nutrient Refresh, Net Adjustment & Light Optimization Arrived in week 5 with a complete nutrient solution refresh. This time using 2.5 ml/L Plagron Hydro A & B and 1 ml/L Plagron CalMag Pro, mixed into a total of 13 liters of water (the bucket turned out to be bigger than expected, according to the Amazon specs 15L). pH adjusted to 5.5 using Hesi pH-. During the water change, I lifted the SCROG net briefly to check on the roots – they’re looking great: bright, healthy, and strong. Net was repositioned afterward. The light is now running at level 8 out of 10, delivering around 800 PPFD in the center and about 700 PPFD at the edges, with a distance of 35 cm to the canopy – everything’s well dialed in! ————— 🗓️ Woche 5 – Nährlösung, Netz & Licht-Feinschliff In Woche 5 gab’s ein frisches Nährstoff-Update: Die komplette Lösung wurde ausgetauscht – diesmal mit 2,5 ml/L Plagron Hydro A & B sowie 1 ml/L Plagron CalMag Pro auf insgesamt 13 Litern Wasser Eimer misst mehr als gedacht – laut Amazon-Beschreibung 15L. Der pH-Wert wurde auf 5,5 eingestellt mithilfe von Hesi pH-. Beim Wasserwechsel habe ich das Scrog-Netz kurz nach oben gezogen, um den Wurzelzustand zu checken – sehen super aus: hell, kräftig und gesund. Danach das Netz wieder sauber positioniert. Die Lampe läuft nun auf Stufe 8 von 10, was etwa 800 PPFD in der Mitte bringt. Am Rand sind’s ca. 700 PPFD, bei einem Abstand von 35 cm zur Pflanzenspitze – also alles gut im grünen Bereich!
Likes
77
Share
1️⃣2️⃣ Final Week Flower : 11/05 - 16/05 💡 Light schedule: 24 hours 📏 Lamp To Plant Distance: 60cm ⚡ Dimming: 100% 🌡️ Average temperature: 23,5° ☔ Average humidity: 60% ------------------------------------------------------------- Finally, we’ve reached the final week, and I think they'll be ready by May 16th. The remaining 14 days are reserved for drying. I decided to do one last defoliation, removing all the leaves that were too damaged and allowing the light to penetrate more deeply. There’s a mix of photos showing them before and after the defoliation. Speaking of light, last week I changed the cycle, and until the 16th, they'll be on 24/24 light—first time I'm trying this method instead of the usual 2 days of darkness. On the 16th, I'll take them out of the tent and snap the final photos. It hasn’t been an easy journey... Right at the start, during germination, while handling the pots, I dropped the light on top of them. I had to germinate a new seed, which became R03. Later, during the vegetative stage, I dropped the R02's pot, affecting her so much that she's now on the balcony and half the size of the others (to be fair, R01 and R03 grew so much that they completely took over the tent 😅). Then there was my excitement when preparing the soil, which ended up being a bit too hot with nutrients, causing both plants to yellow earlier than expected. I tried to correct this by watering without nutrients for a while; it didn’t help much, but I believe if I hadn’t done that, things would’ve been worse. Even with all that, they turned out to be big girls, with plenty of bud sites, and they’re now entering that final phase of fattening up.! Let’s see what they can do in these last 5 days! 💚 ----------------------------------------------------------------- #13/05/2025 I can already see some final improvements, hehe. I watered them one last time with 3.5L of plain water each, because on May 16th, or at the latest the 17th, it's time to cut and put them to dry for the remaining days of the contest. Everything is super tight around here, but we’re going to make it! 💪🏻 I'm thinking of doing a wet trimming when I cut the plants and put them to dry. This way, I can speed up the drying process and gain an extra day or two with them in the tent. 👨🏻‍🌾 ---------------------------------------------------------------------- 16/05/25 I'm going to leave them for one more night, from the 16th to the 17th. Tomorrow they'll be chopped, and I'll create a week for the final photos before the harvest weeks with the dried buds! So, it took 12 weeks from seed to harvest. See you tomorrow 🤛🏻💚
Likes
Comments
Share
After three weeks in the solo cups I transplanted to 1 gallon pots and three days later I noticed yellowing on one of the plants so in 16oz of water I mixed in 1/4 tsp of Epsom salt and gave it to both plants in fear of magnesium deficiency but the other plant is thriving and growing strong. YouTube video:
Processing
Likes
5
Share
Had to change the lamps bc some changes were made in my other tent.
Likes
5
Share
4/17: More of the same as usual.......l can only imagine what she would’ve been doing with the needed light instead of 12/12 4/18: For the remaining time until I harvest her in like a week or 2 I’m going to take her out the tent during light off period so she can receive much more needed light
Likes
6
Share
After you found some good sector and clone it you let the mycelium grow and fill almost all the petri dish like I did last week. So now you're ready to move forward. Making grain spawn!🍄🍄 For grain you can use Organic Rye Berries, but you can also get away with wheat berries, or brown rice or even corn kernels(which I used myself) ! And you'll need some mason jars or honestly I used some jars that I had home just clean them very well and sterilise before using Making a grain spawn can be broken down into 6 easy steps. 🍄Hydrate Grain By Soaking 🍄Make Specialized Lids 🍄Simmer, Drain and Dry The Grain 🍄Sterilize 🍄Put your agar in the jar 🍄Colonize 🍄Soak the grain by placing it in a bucket, covering in water, and leaving it for 12 -24 hours. Easy. 🍄Drill 1 hole on top of the lid. Right in the center and cover with a small dab of high temperature silicone sealant, and leave it overnight to dry. And your jars are done. There other diff types for different methods like liquid culture etc. But I'm just going roughly through what Ive done. 🍄The next step is to simmer the grains on the stove. This will thoroughly hydrate the grains, and will soften them to make them easier for the mushroom mycelium to consume. Cook soaked grain on the stove for about 15 minutes. You don’t want to cook it too long, because eventually all the grain will crack and you’ll get some mushy grain spawn. We don't want that. 🧐After the grains have simmered on a low boil, you’ll need to drain them off. What I did is I drop them in the sink with the drain cover on. The grains will drain over an hour or so, after which you can go ahead and fill your jars. 🍄Once your jars are filled, they need to be sterilised.This kills off all the other nasty contaminants in the grain cover the lids in tinfoil (to prevent water dripping into the lid) and then just pressure sterilise them for about 90 minutes at 15 psi. 🍄After that let them cool down. Get your SAB, wipe down the walls with some alcohol wipes and place the jars inside. And wait untill they will be warm to the touch... not hot and painful 😤patience is key. Bring in your plates that had been stored by you in a dark place. And what u have to do is sterilise your scalpel and just accurately and efficiently decide your mycelium into about 10 pieces and quickly place them in your jar. And complete for every jar u make. You have to be very quick. The more you keep you're jar and your agar plates lids open the more cans they will get contaminated. There certain technics you can see online.. 🍄Ones you're done close all your jars lids tight and Jake your jar so the mycelium pieces will mix around the jar and place them in the dark place to colonize. And just keep waiting... 😅 Untill the mycelium will conquer your grain. Keep your eyes on the jars, any weird smells or colour during the waiting time.. because that would mean you got a contamination going on. Oh yeah and when about 55% of your jar is filled with mycilium shake the sh*t out of it so it will break the mycilium inside and make spread more faster.
Likes
26
Share
Week 2 of flower is in the books and all 3 girls are looking extremely healthy. Perfect time to start packing on the weight. There are tons if bud sites that will get tons of light due to all the defoliation I've done. I've never defiliated plants this much before and I'm curious to see the difference in bud production below the canopy level. I love trying new things and experimenting with these plants. Always coming up with new ideas on how to do things and making things easier along the way. Can't wait to see how much I'll get off all 3 and see the difference in phenotypes.
Likes
15
Share
160 days of life harvested on day 63 of flower. I don’t have photos of her vegging but she started off great. About two weeks in, she started having some major issues. Her leaves started atrophying, curling up at the borders, growing 3 finger leaves, all new growth was deformed and twisted and growth in general almost stopped completely, to what I suspect was from broad mites. These fuckers are nasty! I dm’d my local grow shop and tried out some Neem Oil. I diluted it in water like they recommended and sprayed that baby every day for one week, then every other day the following week, then down to once a week. I sprayed her leaves stem and surface of the soil. I also cleaned the entire grow space with some bleach solution. Doing this allowed her to really bounce back, growth started to take off again! So I vegged for a few more weeks and trained her as much as I could to keep her uniform but short, she responded well to this. During flower, she was very happy. I had two main issues during this time, one was being too hot in Nitrogen and a week of very hot temperatures which burned her a slight bit, although she didn’t seem to mind much. I also could’ve continued a once a week spray of Neem oil because I think they might’ve started to come back on the lower and younger leaves that weren’t getting much light. Overall it was a dope grow and hope to do better on the next one!
Likes
19
Share
@DrLaggis
Follow
🌱 Day 43 - Beginning of the Third Flowering Week 🌱 Hello grow friends! 🌿 Today marks the start of the third week of the flowering phase. This week, I’m trying to adjust my nutrients a bit. I plan to slightly increase BioBizz Grow, as well as BioBizz Bloom, according to the feeding schedule. 🌱💧 I’m continuing to prune and thin out the plants a little each day, aiming to keep them stress-free. ✂️😊 The terpenes and buds are developing wonderfully so far, but I’m still struggling with very high humidity levels. 🌡️💦 Since my grow setup is on the second floor and we’re currently experiencing humid temperatures here in Germany, it’s been a challenge. I’m trying to reduce the humidity from 62% down to 50% during the day, but it’s proving difficult. 🌬️📉 I’ll keep you updated on how things progress! 🌿✨ 🌱 Day 47 - Everything is Going Well 🌱 Watering and Nutrients Today, I watered and fed the plant again. 🌿💧 Each plant received 1 liter, which is about 10% of the pot's volume. The plant is responding well to the nutrients, and growth is steady. Defoliation and Light Exposure I’ve done some light defoliation to ensure that every part of the plant gets proper light exposure. ✂️💡 My goal is to avoid any shadowed areas, allowing the buds to develop fully. Temperature Management The temperature is still quite high, reaching 27-28°C during the day. 🌡️🔥 I’m finding it difficult to bring it down, but the plant seems to be handling it well. To maintain a healthy environment, I keep both the fan and the exhaust system running on the highest setting, ensuring good air circulation. 🌬️🔄 Humidity Control Currently, the humidity is sitting at around 45-50%. 💧 It’s not perfect, but I’m monitoring the plant closely and making adjustments as needed. Careful Defoliation I continue to remove one or two leaves each day to minimize stress on the plant. 🍃🌿 This slow, careful defoliation ensures that the plant stays healthy while making sure all buds have access to light. Guard Dogs on Duty My dogs took a peek into the grow tent today and are now keeping a watchful eye over the plant. 🐕🌱 They’re doing a great job of “guarding” it! 🐾 I hope you enjoyed this update! I’ll continue to keep you all informed, and don’t forget—I post daily update pictures of the plant! 📸🌿 Stay tuned for more!
Likes
8
Share
@LoudLemon
Follow
She is officially on the 6th week now and here was how week 5 went! It was the most dramatic week so far, really started to fill out now and even the popcorn buds and starting to get some weight too. Now it’s just waiting for her to finish swelling then hopefully we will see her nearly ripened by end of next week! Smells fab! I can understand where the cookie idea comes from, my room smells like I have a warm batch of a variety of biscuits and cookies fresh out the oven cooling off!
Likes
2
Share
@Abreuvoir
Follow
18 september 2022 flowering: week 8 -now 2 weeks of water only -the 10 heavy top heads need assistance -I used wires to keep them up -Harvested the smaller-lower-more mature branches -- 154g wet -felt like it would speed up maturation of main heads -also fun having less mature weed
Likes
1
Share
Just starting vegetative stage as it looks like we made it through a week of seedling stage very nicely ! Watering about an ounce every 36 hours! In all these plants are like 10 days old. Keeping them in ac germ kit ppfd for smaller ones is 185 and other one is 200! Have added nothing just going with the original 75% promix ap with 25% worm castings! See you next week
Processing
Likes
1
Share
@ho99o9
Follow
harvest soon day 83 - turned off the light