The Grow Awards 2026 🏆 


Likes
Comments
Share
@Kakui
Follow
Exotic Genetix: Event Horizon (x3) y Toasted Toffee(x3).
Thug pug Genetics: Peanut Butter sunset(x3).
Una ves sean transplantadas a su macetero definitivo(5 litros) se comenzará con riego automático, drip to waste, y protocolo Crop Steering.
20 Octubre(15:30): 9 semillas en remojo, solución de 2 partes de agua de ósmosis + 1 parte de peróxido de hidrógeno 3%, 5.8pH, 0.6EC, 28°C~30°C. Antes ser puestas a remojar se lijaron las semillas para favorecer la absorción del agua.
21:30: puestas en toalla de papel con la misma agua de remojo, dentro de un contenedor de vidrio hermético y sobre una alfombra de calor a 28°C~30°C, para aumentar la actividad metabólica.
21 Octubre: Pre carga del coco, con solución de nutrientes Athena en 2.0EC y 5.7pH, saturación hasta lograr drenaje, el drenaje fue de 1.5EC y 5.6pH.
21:50: Todas las semillas presentan radicula de distintos tamaños(1cm aprox) son inmediatamente pasadas al sustrato.
22 Octubre: 21:10, se aprecian todas ya brotando, se mantiene el ambiente en 26°C~28°C y 70%+ de humedad.
23 Octubre: 9/9 semillas brotadas, se ven algunos Cotiledones.
24 Octubre: (9:30)8/9 cotiledones abiertos, altura entre 3cm~5cm, etapa de plantula iniciada.
Toffee n3 se atrofió por mala manipulación, espero que crezca aunque sea lento, si no, tendré que seguir solo con 8 plantas.
25 Octubre: Toffee n3 está viva!!! Estuve a punto de quitarla, y está mañana apareció sin su capucha, cotiledones afuera. Yujuuuu!!
26 Octubre: hoy tuvieron su primer riego con nutrientes Athena, 2.0EC y 5.8pH. Se regó hasta alcanzar drenaje, el drenaje fue de 1.9EC y 5.7pH.
27 Octubre: Se desarrollan a buen ritmo, algunas han estirado más que otras, alturas entre 4cm~7cm.
31 Octubre: Segundo riego, 120ml casa una, 2.0EC y 5.8pH, runoff de 2.3EC y 5.7pH.
2 Noviembre: Creciendo a buen ritmo, alturas entre 5cm y 9cm.
4 Noviembre: Riego 180ml cada una, 2.0EC y 5.8pH, runoff 2.8EC y 5.8pH, desde ahora se regarán más seguido, removí las primeras hojas, solo por comodidad para regar, de igual manera los primeros nodos y esas hojas se terminan podando pronto.
8 Noviembre: Riego 2.0EC, 5.8pH, 240ml cada una para aumentar el runoff, valores de runoff de 3.0EC y 6.0pH. Alturas entre 9cm y 14cm.

Likes
69
Share
@ClubRiot
Follow
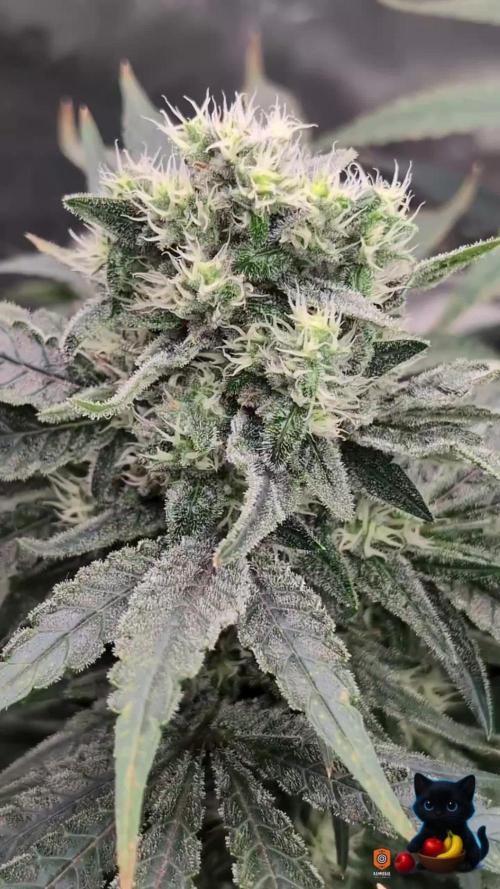
Kalini Asia by Zamnesia Seeds
Week 15
11L Pot
LED: SP250 (245W) for Flow. Stage
Canna COCO
Mineral Nutrients:
👇
Flawless Finish: 2 ml/L

Likes
21
Share
@ArtisticGrown
Follow
Sorry I missed a few weeks was outta town and not able to update! Things hav been going well! Took some time for em to start growing fast! But they are growing fast! Gonna need some rest from the topping and training from the bud clips. I think I got the manifold line down for all the plants! The og kush I accidentally fimmed it was dramatic lol but made it thru and still growing strong! Makes me laugh fim stands for “fuck I missed” but all this is trial and error for me! Any advice is appreciated! “ happy growing”


Likes
2
Share
@Comfrey
Follow
Diese Woche musste ich am Ball bleiben, ein krasser Stretch machte ein fast tägliches LST und eine dezente Entlaubung notwendig. Um einen schönen Ertag für zwei zu generieren, habe ich mich aufgrund der Lage unseres Balkons entschieden, alle Pflanzen kräftig runterzubinden. Zwei Ziele habe ich dabei verfolgt. Zum Einen haben wir hier maximal sieben Stunden mit direkter Sonneneinstrahlung. Durch LST erhoffe ich mir eine gleichmäßige Blütenbildung und Konzentration von Terpenen. Zum Anderen liegen wir mit unserem Balkon mitten im Dorfzentrum mit regem „Publikumsverkehr“. Das deutsche Cannabis Gesetz sieht vor, dass der Anbau nicht öffentlich einsehbar sein darf. Ohne das herunter Binden könnte man die Damen allerdings sehen. Die Anordnung der Pflanzen ist auch so vorgenommen worden, das sich eine Art Sonnenfalle bildet. Jede Pflanze und insbesondere die Blüten bekommen das maximal Mögliche an Sonneneinstrahlung. 🌞
Gegossen wird nun morgens und abends nach Gefühl.
Purple Punch Auto fühlt sich ganz wohl hier. Die Vorblüte sieht vielversprechend aus.
Processing
Likes
9
Share
@LittleBigTrees
Follow
These are about a month old.
I've no idea what they are as there from a long time ago and were mixed with a few varieties of autos and photoperiod. Hopefully they work out and are not Spanish sativa as that just gives me a headache after more than 0.25g in a day?? Anyone else ever have that?
Powerplant does the same if I use more than 0.50g in a day.
The only two strains that have that effect on me!
Likes
99
Share
@FatnastyzBudz
Follow
Shes kinda dark, cal/mag dropped to .5 gallon.
I hit her with Game time and she burned a tad. But shes good. Only getting cal/mag and green sensation.
Had to tie some of her branches up, sagging badly.
She is freaking rocking! Now if the RH will go away. Darn rain!

Likes
4
Share
@mad_nad
Follow
Here we go!
The plants are still stretching!
All plants are mature now and develop small buds!
Last day of the week I watered them with TOP CROPs “BUD PACK” and gave them the minimum recommended dosage.
I’m very interested if the TOP BUD flower stimulator will show some immediate results.
🤞
Likes
23
Share
@Horseluisweed
Follow
Básicamente lo mismo, aunque está semana pilló bastante más horas de luz(tuve que irme fuera de casa dos findes seguidos, en los cuales la dejé con la luz encendida full 24/7 en la caja)
Como experiencia utilicé café reposado 48h para "alimentarla" e intentar bajar el Ph de la tierra (coco ph6+hummus ph7+vermiculita ph8= ph total 7)
El otro experimento fue cubrir la tierra con coco para que el tallo eche raíces y aprovechar su espigamento!
Las horas de luz solía dejarla 8h en bombilla mientras duermo, y el día la pongo en la ventana a que tome el fresco, pero apenas tiene luz directa, me da la sensación que crece más rapido cuando vuelvo del finde, estoy replanteandome tenerla más tiempo en la caja con luz, porque la veo aún pequeña, y quizá ponerle un ventilador de pc o algo🤔..veremos, aún tengo el papel de aluminio al lado de la caja y ni se lo he puesto, con eso os lo digo todo☝️🎃


Likes
3
Share
@Therbalist
Follow
Completely back into Veg again growing slowly for some most are thriving!
Had around 20+ seeds off a zkittles and chocolate skunk will be using them indoors on my next cupboard grow!


Processing
Likes
5
Share
@Bombtofu
Follow
Week two went well. Just maintaining humidity still and a good temp. Watered plant two on day 10. 200ml with 2.5ml added fox farm grow big. Also re wetting the sponges I have in them daily for humidity.

Likes
11
Share
@THe_Cannadaddy
Follow
This is my 2nd ever grow, went from seed / soil to coco / clones LOL
(If I can organize my first grow pictures I will upload that at some point. It was definitely a learning experience and I dealt with mites and a hermie but managed to beat the odds and came out with some amazing bud - all from bag seed.)
*** Clones purchased and replanted same night Feb 28, 2021 @cloneguyindustries ****
- HEPA FPR 10 filter installed in the only air inlet at the bottom
- Using AC Infinity Cloudline T4 - 4" exhaust with digital controller (thermometer / hygrometer) and carbon filter
- 1 bluetooth thermometer / hygrometer
- 1 8 inch fan above lights running 24/7
- 1 dehumidifier running 24/7
- 2 cameras - one monitoring inside the tent and one the AC Infinity controller outside the tent so I can check them on my phone wherever I am
- I am not measuring / monitoring my EC, PPM or VPD levels
- 3 gallon felt pots - NO TRANSPLANT GROW 🤷♂️
Likes
Comments
Share
@Card1Cultivations
Follow
March 17 - 24
Growth is still going very well with lots of LST and defoliation.
Business as usual with nutrients and the Blumat system seems dialed in a I prepare to leave them unattended for 5 days in April.
Near the end of the week I installed a second net.

Likes
2
Share
@mojo1985
Follow
wahnsinnig schnell in der blüte.... und auch wachstum richtig schnell... wollen wir mal sehen was da passiert... bis jetzt unfassbar gut... 🙏💪👍👍
Likes
20
Share
@BruWeed
Follow
Para el lavado de raíz le agregue en total 60L de agua y utilicé Flawless Finish para barrer cualquier residuo que le quede.
En total en humedo tengo 127g de una sola planta. Su olor es muy fuerte y se siente lo citrico.
En estos momentos se encuentran en curado, la corte hace 7 dias aproximadamente.
Se ven muy bien, estan super pegajosos y muy lindos.
Nunca había cultivado una AK-47, muy linda planta y muy conforme con resultados obtenidos. Gracias al banco de semillas Seeds Mafia.

Likes
2
Share
@kissrubb
Follow
Buenas, buenas estamos en la semana 1 de floracion y las plantas comienzan ha estirarse y a mostrar su sexo, hemos aplicado diferentes tecnicas para maximizar la malla de scrog

Likes
6
Share
@burnout
Follow
Day 14 of flower, looking good, lots of budding sites. Papaya Bang Bang stretching nicely, White Gold not as large of a plant. Made some cuttings and waiting for them to root, will be giving some to a friend that does hydro and to a friend that will grow these outdoors.
Likes
3
Share
@LAShugars
Follow
They are all coming along nicely. I’m concerned that they are fading a little early. I’ve used the nutrients may add a bloom booster

Likes
14
Share
@DeaneR
Follow
Week 3 of Flower 😀
I think she has stopped stretching. No new change in height this week.
She is really starting to sugar up and is filling in nicely for 21 days.
Smells nice and sweet so far...reminds me of mandarin oranges.
Time-lapse Film : This film was shot over a six hour period with 299 pictures taken. I started filming 4 hours after lights came on and right after I watered her. I then sped the film up and looped it several times. Enjoy!
Stay safe, and grow on!
Peace,
DeaneR😎

Likes
26
Share
@GoodVibeGarden
Follow
Things are moving right along. She is loving life and starting to frost up. Stacking is nice, And she smells like pungent cheese.
