


Likes
Comments
Share


@Hou_Stone
Follow
Bonne journée tout le monde 💚
❄️❄️❄️❄️❄️❄️❄️❄️❄️❄️❄️❄️
Intensité de la FC3000: 90%
Ventilation : Extracteur mars hydro 6 pouces avec filtre à charbon puissance : 4/10 (24h/24h) + 3 ventilateurs à l'intérieur ( ON 8/24h). ils s'activent à un horaire différent.
Arrosage : Environ tout les 4-6 jours avec 1.5L d'eau. (+ 1gr de bioenhancer/L eau un arrosage sur 2)
Température & humidité : NUIT : 16°C & 70% / JOUR : 23°C & 50%
Mon instagram 🌱❤️️
https://www.instagram.com/hou_stone420/


Likes
37
Share


@DaddyPrime2
Follow
5/27 curious to see where this week ends up at
5/29 the one plant indoors is packing on weight. The one I put outside to finish (possibly stupid) seems to be maturing faster but bulking slower. She's seemed healthy this whole time. Not even a burnt leaf tip
5/31 attempting to take pictures in different lighting to get a better idea for yall viewers

Processing
Likes
14
Share


@rainman
Follow
Ahh shit, here we go again. After 2 month, I'm ready to grow again. This time it's gonna be Lemon AK, cuz its summer you know, not indica time. I'm using same lamp, same DIY growbox but with different reflective material. Gonna use Air Pot , i think it will be better than smartpot, will see. I have chosen some interesting combinating of nutrients for this plant, some from Advanced Nutrients and GHE, hope it works great.
First seed that i started to germinate on 23/6 didnt germinate, i guess it was my fault cuz have put seed in refrigerator, and temperature was bouncing between 7.8c- 14c degrees, i thing it was a problem, so no pretension to fastbuds, you guys are awesome.
Bought a new timer, set to 18/6 light.
3/7 Bought and started to germinate new seed, checked 24 hours later and its already opened, will plant after 48 hours, mb earlier.
7/7 Planted seed today.
9/7 After morning watering and turning on the lights, plant finally sprouted.
10/7 is first day, watering 2 times a day, on morning and evening. About 50-70ml under stem using syringe, rest 400+ml around plant.
Day 2 - 500ml with RootPlus.
Day 3 - 500ml with nutrients.
Day 6 - Switched lights from 18 to 20 hours. Fans are now turned on 24/7. Intake fan gives a plant some nice breeze. Had no time so watered at night, 1L water under and near plant, and another 1.5L all over pot so it can last until tomorrow after's morning.
Day 7 - Plant is showing great progress. No water today. New set of leaves showed up. Very happy with this week.
Peace.
Likes
11
Share


@DimJesus
Follow
Saludos 🙌 completando la octava semana y segunda semana de floración 🙏
Esta semana hubo variaciones de temperatura (como siempre donde vivo) y para resolverla bajé el panel led a 15cm de la planta, ayudó bastante, estaba a 15° temperatura ambiente y dentro del grow estaba 21,4°
Los pistillos crecieron!! 🙏 El crecimiento está comenzando a disminuir poco a poco y el olor aumentando poco a poco kskakaksksksksksksk
Buenos humos 🍃

Likes
28
Share


Likes
33
Share


@StickyFingah420
Follow
Día 88 y penúltimo antes del corte.
Ya se aplicó Flawless Finish para un acabado impecable como su nombre lo indica. Siempre prefiero hacer el lavado de raiz solo aplicando agua en las últimas 2 semanas, pero esta vez lo hice aplicando el finalizador y luego los últimos riegos con agua purificada.
La verdad es que estoy contento con los resultados de esta nena, que es hermosa por cierto, desprende olores ácidos, cítricos, dulces.
Los colores son hermosos y las flores están rebosantes de tricomas, lo que la vuelve muy vistosa.
Es todo por ahora, estaré manteniendoles informados en estos últimos días.
Buenos humos! 👽
Processing
Likes
17
Share


@Majormolasses
Follow
This week I started to realize how much water these lady’s exactly started drinking they are getting so thirsty all the time I’m like non stop giving them water it feels like. They are getting super big Arnie the gal one with two tops is at 17” and helga the shorty with the booty jk. Is 10” but was topped on week 8 I believe so she’s trying to catch up and has been they both where popped from seedling at the same time but are totally different should be the same strain but have different characters about ones smell for sure I love smelling them. 👃

Likes
7
Share


@Mr_nugs_lover_David
Follow
This 5 plants are absolutely gorgeous, they're supper similar to each to each other beautiful leafs and structure, looks like this lady is gonna provide us with beautiful citrussy buds!! Stay tuned everybody! Great autoflowering strain by SPLIFF SEEDS!

Likes
27
Share


@R_Dank
Follow
Nice to get the first month of flowering done! I believe these females will take just over another month, last 2 weeks of additives..

Likes
Comments
Share

@sunshinegroww
Follow
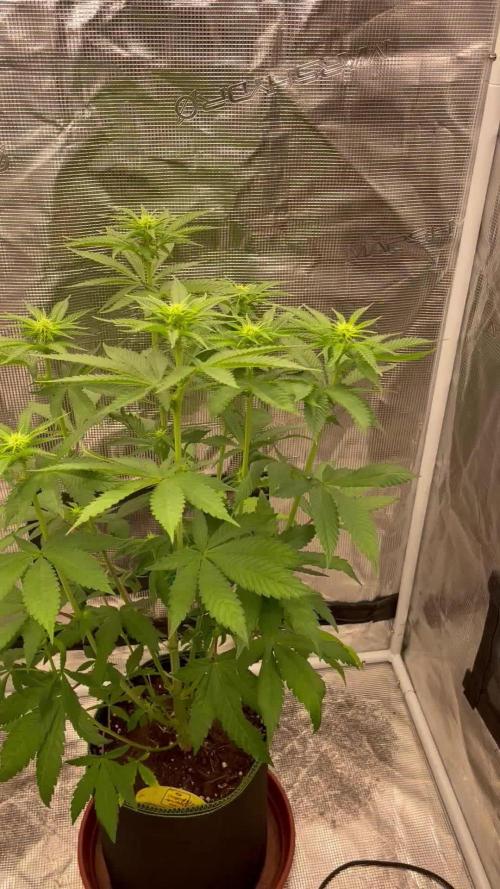
Well i think stretching is finish now she had some light defoliation as RH a bit high looking happy as ever next week lolipopping time and then of to fatten those flowers


Likes
35
Share


@eldruida_lamota
Follow
Vamos familia con la séptima semana de floración de estás Cereal Milk de RoyalQueenSeeds.
La temperatura está en 22 y la humedad actualmente está en 50%.
La cantidad de agua cada 48h entre riegos no cambia, y por supuesto controlando el Ph entre riegos alrededor de 6.5 - 6.2.
Ya se ven bien sanas estas 5 cereal milk, tienen un color y una salud espectacular, y ya están desprendiendo buenos aromas, vemos como van madurando las flores.
Mars hydro:
Code discount: EL420
https://www.mars-hydro.com/
Agrobeta:
https://www.agrobeta.com/agrobetatiendaonline/36-abonos-canamo
Hasta aquí todo, Buenos humos 💨💨💨


Likes
19
Share


@sneakymexican712
Follow
Ok this was my first grow and I made mistakes.
-forgot to buffer coco
- nutrient burn
-started the manlining to early
- probably worried to much about every stage these plants.
-ended up with fungus gnats
And probably appt more I can’t rmeber in the moment.
But i learned so much from all of my mistakes and spent so much time researching and seeing in real time how these plants react and grow.
I did do some experimentation
just a normal top with one blue dream.
I topped twice one another blue dream and did a 3 times topped on all the blue dreams and I see why you should at least top three times the eight main colas and spread out the plant I see some of the buds on the one I only topped once not matured at all because there was minimal light other buds were growing so fat it suffocated it basically. I could have probably defoliated and manliness better but ayy. Beginners wil make
Mistakes and I’m happy with what came out of these girls. Not excited for trim hail but I am at the same time 😅😅

Likes
2
Share


@Kaonoppakorn
Follow
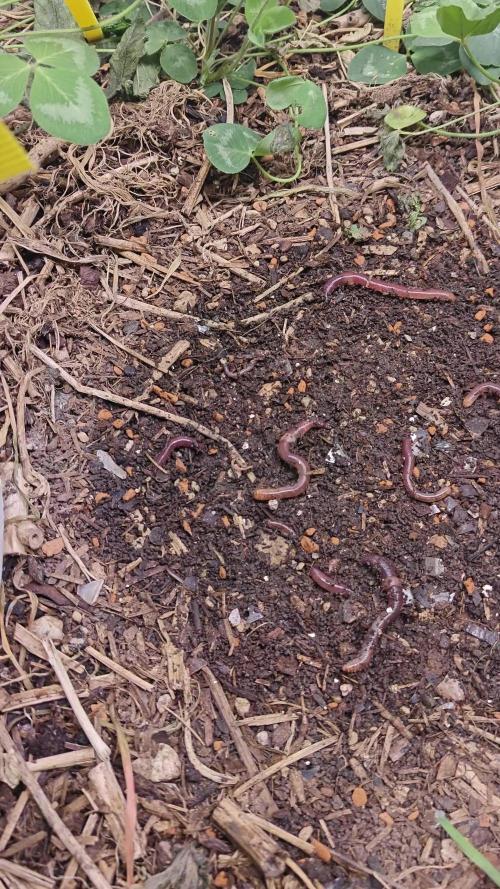
Organic living soil mixed by myself while mixing the local organic matter : )
For example: Earthworm casting / Bat guano / Seaweed power extract / perlite / peat / coco / soil / fungi needed
And water when dry.


Likes
1
Share


Likes
20
Share


@Ghostknife78
Follow
Starting to see pistils and definitely stretching. Everything seems to be going smooth. I'm defoliating slowly, just a couple fan leaves a day. I have a mini dehumidifier coming tomorrow to handle my humidity issues.
I recommend anyone using Maxibloom as a nute to buy a magnetic stirrer to fully dissolve it.

Likes
17
Share


@AestheticGenetix
Follow
7/11 testing testing. harvest update? growdiaries isnt working
9/12 after a 2 month long cure, i can say that this is honestly my favorite weed ive EVER
