
Likes
Comments
Share


@DeepRootsGrowTrees
Follow
MIMOSA by ROYAL QUEEN SEEDS
Week #20 Overall
Week #3 Flower
This week she's doing good just starting to flower so that's always exciting to see no issues this week she's healthy!! Stay Growing!!
Royal Queen Seeds MIMOSA

Likes
Comments
Share


@Ger-Smurf
Follow
Hallo und herzlich Willkommen zurück 😸☀️diese Woche war das Wetter leider immer noch nicht so schön aber das wird schon werden ☀️☀️☀️ ich habe diese Woche bei meinem Auqarium einen Teil Wasser wechsel gemacht , ich benutze einen Teil des Aquarium Wassers für meine Pflanzen. Meiner Erfahrung nach belebt das Auqarium Wasser mit dem Fischmullm und den Microben das Bodenleben. Da reines Auqarium Wasser aber auch nicht gut für die Pflanzen ist meiner Erfahrung nach muss man es mischen. Ich mische 2 Liter Aquarium Wasser mit 8 Liter Leitungswasser. Der Ph des Gießwassers Stelle ich bei jungen Pflanzen meistens auf 6.0 ein. Ich hoffe euch und euren Pflanzen geht's gut 😺 bis nächste Woche 👋

Likes
6
Share

@All_our_small_plants
Follow
Wir haben einige Klone einer Eleven Roses gemacht, zwei von ihnen haben am ende doch überlebt und wir werden mit ihnen weiter machen.
In diesem Tagebuch verfolgen wir denjenigen, wir werden sie wachsen lassen und später erneut Stecklinge zu ziehen. Für die Klonung haben wir Wasser aus der Brittakane, Clonex-Gel und Kokostabletten verwendet.
-Hier ein paar Daten zu der Sorte:
Eltern: Appalachian Kush x Sugar Black Rose
Genetik: 100% Indica
Blütentyp: Photoperiodisch
Blütezeit: 8 -9 Wochen
THC: 24%
CBD: 0-1%
Innenhöhe: 80-120cm
Außenhöhe: 180 - 250cm
Ertrag Innenanbau: Bis zu 600g/m²
Ertrag Außenanbau: Bis zu 2000g/Pflanze
Gattung: Feminisiert
Bewässerung: 100 ml
pH-Wert: 5,8
EC-Wert: 0,2
Temperatur: 28ºC
Luftfeuchtigkeit 75%
Schädlingsbekämpfung:
PPFD: 200 µmol/m²/s
DLI
Düngemittel:
Besonderheiten: Wurden direkt in die erde gepflanzt in einer Kokos-Quelltabletten.
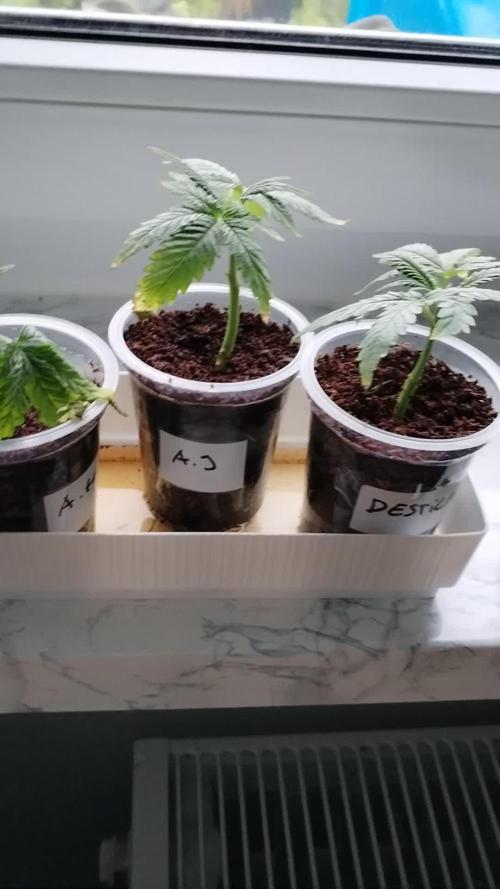
-Tag 8 da wir uns entschieden haben die Mutter Pflanze normal wachsen zu lassen und eine zweite Photoperiodische in den selben Zelt zu ziehen haben wir die Klonen an die Fensterbank verfrachtet.
-Tag 14 so wie es aussieht haben es zwei geschafft, der mit den destilliertes Wasser und dieser geschafft 😍

Likes
14
Share

@Rangaku
Follow
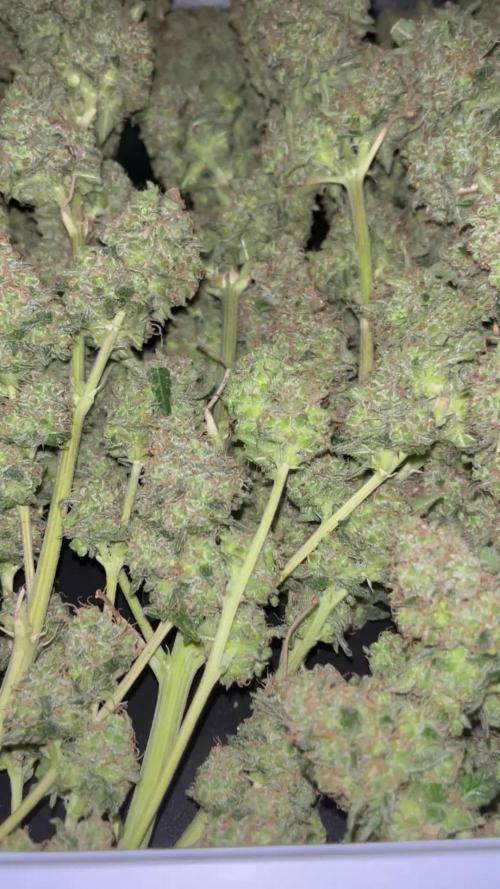
Time to chop the mad max she’s been stinking out my whole street 😂another mad strain this mad max from Dutch fem if you haven’t grown these guys genetics yet do ya self a favour and give em a go . It’s all top notch

Likes
73
Share


@Rando1314
Follow
Well…these ladies have me always guessing! TYPICAL! Lmfao also growing a newer strain so I’m glad to be a part of it all. They’re def chunking up and showing signs of massive purpling on just a single plant. The other 4 aren’t quite there. Let me tell you though, the shorter one DEF have a berry/gas smell compared to the taller more sativa-like plants which have such a peculiar bud structure. Either way both looking awesome and quite surprised as to how they bounced back and are chunking up quite nicely. I’ll be expecting to use my ripening dry kool bloom next few waterings then flush time for the yum time 🤤 💨

Likes
26
Share


@Nistnov
Follow
I know the harvest was too early but I was scared the painkiller could get some bud rot because the next week will be raining non stop.
The Special Queen and honey cream are still growing I'll update them tomorrow.


Likes
5
Share


@Major
Follow
the yellowing of the leaves has started on the plans I continue to rinse and think and hope to harvest the coming WE my last rinse was done on Sunday now I am waiting for the leaves to be completely empty of nutrients to optimize the taste of the weed This BSB look very tasty 😋😋 good grow everyone


Likes
27
Share


@Ganjagrandaddy
Follow
Day 35 (day 1 flowering): Wow these ladies kick into flowering early. thankfully they have allowed me time to get them spread out. Today was a last attempt at getting them into their own space fornwach growing tip. even the lowers have been encouraged to join the party for the stretch period. Bring it on , we are ready !. lol
The Mimosa lemon has really got busy the last week and her transition for flowering should be very positive with her l.s.t set up. She has so many growth tips that are joining the vertical climb. she is still very workable but is hardening up more now. I definitely notice the lack of using silicon fornthese so will start tonadd it early on I think. Seeing how well she filled the pot is a bonus too. she will be a good producer I think . she is at The edges of the 30L pot now and will be held there until late in flowering. Once she hits 21 days , I will defoliate her along with the Glueberry.
The Glueberry is a thicket of new growth and hopeful main buds. The stems are so thick that she is nearly unworkable. with the breakages to her 4th node , I am hoping to keep her stress below snapping point till the finish. She has some serious thick mains fighting for the top slot and i expect a beasty of a flowering girl. Having g just hit the flowering , I hope to use the stretch to get her set up better. seeing her clumped up makes me nervous. Her structure is similar to a manifold but less planned that way. lwrs see what she does.
be well.


Likes
43
Share


@Coopmc
Follow
One starting week 3 the other starting week 1 I’m so impressed!!
So excited!!
Likes
Comments
Share


@DogDoctorOfficial
Follow
# Amnesia Haze Auto by Zamnesia | Pheno A 🌱✨
## Germination Week | Beginning the Autoflower Chapter
Hello GrowDiaries family! 👋🌱
Welcome to another new journey.
As some of you may have noticed, I've recently adjusted the way I document my grows. With the current photo limitations on GrowDiaries, each phenotype now receives its own dedicated diary rather than sharing a single journal with its sisters.
This allows me to continue documenting every stage of development while selecting the best photographs from each week and keeping everything organized from seed to harvest.
The objective remains exactly the same as always:
To create an honest, educational, and complete record while sharing observations, successes, mistakes, lessons learned, and everything in between.
Today, we begin following Amnesia Haze Auto Pheno A.
And with her, we officially begin the autoflower section of this project.
---
## A New Chapter Begins
The photoperiod section of this run is already underway.
Now it is time for the autoflowers to join the adventure.
While these plants will follow the same cultivation philosophy and environmental conditions as the rest of the garden, they bring one important difference:
Time.
Autoflowers move according to their own internal clock.
No light cycle change is required to trigger flowering.
No waiting for a flip.
No negotiation.
When they are ready, they begin.
And that makes them fascinating to observe.
For this run, we're following Amnesia Haze Auto from Zamnesia Seeds, cultivated under a 12/12 from seed schedule from the very first day of life.
A method that is a little different from what most growers choose, but one that has become part of my own cultivation style over time.
Throughout this diary, I'll explain not only what I'm doing, but also why I'm doing it, allowing anyone interested to follow the process from beginning to end.
---
## Germination Using the Cannakan System
To begin this run, I used the Cannakan germination system.
For the sake of organization, the autoflower section was germinated using a second Cannakan unit while the photoperiod section used the first.
The methodology, however, remains exactly the same.
Simple.
Organized.
Reliable.
The seeds were placed inside using only plain water.
No nutrients.
No additives.
No stimulants.
Just water.
Within approximately 24 hours healthy taproots had emerged and the seeds were ready for the next stage.
Exactly what we hope to see from healthy genetics.
---
## Why Only Water?
One question that frequently appears during germination is:
"Why not feed the seedlings immediately?"
The answer remains simple.
The seed already contains everything required for its first stage of life.
Inside that shell are the energy reserves needed to establish roots and begin development.
At this stage, I prefer allowing the seed to use those natural reserves exactly as intended.
The objective is not to feed the plant.
The objective is simply to wake it up.
Water is enough.
Nature already prepared the rest.
---
## Coco Starter Plugs
Just like the rest of the project, this seed began life in a coco starter plug.
The plug was fully hydrated and then gently squeezed to remove excess moisture while maintaining a healthy balance between water retention and oxygen availability.
Once germinated, the seed was carefully inserted into the plug and placed inside a humidity dome.
The dome remained useful for only a short period.
Within less than 24 hours the seedling had already emerged and was ready for the next step.
At that point, she was transplanted directly into a small container filled with Plagron Lightmix.
---
## Environmental Conditions
Environmental conditions remained intentionally simple and stable.
Temperatures stayed around 26–27°C.
Humidity was maintained between approximately 65–70% using a Spider Farmer humidifier.
Rather than keeping seedlings inside extremely humid conditions for extended periods, I prefer introducing them relatively early to the environment they will actually experience throughout their life cycle.
The objective is adaptation.
Not dependence.
Airflow remained extremely gentle.
Just enough movement to keep fresh air circulating without creating unnecessary stress.
---
## Lighting
Lighting during germination remained intentionally soft.
Young seedlings simply do not require intense light levels at this stage.
The goal is healthy establishment rather than rapid growth.
Once properly established, this girl will move under the Future Of Grow Black Series 600W full-spectrum LED system where the next stage of development begins.
For now, healthy roots and healthy growth remain the priorities.
---
## First Observations
Everything has progressed exactly as hoped so far.
Fast germination.
Healthy taproot.
Strong emergence.
Healthy color.
Good vigor.
And perhaps most importantly:
A healthy beginning.
At this stage every seedling is still a mystery waiting to reveal itself.
And honestly, that mystery is one of the reasons growing never becomes boring.
---
## Looking Ahead
Over the coming weeks we'll follow Amnesia Haze Auto Pheno A through every stage of development.
We'll document:
- Root establishment
- Early growth
- Environmental management
- Watering practices
- Structural development
- Flowering progression
- And whatever unique characteristics this phenotype chooses to reveal
Because every seed starts with potential.
And every journey deserves to be documented.
Huge thanks to Zamnesia Seeds for the genetics, Plagron for the substrate and nutrition, Future Of Grow for the lighting, and everyone following along for another seed-to-harvest adventure.
Grower's Love everyone. 🌱💚
Likes
3
Share


@Lazuli
Follow
What an amazing smell she has so lemony. I start overdrive monday (its friday now) so she will be cut in 2 weeks and 2 days


Likes
11
Share


@Sejnik
Follow
Holky vypadají naprosto úžasně. Nemají žádné nedostatky a už jsou trochu cítit. Mám z nich velikou radost ale ještě si na ně musím 2 měsíce počkat.
Tento týden jsem do svých děvčat zainvestoval trochu peněz. Pořídil jsem jim 2 dodatečná světla 2x42w a výkonný odvlhčovač vzduchu. Sbohem vysoká vlhkosti. Sbohem plísně. Mám velikou radost že vlhkost konečně klesla, protože jsem měl opravdu velké obavy z plísně.
Bohužel mě to stálo jednu rostlinu a tou byla Haze Berry 1. Byla to ale nevyhnutelná oběť, kterou jsem musel podstoupit, jinak by se mi odvlhčovač nevešel do stanu. Nebyla jiná možnost.
Zalévám jednou pouze s RQS tabletami easy bloom booster (jedna tableta na 8 litrů) EC 0.7-1.
Podruhé RQS tablety easy bloom booster (jedna tableta na 8 litrů) + hnojiva od Biobizz EC 1,4-1,6.
Zalévám každou z rostlin tak, aby měla dostatečný odtok vody ze spodku květináče.


Likes
4
Share


@Filiaes
Follow
09.06
After some research I think the lightly burn on the leaf tips came from to much light and not from nutrient burn. Anyway, I like how they developed the last week so I guess it wasn't super bad to reduce my scheme. I am now 4 weeks before harvest, I plan to flush the last week, so there is 3 weeks left of nutrients. For this week I will give them some boost with canna pk 13/14 and will remove hesi phospor for the scheme for this week. Tank was cleaned as always and new water with nutrients is prepared for the next week of bloom.


Likes
32
Share
@All_our_small_plants
Follow
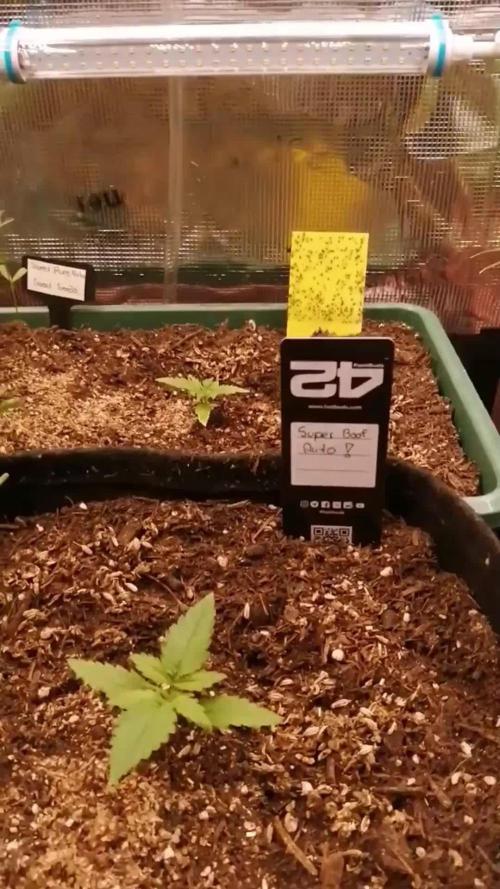
Bewässerung: 500ml jeden 3 tag in der ersten Woche
pH-Wert: 5,8
EC-Wert: 0,6
Temperatur: 30ºC
Luftfeuchtigkeit 68%
Schädlingsbekämpfung:
PPFD: 200 µmol/m²/s
DLI
Düngemittel: mineralischer Dünger NPK 7-3-5
Besonderheiten: wir versuchen bei diesem Grow Effektive Mikroorganismen aus. Die Opfer Linsen sind wieder da 😜
👌Wenn denn Promo Code AOSP15 bei dem Kauf von Fast Buds Samen anwendest bekommst du 15% Rabatt!!!👌
-Tag 8 Heute hat sie Nematoden bekommen 😝
-Tag 10 Heute wurde sie mit mineralischen Dünger gegossen 7-3-5
-Tag 12 wir haben ihr wieder etwas Dünger gegeben 😌
-Tag 14 Heute hat sie nur Wasser bekommen
Likes
8
Share


@eldruida_lamota
Follow
Que pasa familia, vamos con la cosecha de estas FBA-2506 de FastBuds.
Por dónde empezar, es una autofloreciente que es normalita de cultivar, tiene un periodo corto de crecimiento y de floración igual no es largo.
En cuanto a la alimentación , pues la aplique una vez por semana y a sido suficiente, se a comportado bien en interior, la flor pues no es muy prieta porque no deja de ser una autofloreciente, pero es una flor que va repleta de tricomas, y tienes unos colores morado intensos.
El periodo de luz pues de principio a fin a 18 horas, fue suficiente para completar el ciclo de vida como esperaba.
Hasta aquí todo, Buenos humos 💨💨💨