
Likes
Comments
Share


@bigred092
Follow
11/24 - Will be Adding Silica and CalMag to watering, 550-600ppm - Lighting Average 625ppfd
11/25 - Drip system in-place and usable. Waiting on my new AC Infinity 8-port controller, then I'll be throwing the pump on a controlled outlet. Figured out flow rate per minute, so I'm hoping I can schedule it to run once daily and essentially auto deliver a specific amount of water. Changed filter sock, there was a bit of residual perlite dust from when I added the top layer to the pots.


Likes
2
Share


@Greenbean420
Follow
For 6 plants I got 415 grams which is so far, again my most yield to date. I think the light is deffo a factor plus the genetics help.
It says it has up to 27% THC, it was deffo one of my favourites and I think I’ll be growing this again in the future. I’m terrible of explaining the smell and taste but it was really danky and a lot of my mates loved it.
Likes
24
Share


@Alpha_Green
Follow
And this is how we successfully open week 9 -
After fermenting a dose of PK compost tea at the end of last week, I poured it extensively. As always, he did them very well. They also need significantly more water again. I have now also increased the humidity a bit, because there is currently drier indoor air in the room of the cultivation area.
Let's see how long I leave my Sweet Seeds ladies. I'll decide that at short notice.
Sour Jealousy will then be able to enjoy all the space to bloom at her disposal.
Both Sweet Seeds now only get purified and aerated water and only enriched with enzymes.
It is now time to signal to both to use up their reserves. After all, their genetically pre-programmed life cycle is significantly shorter than that of sativa-dominant strains - for example, Sour Jealousy from Fast Buds.
She is only now really starting to flower, while the indica dominant strains are moving towards the glorious end.
I have also already been able to positively determine how practical and thought through to the end 2 Sanlight panels really make sense. I am not primarily concerned with more power through the lighting, but also and above all, I am concerned with the homogeneous illumination at 11 degrees inclined positioning of the solar panels. And to have the opportunity to meet the different growing conditions individually by adjusting the heights of both panels.
Of course, I will be able to strive for much higher performance in the large Homebox Ambient with CO 2 and both lamps, but area coverage is the be-all and end-all for me.
Lamps currently operate at 60% each. That's definitely enough. Because 2 x EVO 4 - 80 means to me:
Precision in the form of light - a tool that you learn to use. Everything before didn't convince and satisfy me nearly as impressively as Sanlight.
Also the advantage of being able to operate your lighting system from the outside, via Bluetooth, yes that is really very important, practical and innovative.
It makes things so much easier...
Sweet Seeds - brand new:
„Jealousy Z XL“
I can’t wait to give it a try next run…
Super noble presentation, in my opinion.
There are many reasons for an emotional attachment to a product. But one stands out in particular: the desire to design, personalize, individualize something or - in other words - the desire to own something unique and feel special as a result. Scientists have found that our buying behavior is shaped by emotions. A person does not buy a product, but an emotional feeling.
Many thanks to Sweet Seeds! 🙏
I also feel the feeling that Dark Devil gives me - as a noble high. I associate the turn with a noble, very effective and multifaceted indica dominant weed from Sweet Seeds. Creative work only works in the 1st part of the turn - haha, because then the coma phase begins with subsequent binge eating!
But even during sports I was in the vaporizer with Dark Devil and it supported me mightily during training. Maybe it depends on the activity at the time of consumption, haha
I find it very fruity in taste and smell. Very sweet terpene spectrum.
And not very top-heavy.
A wonderful body high.
Worries and fears - as if blown away…
Some here on growdiaries describe meticulously exactly how they give what, when and how much of it to the plant, etc.
I prefer to keep a diary for my passion in a different way. With passion and feeling. I feel my plants. And talk to them. They also listen to chilled music.
The Kobe beef in Japan is even massaged to classical music. ;-))
I think such information is only useful for a run to those who do it exactly the same way, under the same conditions with almost the same phenotype.
That is almost impossible. And not necessary either. I have to learn to read plants. Their signs are pointing. Become sensitive to it.
If I know why and how something happens, then I also know how to keep something like this alive. And what it takes.
And why.
So let's see what we have to do today. In any case, Lady Jealousy is being driven to the hairdresser today. Yes, we're doing beauty and wellness spa today, haha. She's so busy with branching, I'll give her a helping hand.
She has developed incredibly. And has an unusually long breath. Comparative:
She looks like a farm animal to me. In other words, what it was bred for. Very strong and healthy adult. Then bloom efficiently and productively. And that's the fascinating thing for me. The breeder creates all parameters here to perfection.
Even though I don't particularly like the marketing of Fast Buds anymore, I have to admit without envy:
"I've never experienced that before."
The phenotypes are absolute warriors, from another planet. Marketing is debatable. No problem.
But I can only marvel at these plants and their quality.
Unfortunately, too much turnover often spoils the core vision of a successful company.
…PK is on the way!
Addendum about the one, Lady Dark Devil 😈, which had to be harvested too early:
And yet:
Dark Devil gives me a deep inner satisfaction in my existence. Nothing upsets me. Nothing can disturb me, because I am one, with myself and my environment. I can only feel gratitude for that.
It gives me this broad, generous sense of inner peace.
For me, inner peace means balance, equanimity, even-mindedness, harmony, and stability.
And that's exactly what a noble special effect means to me. When a weed variety can develop medicinal qualities. When THC simply has a more complex effect on my organism, than just the usual power high.
And if, a plant that hasn't even had the opportunity to reach its full potential, can do that, it has passed all the requirements of a cannabis variation, with flying colors.
And on top of that, she seems incredibly graceful and elegantly feminine to me. It's just something very special:
She's a Sweet Seed!
Oh I see, I'm writing a real diary here... 😜
But I love that. I love grow diaries.
Look at the brave girl. She forgives me for topping, training, defoliating and in the end: that I have to kill her.
But I know then for sure, that she knows, that I really loved her.
And the fascinating homogeneity. Totally instructive.
It behaves like a photoperiod phenotype, unbelievable but true! on 14.09.2024 I moved her to the grow room with the others. So it's almost 9 weeks. I'm curious to see if she holds out. But I think so. It seems incredibly energetic and relatively relaxed to me. I'm mentally very busy with her right now. Every morning I comb through her leaf picture. Make impressions of the smallest changes.
I currently have Pk boosters or tea with her every third day, alternating. And in between only purified water with enzymes. Dark Devil and Big Devil I let slowly starve and then die of thirst. They consumed the last booster 4 days ago.
She (Sour Jealousy) currently swallows 2.5 liters per day. That's really a lot. And in the morning she wants to have something again. I think the lamps tickle out their full potential. I meticulously defoliated her and now she stands happily and despite all the exertions, like a star in the sky. My star. 🌟
Sour Jealousy is really crazy, I can say that.
And the coolest highlight will be:
Lady Jealousy will soon be able to enjoy the whole place in the sun for the "grande finale".
The smell of the two Sweet Seeds totally upsets me! I would like to bite into it.
Its killing me softly.
Very few leaves have a few dark small spots or dots at the tips of the leaves. (Sour Jealousy)
Many thanks to BerrySweetHighhat. I think the same. Will probably be calcium. She gets this from the Bio PK Booster. I keep calm and don’t panic, it’s organic. ;-))
Sour Jealousy:
Today I cleaned out small shoots again & defoliated them from below up. I think there were still too many young little shoots. Now everything should be distributed quite well. We'll see.
Tomorrow I will
probably harvest both Sweet Seeds.
Hello everybody!
Today it's Dark and Big Devil's attack. It's about time. Lady Jealousy will be allowed to use the full 0.64 sqm of cultivation area for herself from today.
Take care & bee 🐝 positive
🐝… to bee continued.

Likes
35
Share

@SkunkyDog420
Follow
Hallo zusammen 🤙.
Habe sie heute geerntet.
Wir sehen uns in 3 Wochen mit dem Erntebericht.


Likes
132
Share


@Crashoverite
Follow
Hi all👨🌾👋
Welcome to my another week update
Hope everyone doing well 🧑🌾🤤
Week 3
Feb 16 - Feb 22
It was a very easy week. Both baby girls are growing steady but not in rapid speed yet. 2 waterings of 500 ml each on Feb 17th and Feb 22nd alongside with foliar feedings(100ml water and fish mix) both looking healthy and happy. LST is coming next 😁🧑🌾✨🍀
Wishing you all a wonderful week✨🍀
Much appreciate all your likes, follows and comments. 🙏💚❤️💜
Peace and love brothers and sisters 👨🌾✌️💚
Links
https://2fast4buds.com/seeds/TROPICANA-COOKIES-AUTO
https://www.biobizz.com/
https://fishheadfarms.com/
Likes
17
Share


@Lazuli
Follow
Very intense high, hits very fast and long. Im not stoned but still sleep like a rock after a few hits

Processing
Likes
2
Share


@Vet4weed
Follow
Week 7 (Feb 15 - Feb 21).
All three plants are doing nicely, and River, our youngest plant, is doing a good job keeping up, but still a couple inches shorter. So, I decided to FIM the older two plants to see if it evens them out, or sends them into a growth spurt. If the later, then I'll give River a FIM next week.

Likes
10
Share


@TeesTrees
Follow
Day 57 - The plant looks great, healthy! The buds are looks great also.
Day 58 - The plant is looking great i just watered her today looks like she might have a bit of water shock. I gave the plant some PH controlled water but i didn't take into account the soil so the whole thing didn't make a difference.
Day 59 - The plant looks amazing. Defoliated her a little more today.I'm noticing the smell more prominently now as well; Also we done some seriouse decore change today so the whole place looks like a bud box we got the other plants from my diaries featuring in a the video.
Day 60 - She is well and growing.
Day 61 - Was to busy running around didnt take a pic its a shame but its okay.
Day 62 - The buds are forming nicely plant is stretching out for the last time. The plant is also dry and will need watering tomorrow. I raised the light today as she is very tall now and was nearly touching the light.
Day 63 - The plant got fed PH 5 water, so she looks a bit droopy from water shock but; she will spring back to life like she normally does. Looks like the plant is doing well though.

Processing
Likes
6
Share


@Ferenc
Follow
I am back from my holiday left on 19th of December so my friend handled them in had to remove a lot of leaves atvteh bottom they are very tall pistils are out. Crazily nice! :)


Likes
10
Share


@MichaelMan
Follow
Took two 20L buckets. Drilled holes in the bottom of the buckets and transplanted them right in. Should have done this before.
Sending them into bloom next week.

Likes
2
Share


@Canaryweed_tf
Follow
Aquí tenemos la primera semana de la GingerPunchAuto de la familia de @Kannabiaseeds. En está primera semana han crecido muy bien y tienen muy buen color, lo que una de ellas tiene un color muy pálido, estoy agregándole nitrógeno haber si se recupera. El resto de plantas están muy bien, buen color, buena estructura... 😍

Likes
2
Share


@cafer
Follow
Today is the day my big bud seeds come out of the soil, they have all started to take root in 25 liters of soil without any problems

Likes
26
Share

@Salokin
Follow
Harvest Report | GMO × Triangle Mints BX
Week 17 — chop day. **6 plants** came down after a full run under **2800W** total light power in the **4.5m²** room.
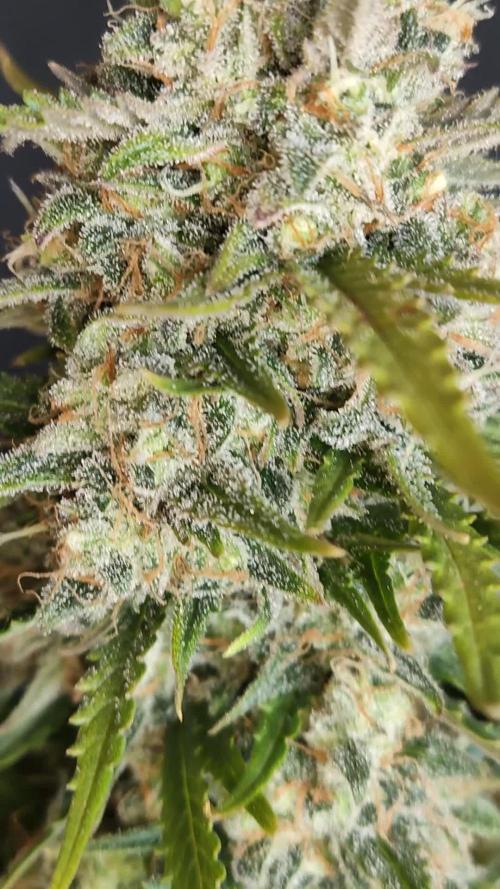
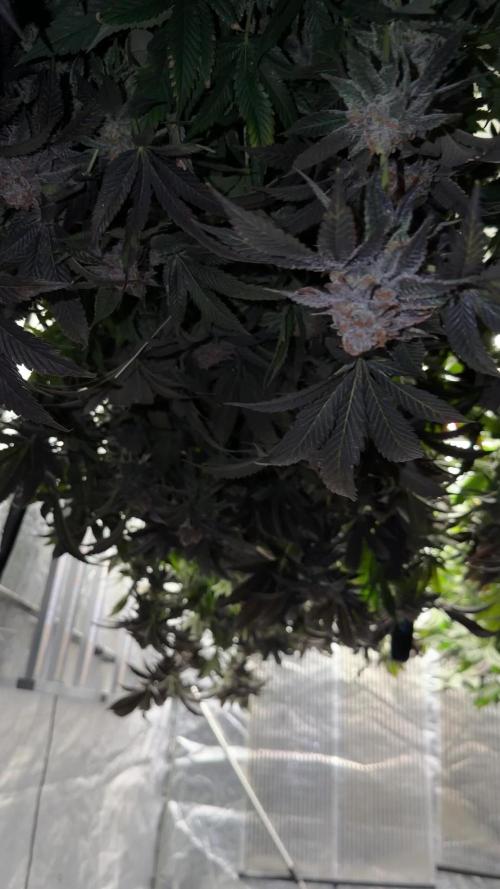
The finish was everything this genetics promised. Dense, frosty colas with deep purple and near-black coloration throughout — confirmed as true phenotype expression, not a lighting artifact. The candy gas profile that built through the back half of flower hit its peak right at the chop, filling the room the moment the first branch came down.
Drying and curing now underway. **Aptus Regulator** earns a well-deserved 5-star mention — used throughout veg and flower for stem strength and structural integrity, and it delivered exactly as expected. Not a single weak stem on this run despite the bud weight these colas were carrying.
This closes out the GMO × Triangle Mints BX diary. Thanks for following along — the genetics, the process, and the result all came together. More to come from the next run.
jeder soll growen wie er will


Likes
11
Share


@Synkery
Follow
Porfin ya estan en su armario y en sus macetas finales de 11L. Comen 150 mo cada una cada 48h con top veg y deeper undergraund dos veces por semana! Cualquier comentario o opinion lo agradeceria para poder ir mejorando!

Likes
26
Share


@siL01337
Follow
Okay here we go.... 6 seeds..... 6 different kind of phenos #F 1-6
They all different to each other... From the taste from the look from the smell from the strength ..... But for me it is perfekt than I have a little bit Option to change when I want another taste or strength. From the result in the first point I am happy But for a strain with 7 weeks flower (they need nearly 10 weeks) I think the waight is a little bit to less. But I am very happy with that result it is okay 😊😋. And from the cuttet trim I have made some iceolator bubble hash and this result is nearly perfect... Okay let's view some pictures....


Likes
4
Share


@ATX_growguy
Follow
Has a great taste not too strong of a buzz but just right night time. Cdb numbing effect… this was the smelliest plant ive grown so far. I wanted to make fem seeds but seems like it was unsuccessful using. Colloidal silver. I see one weird looking seed but don’t know if it’s viable. Callin this a half win because the bud is good . Will grow again when i have more space because i have a seed left. Thanks seedsman.
Solid auto genetics send me more autos please lol