The Grow Awards 2026 🏆 


Likes
Comments
Share
@Mastr
Follow
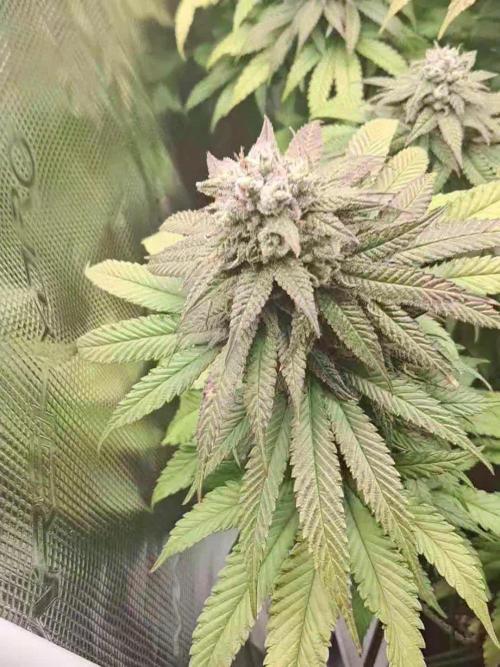
This week just flush her with 8 litre ph water and I will harvest her next week some point
Update today day 100 and she is thirsty as hell will flush her again tomorrow then will go for 48 hour darkness
Update today day 103 and I find my jewellery microscope but still can't see any Amber trichomes so I leave her and will check on her everyday
Update today day 105 and I decide to chop her down I let her 12 hour darkness then chop off will update later

Likes
28
Share
@MadeInGermany
Follow
Hey everyone ☺️
Both phenotypes are great 👍.
The leaves look like a nice sativa 😍.
Because of training I am still thinking about it because for some time now I have wanted to do one round completely without topping etc.
I will decide that in the next 1-3 weeks 😀.
Both were poured this week with 1.3 l.
I'm really excited about the coming week and until then I wish you all a lot of fun with the update 😃.
Stay healthy and let it grow 🍀🍀
You can buy this Strain at :
https://www.royalqueenseeds.de/feminisierte-hanfsamen/115-amnesia-haze.html
Type:
Amnesia Haze
☝️🏼
Genetics:
Original Amnesia Haze
👍
Vega lamp:
2 x Todogrow Led
Quantum Board 100 W
💡
Bloom Lamp :
2 x Todogrow Led
Cxb 3590 COB 3500 K 205W
💡💡☝️🏼
Soil :
Canna Coco Professional +
☝️🏼
Fertilizer:
Green House Powder Feeding
☝️🏼🌱
Water:
Osmosis water mixed with normal water (24 hours stale that the chlorine evaporates) to 0.2 EC. Add Cal / Mag to 0.4 Ec Ph with Organic Ph - to 5.5 - 5.8 .

Likes
29
Share
@MELs_Garden
Follow
Semana 0
Del 3 al 9 de agosto
Estamos en la semana 0 que va a ser la primera desde el cambio a 12h.
Las temperaturas están siendo geniales y los LED ayudan bastante. Estamos en 26°C en ON y unos 24°C en OFF.
Vimos que el último riego pudo ser demasiado potente y aprovechamos para hacer varias cosas.
• La planta tiene 0 marcas de bichos, ni picaduras ni nada.. parece que los preventivos han funcionado bien, pero no bajamos la guardia. Espolvoreamos la capa de arriba del sustrato con tierra de diatomeas y humedecemos. Como el sustrato ya había bajado bastante, echamos una capa de sustrato ( monkey soil coco) y repetimos volvemos a espolvorear.
• Realizamos riego con unos 2l casi.
Usamos 0.16 Mammoth P + 1 calmax
PH 6,2
EC: 0,4/0,6ms
Th20: 23,5°C
• Hoy soltamos todo el sistema LST. La idea es la siguiente: dejarle un día suelta descansando para que se estire un poco y luego colocarlas en su posición final. Parece que tiene forma de pino y cada rama esta cogiendo esa forma, por eso quiero estirar la un poco, para que tengan sitio.
5 de agosto
Volvems a hacer el LST Pero esta vez con grapas de hierro, aprovechamos para dejar en posición.
Mientras la entrenabamos quebrados el tallo central..
6 de agosto
Vemos que se posiciona mejor y aprovechamos para quitar algunas hojas y algún brote pequeño. Hoy a vuelto el calor pero aguantamos en unos 28,5°C de max. La humedad si he es alta, entorno al 70%
8 de agosto
Hoy movemos un poco los brotes para que quede menos sombras. Aprovechamos para hacer un riego con 1,5l usando
5ml•l de Delta 9
PH 6,01
EC: 1,2ms
Th20: 26,6°C
El calor continúa y más o menos aguantamos las condiciones. 28°C y un 66% de humedad.
Este riego de Delta 9 le sentará genial, se puede apreciar como siguen estirando los brotes de cada rama para coger su sitio de cara a florecer. Además la planta en general a engordado bastante en cuanto a tallo y ramas más fuertes.
9 de agosto
Terminamos esta semana de perforación. Seguimos con el calor y la humedad, en ese sentido a sido un mal día. De temperatura rondamos los 28°C con una max de 30 y mínimas de 24,5°C (en OFF)*. La humedad a andado de 60/70%, esperamos que las condiciones mejoren cuando la flora sea mas avanzada.
Hoy realizamos ultimo preventivo, unas 6h com el quemador de azufre para después de ventilar un rato hacer un foliar con 15ml spruzit + 2 aceite de neem + 2 un producto de prueba.
Las sensaciones son tremendas y la verdad que nos lo estamos tomando con mucha ilusión porque esta quedando preciosa y respondiendo como un Jabato. El juego a empezado amigos, a partir de ahora empieza lo buenoo.

Likes
17
Share
@Koda11
Follow
Beginning: 12/11/2020 10:30 Pm
12/12/2020 5:30 Pm approximately Purple Hulk Auto
MSNL Seeds (First and only seedbank I use as of right now)
(5Gal Fabric Pots) 2 Lemon OG Fem Auto-
Genes: OG Kush x Lemon Haze (High Times Cannabis Cups in 2008 and 2009, alongside first prize at the IC420 Growers Cup)
Flowering: 8 Weeks
Plant Height :Medium 100cm-180cm
Harvest: 300 - 400g/m²
THC: 15-18%
(5Gal Fabric Pot) Purple Hulk Fem Auto-
Genes: GDP x Big Bud
Flowering: 8-10 Weeks
Plant Height: Short 60cm-100cm
Harvest: 300-400g/m²
THC: 19-22%
-Placed under 18/6 light schedule.

Likes
3
Share
@Grow4ever
Follow
Absolute Pracht.
Die Pineapple Express macht ihrem Ruf alle Ehre.
Duftet süß und fruchtig, ziemlich genau wie mein erster Phäno. Buds sind bisher bei ihr am dicksten.

Likes
47
Share
@Jimmy89
Follow
The the buds were small so it made trimming a nightmare! But it’s done and the end product is worth all the time. I have loads of trim and small popcorn buds that will be dry Ice sifted and pressed into a hash brick. Will update the diary when I have some bcp hash
Weighed up the trim at 588 grams, used my trim bins with dry ice to sift the trim and pressed it into blocks using a rosin pre press, I’ll now jar this and put it to one side. My first time doing this, definitely worth the effort!


Likes
38
Share
@Green_Mountains
Follow
I took the tiny plant out of the tent due to state laws. She is happily sitting in a window... we'll see what happens with her!
Massive growth for both plants this week! They both doubled in size! I don't know whether to call my plants vegging, pre-flowering or flowering. I figured this was the last week of veg and next week is full on flowering!!
They both stink! Gassy for sure! I'll need to turn start using my carbon filter soon... I caught a few cool time lapse videos this week. Especially after feeding them last night!!
I fed them twice this week. The first time was at a third recommended dose and I jumped it to half yesterday. The leaves are clawing at the top of the plants... I think it is a lack of phosphorus due to me only watering them the last 2 weeks. Any thoughts out there?
I'd love advice about defoliating... I have a couple massive fan leaves I could remove to open the canopy for flowers... I just don't want to stunt the plant or rob the main cola of a major energy source... Thoughts are definitely welcome!
I tried my hand at LST... I think a few are working and a few aren't doing the job... Definitely need to figure this out! Again advice is welcome!
If you've made it this far... thanks!! Cheers!


Likes
16
Share
@Ziocannabis
Follow
Oggi, lunedì 22/01 ho cambiato una 40 ina di litri di soluzione nuova e fresca...ho notato che verso la fine, l'acqua/soluzione era più "limpida" rispetto alla prima ventina di litri ... credo che la pietra porosa con aggiunta di ossigenatore sia stata utile nel secchio "Sistema" per evitare eventuali depositi sul fondo
Il problema maggiore è la temperatura stessa ossigenata... è impossibile tenerla a 19/20° senza l'uso di un raffreddatore(Chiller)...costa un botto!
Ora è a 21.3 ma sicuramente salirà....di solito è intorno ai 22° ...La luce led dimmerabile è all'80%... È vero che ci saranno le foglie a fare ombra al vaso....ma non so se al 100% ,che metterò ad inizio fioritura e l'abbassero in altezza a 40 cm dalla cima,cosa accadrà alla temperatura,in generale
Per ora andiamo avanti e proviamo a risolvere una cosa la volta 😉
Oggi topping o FiMing, vediamo cosa riesce😂
Crescono ma... credo che abbiano preso il Mosaico del tabacco..una malattia che deforma le foglie,si piegano le punte in su e in giù, alcune foglie appunto presentano una specie di mosaico con macchie giallognolo
Sembra bene...oggi 2 febbraio defogliazione e da lunedì si passa alle 12 ore..... credo che farò così...o farò poi fatica a gestire le altezze e l'area...ho notato che le foglie e il tronco sono molto più grossi rispetto la terra con lo stesso periodo di 3 settimane piene...
Likes
41
Share
@GermanGrow182
Follow
Gute Woche für die letzten Tage der vegetativen Phase. In ein paar Tagen sollten sie in die Blüte gehen. hst zeigt den gewünschten Effekt. Alle verzweigen schön. Nachdem 2 automatic-kübel geerntet sind, konnte ich endlich die photoperiodischen neu anordnen, damit sie bessere Standorte, mehr Platz pro Pflanze und nochmal mehr Sonne bekommen fürsletzte Wachstum.
Es läuft prima 👌
Bis nächste Woche ✌️
Processing
Likes
3
Share


Likes
36
Share
@Momentum
Follow
Wir sind voll im Stretch, haben den Dünger langsam über die vorige Woche gesteigert und sind jetzt beim normalen Düngeschema.
Breite Indiicablätter mit einem Geruch von Vollblutcannabis.

Processing
Likes
8
Share
@eldruida_lamota
Follow
Buenas noches familia, de nuevo actualizamos el diario, y acabamos la cuarta semana de floración, vaya brazos laterales que están tirando, se van a poner hermosas, se las ve sanas y vigorosas, nota mucho la forma sativa de sus hojas así que veremos lo que tardan en florecer.
Ph controlado a 6,5 y humedad por debajo de 45% not bad las condiciones temperaturas mínimas de 20 y maximas de 27,5 Grados.
Al atar las puntas los brazos tendieron a ir a la luz y gracias a eso la planta está tomando la forma de la esquina.

Likes
104
Share
@SmokingTiki
Follow
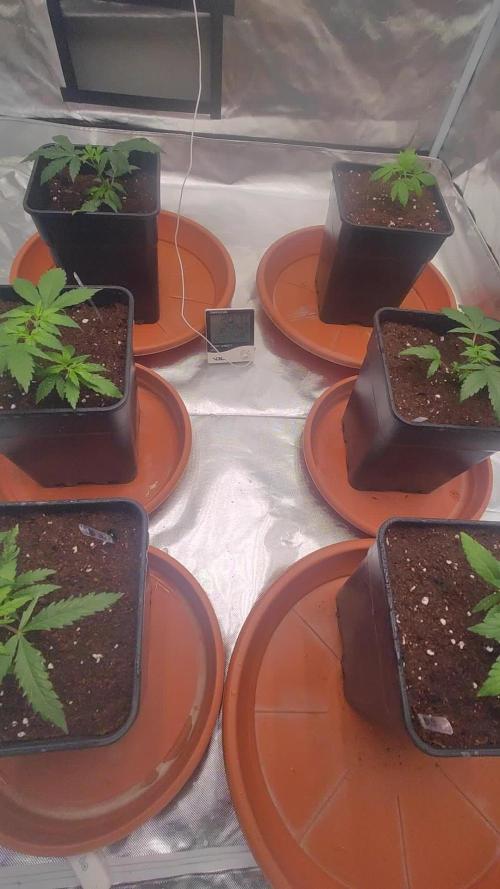
Good growth this week, the roots have already reached the pots! The Blackberry Cake seems to develop nicely but it's still smaller than the two others. I topped the plants and started to apply some LST and they responded very well. This is the first time I try to do some LST without bending the main stem, let's see how it goes.
I increased the light power to 75%. I moved the fan to be further away from the Blackberry Cake because it seems that it suffered from the wind, the leaves look and feel dry.
During watering, only a small quantity of water ran down in the saucer and I poured 2l in each pot. The Blackberry Cake and the Cashew Kush looked a bit droopy, I think I should have watered a bit sooner.
It starts to smell in the room 😏
Plants heights at the end of the week :
-------------------------------------------
Blackberry Cake : 12,5cm
Jack Herer : 18cm
Cashew Kush : 19,5cm


Likes
2
Share
@Chrisandweed
Follow
Poda apical hecha y brotes y hojas que no pintan na, fuera, a crecer 4 brotes con fuerza, que de estos sacaremos 8 y así sucesivamente. Esto de momento a la que nacio y arrancó sana, a la otra aún no, vamos a dejar que recupere un poco que está llendo muuy bien y con carrerilla. En sí ambas están creciendo muy bien.
Seguramente la semana que viene le haga apical a la chunga que se está recuperando super bien.
Edito domingo 22/02: cambio de armario, de luces y de maceta.
El armario es la leche, se nota la calidad joder jajajajajaja es de la marca Vevor, poco conocida de momento... Pero dadle tiempo, uso también su extractor y de verdad que funciona de lujo y muy silencioso.
Las luces las tengo a 300W ya que es lo minimo pero bastante alejadas, a unos 40/50 cm. Les llega una media de 11,12k de ppfd.
Y lo dicho, trasplantadas a maceta todas.


Likes
7
Share
@Mr_nugs_lover_David
Follow
This ladies look absolutely gorgeous and super strong, they're gonna be flipped into flower tomorrow on February 15th when they'll hit the 30th day since they were planted and the first day of flower!
As said, I have flipped this ladies into flower on February 15th so now I think we're gonna see a beautiful stretch specially on this 2 plants which are the biggest one in the tent, very nice genetic, cannot wait to see their performance ❤️💛💚👨🌾 stay tuned everybody! This is gonna be a beautiful run! ✌️

Likes
10
Share
@Its_Fruz
Follow
Big bud stop 32 day
Overdrive start 33day
Terpinator 1 of 10 days 4ml/l all flowering phase