
Likes
Comments
Share


@nijuana
Follow
I'm mitigate from this experience , the grow was not optimal why ? Maybe because my main thing is not to grow auto flower but femenised , the #3 was hermaphrodite plant ...


Likes
4
Share


@eldruida_lamota
Follow
Vamos familia, actualizamos la primera semana de floración de estas Thunder Banana de Seedstockers, salieron las 3 de 3, 100% ratio éxito.
Aplicamos varios productos de Agrobeta, que son increíbles para aportar una buena alimentación a las plantas.
Temperatura y humedad dentro de los rangos correctos dentro de la etapa de crecimiento.
La tierra utilizada es al mix top crop, por cambiar.
De 3 ejemplares seleccioné los 2 mejores para completar el indoor, cambié el fotoperiodo a 12/12 y también apliqué una poda de bajos, se ven bien sanas las plantas, tienen un buen color progresan a muy buen ritmo por el momento, marcaron las preflores.
Agrobeta:
https://www.agrobeta.com/agrobetatiendaonline/36-abonos-canamo
Hasta aquí todo, Buenos humos 💨💨💨

Likes
101
Share


@DogDoctorOfficial
Follow
All going kind off as planed, appart from the SuperGlue Girl. just did a big 2,5 gallon Flush on her and now waiting for the soil to dry and start over the feedings. clean her good so i'm hopping for the best 😅 lets see how they react and if they cacth up 😍😋
Loving this LED Tec 😍
Girls:
1-BlueBerry
2-Alaskan Purple
3-Poyote Gorilla
4-Hindu Kush
5-Whitw Mango
6-Super Glue
7-Badazz Cookies
8-S.A.D.
tent -8x8 / 2.4x2.4 but i'm only using 1/2 so 4x4 / 1.2x1.2
Led - Lumatek 465w Compact Pro at 100%
All i Grow is medicine for myself,
Stay safe, stay tuned and B Happy
Peace out
D


Processing
Likes
26
Share


@BigBadLion
Follow
Hey hey everyone! 😀👋
This is week 5! My girls are growing strong and very, very bushy. I gave them a good dose of water this week and it seems they really enjoyed that! Besides that theses are the things I noticed:
- The girl on the back is bushier than the one on the front and her leaves are smaller in comparison (with the exception of some leaves).
- The leaves might be a little dark in color, but I could also be wrong hah. Perhaps I'm feeding them too much fertilizers?
- The stems are getting very, very thick. I like that!
- I've tucked so much this week... and some leaves are curling weirdly. Probably that's a sign my efforts are paying off? 😅
- I also reinforced the LST at the end of the week. I need those thick stems to bend a little more!
Anyway, that's pretty it for this week! I took tons of photos and I hope you'll all enjoy them! 😍
See you all next week!
Likes
26
Share


@420DeepGrow
Follow
Sorprendido por la noticia de mi primera colaboracion con MarsHydro 😊🙏 y muy sorprendido tambien por el envio de las semillas por parte de Sweet Seeds.
La marca numero uno en focos 💡, carpas de cultivo ⛺️, extractores 🌬️ y demás aparatos que necesitas para tu cultivo.
Para esta aventura arrancaremos con 💡Mars Hydro TS 1000 Full Spectrum LED Grow Light 150W Regulable y 1 semilla autofloreciente a un ciclo de 20/4.
Verdaderos 150w con este TS1000, la mejor luz de cultivo LED para principiantes.
Ofrece una luz adecuada para 2-4 plantas 🌱. Su precio razonable, la marcada mejora del rendimiento y el control variable de la producción la hacen amigable para los nuevos cultivadores. Todo un tesoro para cualquier cultivador que este comenzando.
Usaremos tambien una carpa de 60x60x90, de nuestros amigos de MarsHydro, una carpa para los más exigentes.Con una solapa de cremallera mejorada, dobles cremalleras de metal con forro,reflectante diamante tipo Mylar, postes de metal para una estructura mas solida, no se puede pedir nada mas.
Garantizando una respuesta en solo 24 horas tanto si has usado antes la marca como si no.
Que decir de Barney's Farm uno de los mejores bancos de semillas a nivel mundial, con cepas que te sorprenderan.
Barney´s Farm, MOBY DICK ha evolucionado una vez más siendo cruzado con nuestro BF Super Auto #1.
Producción final impresionante, genética fuerte, robusta y perfectamente equilibrada creando una planta de energía Sativa dominante altamente resistente al moho.
La versión de Moby Dick Auto es ahora más compacta, con un ciclo de crecimiento autofloreciente más corto, pero poco se ha perdido en sus capacidades de producción, potencia y sabor.
💡 MarsHydro TS1000:
https://www.amazon.com/gp/product/B07PLY1WKK
⛺️ 60 x 60 x 90 MarsHydro:
https://www.amazon.com/dp/B081PN2QDN/
🌻 Moby Dick Auto:
https://www.barneysfarm.es/moby-dick-auto-562
📅 Dia 0: Germinacion con enraizante
📅 Dia 1: Siembra en maceta definitiva, riego con agua solamente, ya que siembro en sustrato y suele traer una EC de 1.5 - 1.8
📅 Dia 2: Riego con agua
📅 Dia 3: Descanso, ella esta feliz en su entorno MarsHydro
📅 Dia 4: Riego con agua
📅 Dia5: Descanso
📅 Dia 6: Descanso

Likes
22
Share


@CanarianGrow92
Follow
After the transplant and some food the girls are looking great, nice and green 💚
Cant wait to start flowering 😁

Likes
24
Share


@Jays_Not_Here_Man
Follow
The Apple Betty babies had some good growth this week. Days 14-21. The girls have been dialed in at about 63-65% RH and 76-79 degrees F.
On day 18 I dialed up my BP2500 to about 165 watts at the wall, and kept my small tent heater in place for the time being, nights have gotten cooler. The girls seem to be ❤️ the extra light, without causing any harm.
Switched from distilled water to tap water that has been dechlorinated for 24 hours mid way through the week, no issues shown. Added 1 ml of Micro, and 1 ml of Cal/Mag to 1/2 gallon of water, PH’d to 6.2 and watered approx. 1/2cup of water per x2 throughout the week, and about 1 cup once transplanted.
On day 19 they were all looking so healthy, with some roots coming from the bottom of my starter pots, I decided to transplant into 2 gallon nursery pots. My final pot will be a mix of 5 and 7 gallon fabric pots.
Next week the LST begins! Happy Gardening 🇨🇦❤️🌱😎💨


Likes
58
Share


@MadeInGermany
Follow
Hi everyone 😀.
Short update for this week, as nothing has happened so far, and the roots should come out this week .
The water will be completely changed once this week, and the whole system will be checked again :-).
I wish you a lot of fun with the short update. Stay healthy and let it grow 😊🌿🍀
at :
www.Zamnesia.com
☝️🏼☝️🏼☝️🏼☝️🏼☝️🏼☝️🏼
Strain
Gelato clone from mother (Zamnesia )
☝️
Genetics: Wedding Cake x Gelato x Gelato 33
👍
Vega lamp: 2 x Todogrow LED CXB3590 COB 55 W
1 x Sanlight S2W 62 W
💡
Flower lamp : 2 x Todogrow LED CXB3590 COB 55 W
1 x Sanlight S2W 62 W
💡 ☝️
Grow Aero System : Growtool 0.8
☝️
Fertilizer:
Canna Aqua Vega A + B , Canna Aqua Flores A + B , Rizotonic, Cannazym, CANNA Boost, Pk 13/14, Canna Cal / Mag, Canna Ph - Grow, Canna Ph-Bloom
☝️🌱
Water:
Osmosis water mixed with normal water (24 hours stale that the chlorine evaporates) to 0.2 EG. Add Cal / Mag to 0.4 Ec Ph with ph- to 5.2 - 5.8
💦 💧


Likes
8
Share


@Organic_G
Follow
Ich hasse es wie die Pest, schlimmste was es auf der Welt gibt, Harvest… 😭 3 Tage meines Lebens schon in die kacke versenkt… denke für die nächsten Ernten wird eine Trimm Maschine angeschafft


Likes
8
Share


@SoakingThePot
Follow
Looking good just starting to flower on fastbuds banana purple punch and the gorilla cookies strawberry banana is still probably a week out from flower. Using Roots organics grow and elemental will be adding bloom soon! Can’t wait to see what they look like in flower.
Likes
75
Share


@Sider79
Follow
Pure distilled h20 for her last week ..It got pretty chunky over the last two weeks.

Processing
Likes
2
Share


@BigHorn
Follow
Week has gone very well will be trimming all fan leaves come week end. The buds are already starting to come in and the smell is becoming more pungent


Likes
12
Share

@Leprechauns_Garden
Follow
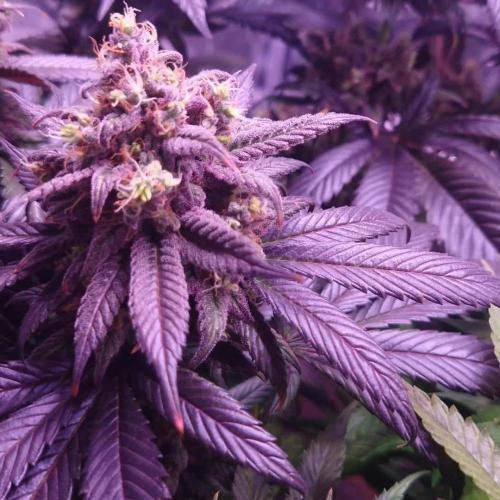
Wochenupdate - Woche 9 ?
🇵🇦Panama Red🇵🇦 - färbt sich aktuell wunderschön rot/lila. Pistillen nwerden schön braun. Auf den Zuckerblättern sind schon bernsteinfarbige Trichome zu sehen. Ich denke noch 14 Tage!
🐍Hyper Viper🐍 - hat aktuell einen wenig Lichtstress. Leichte Taco-Blätter und an 2 Tops ein wenig LED Bleiche. Ich werde bisschen Licht reduzieren. Sonst machen sie sich prächtig, braune Pistillen und fast überall trübe Trichome. Ich denke auch hier noch 14 Tage!
🚂Ghost Train Haze🚂 - mein Sorgenkind. Sie zwittert leider weiter. Habe viele "Bananen" entdeckt und vorsichtig entfernt. Trotzdem Schwellen ihre Buds weiter und werden immer schwerer. Sie färbt sich immer dunkler - die Blätter sind fast schon schwarz. Ihre Schwester ist ein komplett anderer Phänotyp - Grasgrün und eher schlanke hohe Colas.
Ich denke noch ca 21 Tage!
Power Buds habe ich jetzt rausgenommen!
Alles in Allem schaut es gut aus! 🤞🤞🤞
in diesem Sinne
Let IT grow 🌱 🌿 💚
Likes
54
Share


@Ganjagrandaddy
Follow
Day 36 flowering: This lady is my superstar. her growthbhas been excellent and never slowed at any point. Her buds are solid and orangey when pressed. Size wise she is huge at 2ft from the pot top. 5 weeks left for her and i know she is going to be one of my personal bests. A beautiful Keeper strain so far.
Likes
28
Share


@Trickybis82
Follow
Lovely to smoke. With a great weight given the set back with nute lock. Which Is the downfall to this run. Because this happened In last 3weeks which certainly resulted in small buds. However I am totally pleased with final weight and smoke from.this girl. Xx


