The Grow Awards 2026 🏆 


Likes
Comments
Share
@Daspetri
Follow
Last transplant. Planning on taking a few clones just to preserve any strain that might turn out really good. I’ll do that at the end of this week and I’ll turn to flowering next week.


Likes
9
Share
@JerMeds
Follow
Nice Bud swelling going on.
#2 has outgrown the grow box. I'm going to swap her with a small plant from my big grow room. She got a little bit of light burn but not to bad.
#1 is close to the lights bud she seems ok. I will move her if I have too.

Likes
Comments
Share
@FarmZOG
Follow
Day 75 to the big one, the other one nobody knows
we got to keep vegging til my room ready FFS
Beautiful root
Likes
2
Share
@Wondrej
Follow
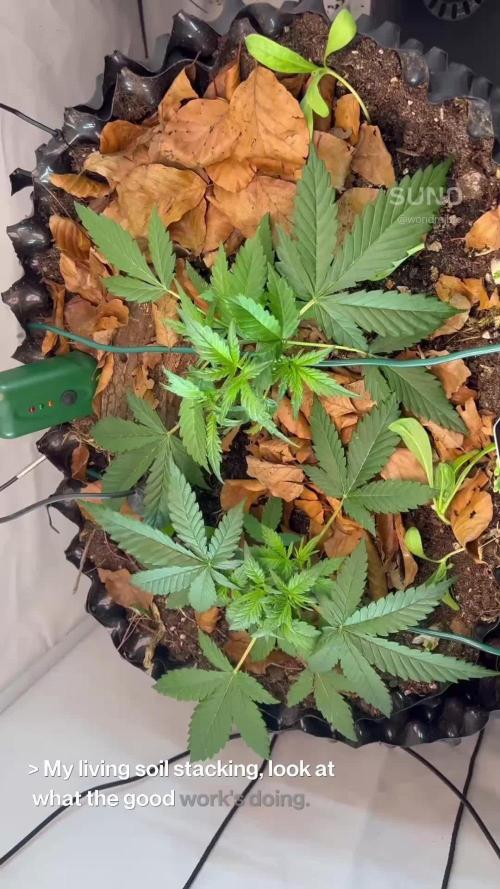
One love, growers 🇯🇲💚
So today we have the first day of Week 4(1.12.25)of vegetation, counting from the first cotyledon leaf.
The girls have recovered quite well since Thursday (27.11.25) when they were topped and bent, and we are going strong without flipping from the stress.
TBH, try putting other autoflowers through that much stress in the middle of Week 3 compared to Fast Buds without flipping into flower 🤲🏻
BIG UP to their genetics. They are really changing the game.
What do yall think of the girls, growmies? Any tips? Btw, the fertrometr finally shows the living soil is OK, it took those little rascals long enough to make it 🐛
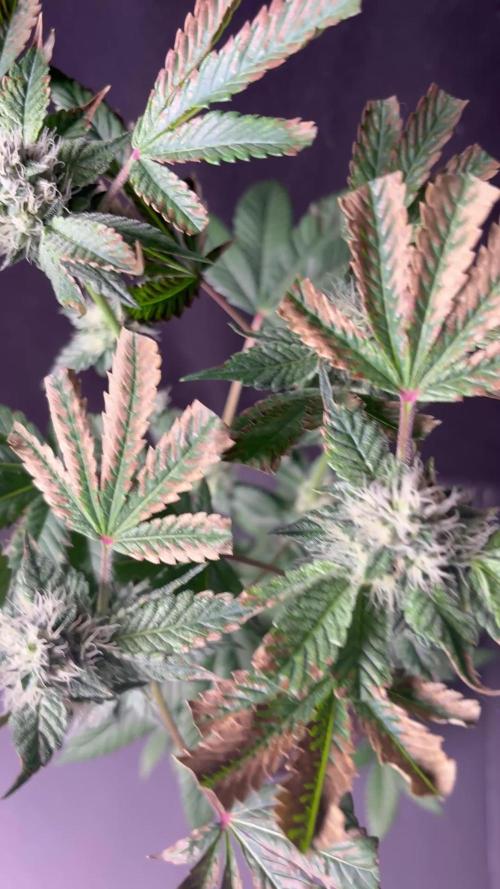
2.12.2025 They look so freakin beatifull i needed to shot some random short. Again and again shout out to Fast Buds team. See ya later growmies👽

Likes
Comments
Share
@Pablo_420
Follow
Última semana de todas al final quite la cheese auto floreciente ya que estaba en su punto óptimo y bastante contento con los resultados


Likes
18
Share
@BlueSmokeFarms
Follow
Bud sites are producing black/purple spot in leaves. Bud growth is producing as the days go by. Really excited with this being my first grow
Nitrogen boost really helped with the deficiencies. Plants are starting to look really heathy... Prunes lower colas that weren't stretching past the canopy and receiving energy so more energy can be used towards the top buds

Likes
16
Share
@Jazzvet
Follow
Second week of flowering, the girl is getting very healthy, all previous symptoms have disappeared. I am continuing the LST by pulling some rods in a way that all the tops are receiving direct light (Wish I have a scrog network to make the job more efficient) and
I defoliated and cutted some buds and lower leaves that did not reach the light.
Next week, I'm thinking of turning on the dehumidifier, trying to lower the humidity below 50%
See you next week
Happy growth guys

Processing
Likes
15
Share
@eldruida_lamota
Follow
Que pasa familia, volvemos de #GMM20 , y la verdad que entre buenos humos fue un día agradable, ya actualizó esta cepa , crazy cookies de zambezaseeds ya están a punto para cortar, una a tirado al final plátanos y la verdad que no estoy tan contento aun viendo el tamaño.
Ph controlado hasta el final, la temperatura al final algo alta pero sin problemas, Humedad correcta.
Así que hasta aquí es todo , que paseis un buen finde fumetillas.

Likes
20
Share
@Boomdrawfyah
Follow
Dia 83 de viday 55 dias después del trasplante ya tienen muchos brazos y esta llenandose la planta se puede ver en compracion de hace una semana como han crecido estan muy sanas y siguen haciendose robustas vamos a ver hasta donde pueden llegar

Likes
17
Share
@JonnyKush
Follow
hey growmies I decided to switch to flowering, I am using ADV nutes with the dosage recommended by them and they seem to me in great shape, tonight I will do a defoliation in order to breathe better and get as much light as possible. I'll keep you up-to-date. good growth and happy day 💚🌳

Likes
4
Share
@Ninjabuds
Follow
The leaves got a little burnt when experimenting with nutrients a little sad ugh

Likes
66
Share
@Neo09
Follow
A few problems this week... Just arrived back from Paris trip after week and i see, that i have to stay always by The Grils... 🤷♂️


Likes
10
Share
@asstonmartian
Follow
Fourthish week of flower and they have begun to pray 🙏🏼 well, most of them anyways. The largest still is suffering from an untreated overwatering and over nuteing condition but the others are looking nice! The ones on the roof were in full prayer and loved the hot afternoon direct sun.
At this point, giving the flowers a squeeze rewarded you with sticky fingertips and a smell of stinky gouda cheese or similar. Crystals were starting to form on the sugar leaves which was exciting to watch for the first time. I was thoroughly impressed with the prayer formation that these plants assumed when conditions were prime. Very cool! You could see how the plant was able to maximize leaf surface area exposure while blocking the least amount of light from the leaves below.
The light was being run on 100% and temps would be between 83 and 85 degrees. I was OK running it a bit hotter as it's an LED light. I like the light a lot - especially it's precision. Each 25% dim increment correlated to 2 degrees temp change. Nice!
Likes
152
Share
@BioBuds
Follow
Beginning of week 7, 6 full weeks of flower done, they should be ready this or next week. Trichomes are still mostly milky with few to no ambers. Some clear also still there. Found some larf hiding but able to reach the light so they are also fattening.
Really hard to estimate how much it is going to be. So as a growquestion and a bit of a pool amongst us and to have an idea what the more experienced growers think, I'm giving away three Zambeza White Cheese Fast regular seeds to the GD meber who comes closest to real result, which I will display here once dried.
Rules: This is, if you are over 18, from a country where sending and owning seeds is legal, have a GD account with at least one active grow. Otherwise you get a prize in same value but legal. This all if this is not against GD rules (couldn't find anything). Just to spice things up a bit.
To participate just answer the growquestion from this post. Answers are valid until final tally has been made. Total of buds and small buds. Larf and sugarleaf not included.
I'm not sponsored by Zambeza nor do they know anything about this quiz (these seeds are fresh though), I do not have any affiliation with any cannabis realated organisation and I only grow for my own medical purposes. Just for fun, I know rare these days....
If I had some Advanced seeds I would offer them to be in style with the grow, but allas, I don't.
See you next week, can't wait to hear your estimates!
Details about the grow and setup:
- 300 watt lights in 3 100 watt boards, 252 LM301b with 12 Cree. Thats one board per plant basically, giving 850 ppfd on average on canopy level.
- 140 cm (4.5 ft) by 70 cm (2ft) by 200 cm (6.5 ft) growtent.
- Temps have been stable, so has humidity but 10 % more than I would want in this stage of flower, at 50 to 55 %. Nugs feel dense though, compact and weight to it.
- middle plant has more buds, but are more larfy and little less dense.
- all buds have sprouted little mini buds on them adding weight
- Underlayer of buds are all less dense and more larfy.
So I wonder what you all think!! See you soon with some results.
As a reminder: I plan to dry-cure for at least 10 days at 15% celcius (60F) and 62% RH.
When the buds itself reach 62% RH, the weigh commences.
Although flavors might ot be ready. Final weight will have been established.
Happy guessing all.
One entry per GD account!! XXX Your buddy, Biobuds...

Likes
12
Share
@Lazuli
Follow
I fill a reservoir with 25 liters rainwater
Then i add 10ml ph up
Then i add 25ml calmag
Then i add 30grams drypart bloom
This way the ph is perfect and the plants have all they need.
This scedule also works for soil, just add 15ml ph up instead of 10.
*if my kids ever need help with growing and im gone:
The scedule above is what i use from start to finish on all my plants, autoflowers and photoperiods
(ofcourse half strength first 2 weeks)

Likes
35
Share
@bioaccessory
Follow
Hello colleagues! ✋
Somehow this time the cycle ended quickly, perhaps because the plants performed very well.
At the beginning of the week I washed it with Clean, and throughout the week I gave it clean water.
Visually, the harvest looks good, the buds are as dense as stones. After about ten days of drying, I invite everyone to evaluate the results 😎
Thank you for stopping by, and be healthy! 🙏
To be continued... 😶

Likes
28
Share
@Jef79
Follow
SUMO SEEDS
SUMO'S OG KUSH
Mys.OG Kush x Cali.Kush
85% Indica
15% Sativa
49-56 days in flowering
THC: High
CBD: Low
Great kushy strain for beginners to advanced growers.. Sure she wud b a beast in hydroponics systems or larger pots.. No problems with her growing and sge finished with a nice light purple on her top sugar leaves.. Will update on smoke report (taste & effects) in few days as i want to let her cure up a bit b4 i try her.. Big thanks to you all.. Stay safe and best wishes..
