
Likes
Comments
Share


@mikheil007
Follow
Vanilla Latte is very special strain for me: I've never grown the plant like this: thank you Humboldt Seed Company for such a good job


Likes
3
Share


@Luv2Grow
Follow
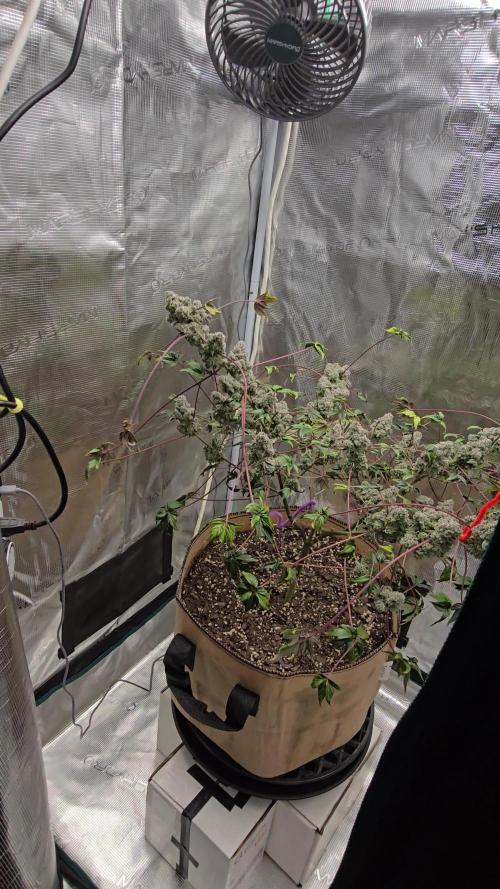
Day 91 - Started week 14 off with 2 gallons of plain pH’d water. It’s looking like this will probably be her final week and she’ll get the chop this coming weekend. I’m still thinking I’m not going to do a full harvest, I’ll chop the main buds and such and see if I can get the lower popcorn shit to fatten up. This is one of the best plants I’ve grown to date and want to maximize as much of her as I can.
Day 92 - She’s getting really close now, I can almost taste her. Thinking about chopping most of here either Friday or Saturday. Buds are nice and dense and wanna get the lower popcorn to fill in after chopping the main colas. Not seeing much for amber trichs but there’s a few in there and she’s all cloudy other than that.
Day 93 - Gave her 2 more gallons of plain water today and that will probably be it. She will be getting chopped this weekend and gonna let her dry completely up before cutting. Starting to show quite a bit of amber trichs so she’s ready, just holding out till Friday.
Likes
15
Share


@Skinnytalls420
Follow
So I think we are on day 36!!-02/08/22😂 had a lot of things to do but we should be back on track with this diary and the new one!!! So they are a lot bigger than the first blue cheese I had grown! So today because they got so big I’ve had to take em out and put them under a tsw2000 in a bigger tent just while a organise everything! But they are looking amazing so far


Processing
Likes
31
Share


@MadeInGermany
Follow
Hi everyone 🤗.
The lady developed very well this week 😃.
Only she is a little more hungry than she got 😄 which is why she gets a little more of the Orcanic Grow Liquid from the next watering 👍😃.
Otherwise everything is going great.
I wish you a lot of fun with the update, stay healthy 🙏🏻 and let it grow 🌱
You can buy this Strain at
https://www.barneysfarm.com/blue-cheese-34
You can buy the fertilizer at
https://www.greenbuzzliquids.com/
Type:
Blue Cheese
☝️🏼
Genetics:
Blueberry
X
Original Cheese
👍
Vega lamp:
2 x Todogrow Led
Quantum Board 100 W
💡
Bloom Lamp :
2 x Todogrow Led
Cxb 3590 COB 3500 K 205W
💡💡☝️🏼
Soil :
Canna Coco Professional +
☝️🏼
Fertilizer:
Green Buzz Liquids :
Organic Grow Liquid
Organic Bloom Liquid
Organic more PK
More Roots
Fast Buds
Humic Acid Plus
Growzyme Big Fruits
Clean Fruits
Cal / Mag
Organic Ph - Pulver
☝️🏼🌱
Water:
Osmosis water mixed with normal water (24 hours stale that the chlorine evaporates) to 0.2 - 0.4 EC. Add Cal / Mag 2 ml per l water every 2 waterings . Ph with Organic Ph - Pulver to 5.8 .

Likes
1
Share


@TTerpz
Follow
Start of week 12 : 9/6/25
(Day 35 of flower)
Fed with water : 9/8/25
Fed with nutrients : 9/11/25


Likes
12
Share


@RayTheGrover
Follow
So, by the look of the trichomes I assume its a harvest time!
Weighting and taste review after drying and curing. For now I could that that despite all the mistakes I made the plant managed to live till the end, smell wonderful and looks tempting.

Likes
46
Share

@Hempface86
Follow
This is it last week. I am going to give her the chop in a day or 2 I am going to not give her anymore water. As you can see, the buds are super heavy. This plant has been an amazing grow, because of the mutation and how the fan leaves are, it really showcases how beautiful the buds are, themselves.. really looking forward to this one big shout out big.Thank you too @Grow4releaf because this would not be possible without him... God bless everybody and happy growing! Next update will be the chop

Likes
18
Share


@TheGreenLeopard
Follow
Great to grow - defoliate like a champ. Check out the sea of beam on thegreenleopard.com Twitter going wild for it - really nice addition to grow space - would take this strain to the moon - check out the light combo - world wide !

Likes
10
Share


@Audi_grows98
Follow
Cherry cola is getting real close! As you can see in my tricomb pictures I got a new toy! You can see some ambers in there and we’re starting to go down on our nutrients with her. She’s gotten chunky and smelly and I’m super stoked to do a smoke review on this one🤤
Gorilla Cookies is starting to chunk up as well! She’s frosting,chunking up and starting to show what seems to be a slight fade. She’s smelling amazing and I’m super stoked to see her put on the weight 💪
Likes
11
Share


@Microsun
Follow
Alright, the time is here, I’ve started the harvest but I don’t want to press the harvest button until I have all my info correct, but I’ll show some photos from my baby, we started a slow 6.0 flush about 2 weeks ago and finishing flush about 4 days ago. She was already fading but I had some problems since I fed her without thinking after having some drinks witch is obviously a very rookie move. But as I’m still learning it’s just another oof under the bridge, she was fading and I got some nice looking tricombs and I’m happy with the smell and size for her life cycle, I’m aiming for a slow dry and cure but my space is limited in my appointment and grow room so I have a drying tent set up but conditions could be hard to handle since the season change. Cheers. (And yes I didn’t wanna flush my auto but I figured it was the safest route.)

Likes
39
Share


@King_Green21
Follow
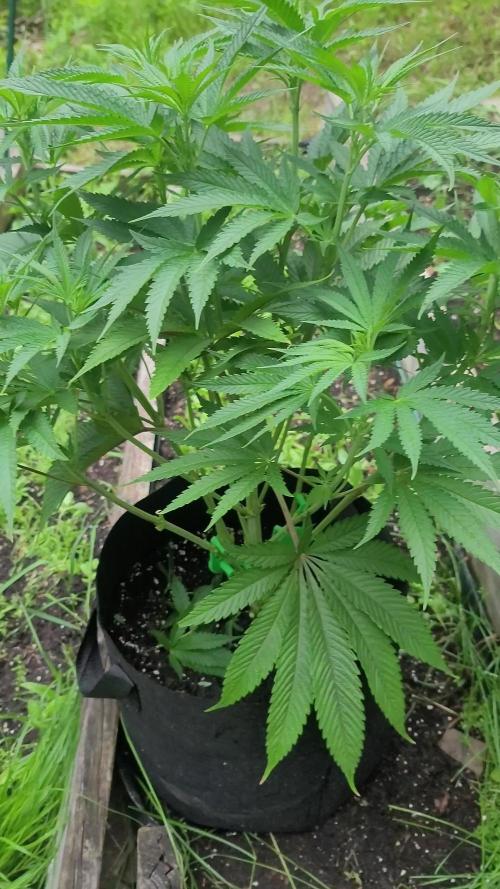
Everything going well with this strain no problems and growth is very fast, they bounce back after any defoliation.
Day 41 - Gave them a haircut today and a good Biosys tea feed till run of will leave now till start of next week
Planning to add a drip irrigation feed system this week to make this a little easier. 🤞
Will update next Sunday now end of week 6 as will be busy adjusting and implementing the irrigation feed.

Likes
8
Share


@The710Garden
Follow
Now they bulk up slowly but sure
All my plants get a usually Dynomyco Mycoriza treatment,because if you See how Crazy the roots goin you Never will do it without After it 💚
Likes
14
Share

@For2itous
Follow
Just defoliating a bit pretty much lollipoping it to take out any super lower stuff. Seems to like the nutes and it's rained recently so haven't had to water as much which is nice. Hopefully she continues to grow as she is and adds some height can't wait to see how she turns out. Happy growing 🌴
Likes
9
Share


@TheGreenGroomer
Follow
🌿 Grow Update: Week 6 of Flower 🌸
Hey growers,
We're cruising through Week 6 of flowering, and I gotta say, things are looking solid in my grow setup. This being my first rodeo, I'm pretty stoked with how it's all turning out.
The plant's rocking a deep green, which could be a bit of nitrogen overload or just her natural vibe. Regardless, she's thriving, Ive been so stupid letting her get so big in a 5gallon i wouldn't be surprised if she is rootbound..
Got a bit of a snag with some lower bud sites getting overshadowed by the top canopy. Didn't want to push my luck with more defoliation i cant really at this point of flower, but hey, it's all a learning experience next round, I'll be more surgical.
Already thinking about the next grow — tossing in a couple of plants in 5-gallon pots, keeping veg short and sweet at 4-5 weeks. Gonna tighten up the training game for sure.
Despite the lower buds not getting as much love, the top ones are coming along nicely. She's a thirsty one, so I'm hitting her with 4 liters at lights on and another 2 liters a few hours before lights off to keep that coco from drying out.
Got about 3-4 more weeks to go, and I'm itching to see how it all pans out. Can't wait to see the final yield and taste the goods. Here's to a killer harvest ahead! 🌿💧✂️🌸 #GrowLife #Week6 #FirstTimer #HarvestCountdown


Likes
11
Share


@hannabis420
Follow
fast growing auto, overloaded on nutes with this one but she still produced beautiful buds
Likes
15
Share


@raulmoat123
Follow
Week 3 flower 🌼 , and everything is going well , I have now added scrog nets and bamboo sticks for extra support . These girls are coming along wonderful some strains coming along faster then others
Banana kush from BSB is smelling like the most unique strain I have smelt in a while
Super kushs are becoming really frosty and packing on the pounds the fastest out of these girls
Gorrilla zkittles coming along really well and still stretching also becoming really frosty
Gorrilla glue number 4 are doing well
Phantom smelling really nice and is also starting to pack weight


Likes
10
Share


@barlobruz
Follow
8/22/2021
- Did some mid-flower defoliation to increase airflow and to prevent mold and mildew.
- Split the top right main from trying to train her down and spread out the canopy, supporting with tape and twist ties.
8/23/2021
- Top right main is still vigorous after split.

Likes
21
Share


@BB_UK
Follow
So amazing! She’s stretched healthily up to canopy and I feel she may still have a bit of stretch to go so I think I can take her off her raised block (4”) and let her just be where everything else is at 44” (top one) it’s going to be an amazing yield here! I think my best ever I’ve ever done! With the least supplements 😉 my way seems to get me more than if I used all of advanced nutrients line up! Lol been there done that!