
Likes
Comments
Share


@Insaniac_0
Follow
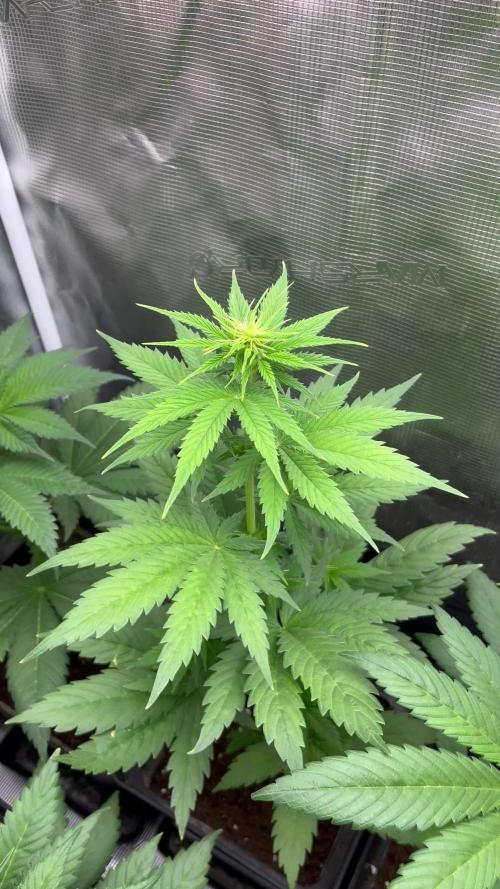
I want to thank all the growers that take the time to post their work and results, these journals were invaluable in my grow. I also want to thank Royal Queen Seeds for making such a resilient plant available to people like me... I really tortured this girl.
Site update really ruined the experience of posting for me for the moment ... so Im going to take a break for a bit and perfect my craft on my own while it works out the kinks.... I cant post many pics, the order of which I can organize them is locked out or moves to another position, and it takes forever to fully load the page so I can edit or update. But I 'really' wanted to finish this journal, so here it is. I promise to be back better than ever once the site works it all out. Hopefully not too long.
This was my first seed to weed grow and I learned a lot. I hope my notes, pictures, and videos benefit someone else as well.
My results were not typical, Im sure I could have done better, and I will continue on my path to learning and becoming an experienced cultivator of cannabis with skills I can be proud of.

Likes
7
Share


@eldruida_lamota
Follow
Que pasa familia, vamos con la sexta semana de floración de estas Black muffin F1 de Sweetseeds.
Vamos al lío, me quede con 3 por espacio, siempre pongo alguna semilla de más por si no abriese alguna por no perder ese hueco del indoor.
También se trasplantaron a su maceta definitiva, en este caso de 7 litros y el trasplante se realizó correctamente.
El ph se controla en 6.2 , la temperatura la tenemos entre 20/22 grados y la humedad ronda el 50%.
Las jodidas han estirado bastante, ya veremos que ocurre como va todo.
Hasta aquí todo, Buenos humos 💨💨💨

Likes
14
Share

@Erik99
Follow
Esta semana ya están más entradas en la prefloracion, se han realzado los colores morados de algunas plantas con el fenotipo, se puede apreciar también que se empieza ha extenderse el polen por todos los nuevos calices y borde de las hojas.


Likes
Comments
Share


Likes
3
Share


@Skinnytalls420
Follow
Day 34-28/08/22 my diaries have got abit messy as I’ve been unwell but so far so good with this tulip can’t wait 😜 growing really well!!
Processing
Likes
9
Share


@NutsInGuts
Follow
19.08.2020 - water with plain water
21.08.2020 - nutrient watering
23.08.2020 - nutrient feeding.start lst. and recharge watering
Likes
7
Share
@eldruida_lamota
Follow
Que pasa familia, vamos con la primera semana de floración de estas Green Gelato feminizadas de RoyalQueenSeeds.
Vamos al lío ,se trasplantaron en macetas de 7 litros definitivamente.
El ph se controla en 6.0 , la temperatura la tenemos entre 24/20 grados y la humedad ronda el 50%.
El ciclo de floración puse 12h de luz, el foco está al 50% de potencia.
De momento van creciendo a buen ritmo y tienen un buen color, estaban muy bien enraizadas al realizarle el trasplante se notaba la abundancia radicular.
Agradecer Agrobeta por el envío del kit gold series en cuestión, unos maestros 🙏
- os dejo por aquí un CÓDIGO: Eldruida
Descuento para la tienda de MARS HYDRO.
https://www.mars-hydro.com
Hasta aquí todo, Buenos humos 💨💨💨
Likes
10
Share


@Servietsky
Follow
Certainly last week of growth, NL is short and made of large and beautiful intense green leaves well formed. This week I stop the Start Booster. Light fragrance of greenery.


Likes
18
Share


@BlogMArley
Follow
Los últimos tres días de la semana pasada fueron cruciales , han evolucionado super bien, espero poder mejorar esta semana enormemente
Le voy a aplicar enraizante de top crop y top veg cada uno 2 ml por litro de agua , esta semana para poder mejorar mas aun el crecimiento
Actualizacion de la semana
Su crecimiento han sido notable, la altura del foco la bajaremos para ver si podemos subir la temperatura
Actualizacion
Estos ultimos 4 dias han sido un huracan de crecimiento, ayer en la noche la ampolleta de haluro que ocupaba para el crecimiento de vegeta se quemo
y bueno siempre tengo otra ampolleta por si acaso pero esta es una ampolleta que sirve para todo el proceso de vida! el color es amarillo por eso de aqui en adelante estaran coon esta luz que nos acompañara hasta el final si es que no explota tambien jajaaj

Likes
2
Share


@420Somewhere
Follow
Smoked this before from somebody else's grow who I know didn't posses the greenest of fingers and it was incredible, so will be interesting to see how good (or bad) it will be in my hands.
Just water week 1


Processing
Likes
25
Share


@curvylex
Follow
Week 3 In the beginning of Week 3 I used 1/2 teaspoon of Grow Big which was a mistake! They really just needed to be left alone! Showed the tiniest bit of nute burn on the tips and when I saw that I went straight to checking PPM which was at like 1500 (yikes) and flushed until I got it down by 300 ppm. Should have waited until the 3rd set of leaves to feed! Luckily it was caught early and they are flourishing with no further issues.
The side lighting from the T5 bulb really seems to be helping. They are really going along nicely, here's hoping I can get them through the net few weeks in the same fashion :)
Moved the light down from 28 inches in the beginning to 17/18 inches by the end of week 3. The plants seem to love it and aren't showing any signs of heat/light stress


Processing
Likes
3
Share


@mr_smooke
Follow
I'm a little late with update, I was very busy. In grow room it is all under control. the buds are filling up. Strech has stoped. She is 16 days in flower.
Smeel is pretty strong, i just need to set up carbon filter. Next update will be in a fev days.
✌️🤘💚💜

Likes
42
Share


@rhodes68
Follow
Typical Green Crack harvest, lot of leaves but easy otherwise
Lack of tent space really hurt her yield, guessing 25% less due to it
Dry weight for Plenty 322 grams nice easy final trim rock hard nugs
Two clones follow
The clones nearly identical both weigh in at 710 grams wet in dry yield later
Clones yielded 287 grams dry

Likes
50
Share


@ClubRiot
Follow
Start week 8 , Top-Max 4 ml/L + Cal-Mag Xtra 2 ml/L + Bio Bloom 4 ml/L + CarboLoad 2 ml/L + Alg-A-Mic 2 ml/L + Bio-Heaven 2 ml/L ( Ph 6.6 ).
Likes
Comments
Share

@Emerald_Gardens
Follow
Week 1 of the Purple Lemonade journey! She’s officially out in the wild and taking in those first few days of natural light. It’s always a nerve-wracking but exciting phase, but she’s looking healthy and vibrant so far. Keeping it simple this week—no training, no nutrients, just letting her natural hybrid vigor take the lead. Other than giving her shelter form the rain she is at the mercy of mother nature in Northern Ontario Zone 3. Big things ahead! Grown directly in Gaia Green living soil with some worm castings, all purpose 444 and power bloom.
Likes
11
Share
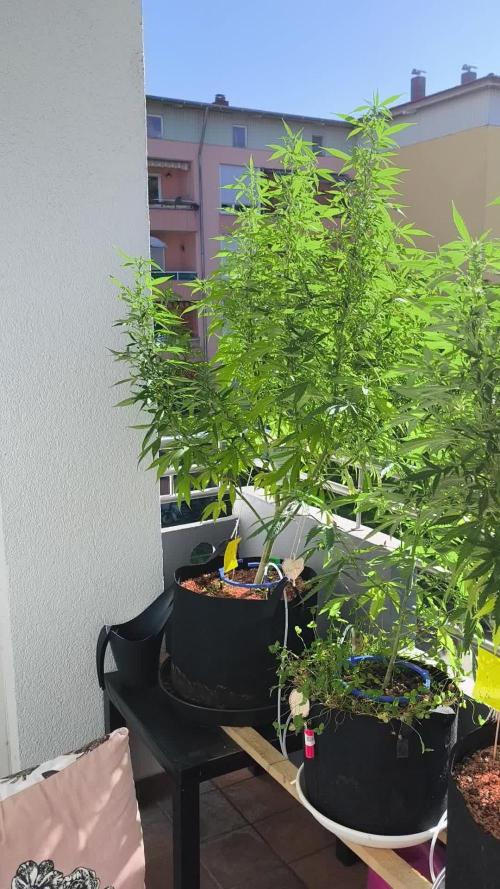

@BalconyBoy
Follow
12.08.25 weather is back on Sommer Mode and the plants continue to start flowering except the Quick Sherbet which still lacks visible signs. I installed a smart plug and camera to be able to give additional water on hot days based on leave tension while on vacation. The setup was super easy. I plan on top dressing flower fertilizer a second time at the end of August. Enjoy the weather if you can and happy growing to everyone!
