
Likes
Comments
Share


@Justjewit
Follow
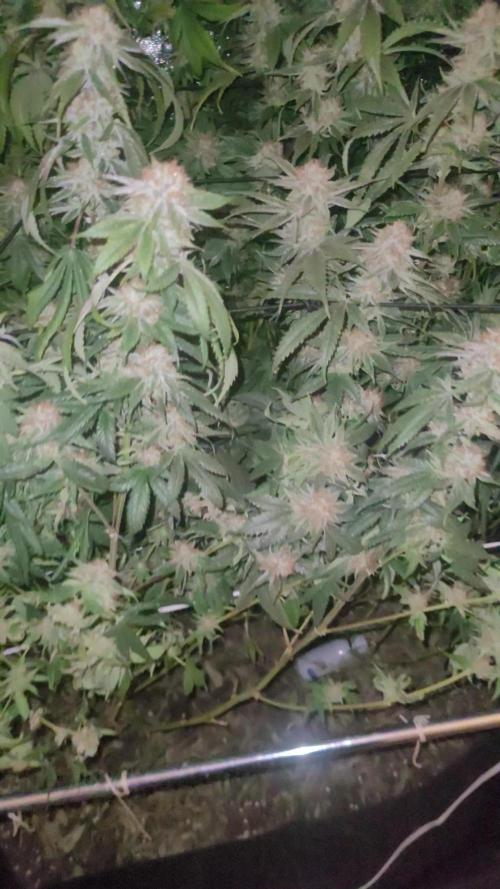
So it's the start of week 3 , to say the plants had a very randomised environment up until this point , and 2 plants are in 1 pot ...... all 3 aks are looking good . Soo I'm going to keep them in the room , can just make friends with my new strains I want to put in there .... sure they will get along


Likes
27
Share


@Bread_n_Buds
Follow
Time flies, we have arrived in a flash at day 16, it seems like the other day that the first young ladies were appearing on September 1st. "Do you remember.....nanannana Septermber"
She is XXXX Test 2, the elves of the Zamensia house have been very clear about keeping the name of these beauties TO SECRET that will soon be available to the public, I am testing them for you. They are growing very well, they are truly a force of nature. We are talking about a strain with a large internodal distance that is already showing this characteristic clearly, that is growing at a great pace so much so that we are very slightly under fertilization always exclusively due to my fault but no big deal this thing is easily recovered.
--- feeding program - As I mentioned I was shy about fertilizing and the seedlings are slightly, very slightly faded, let's learn to notice these small signs and with the normal doses after two or three waterings we should be fine. You have to look at the plants guys.
- Power Roots - 1ml/l
- Alga Grow - 2 ml/l (instead of 4 ml/l I made this mistake)
- Pure Zym - 1 ml/l
- Sugar Royal - 1ml/l
- Vita Race - 0,5 ml/l
- The 100% Organic pack by Plagron can be found on Zamnesia at the link: https://www.zamnesia.io/it/11457-plagron-easy-pack-natural.html We are giving a lot of humidity with a humidifier and we oscillate between 65% and 70%.
// Strain Description // New Strain testing coming soon... -
- Get a seed of this fantastic strain --- new strain coming soon get some others on - https://www.zamnesia.io/
- Soil and Fertilizers entirely organic --- https://plagron.com/en buy on www.zamnesia.io
- Growbox and air sistem --- https://www.secretjardin.com/
- Light - Sp3000 --- https://marshydro.eu/
- Music and sound --- I made my girls listen to 432hz frequencies and music from www.radionula.com
- Z --- You can find these seeds, much more from the world of cannabis, mushrooms and an incredible series of accessories and gadgets on the reference site not only mine but of many growers ---- https://www.zamnesia.io
Processing
Likes
33
Share


@ganjaman24
Follow
Started the flush with her last feed! She looks amazing can't wait to see her fill out!

Likes
6
Share


@GoldenWeedGrower
Follow
Legend
Timestamp: 📅
EC - pH: ⚗️
Temp - Hum: 🌡️
Water: 🌊
Food: 🍗
pH Correction: 💧
Actions: 💼
Thoughts: 🧠
Events: 🚀
Media: 🎬
D: DAY, G: GERMINATION, V: VEGETATIVE, B: BLOOMING, R: RIPENING, D: DRYING, C: CURING
______________
📅 D22/V18 - 07/05/24
⚗️ EC: 0.7 pH: 5.3
🌡️ T: 22 °C H: 50%
🌊
🍗
💧
💼
🧠
🚀
🎬 1 TL video
______________
📅 D23/V19 - 08/05/24
⚗️ EC: 0.7 pH: 5.3
🌡️ T: 22 °C H: 50%
🌊
🍗
💧
💼 Topping and LST
🧠
🚀
🎬 1 TL video of grow and one of the topping
______________
📅 D24/V20 - 09/05/24
⚗️ EC: 0.9 pH: 5.4
🌡️ T: 19 °C H: 50%
🌊
🍗
💧
💼
🧠
🚀
🎬 1 TL video
______________
📅 D25/V21 - 10/05/24
⚗️ EC: 0.9 pH: 5.4
🌡️ T: 19 °C H: 50%
🌊 12 L
🍗 Calmag, Grow A-B, B52, Hydroguard, Rhino Skin, Bud Candy
💧
💼
🧠
🚀
🎬 1 TL video
______________
📅 D26/V22 - 11/05/24
⚗️ EC: 0.9 pH: 5.4
🌡️ T: 19 °C H: 50%
🌊
🍗
💧
💼
🧠
🚀 Out of Home
🎬 1 TL video
______________
📅 D27/V23 - 12/05/24
⚗️ EC: 1.0 pH: 5.3
🌡️ T: 20°C H: 50%
🌊
🍗
💧
💼
🧠
🚀 Out of Home
🎬 1 TL video
______________
📅 D28/V24 - 13/05/24
⚗️ EC: 1.0 pH: 5.2
🌡️ T: 20°C H: 50%
🌊
🍗
💧
💼
🧠
🚀 Out of Home
🎬

Likes
1
Share


Likes
5
Share


@DrShotzUK
Follow
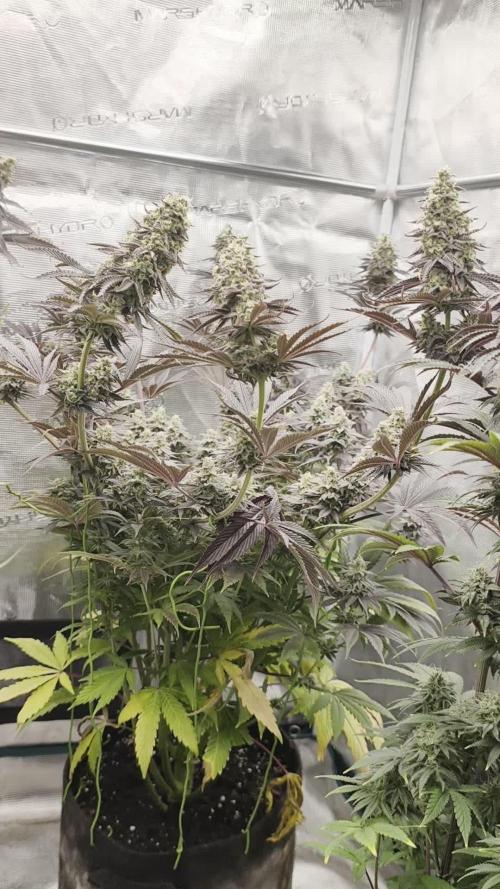
All round a very good plant to grow , one of them stretched but I lollypopped and topped it late into flower due to outgrowing my tent and she took it well, producing absolutely top quality buds covered in milky thricomes and glistening all over the nuggs. Absolutely frosted.
The smell at this point was around 7.8 smelling strong of orange and citrus , the main cola nice and dense, with lots of other colas branching off.
Easy strain to grow to this point although I did have a calcium deficiency but it was fairly rectified.

Likes
11
Share

@XII_XII_MrGreen
Follow
I love this lady she exploded, beautiful buds loaded with trichomes, everywhere, smells amazing, beautiful purples hehe 😋👌💚

Likes
29
Share


Likes
2
Share


@Oldwied
Follow
For the first time, I tried working with enzymes in the irrigation water. These are supposed to break down dead roots and plant material in the soil and make it available to the plant as food. I'm curious to see how it goes.
After the first three weeks of light changeover the flower transformation is done. Now it is the right time for defoliation and lollopoping.
In case cherry high lollipopping wasn’t necessary I only removed one or two popcorn buds and a few leaves.
Light Power: 100%
Day 72
Flower day 29
Photoshooting
Defoliaton
Likes
3
Share


@Easygrower
Follow
Hello welcome back to the garden today is day 63 with the Californian snow sorry iv missed a few weeks but here you go she is a beast she has towered over all the others she’s at about 120-125 cm in hight and she’s starting to swell it is amazing how big she is in 63 days she’s frosty af and I can’t wait to try her buds so until harvest be safe and happy growing 👌🏻

Processing
Likes
50
Share


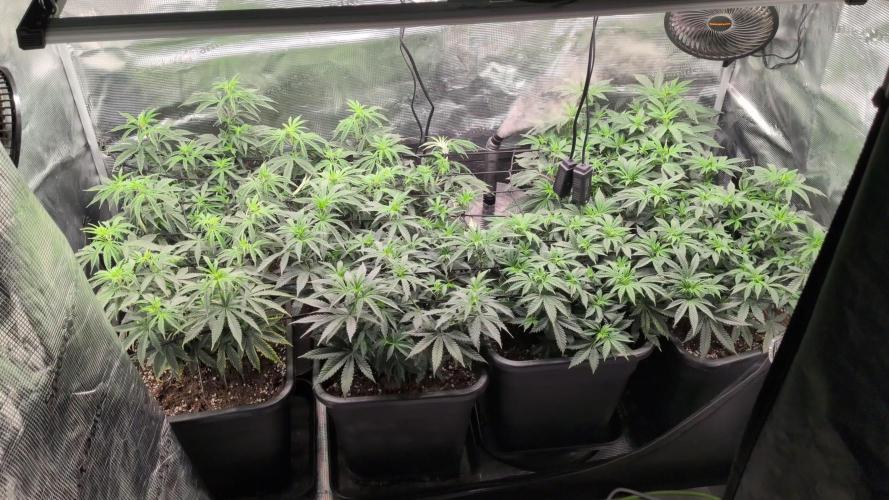
@BarrieGrower
Follow
Had to rearrange everything and start using the 5 x 5 tent for all the flowering. Put the 11 Timber Grow Vero cobbs set up in the tent. Had to customize the frame to fit it in. Customize is code work for cut up. Did not change the cobb spacing at all, just trimmed the overall frame so it is slightly smaller. They fit good. The tent is bright. Had to install a 6" exhaust fan to the tent to suck all the warm air out. This gets dumped outside without a charcoal filter, haha. I can smell it in the backyard, I wonder if anyone is going to say something. Who cares though, haha.
Installed two small fans above the lights to cool the cobbs and a larger floor fan to keep the air moving around in the tent. The end result is good however the temperature is still slightly higher than I want. I will work on ways to lower it.
Plants are doing good, smell is stronger now. The smell is great too. Buds are bulking up and really frosty.
The silicate seems to be working fine, Ifeed this every watering. The plants seem to love nutrient, I keep adding it and watching this closely. The one plant is starting to get orange hairs, this is the one that was always under the cobbs. The other two are a week or two behind.
Cheers.


Likes
Comments
Share


@SmokeAndChill
Follow
Gorilla Cookies Auto 12/12 from start.
Smells like Work Shoes after a 8h shift lol.
I don't like the smell at all, got fast dryed and has a lot of seeds it's already smoked only a few grams of low mid.

Likes
9
Share


@fanofCalvert
Follow
22 days of Flower done, all pots have stabilised except the Small Ghost, I don't think it is genetically 'Small' as it's cut is just as vigorous as the other clones. Never recovered as quickly from the lockout as the others I suppose.
Now, I will start slowly increasing E/C . How high I go for each plant? We shall find out together.
I have begun to lolly-pop the plants, a process I will continue to do right up to flush, If its gonna be larf it's coming off!
These plants are a lot taller than I had planned, the lockout and full recovery took longer than I expected, + days lost due to a quest for new coco. It will only cost me time in the end, and with big root systems only feeding 1 .77 sq ft of canopy after thinning, bending etc.
It should not hurt my yield. I also realise there will probably be a large, 4 or so week window for these plants finishing, I can open up the space a bit then to help finish late bloomers. (I have a UVB lamp at the ready, to Speed it up at the end.( In more ways than one?)
After more bending I will add some doses of silicone over a few days. Help repair the branches that I have Crush Bent. The silicone also toughens up the plants against Insect attack. When using Silicone I dilute before use to prevent precipitation of elements.
Day 24 -
Maltezerz This plant is most advanced into flower, plenty of resin being produced. Smell is forest fruits and berries first, then Afghan Hash with a distinct chocolate finish. If it keeps a similar flavour profile to the end and has the promised hit of THC, Wow.
Orangesicle. This plant is a lot more stretchy than French Cookie parent. (Tangie influence) The smell is powerful and a distinct Orange but a bit on the sharp synthetic side of the profile. Probably change and mellow with maturity.
Blue Sherbalato, Tons of resin with a distinct sharp citrus sherbet smell.
GTH 1, The smell is complex 'Dirty Lemon floor polish' then Diesel, then underneath a musty mushroom type smell. Not unpleasant, but not that inviting.
GTH 2 and 3 Clean fresh lemon scent very pleasant and lifting.
GTH 4 This is also dominated by a lemon scent, but different, Sticky Sweet Lemon, like Drizzle Cake, an oily thick heavy lemon aroma.
Scotts OG. This is weird, in the morning this plant smells like a custard slice, by lights out, the smell has a tinge of sour milk or yogurt to it . No hint of the Ginger and Spice of the grow phase stem rub! This plant is quite slow out of the blocks and stretched as much as the GTH's. No real resin production up to now.
Wedding Cake. Beautiful complex aroma. It smells like a Panattone with a touch of Black Hash underneath. Different to the US cut I have grew before, which was high yielding and very potent but lacked much aroma at any stage.


Likes
3
Share


@CanarianGrow92
Follow
The plants are starting to recover from the N excess 2 weeks ago, this delayed a bit the starting of flower from some plants but im sure that the rest of flowering will be ok, i gave only water this week and applied a small amount of guanokalong nutrients as these are slowly absorbed to ensure the plant continues to receive some nutrients until next 2 weeks when we will start to give some extra PK
Likes
23
Share


@Mr_McNasty408
Follow
12/28/20
Nutes:
Veg A: 2.05 g/gal
Veg B: 1.38 g/gal
PPM: 570
Water temp: 64°F
pH: 5.9
12/29/20
Nutes:
Veg A: 3.07 g/gal
Veg B: 2.07 g/gal
PPM: 850
Water temp: 64°F
pH: 5.8
12/30/20
Nutes:
Veg A: 3.07 g/gal
Veg B: 2.07 g/gal
PPM: 850
Water temp: 64°F
pH: 5.8
12/31/20
Nutes:
Veg A: 3.07 g/gal
Veg B: 2.07 g/gal
PPM: 850
Water temp: 62°F
pH: 5.8
1/1/21
Nutes:
Veg A: 3.07 g/gal
Veg B: 2.07 g/gal
PPM: 860
Water temp: 62°F
pH: 5.8
1/2/21
Nutes:
Veg A: 3.07 g/gal
Veg B: 2.07 g/gal
PPM: 860
Water temp: 62°F
pH: 5.8
1/3/21
Nutes:
Veg A: 3.83 g/gal
Veg B: 2.58 g/gal
PPM: 1050
Water temp: 62°F
pH: 5.8
Likes
7
Share


@BushDoctor740
Follow
Day 42 and things are moving along awesome.Ive seen a huge stretch in the past week the strawberry pie is 3 feet tall.Watering more frequently these girls have been very thirsty and growing well.Top dressed with 4 tbs of Gaia green power bloom and watered with 1/2 tsp of Recharge.Increased light intensity to 60 percent power today as well.
Day 46 I cleaned out the tent and gave the girls a haircut to allow some airflow.Also decorated a lil for Christmas
Likes
12
Share


@Willy_Balls
Follow
First week of flowering.
Girls are super happy. And drink a lot. I very much prefer the lower plant count with 8 plants. And I’m probably not going to go back to more than 9 plants. Perhaps will even try 6 or 7. 12 or 16 was a bit of overkill. Maybe with super short veg it has its place.
26.01 first day of flower.
