
Likes
Comments
Share


@SkunkyDog420
Follow
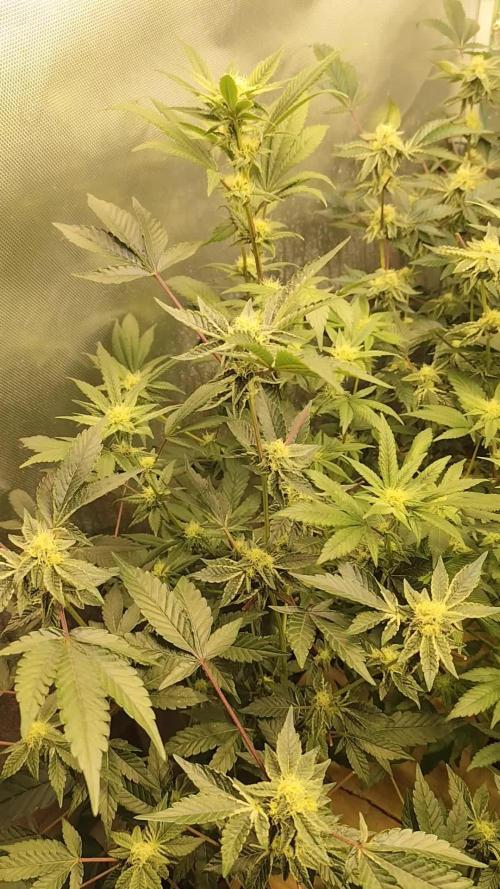
Hallo zusammen 🤙.
Sie wächst sehr schön und macht keine Probleme.

Likes
Comments
Share


@Dabking
Follow
I was told to never judge a strain purely off it's THC percentage. To smell a plant, and what your nose picks out is generally the strain that will jive the best with the endocannabinoid system in your body. This strain exemplifies that. It's only around 17% but the high is amazing. An under-rated strain for sure.
Very easy strain to grow. Although the same strain, one looked pretty different and was much frostier despite getting the exact same treatment from seed to chop.

Processing
Likes
23
Share


@HanzGrowz
Follow
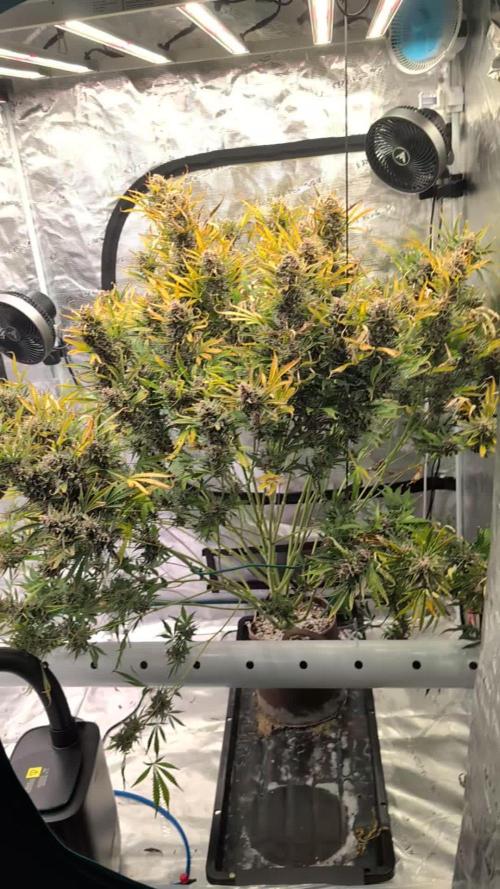
Amazing progress across the board in the tent the last week. Development has been positive for The New and Black Dog, Bubba has swollen up bud wise, and it’s still another week away or so (flowering is supposed to be 50-55 and we’re at 50 today). Chemdawg smell is getting stronger but not too aggressive, and it’s fate king nicely on most colas. Even at the bottom of the plant the buds look nice. It’s an amazing strain, can’t wait to smoke it.

Likes
8
Share


@GrowingABushWithButch
Follow
It's week 01 Day 02 Of 12/12 For My 02 Kombucha Cream By atlasseed . And For My Snow White & SpliffStrawberry By Spliff Seeds Amsterdam . So Yesterday All 4 Lady's Received there Transition Feed. And Prep For Flower. The Kombucha Cream 3-Part And Snow White. Received 4ml Of Emerald Harvest Nutrients Grow, Micro,Bloom,6ml of Emerald Goddess, 4ml Of King Kola, 4ml of Honey Chome And 4ml of Quad.AG Products Fulonic. pH at 6.3 ppm at 766. On Runoff. My Kombucha Cream 3-Part as a pH of 6.5 and ppm at 932. My Snow White as a pH of 6.4 and ppm is at 723. The Kombucha 2-Part and SpliffStrawberry Received 5ml of Emerald Harvest Cali Pro Grow A&B,6ml Emerald Goddess, 4ml King Kola,4ml Honey Chome And 4ml Of Quad.AG Fulonic. I pH the Kombucha Cream 2-Part at 6.2 Ppm at 613. On Runoff pH is at 6.3 ppm is at 833. My SpliffStrawberry I pH at 6.5 the pH was a little low on my last feed. Ppm is at 613 l. On Runoff pH is at 6.0 ppm is at 756. I like a pH of 6.2 in Flower I will work on getting the pH at 6.2 on the next few feeds.The Plants are really Loving Life Very happy and Perky This Morning.
Happy Growing Growmies 🤘🏻


Likes
17
Share


@Paflucy
Follow
Heeloo everybody :)
After huge problems on veg, finally we start blooming :) First day after older ladies break into flowering. Right now they are on 12/12 lighting cycle and they just get the final boost of nitrogen.
When the girls were at 10 level I cut them down into 5, 4 and 3 level or 4 and 3 level. I had also erased all the bottom levels. After removing top level I waited 3 days and removed the lower one. The stem had maybe 3 cm but I decided to try and make a clone off it, just as an experiment. I was super suprised when I saw some roots after only 10 days :)
Grow Medium - Biobizz light mix + with acid humus + dolomite + perlit + Great White Shark ( when transplanting)
On the bottom and top Plagron Coco 60 - Peebles 40
Check the lamp, it's something really innovation in my opinion.
https://bilberry.pl/en/home-page/


Likes
14
Share


@BLAZED
Follow
Week 7 (13-3 to 19-3)
13-3
Temperature: 24.2 degrees (lights on) 18.5 degrees (lights off)
Humidity: 65% (highest) 52% (lowest)
14-3
Temperature: 28.2 degrees (lights on) 19.5 degrees (lights off)
Humidity: 57% (highest) 44% (lowest)
Today i refilled the reservoir with 15L feed (1L + 0.2 ml Silica + 1 gr Calcium + 0.7 gr Grow) EC: 1.3 PH: 6
One wavemaker already broke on me, luckily i bought 2 so i replaced it with a working one.
15-3
Temperature: 28.5 degrees (lights on) 21.1 degrees (lights off)
Humidity: 60% (highest) 46% (lowest)
16-3
Temperature: 28.2 degrees (lights on) 19.7 degrees (lights off)
Humidity: 59% (highest) 45% (lowest)
No pictures.
Adjusted the distance of the light to 40/50 cm (depending on hight of some tops)
17-3
Temperature: 27.8 degrees (lights on) 19.7 degrees (lights off)
Humidity: 62% (highest) 44% (lowest)
18-3
Temperature: 28.1 degrees (lights on) 20.4 degrees (lights off)
Humidity: 62% (highest) 44% (lowest)
Today i cleaned the reservoir and added 15L. (1L + 0.2 ml Silica + 0.5 ml CalMag + 0.46 gr Grow) EC: 0.9 PH: 6
19-3
Temperature: 28.2 degrees (lights on) 19.9 degrees (lights off)
Humidity: 69% (highest) 43% (lowest)
No pictures.
Today i installed a new SCROG net, this one is much better then the one i used before.

Likes
7
Share


@ibbzy
Follow
Only two plants which will need another two weeks. (Red Mimosa)
Everything just ripening and swelling at the moment!
Sad that it’s coming to an end
1x Mimosa Bruce Banner
1x Sweet Mandarine Zkittlez


Likes
4
Share


@4F1M6
Follow
Shes booming through the stretch! Got branches rowing up great as she fills right out. Did a big defoliating of most the leaves under the first net. Allow some air flow through the under skirt. Did a preventative treatment using dr zhymes. Than gave her a good shower to wash off any residual build up.
I'm just starting to see pre flowers coming in at the nodes. So she will still have some stretching period to go. I'd say atleast another week of stretching out and filling up my net. Before I start seeing those white stigma pom poms coming in at the bud sites. Lets see what this lady can do.
Until next update. Happy growing and stay lit fam.
Processing
Likes
29
Share


@Lennys_Laboratory
Follow
Feed Started With Tap Water Left Overnight For Chlorine/Chlorides To Evaporate.
Next Day.
Starting EC of our water is 0.15.
I added 1ml of Rhiz Per Litre. Then Used Canna Terra Vega Until EC measured 0.4.
I then used the mighty growth enhancer drop by drop until my EC measured 0.7
Finally i PH'd the mix to 6.2. Made sure the feed was of adequate temp and continued to feed.
Next Two Feeds Are Just PH Water with a few drops of Rhiz 😎

Processing
Likes
78
Share


@ThrashedTV_BakedByGlaze
Follow
Day 61 - 12/29
Returned from 2 days out of town and girls (LSD + 2 Cali Snow) are doing well. No grow lights when I left so I pointed the open tent towards a window so it got some light but not a lot.
Noticeable bug growth from the end of last week since the couple days away from her gave me some fresh eyes 😂
The plants have spent most of the day under the grow lights again and once they drink enough, they'll be getting another PH Perfect feeding later in the week.
The deep purple of the buds is amazing and the growing deep indica/varnish/kushy bitterness smell coming off it will probably taste so nice when it's all said and done.
Will have to break out the good camera in a week or so when they get fatter so I can get that colour better than the phone shots I've been using so far #SamsungNote9
---
Thanks for stopping by, throw a like so I can return the favour, and will update through the week 🙌
IG: @GlazedGrow


Likes
18
Share


@Onlygrow99
Follow
Empecé la germinación el 23/01/23 en un vaso de agua durante 12 horas, después al taper con servilleta húmeda 24 horas más.
Radícula de 2cm y las planto en maceta de 1L
Actualización estado de germinación 03/02/23:
Meto fotos ya con las macetas rellenas al 10º día y fotos del 7º día comparando las macetas y los tallos.
En cuanto el 2º par de hojas sea mas que evidente empezamos las semanas de crecimiento. Dentro de 2 o 3 semanas quizás, trasplantamos a maceta definitiva de 7Litros. Lo veremos.
Actualización 06/02/23:
Meto unas fotos de las plantas mas grandes, 3 días después para que se vea la diferencia de crecimiento.
Además un video mostrando el cultivo entero, la luminaria y la extracción. Llevamos 13 días desde la germinación.
Actualización 08/02/23:
A partir de aquí voy a empezara a contar ya las semanas de crecimiento. Hemos tenido 15 días desde la germinación.
Venga va, día 10/02/23 meto unas fotos mas, llevamos 17 días desde la germinación

Likes
23
Share


@eldruida_lamota
Follow
Como estamos familia, a día de hoy, viernes, llevamos exactamente 7 días en la fase de floración y todas ellas están marcadas por su sexo.
Todo va sobre ruedas, tenemos mínimas de 20,5 y maximas de 28,5 grados. la humedad no supera nunca el 60%.
Altura mínima lemon kush 25cm.
Altura maxima northern light xl 42cm.
•las power plant xl Han pegado un estirón serio, están empezando a ensanchar bastante.
•una marea verde desde semilla, con tan solo 5 semanas de crecimiento y un solo trasplante desde que se germinó, para controlar un mal crecimiento.

Likes
10
Share


@Martymar021208
Follow
This week was the beginning of my L.S.T. and some defoliating in order to open up the canopy and allowing more light to and Air flow. About two more weeks and we will be flipping into flower can't wait.

Processing
Likes
5
Share


@MyloGrow2019
Follow
Week #4 of bloom , girls are all looking good , going to remove some of the shade leaf this week to open up the canopy and get some more light to the smaller bud sites , I dialed my feed schedule back to 3 times per 24 hrs , I haven’t seen any negative reactions to the adjusted feeding and it’s been a week since I made the changes ,

Likes
5
Share

@Grow_for_Happiness
Follow
And then there was one!
Here we are on day 84 and there is only this beast left standing. She's only got a few days to go with most of her trichomes a nice cloudy with just a few clear here and there, and a handful of amber throughout the pics I took. Buds are nice and swollen and very dense, with some beauty colours throughout. This plant got to quite the respectable size for an auto, once the front plant was removed she spread out to cover 80% of a 4x4 area.
Harvested the front plant on day 82 as she was showing amber/cloudy without a sign of clears. Buds were nice and dark coloured, dense, and smelled so lemon. Really enjoyed harvesting it even with the mask on could get a good sniff and smelled delicious.
I can't wait to dry, cure, and try her out!
Likes
5
Share


@SgtDoofy
Follow
April 2
LST is really working well. Letting the plant fully sacrifice the yellow leaves before I pull them off. Fed a half gallon of RAW BLOOM yesterday and a full gallon 2 days prior.

Likes
37
Share


@GODSGIFT_2005_JM
Follow
For LIQUIDS & NUTES ******GREEN BUZZ NUTRIENTS***** organic.
Also i’m using their LIVING SOIL CULTURE in powder form!
MARSHYDRO ⛺️ has large openings on the sides which is useful for mid section groom room work. 🤩
☀️ MARSHYDRO FC 3000 LED 300W
💨MARSHYDRO 6” in-line EXTRACTOR with speed-variation knob, comes complete with ducting and carbon filter.
