The Grow Awards 2026 🏆 


Likes
Comments
Share
@xmackobox
Follow
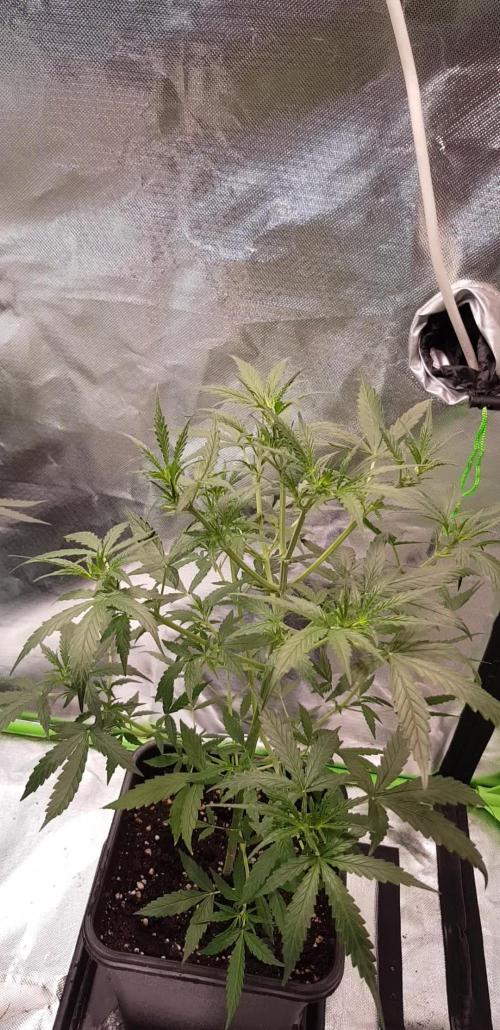
Hola amigos arrancamos nuevo cultivito, por ahora os traigo los videos que subo a YT como ya sabéis le estoy dando caña al canal, buscarme allí, me llamo como aquí, xmackobox.
Poco mas, se empezaron a germinar el día 14/02/24. Algunas se pasaron a maceta el día 16, otras en 17 y se terminaron de plantar en maceta definitiva de 11 L el día 18/02/24.
Para la primera semana de crecimiento ya meto fotos detalle de todas.
**ACTUALIZADO**
26/02/24 llevamos 12 días desde que se empezó a germinar, todas brotadas perfectas excepto 1 que como veis parece atrofiada o con algún problema, no desarrolla el ojo principal es decir su punta apical.
Esperaremos a ver que hace esta plantita :D
Likes
15
Share
@Drgreenthumb627
Follow
upsized it to a 10 gallong pot, will throw into flower in about 5 weeks!

Likes
6
Share
@Chino8
Follow
Decided to start dark period(24-48hrs) day 85 mostly milky not much amber maybe some amber on the sugar leaves. I wanted to go 90+days with this auto but I needed the space in the tent for my photos and she looks almost ready, would’ve liked to see a little more amber but nevertheless I haven’t grown much at all so don’t have too much preference yet on trichomes. I’ll chop in a day or two and dry in my smaller tent and hopefully it goes well, my first harvest I dried too fast in low humidity and wasn’t that pleased with the end result. This time I’m planning on lowering exhaust speed and to not be so scared of 50+humidity in drying area and raise it to around 60humidity after a few days. Can’t think of anything else to write, but I’ll update after the chop and dry and 🙏 hopefully all goes well.

Likes
37
Share
@DogDoctorOfficial
Follow
🌱 Week 10 Veg – The Final Stretch Before Flowering! 🌱
This might just be the last week of veg, and what a journey it’s been! The garden is thriving, each plant showing off its unique structure and character. But the big news this week? A nutrient program switch! 💧✨
I’ve transitioned from the Aptus Holland Organic-Mineral program to the Clean program, setting them up for a smooth ride into flower. This move is all about prepping the plants for peak efficiency in their next phase—getting them used to their long-term diet early.
💡 So, what’s in the mix now? Let’s break it down:
🔹 Regulator – The foundation. This ensures optimal nutrient uptake, strengthens cell walls, and helps plants handle environmental stress like a champ. Plus, it stabilizes pH from the get-go, which is why it always goes in first.
🔹 System Clean – Think of this as a reset button for the root zone. Keeps irrigation lines clear, prevents biofilm buildup, and ensures nutrients are delivered without obstruction. A must-have for maintaining a pristine growing environment.
🔹 RO Water Conditioner – With a mix of rainwater and dehumidifier-collected water, this ensures the right balance of minerals while neutralizing any potential issues. Hydration is key, but quality hydration is the real game-changer.
🔹 All-In-One Liquid – This is where the power punch comes in. A full-spectrum nutrient solution that keeps everything in balance, providing essential elements for vigorous growth as we near the flip.
💭 Why switch now?
The pellets that were feeding the soil are officially depleted, meaning the Clean program takes over full-time. This ensures a seamless transition into flower without any shocks or deficiencies. Smart planning makes for stronger plants and better yields! 🌿💪
🚀 Other highlights this week:
• One of the plants is getting some light bondage training—a little stress now means big rewards later. Let’s just hope she’s a female and not a sneaky male in disguise! 🤞
• Every plant is looking unique and fantastic, showing off their potential.
🌟 Next Up?
If all goes to plan, flower time is coming! Get ready for spectacular structure, stretching, and the next evolution of these beauties!
Big love to the community, growers, supporters, haters, and legends—we keep pushing forward! 🙌💚
Genetics - Mentha De Croco
https://terpyz.eu/products/menta-de-croco-fern-type?_pos=1&_sid=e9237cbcb&_ss=r
DogDoctorOfficial Discount Codes @ terpyz.eu - DOCTOR 15% off
Nutrition - @aptusholland
https://aptus-holland.com/
Led Power @ F.O.G. Future Of Grow
https://www.thefuturofgrow.com/en/online-store/BLACK-SERIES-600-p489093171
Controls @ TrolMaster
https://www.trolmaster.eu/tent-x
As always thank you all for stopping by, for the love and for it all , this journey of mine wold just not be the same without you guys, the love and support is very much appreciloved and i fell honored with you all in my life
With true love comes happiness Always believe in your self and always do things expecting nothing and with an open heart , be a giver and the universe will give back to you in ways you could not even imagine so
As always, this is shared for educational purposes, aiming to spread understanding and appreciation for this plant. The journey with nature is one of discovery, creativity, and respect. Let’s celebrate it responsibly and continue to learn and grow together!
Growers Love To you All 💚

Likes
4
Share
@Ieiogrow94
Follow
Eccoci di nuovo qui!!!
Super eccitato per questa nuova collab con Sweet Seeds, team davvero al top, che mi ha dato l’opportunità di testare questa nuova genetica e di condividere i progressi con tutti voi!!!
Come sempre partiamo nei bicchieri per poi travasare.. Questa volta verrà svolto tutto sotto la Lumatek Zeus 465 ProC, mi aspetto molto da questo ciclo!!
Settimana WOW!!!
Grazie a tutti per il supporto ❤️🍀🔥

Likes
83
Share
@RunWithIt
Follow
Beautiful progress with this girl. Can't really tell from pics, but some of her fan leaves are turning a purple tint, like her sugar leaves. Been feeding max strength compost tea with every watering, and she really enjoys it so far.
Also, a little update on the clones I plucked from her a few weeks back. 6 of them successfully rooted, and now I'm hardening them off in the veg tent. 1 is already progressing onto vegetative growth. So her legacy continues :)
Update 01/27/22: Her lower leaves are beginning to yellow and i see a nice mauve color spreading onto the fan leaves. I don't believe the leaves yellowing are a result of a deficiency or anything bad. She drinks at a fast rate, prays upwards first thing in the morning, and continues to stack her buds at a solid pace. And shes getting plenty of phosphorous, potassium and a bit of nitrogen as well. Shes getting fed blackstrap molasses with every feeding, which has a lot of calcium and magnesium. So after considering all of that, I think she'll just chug right along. As it's more likely just how this strain is. I remember my first run having a rather light-toned leaf coloration.
Anyways, im starting to get a slight whiff of that infamous "purps" smell when I open the tent. It'll be hard to keep my head out of the tent come week 5, because I remember this strain being such a beauty. And I think I'm doing a better job with this run than my first. So I'm super stoked for the weeks to come.
Cheers everyone 👍🏾


Likes
18
Share
@eldruida_lamota
Follow
Que pasa familia, vamos con la cuarta semana de vida de estas Tropicana Cookies Fast Flowering, de FastBuds.
Vamos al lío , las 3 plantas se colocaron en macetas de 7 litros definitivamente.
Ya recuperaron la carencia de nitrógeno, ya se ven bien sanas.
El ph se controla en 6.2 , la temperatura la tenemos entre 21/24 grados y la humedad ronda el 60%.
Ir van creciendo y no llevan ni mal ritmo ni mal color, veremos como avanzan las próximas semanas.
Mars hydro:
Code discount: EL420
https://www.mars-hydro.com/
Agrobeta:
https://www.agrobeta.com/agrobetatiendaonline/36-abonos-canamo
Hasta aquí todo, Buenos humos 💨💨💨


Likes
119
Share
@Roberts
Follow
I just dropped Divine Indica. I scuffed the seed, and dropped it in water. I will place in the rockwool in 24 to 48 hours. Thank you Divine Seeds, and Spider Farmer. 🤜🏻🤛🏻🌱🌱🌱
Update: the first seed failed. Starting a second.
Thank you grow diaries community for the 👇likes👇, follows, comments, and subscriptions on my YouTube channel👇. ❄️🌱🍻
Happy Growing 🌱🌱🌱
https://youtube.com/channel/UCAhN7yRzWLpcaRHhMIQ7X4g

Likes
98
Share
@OrganicNature420
Follow
Germination date 🌱 28/11/2021
Day 70 09/02/2022
Strain 🍁 Solfire Gardens Bahama Bussdown
(Runtz x Bahama Mama)
THC% • Unknown
💡 Mars Hydro FC-E6500
• Power draw 650W + 5%
• Max coverage 5 x 5
• LED 3978 pcs high quality chips
• Max Yield 2.5g / watt
• Noise level 0 DB
• Removable Driver & Light bars
• Daisy chain
• Fast cool system
https://marshydroled.co.uk/ 🇬🇧
PROMO CODE • (organicnature420) DISCOUNT
https://www.mars-hydro.com/ 🇺🇲
PROMO CODE • (ORG420) DISCOUNT 👍🏻
⛺ Mars Hydro 150 x 150 x 200cm
📤📥 AC infinity 6inch
💧 10lt dehumidifier
❄️ 3.1kw air con system
💉 Nutrients GreenBuzzLiquids 🇩🇪
⭐⭐⭐⭐⭐
Organic Grow Liquid • 1-4ml until 2wk flower
Organic Bloom Liquid • 2-4ml flower stage
Organic More PK • 2-4ml +wk3 of flower
Organic Calmag • 1-2ml/lt whole grow
Fast Plants Spray • first 2wks at night lights off
More Roots • 2-5ml veg +2wks flower
Fast Buds • 5ml 12days before flower until wk1
Humic Acid Plus • 2-5ml whole grow
Growzyme • 2-5ml whole grow
Big Fruits • 2-5ml flower stage
Clean Fruits • 5ml flush 1wk
Ph powder
Root Gel
Living Organics
https://greenbuzzliquids.com/
PROMO CODE • organicnature420 15% off ✌️🏼
🥥 Growing Media • Coco Coir
💡 65%
Notes 📝
Looking super frosty and some lovely purple colours coming through. All 3 Bahama Bussdown are looking 🔥 .. look forward to the next couple of weeks. Light upto %80
✌️🏼 if your thinking of changing nutrient company's please think of GreenBuzzLiquids. They honestly are a game changer and you can thank me later 😉
Discount codes in bio for Mars and GreenBuzzLiquids 👍🏻

Likes
8
Share
@GERGrowDesigns
Follow
Welcome to Veg Week 4 of Divine Seeds Auto Big Demon
I'm excited to share my grow journey with you all as part of the Divine Seeds Autoflowering Competition 2025. It's going to be an incredible ride, full of learning, growing, and connecting with fellow growers from all around the world!
For this competition, I’ve chosen the Feminized Automatic strain: Big Demon
Here’s what I’m working with:
• 🌱 Tent: 120x60x80
• 🧑🌾 Breeder Company: Divine Seeds
• 💧 Humidity Range: 90
• ⏳ Flowering Time: 8W-10W
• Strain Info: 21-23%THC
• 🌡️ Temperature: 26
• 🍵 Pot Size: 0.5l
• Nutrient Brand: Narcos
• ⚡ Lights : 200W x 2
A huge thank you to Divine Seeds for allowing me to be a part of this amazing competition and Sponsoring the Strains. Big thanks for supporting the grower community worldwide! Your genetics and passion speak for themselves!
I would truly appreciate every bit of feedback, help, questions, or discussions – and of course, your likes and interactions mean the world to me as I try to stand out in this exciting competition!
Let’s grow together – and don’t forget to stop by again to see the latest updates!
Happy growing!
Stay lifted and stay curious!
Peace & Buds!
Likes
9
Share
@Jakobyzone420
Follow
Per me è stata la prima esperienza nella vita nel mondo della coltivazione di cannabis. E si sono soddisfatto e molto contento. Mi sono divertito, acculturato, e ho cresciuto in me una passione. E spero un giorno un lavoro. La mia vita.
È una soddisfazione enorme avere il tuo prodotto fatto da te e basta. Non dover fare soldi alle mafie. La zkittlez x og lo scelta perché fumandola a Barcellona mi ci ero innamorato e quindi ho detto faccio questa.
La pianta e cresciuta con molta calma però appena è entrata in fioritura è esplosa ahaha è diventata quello che avete visto. Ho imparato molto bene e sto imparando sempre di più per le prossime coltivazioni. Ho adottato l’LST per motivi di visuale dei vicini così restava bassa e compatta ma devo dire che avendolo fatto la prima volta sia venuto molto bene.
Devo dire che sono estremamente felice e con ansia aspetterò il mio box da 4 piante
Saluti e buoni coltivazioni a tutti 💚

Likes
2
Share
@Grower_Resina
Follow
Uma boa experiência com fast flowering, sinto gosto e bons resultados sem stress. Planta realmente muito resistente.

Likes
57
Share
@Kmikaz420
Follow
Et voilà la fin de se grow il me reste la magnifique orange scherbet de fast bud et les 2 dernière dos i dos de barney .
Demain je vais couper et sécher tous sa et après sa j aurai le temp de remplir les rapport de = recolte, fumer ,et surtout le poids totale de toutes ces weed voilà voilà c'est tous pour aujourd'hui..encore merci d avoir suivi mes journaux et qui sais peut être un jour je repasserai sur growdiaries..
Likes
35
Share
@hannabis420
Follow
Alot of trial and error on this gal and shes fast to spring back, resilient to a lot-- hot res temps, training, etc. beautiful plant and genetics!
Likes
6
Share
@Bncgrower
Follow
Good evening, a little late but updating... this girl is more compact, but the buds are extremely resinous and fragrant as the last weeks approach... Otherwise everything is as expected.
Happy growing! 🌱🌱
Likes
8
Share
@datrobspeoria
Follow
This was a easy strain to grow and was never picky with my Amateur ways... She had a very strong smell that was Dominant over my huge Purple ghost candy..
I use my own soil now that has been worked over by my Worm Farming..
I also use worm castings every week spread on all of my plants.. Also every couple of Weeks I make a homebrew Tea for all of my plants with Alfalfa, Molasses, Worm castings, Seeweed with the Salt washed off..


Likes
Comments
Share
@Chubbs
Follow
42Fastbuds-ApricotAuto
A strain thats worthy of growing back to back.
I decided to start another round of one of my favorite strains ApricotAuto. I put them in the soil,after soaking in a cup of water for 48hrs and low and behold we have sprouts within 72hrs.
💯 % germination. Looking forward to these as they'll be made into freshfrozen live rosin when finished. Happy Growing.