The Grow Awards 2026 🏆
Likes
Comments
Share
**Encontrarás la traducción a español al final de la descripción** From/Desde: 19/04/19 || To/Hasta: 25/04/19 From day/Desde día: 57 || To day/Hasta día: 63 You can find the Gorillas Diary here (Texts are the same this week): ** Podéis encontrar el diario de las Gorilla aquí (Los textos son iguales esta semana):** https://growdiaries.com/diaries/25675-makingmoney-with-gorilla-mm-vs-gorilla -----IMAGES & VIDEOS----- 
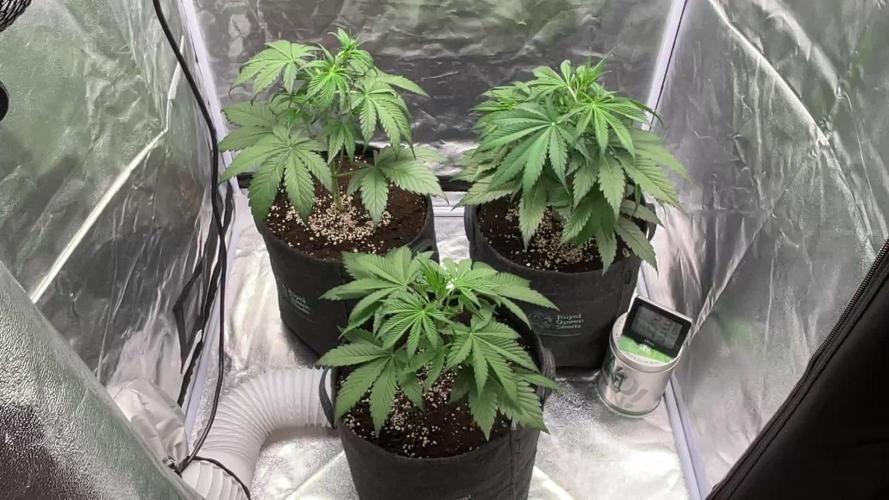
1 - Before defoliation 2 - Defoliation 
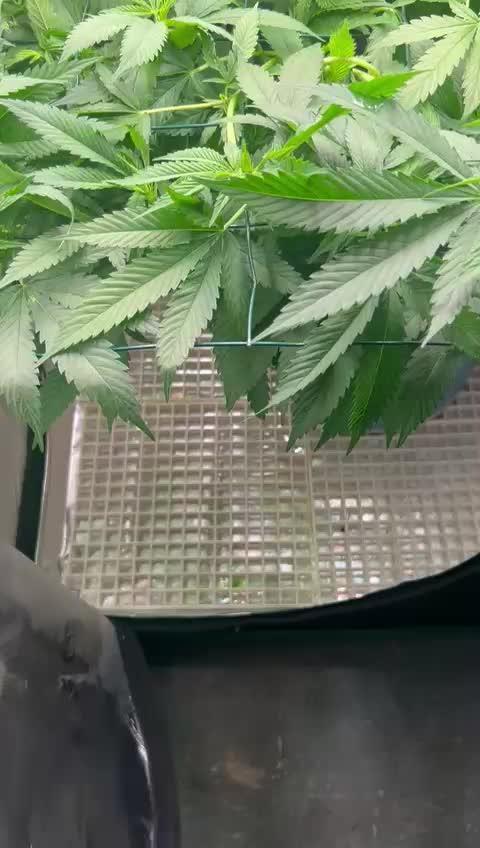
3 - After defoliation -----WEEK SUMMARY----- (Following text was translated with tools and reviewed, sorry for mistakes, misspellings or nosense things) As you can see I've done a defoliation this week. Yes, I have really gone over the top, I have removed many more leaves than I had, and the tails of the plants has not come to join at all due to the failed defoliation. Being the first defoliation I do, I did not really know what I was doing and I went crazy. Now that it has been several weeks since I made this defoliation, I realize that I should not have removed the leaves from the nodes of the tails, because they have stopped growing and have not joined with their superior parts. Anyway, the plants are beautiful today and although they could be much better I feel very happy with them. I know I've made 2 fatal mistakes in this grow - The first has been the massive defoliation badly done, defoliation yes, but with head ... do not follow my example. - The second failure that I see today, is that I did not leave enough growth time (18/6) after having made the last pruning and that has made the tails have been a length much less than what would have been desired, I think that 2 more weeks of growth would have been perfect. -----WATERING CALENDAR----- 20/04/19 - 1,250 ml with Sensizym, Silica, Rhino Sk, Bud Ignitor, Big Bud, Bud Candy & Bud Factor-x @ PH6.4 & 1.2 E.C. 23/04/19 - 1,250 ml with All week nutrients - (Silica, Sensizym & Bud Ignitor) @ PH6.5 & 1.5 E.C. *****ESPAÑOL***** -----IMÁGENES Y VÍDEOS----- 1 - Antes de la defoliación 2 - Defoliación 3 - Después de la defoliación -----SUMARIO SEMANAL----- Como podéis ver esta semana he hecho una defoliación. Si, efectivamente me he pasado de listo, he quitado muchas más hojas de las que debía y las colas de las plantas no ha llegado a unirse del todo debido a la fallida defoliación. Al ser la primera defoliación que realizo, no sabía muy bien que hacía y me lancé a lo loco. Ahora que han pasado varias semanas desde que realicé esta defoliación, me doy cuenta de que no debí de haber quitado las hojas de los nodos de las colas, pues estos han dejado de crecer y no se han unido con sus partes superioras. De todas maneras, las plantas están preciosas a día de hoy y aunque podrían estar mucho mejor me doy con un canto en los dientes. Se que he cometido 2 errores gordos en este cultivo - El primero ha sido la defoliación masiva mal realizada, defoliación si, pero con cabeza.... no sigáis mi ejemplo. - El segundo fallo que yo veo a día de hoy, es que no dejé suficiente tiempo de crecimiento (18/6) después de haber realizado las últimas podas y eso ha hecho que las colas hayan quedado de una longitud muy inferior a la que hubiera deseado, creo que 2 semanas más de crecimiento hubiera sido perfecto. -----CALENDARIO DE RIEGO----- 20/04/19 - 1.250 ml con Sensizym, Silica, Rhino Sk, Bud Ignitor, Big Bud, Bud Candy y Bud Factor-x @ PH6.4 & 1,2 E.C. 23/04/19 - 1.250 ml con todos los nutrientes semanales - (Silica, Sensizym y Bud Ignitor) @ PH6,5 & 1,5 E.C.
Likes
34
Share
So there were a couple little things I did to the tenth I removed some of the very low but that we're definitely not getting anywhere close to the canopy in fact they're only sticking up about three and a half for in above the trellis net so got rid of those guys and I moved the air conditioner Inlet to the top of the tent other than that the girls are doing really well
Likes
5
Share
Day 63 from germination. All 3 plants look and smell amazing. Have about 12 days left before I chop them down. Definitely ended up with 3 very different pheno types. All 3 have a very sweet smell with a hint of diesel. Even though I’m using super soil for these plants. I still like to flush the last 2 weeks. Watering every 4 days and have about 2 watering left.
Likes
101
Share
@TOTEM
Follow
This week I made a special video tour of the grow room, hope you like it. This Gorilla is feeling great! She’s spent this week fattening up lower colas. These colas are even frostier than bigger ones. I didn’t get them so frosty on my last growth. I still have to give her Overdrive since the soil is still wet, but will do it in a few days. See you next week 🐵
Likes
Comments
Share
The last of my skunk regular that germinated. No sign of pre flowers however this is looking like a female based on the speed of her growth being very slow.
Likes
12
Share
Likes
14
Share
Likes
36
Share
@Regenwurm
Follow
Die Bedingungen sind perfekt, ich bin mit der Entwicklung sehr zufrieden. Diese Woche ging es in die Blüte, Lichtleistung wurde erhöht und es wurde heftig entlaubt um den versteckten Trieben Licht zu geben. Tage der Keimungsphase = 7 Tage. Tage in Wachstum = 21 Tage Tage in der Blüte = 7 Tage Wachstum h Woche 1 Blüte = 10 cm 2 mal in dieser Woche mit Purolyt Mischung 1:25 besprüht Lichtstärke: 90 % PPFD: ca. 850 umol Lichtabstand: 40 cm Std Tag/Nacht: 18/12 Temperatur Tag: ca. 25 Grad RLF Tag: 60% Temperatur Nacht: 21 Grad RLF Nacht: ca. 60 % VPD Wert: ca. 0,9 PH Wert Wasser/Düngelösung: 6,3 EC Wert: nicht gemessen Ventilator Oszillation: Stufe 1 Befeuchter: an Entfeuchter: aus Zusätzlicher Entfeuchter: 0 Stk. außerhalb vom Zelt im Raum Bewässerung: 2* bewässert 1 l/Pflanze mit Dünger mit den o.g. Mengen 1 * pures Wasser mit 2 l/Pflanze Purolyt Besprühung: 2 mal Besprühung Fastplantspray : 1 mal Controlling: Grow Control Dünger: Greenbuzz Nutrients Licht: Pro Emit Vollspektrum Abluft: EC Carbon Active 750 m3 Danke an Zamnesia für die Seeds, den sonstigen Merch und natürlich das Vertrauen in die Kooperation https://www.zamnesia.com/de/10681-zamnesia-seeds-pineapple-express-f1-automatic.html Danke auch an Mia von GB: https://greenbuzznutrients.com/de/ Ihr bekommt 25 % Rabatt bei der Nutzung des Codes auf der GB Homepage https://greenbuzzliquids.com/de/shop/ Code: GD42025 (Mindestbestellwert 75€)
Likes
156
Share
@StarLorr
Follow
Helloing 👋🏻friends and visitors. Welclone to my Clone diary🙃 Clones are doing very well, did more defoliation trying to get more light to penetrate the plants and exposing bud sites. Feeding: Tue 14Nov: 2L each with nuts pH'd 6.35 Thu 16Nov: 2L each with nuts pH'd 6.34 Sat 18Nov: 3L each water only pH'd 6.5 -------------------------------------• Hope you enjoy the videos and pictures. Thanks for stopping by, likes and comments are appreciated. Keep on growin! Keep on tokin!!! 😙💨💨💨💨💨
Likes
3
Share
The plant seemed recovered but still dwarfy, because she only got around 6 hours of sunlight, or maybe even less, on my balcony.
Likes
12
Share
@MH_RDWC
Follow
Pics from Christmas Day are actually last day of week 6 but video is week 7 so grouped them together. They’re in the big tent now and very happy.
Likes
38
Share
Utopia Haze is a rare heavily sativa dominant hybrid (90% sativa/10% indica) strain created through back crossing Brazilian Sativa strains. This tasty little bud took home 1st Place for Best Sativa in the 2008 High Times’ Cannabis Cup and for good reason – with its potent 18-22% average THC level and long lasting cerebral effects, Utopia Haze is one powerhouse smoke. The Utopia Haze high comes on soon after you finish your first toke, hitting you with a strong cerebral lift that infuses you with a sense of hazy relaxation. Type: Feminised/Photoperiod Cultivation: Indoor/Outdoor Flowering Time (days): 70-75 Indoor Yield (g): Up to 650 Feminised Outdoor Harvest Month: October Feminised Outdoor Harvest Month Week: 3rd-4th week Aroma: Citrus, Woody, Pungent, Mint Effect: Cerebral Lift, Hazy Relaxation, Sleepy Welcome Everyone to the Final Entry of my Utopia Haze Grow ! There is so much to discuss ! I have been extremely busy as of late trying to get this Harvest together, but i am happy to have it here for you now ! I Seriously under estimated the amount of time, help from others, and my own necessary skills to pull this off.. and i still kind of screwed it up lol ! But its worth noting i have never actually done this before and trying to document it during....was extremely hard. It is next to impossible to work an iPhone with rubber gloves on ! First I want to discuss everything step by step so before you jump straight into the comments on how the end product is so small in "quantity" Rest assured i am happy with its"quality"...and thats all that matters to me because Life is a journey not a destination! and i have learned so much from this grow that I couldn't be any happy even if i messed some things up :) But at the very least I hope you read through this entry in its entirety with an open mind and focus more on the process, rather than just the outcome! I ran out of Ice & i was only able to wash three times..(normally I've heard you should go sometimes 5-6 washes) Preparation is Key & things will be much better next round :) Photos 1-22 These are pretty self explanatory but for those of you just tuning in now.. this is what happens to a very happy plant when you don't have the necessary tools to monitor key components of growing cannabis.. Ph, as well as EC levels play a very key role in the outcome of your grow lol that being said I was just able to save this plant by purchasing both tools but that doesn't mean the plant didn't suffer because of the prior events.. This was a Huge reason behind me choosing to turn this harvest into what i would consider "Solventless Hash Rosin" from "Ice water extracted Bubble hash". Pictures 23 The idea here is the process of using "fresh Frozen Cannabis" this has been discussed many a time online on such sites as instagram and here on grow diaries as well.. I personally have Never tried the process so i decided to try it out and make a judgement for myself.. Video 24 The Cannabis has now been in the freezer for 72 hours making it very well frozen.. as you can tell i struggled getting it all into the 25u Screen Wash Bag. One thing of note i would do differently is i will de-stem my next batch as i also believe this played a part in the amount of plant matter that escaped through the sieves. Photo/Video's 25-28 The idea here is "ice water Seiving" & especially with the bags that I am using here that are only have screen material on the bottom portion of the bag it is very important to have spaces in-between the screens to allow the water to pass directly through the screens into the bottom bucket with the least amount of resistance.. because the hash is so extremely temperature dependant if it gets warm on the side of the bag.. it will stick there and not make it to the bottom to become use able product.. 29 You do not need to use as much Ice as i used here lol... the idea is to keep everything very cold..i certainly achieved that but at the sacrifice of using so much that i ended up grinding product and producing "contaminants" but in the end they are just plant matter that i would be smoking when i rolled up my joint either way so.. I'm not super disappointed.. But it should be noted that what you want to achieve here is a Layering effect where you have the wash bag between two small layers of ice while the "water current" washes the Trichomes away allowing them to be separated by the screens setup below :) Before Starting the machine you should allow some time (i.e.;10-12minutes pre soak to allow the product to become saturated) before the first cycle. By video 32 I have just ran out of ice lol.. Video 33-34 Here I have a tip for you.. to separate the screens that you sieve through.. cut 5 gallon buckets to stretch them across nice and tight.. it'll make scooping your Bubble that much easier ! i learned this from the many "Frenchy" videos I have watched :) Picture 35 Here in lays the problem for most people.. drying your hash without loosing vast amounts of "Terpenes" whilst also stay ever vigilant against mold ! Thanks to all those videos I've watched on youtube.. id like to think this was one of my most successful parts of this process.. Things to Note; Terpenes start to seriously evaporate at temperatures 68F or 20C you need to stay as cold as possible whilst bringing the Relative Humidity in the space down into the 40-30% to stay away from that nasty mold ! I used my cold storage room in the basement.. with a dehumidifier running to keep the space at 45% RH & staying at a constant 15c. All while spreading the hash as thin as possible across parchment paper, on top of the white screens with a fan moving air across both sides of the paper. Pictures 36-38 These are some macros i took in the middle of my drying session I fell in love with the colour. Yes i know the black spots are plant material but they will get caught when i bag the hash & squish the oil out. Thing to Note; at this stage it is important to ensure you 'micro plane" the hash down as fine as you can whilst staying weary of the temperature... any "chunks" will hold pockets of moisture.. that lead to potential problems..ie; mold ... Picture/Video 39-41 Successfully planed bubble hash ready to be bagged and Squished ! Picture 42 Ive decided to follow Pedro.. from Pedros Grow Room and double bag to be on the safe side so i don't have any blow outs. So thats One 25u bag inside one 160u bag ! :) Pictures 43 This is almost 3 grams of the bubble hash from above, already melting in the bag.. this is where i ran into trouble again lol things started getting to warm in the house and i was only able to get one of the three squish's i did on video :( things started getting sticky. Picture 44 This is basically just a photo of the equipment I'm using; 3x5 LowTemp Cage in the frame I built myself, with a 20Ton bottle jack. Something to note here is this is an older Lowtemp model with only a single heating zone which is which i have it closed here heating Both sides of the press :) As well as the importance of having adequate pressure on your plates.. my rig is very overkill for the size of hash bags..lol Video 45 Here is the lovely press video.. its didn't quite work the way i wanted either lol my directional folding wasn't quite tight enough for a big "drip" :) &the Press was set to 65°c Photo's 46-50 are pretty self explanatory :) I had a blow out.. but still managed to pull an 80% return from the hash once squished...& yes it tasted amazing :) Was it worth it in the end... that could be debated.. for some..i understand..its not your thing, but for those of us that are interested in making our own concentrates.. free from Solvents... I wouldn't make it any other way :) If even ONE of you reading this diary finds it helpful to reference for ANYTHING.....even if its "what not to do" ill consider it a success ! Thanks again for tagging along on this garden adventure.. its been one heck of a journey ! Much Love from B.C. Canada, Until Next time, Cariboo
Likes
14
Share
@420lor
Follow
¡Comienza una nueva semana de floración y hoy ha sido día de riego con mi producto favorito! 💧💚 Aunque puede que haya sido un poco entusiasta con la dosis (¡pero quién puede resistirse a más de lo bueno!), mis Moby Dick de @kannabiaglobal están en pleno auge. Pero hoy, he notado que necesitaban un extra de potasio/fósforo. MissyLK de AScenza es mi arma secreta en este viaje. Con una composición cuidadosamente diseñada, este fertilizante ofrece una mezcla perfecta para la fase de floración. Su fórmula única contiene un 10% de nitrógeno, 20% de fósforo, 30% de potasio, y una combinación de otros microelementos vitales, diseñados para estimular el crecimiento de cogollos densos, resinosos y llenos de sabor. Además, su contenido de aminoácidos libres, extracto húmico total, ácidos húmicos y ácidos fúlvicos promueven una salud óptima de las plantas y una absorción eficiente de nutrientes. Con cada riego, estamos un paso más cerca de una cosecha que promete ser legendaria. ¡El viaje continúa y cada día es una nueva aventura! 💪🌿
Likes
6
Share
@Headies
Follow
this is weeks 5 and 6.I topped them and trained the branches out to the side. Plus I broke one... I tried to save it but it broke again later
Likes
13
Share
Welcome back, Day 23, everything is on track, and I'm able to leave the system to run, although I still check on the girls 2 times a day and foliar feed Remo cal-mag. pH sweet spot seems to be around 5.8/5.9 upto about 6.3. EC has been gradually dropping which let's me know the plants are uptaking the nutrients. Roots are now getting very established hence the faster growth. I am due a RO water change in the next day or so. Plant training - I plant to do some LST and Topping soon. Withing the next week for sure. Stay tuned until then! Day 28 - Things are looking good, some decent growth the past few days. Everything is luscious green and looking healthy. Occasionally foliar feeding cal-mag as I use RO water. Taken off 2 fan leaves off each plant as they were pretty big blocking light. The rest I've just leaf tucked. Trying to open up the lower shoots without causing too much stress to the girls. The LST and topping will start properly soon. Let the fun begin
Likes
8
Share
Muy buenas. Ya en la primera semana de vida de esta florcita, ha recibido su primer riego hoy mismo con estimulador de raíz (raziel de hype) veremos como cambia la próxima semana. Con una temperatura entre 23'5/24'5° encendido y 16° apagado con una humedad entre 60/80%. Con el led de 150w al 75% para poder aprovechar bien los lúmenes en sus diferentes fases. Está semana le tocará cambio de maceta por una de 3 litros ya que está en 250 centilitros. Por el momento marcha muy bien con buen color buena forma y asta se le puede ver la capa de glándulas que tiene sobre las hojas.
Likes
43
Share
~ FastBuds PAPAYA SHERBET Photoperiod~ Well here we go on another journey together through 'Canna-land' and this one's kinda special... forget that, it's VERY special because this is FastBuds newest surprise for the community, a FEMINIZED PHOTOPERIOD STRAIN!🤯 I was fortunate enough to score these seeds, of which only 1000 were available and can't wait to see what this strain can do! This Papaya Sherbet, according to FastBuds, is a hybrid with a 9-10 weeks flowering period. For a more detailed and accurate description of this strain the following from FastBuds says it best: "Combining the massive stature of Papaya (Oni Selection) with the strength and resilience of one of our best keeper cuts (Sunset Sherbet), this strain develops into a big, expansive bush adorned with numerous bud sites that later transform into a generous harvest of medium-sized buds. Papaya Sherbet flowers deliver a signature flavor of premium cannabis with subtle citrus undertones that emerge upon inhaling. During growth, her aroma makes for a sweet yet pleasantly bitter fragrance, giving you an idea of what the smoke will taste like. Notably stress-resistant, Papaya Sherbet is a great choice for growers working in challenging environments. She is very forgiving and rebounds quickly from any adversity, allowing growers the freedom to experiment with confidence that she will take everything like a champion she is. This strain embodies resilience, flavor, and abundant yields in every grow cycle." Sounds like an epic strain and I personally cannot wait for this lady to strut her stuff!😍 ________________________________________________________________________________________________________________________________________________________________________________________________________________________________________________________________________________________________________________________ The Setup: This is going to be an outdoor grow, but I have started the Papaya Sherbet photoperiod indoors as our weather is still a bit too chilly to put a newly sprouted seedling outside (nighttime temp's dipping regularly into the 40's℉). The plan is simple... let her grow inside under a 19/5 light schedule until the nighttime temperatures are in the mid 50's℉, which shouldn't be long. After which, she'll be moved outside and transplanted into the soil which I have already setup and inoculated with beneficial microbes from BioTabs and slow release dry amendments from Gaia Green. Once she's established herself outside she'll be given periodic top dressings of Gaia Green 4-4-4 and 2-8-4 along with worm castings and Compost Tea's. Her grow area is approx. 5'x5' and I have posts and a trellis net set up already for when she gets bigger to aid in training her. Let the fun begin!🤪💚 ________________________________________________________________________________________________________________________________________________________________________________________________________________________________________________________________________________________________________________________ Weekly Updates: 5/23- Week three from seed and the second week of veg for the FastBuds Papaya Sherbet photoperiod and she's doing surprisingly well considering the crappy weather, and being eaten like a salad by slugs and a rabbit! 5/25- The diatomaceous earth that I spread around her seems to have lessened the attacks on her leaves. I've also been spraying her down every other day with Neem Oil, and every three days with an organic insecticidal soap that I'm sure has helped as well. I watered the Papaya Sherbet today via garden hose and began to train her branches a bit as well. 5/27- The FastBuds Papaya Sherbet continues to do exceptionally well with great color and vigor, putting out new growth it seems daily. 5/29- There's three weeks on the books for this little lady and I'm looking forward to see what she'll look like in the coming weeks! I will have to top dress her soon, probably in the next few days. I haven't added any dry amendments to her since I initially amended her soil and she's a hungry girl... Hope to see you next week, stay Blessed! Thank you for checking out my diary, your positive comments and support make it all worthwhile! 💚Growers Love!💚😎🙏