


Likes
12
Share


Likes
15
Share


@Oetelando
Follow
We have Day 1 of Week 6.
The buds Get Biger And Denser.
Last week of Nutrients and week 7- Harvest only Water.
They smell like Exotic Fruits.

Processing
Likes
3
Share


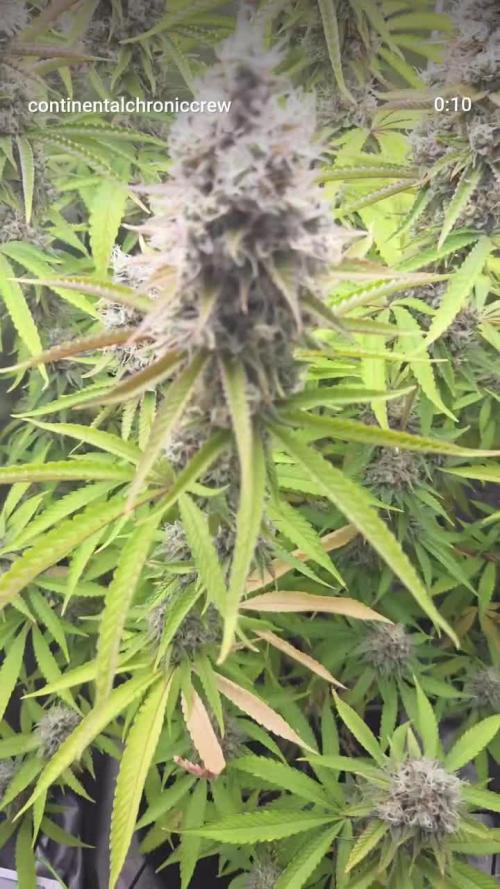
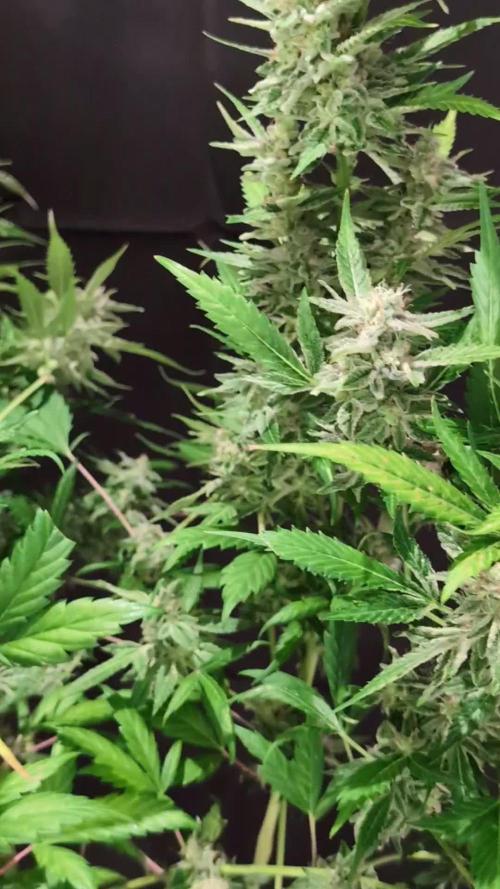
@420cfm
Follow
Serious increase in frostiness, smell in the tent, size of the buds. Amazing fresh, fruity smell. Continuing to throw out new pistals and old ones are turning orange. I fucked up my nutrients this week by using my k blaster instead of my monster flower but seems to be ok. Will get this fixed next week and run proper nutes for next two weeks before flipping back to my k blaster. Still learning so much but feel it's getting dialed in now.
Likes
2
Share


@Comfrey
Follow
Diese Woche musste ich am Ball bleiben, ein krasser Stretch machte ein fast tägliches LST und eine dezente Entlaubung notwendig. Um einen schönen Ertag für zwei zu generieren, habe ich mich aufgrund der Lage unseres Balkons entschieden, alle Pflanzen kräftig runterzubinden. Zwei Ziele habe ich dabei verfolgt. Zum Einen haben wir hier maximal sieben Stunden mit direkter Sonneneinstrahlung. Durch LST erhoffe ich mir eine gleichmäßige Blütenbildung und Konzentration von Terpenen. Zum Anderen liegen wir mit unserem Balkon mitten im Dorfzentrum mit regem „Publikumsverkehr“. Das deutsche Cannabis Gesetz sieht vor, dass der Anbau nicht öffentlich einsehbar sein darf. Ohne das herunter Binden könnte man die Damen allerdings sehen. Die Anordnung der Pflanzen ist auch so vorgenommen worden, das sich eine Art Sonnenfalle bildet. Jede Pflanze und insbesondere die Blüten bekommen das maximal Mögliche an Sonneneinstrahlung. 🌞
Gegossen wird nun morgens und abends nach Gefühl.
Purple Punch Auto fühlt sich ganz wohl hier. Die Vorblüte sieht vielversprechend aus.

Likes
12
Share


@GYOweed
Follow
This one adds weight smell and stickiness at the end it seems.
Smells nice licorice fruity sweet kush. Dense buds. Not much for size.
I think this is the last week.
Glad i gave it nutes to the end alternating.

Likes
24
Share


@DarbGrowDiaries
Follow
Last week maybe?
Both are holding on very well, so very excited to trim the big girl (:

Likes
422
Share


@Crashoverite
Follow
Hi everyone 😁
Welcome to my second diary.
Strain of choice 🍌💜👊 Auto from Fast Buds 420.
Normally I would use paper towel method but this time decided to try germination in propagator directly to substrate. 100% success. First girl showed in about 48h after planting and second maybe 12h after.
07/10
Seeds planted. Propagator at 22 degrees and 90% humidity.
09/10 Day 1
Girls popped through the soil.
13/10 Day 5
Xena and Athena comfortably transported to new 5 star spa resort and they do like new 14l queen beds
15/10 Day 7
End of germination week. Girls are growing very fast. Have a very good feeling about these 2
Stay tunned for daily updates.
Have a great week coming everyone.
Peace and love brothers and sisters
🍌💜👊
Likes
11
Share


@McShorty
Follow
So far so good. Another week has passed and everything looks nice. At the beginning of this week i transplanted the blue cheese and special queen in bigger pots and they dont look so small in comparison to the others.
In generell all plants recovered good from the topping and in this week i think i will start with some LST and removing some of the lower leaves. I also raised the lighting higher, because i wanted to see if they stretch themselves a little bit, because they didnt grew so much in height but only developed more leaves, but i think i will lower it again and also increase intensity.
Also i added up the fertilizer since i had some yellow colering of the leaves at the bottom, and so far they show no signs of overfeeding. Since it wasn't raining like in the last 2 weeks i took them outside to make some pictures with natural light.
So lets go into the next week :)

Likes
13
Share


@HomeGrownFamz
Follow
This thing shocked me by how much it stretched, so much so that I have now moved the lights vertically around the plant. Bud development has been amazing. The buds have that fat dense look with the slight genetic foxtails on top. I had a small issue with humidity due to the res of the hydro system being in the tent but have added a dehumidifier now keeping RH around 43% temps @ 24.5C. Drinking around 5-6 litres per day atm!
Likes
3
Share


@Burndylugs
Follow
Day 49. Selective defoliation couple leaves here and there. Only plain water from here on. Maybe 1-2 weeks left. Still Throwing out white pistols

Likes
17
Share


@420DeepGrow
Follow
Gracias al equipo de Seedsman Marshydro XpertNutrients y Trolmaster sin ellos esto no sería posible.
💐🍁 Tangerine Snow F1 Fast:
Esta gran cepa es un cruce de cuatro vías 75% sativa de (Boost x Tangelo) con (Lavender x Power Plant). Este híbrido Fast F1 proviene de la genética Cali y cuenta con excelentes terpenos cítricos, alta producción de resina para extractos, altos niveles de THC, muy buenos rendimientos y excelente resistencia al moho. Tangerine Snow F1 Fast se puede cultivar tanto en interior como en exterior. Los tiempos de floración en interiores son de entre 8 y 10 semanas, mientras que el tiempo de cosecha en las latitudes del norte es en septiembre, mientras que en el hemisferio sur los productores cosecharán durante marzo. Las regiones climáticas recomendadas son cálidas, secas, húmedas y cálidas. Se trata de plantas altas, semiramificadas, que superan los 200cm y que presentan un alto vigor con muy buena uniformidad. Al igual que muchas otras variedades con fuerte dominancia sativa, Tangerine Snow F1 Fast ofrece una excelente resistencia al moho, así como a las plagas y enfermedades de las plantas. La combinación de terpenos cítricos y mucha resina la convierten en una cepa de muy buen extracto, cuyo método de "lavado" produce muy buenos rendimientos de hachís. El perfil de terpenos cítricos recuerda a las mandarinas y mandarinas y también tiene notas dulces. La producción de THC ha sido verificada en laboratorio en un fuerte 24%, mientras que el CBD es bajo. El efecto es edificante y energizante, perfecto para usar durante el día y las primeras horas de la noche.
🌻🚀 Consigue aqui tus semillas:
💡TS-3000 + TS-1000: se usaran dos de las lámparas de la serie TS de Marshydro, para cubrir todas las necesidades de las plantas durante el ciclo de cultivo, uso las dos lámparas en floracion para llegar a toda la carpa de 1.50 x 1.50 x 1.80.
https://marshydro.eu/products/mars-hydro-ts-3000-led-grow-light/
🏠 : Marshydro 1.50 x 1.50 x 1.80, carpa 100% estanca con ventanas laterales para llegar a todos los lugares durante el grow
https://marshydro.eu/products/diy-150x150x200cm-grow-tent-kit
🌬️💨 Marshydro 6inch + filtro carbon para evitar olores indeseables.
https://marshydro.eu/products/ifresh-smart-6inch-filter-kits/
💻 Trolmaster Tent-X TCS-1 como controlador de luz, optimiza tu cultivo con la última tecnología del mercado, desde donde puedes controlar todos los parametros.
https://www.trolmaster.com/Products/Details/TCS-1
🍣🍦🌴 Xpert Nutrients es una empresa especializada en la producción y comercialización de fertilizantes líquidos y tierras, que garantizan excelentes cosechas y un crecimiento activo para sus plantas durante todas las fases de cultivo.
Consigue aqui tus Nutrientes:
https://xpertnutrients.com/es/shop/
📆 Semana 7:
Ha sido una semana algo complicada, tormentas, frio y lluvia han ralentizado el crecimiento, espero que pronto lleguen dias soleados, continuo con 1/3 nutrientes recomendados en cada riego.

Likes
9
Share


@TheWeedPimp
Follow
She’s still a little burned.
But growing very slow. Not much sun... cold, wet and windy Weather 👎🏻 Close to - 1 this morning... Think i gonna chop her Down before the rainy weather or the cold one kills her...
But the buds are still so tiny
Need a least 1 month😕
Any inputs guys?

Likes
11
Share


@RadDad
Follow
I originally had applied to Green House Seed Co.'s Taste of the USA Contest here on Grow Diaries. Turns out I was ineligible but the good folks at GHS still had the big hearts to send me seeds anyway. So big ups to them for hooking this grower up.
Welcome to the Sea of Fire 🔥
For this grow were using the Dark Phoenix seeds that GHS sent to me to create a Sea of Green. I've got 8 plants in 8 1L pots.
I've decided to use Black Swallow's living soil for this grow so we won't need to add anything but water for the first 3 weeks or so.
Our goal for this grow is to have these girls ready for harvest in about 20 weeks which will bring us to the beginning of November 2021. If all goes according to plan these firey buds should be filling my friends stockings this Christmas.

Likes
9
Share

@GoodTimesOrganics
Follow
Hi liebe Community and Welcome back! 💚
Nach dem Trichomcheck, war es Zeit die DMO Grapefruit zu ernten.
Die Pflanze hat jetzt genau acht Wochen Blütezeit hinter sich. So wie es auch gewünscht ist.
In dieser Zeit hat sie einen enormen Sprint an Blütenentwicklung hin gelegt, welche allerdings so nicht gut beobachtbar war.
Eine sehr imposante Pflanze! Sie zeigt unter ihrem Blätterwerk ein riesiges und ausgeprägtes Blütenvorkommen. Absolut im XL Bereich.
Es lässt sich beobachten, dass die Blütenbildung im mittleren Bereich der Colas stark ausgebreitet hat und die Pflanze Richtung Spitze eher etwas dünner wird.
Sie bildet die Blüten sehr vielseitig aus, von dünner kompakt bis hin zur breiten dichteren stellen.
Ihr Geruch ist nun sehr stark ausgeprägt und eine Grapefruit Note zeichnet sich als markante Hauptnote ab.
Beim Schneiden waren nun auch dann Gasige und etwas Lakritzähnliche Note mit etwas süsslichem Wahrnehmbar.
Die Wachstumsbedingungen im Growzelt sind aktuell wieder super!
———————
🌞 Temp: 23°C
🌚 Temp: 20 °C
💨 RH: 53%
VPD: 1,00 kPa
😎PPFD: 830 mqm
———————
Stay Tuned! 💚
Likes
17
Share


@Mr_nugs_lover_David
Follow
Beutiful ak420 phenotype I love this lady, she's developing perfectly, no issues. Let's see how she keeps developing guys 💚 ❤️👨🌾✌️

Likes
4
Share


@Bossman
Follow
I ran into some issues with the pan dragon f1. I fried her with nutes as you can see by the leaves, but the rest are fine. I’ll be taking them down day 70


Likes
27
Share


@Dunk_Junk
Follow
Wow she's jumped up this week!!!
Got loads bushier too!!!!!!!
Just entering flowering.
Likes
11
Share


@ButterfliesLittleFarm
Follow
Hello Diary,
It's time for another round. I am continuing with F1 strains since I am delighted with Medusa F1.
This time I will have three different strains on the "Farm" Apollo, Milky Way and Titan.
I will keep separate diaries for each strain, and this one is dedicated to Apollo F1.
First, here is some information about the strain itself.
APOLLO F1
Apollo F1 is a vigorous autoflowering hybrid that boasts a strong structure and delicious aromas.
Created from inbred lines descending from Lemon, Black Domina, and Sugar Magnolia, Apollo F1 inherited premium genetics from all of its predecessors.
Apollo F1 produces balanced, creative effects that might inspire your perception of music, dance, poetry, and more!
Mature and well-dried Apollo F1 flowers boast an upfront fresh aroma that combines crisp pine and herbal notes with the invigorating kick of ripe citrus peels.
Accentuating these notes is a rich backdrop of dark vanilla and hints of lavender, reminiscent of modern cannabis varieties descending from Cookies and other US lineages.
Flowering time - 45-50 days
SET-UP ON MY LITTLE FARM:
Box - Secret Jardin DS120W 120x60x178
Lights - MIGRO 200+
Ventilation - TT Silent-M 100
Filter - Primaklima filter PK 100/125
Fan - Oscillating Koala Fan X 2
Humidifier - Beurer LB 45
Soil - BioBizz Light - Mix
Pot - 11L Air pots
Seed - Royal Queen Seeds
Nutrition - RQS Organic nutrition
I can now officially start the journal.
20/04/2023
Planting plants. As usual, I prepare everything I need for planting in advance.
I still use Air-pots because they are really great.
For the soil, I used BioBizz - Light Mix, which I filled 2/3 of the container and then added the Organic booster in pellets, Mycorrhiza and Rhizobacter.
I mixed everything together well with the soil and filled the container to the top.
I soaked the earth well with 2 liters of water, made a small hole, put the seed and lightly covered it with earth.
The conditions on the Farm are good, the temperature is around 25 degrees while the humidity is around 50%.
I think that after sprouting I will put a humidifier to increase the humidity.
23/04/2023
I sprinkled some water on the surface of the earth to let them know where they should go.
24/04/2023
Apollo F1 sprouted like its other two roommates.
26/04/2023
First watering. I regulated the p.H. of water at 6.0 and watered the plant with maybe 0.5 liters of water.
That's all for this week, see you soon.