The Grow Awards 2026 🏆 


Likes
Comments
Share
@justsomedude420
Follow
3/16/2024
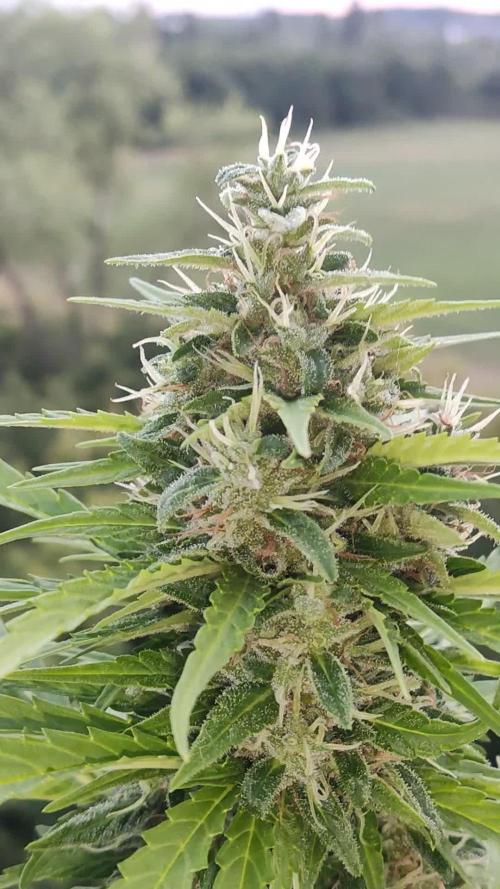
Day 56 from sprout 🌱
Interesting how different the buds are developing on these two gorilla cookies. G1 has smaller leafier buds but they are super frosty while G2 has bigger dense golf ball size nugs but not quite as frosty. They are drinking about 3/4 a gallon every 2-3 days and being fed once a week. I think these are going to take 11-12 weeks to finish, we'll see 😊
Thanks for dropping by and happy growing!

Likes
8
Share
@Canna96
Follow
Hey now, I hope everyone is having a great holiday weekend. This little deformed lady is still going fairly strong, she is not growing quite as fast as the other two autos in the tent, but I think she could still put out some nice flowers. I am still feeding her silica, cal mag, and just veg nutrients. I did top her yesterday on day 34 as she is still not showing many pre flowers, so I just topped her so she doesn't get too tall. I have not done much LST on her yet but I may do some this week.
I did change the Medic grow spectrum to the F1 spectrum this week which is the flower spectrum. I am also running the UV/IR bar for about 75 minutes every day before lights off, and I now have the light cranked up to 100%. I will start to transition to flower nutrients probably next week, depending on how tall she gets and how soon she transitions to flower production.
Not much to do this week except keep the reservoir clean, full, and in the proper PH range. If any colas get crazy higher than the others I will correct, but other than that she can do her thing from here on out.
Thanks for stopping by, Stay Safe and Blaze On!!! 💪
Website: https://medicgrow.com/
https://growdiaries.com/grower/medicgrowled

Likes
23
Share
@DeepRootsGrowTrees
Follow
MATARO BLUE by KANNABIA
Week #21 Overall
Week #7 Flower
This week been a good week for this lady she's doing good no issues to report buds are looking good so far.
Stay Growing!!
Kannabia.com MATARO BLUE

Likes
19
Share
@MadeInGermany
Follow
Hey everyone :-).
There is not much to tell this week ☺️
A Wonder Pie was removed due to lack of space.
So this is still going on here and the diary of the cup :-)
It is growing very nicely, and I am looking forward to seeing what she is doing this week 🙏🏻
This week she is getting some Enhancer Green House Bio for the first time.
I wish you all a nice week 👍
Stay healthy 🙏🏻 and let it grow ☘️🌱

Likes
3
Share
@Ned_Grows
Follow
The bud is knock out stuff definitly a night time smoke, too much of this stuff will put you to sleep not to mention a bad case of the munchies before hand. overall growing this strain was easy and enjoyable plus it was great for edibles I made triple choc fudge brownies with the sugar shake that were really good for pain relief I have chronic back pain and this stuff takes it away 👍👍👍

Likes
29
Share


Likes
2
Share
@Reskap
Follow
J’ai fait un peu de lst et de défoliation. J’ai des mouches de terreaux j’ai donc ajouter des pièges collant jaunes. Mes plantes sont tout de même petites quand je compare à d’autres journaux mais c’est la première fois. D’ailleurs si vous avez des conseils pour faire mieux je suis preneur


Processing
Likes
9
Share
@Alejangrow
Follow
This week they they all took well to being topped. 🔝 ✂️ Temps are a little lower than I'd like in the veg tent but they're still chilling.☀️ I added a small humidifier to the tent to help out with this dry season.💧

Likes
10
Share
@Backwood_scientist
Follow
For my first run I am happy with my results even though the yield was very low . The banana cake is frosty and has a great nose on it . The bud has white ash and overall it tastes great . I will be doing another grow soon and Im going switch it up . Going to be a great next grow so don’t miss it .

Likes
6
Share
@midnitrtoker
Follow
Was trying to play around with a new feed schedule for the upcoming weeks but threw my EC outta wack figured I’d see what happens at 2.2 EC as I should be tapering down soon. Started to notice some over feeding symptoms but I might be tripping. Still trying to dial in this Autopot it could also be that I’m using doctor zymes as an IPM and I have to spray the coco on top causing the nutrient build up to go down towards the roots? Idk but either way we will still chug along we are 3 weeks away from chopping down anyway so let’s go!!!!
Likes
5
Share
@DemonDabsSolventless
Follow
🚨🚨🚨🚨🚨
Week V
🚨🚨🚨🚨🚨
OOOOKAAAAYY THE SMELL ALREADY TAKES OVER AND IT'S SATISFACTORY NOT TO LEAVE THESE LADIES SIDE! AND LOOK HOW THEY JUMPED! ITS GROWTH SEEMS ACCELERATED AND WITH AN INSATIABLE HUNGRY IN ITS DEVELOPMENT. BIG WEEK TO BE ALIVE 🤣 LOL
📝📝📝📝📝
Notes
📝📝📝📝📝
ALL PLANTS WITH THE 4TH DEVELOPED NODE HAVE BEEN TOPPING ONLY THE TWO LARGEST NODES ARE STILL DEVELOPING.
STILL SEEKING THE BROAD SPECTRUM OF LIGHT WE HAVE UP TO 50cm DISTANCE AND THEY ARE GROWING WELL AND APPEARINGLY HEALTHY.
FROM THIS WEEK YOU WILL ALWAYS HAVE THE PLANTS DISTRIBUTION SCHEME AT THE END OF THE PHOTOS
📝📝📝📝📝

Likes
11
Share
@BudBeezy
Follow
Welcome to week 18 of my grow diary. As expected, growth has stopped. In the middle of the week I removed underdeveloped shoots that were covered by leaves. I also removed the lower fan leaves to ensure better aeration and additional leaves that were on the inside. The buds are slowly becoming denser and denser.
See you next week ✌️
Likes
1
Share
@Paul_on
Follow
I am really happy with how this Sweet Mandarin Zkittlez is after doing , also their Papaya Zoap grew very well ,both with thick branching and stems that produce thick fat buds that smell gorgeous, sweet n fruity with some gassy aromas there too ,I will grow these strains again,
Thanks @Sweetseeds.com for another great one 👍 🙏 Sincerely: Paul_on 😶🌫️😉

Processing
Likes
4
Share


Likes
8
Share
@Hempcules
Follow
WEEK 9
Wuhuuu 🙂 Things really took off this week with my Diablo Delights XL. The buds have bulked up significantly and are now filling out almost the entire plant. I think it’s going to end up as one big bud ball 😅 She’s absolutely stunning to look at, even though she stayed relatively short in height. You can already start to pick up on the flavor, and the smell is downright delicious. I’m really looking forward to the tasting. If she keeps up this pace, I don’t think she’ll need another four weeks.
I did a bit more defoliation and removed a few weak shoots since she was still a bit too bushy for my liking.
This week, I ran the light at 800 PPFD and watered once with plain water and once with nutrient solution.
Likes
14
Share
@Silvadragon
Follow
Greeting! She fine! Decide to do an early LST to start shorting the growing stages.


Likes
18
Share
@BufoAlvarez
Follow
Back to the 1000 wt as temps here are modest for July atm. Still 1 plant not flowering like the other 2. I will be patient as it’s overall structure looks amazing. Slowly easing into the process not as much anxiety about every little thing.
Changed my light out for my lower power 600 wt led instead of the 1000wt TMLAPY. Maybe not the right move i really don't know what to do b/c i have tip burn and my tent gets a bit hot in the low 80s when its in the 90s here in Illinois. I have an makeshift cooler w fan and some fans and my exhaust fan system which im pretty sure is under powered and overall and bad beginner purchase. I will upgrade as soon as i can financially afford to. Also had flooding issues in basement which is always an adventure, i eventually need a better way to get my grow tent up off the ground b/c water does get in there sometimes. Doing everything in my power to avoid mold and have fans and filters and cleaning, but again this may have been a beginner mistake and i may have to find a new home for the tent for the next time. Also I definitely had been under watering the girls and came close to one of them dying and have to remove some yellow leaves at bottom, they all look stable now. 1 out of 3 plants has a darker color and looks fuller and healthier w less tip burn but it is shorter only has a couple of hairs where the other 2 are going full on into flowering with so many hairs and growing much taller. Possibly stunted the growth... Anyway the word of the day for this week is TIP BURN. I will submit a question to follow. i recently uploaded a video that should show all 3 plants w the tip burn.

Likes
17
Share
@Reyden
Follow
Purtroppo la volta scorsa forse avevo dato da bere troppo ravvicinato e ho visto che questa volta fa più fatica ad asciugare..quindi aspetto che asciuga bene anche dentro, non è mai un buon segno però la pianta 🌱 non sembra proprio stare male..proverò a dare da bere solo dal sottovaso la prossima con una saluzione a 1700 di EC e PH 6.8 ✨✨✨ la Auto Purple OG Punch non è stata sottoposta a nessun tipo di allenamento 🏋️♂️ Perché volevo vedere come diventerà e che conformazione dei rami riesce a sviluppare, visto che ho praticamente cambiato a 12/12 dopo due settimane di crescita…in effetti le Autofiorenti sono fatte per crescere a 18/6 per far emergere il loro massimo potenziale, contando che è cresciuta con 12 ore di luce cercherò di tenerla anche qualche giorno in più per farla maturare come si deve 😀🤞
